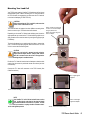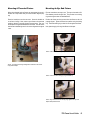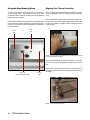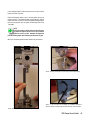
1
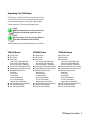
Chatillon®
TCD Series Frames
For Use with TCD110, TCD225 and TCD1100
Series Digital Force Testers
User’s Guide
TCD Frame User’s Guide
1
TCD Frame User’s Guide
Page
Page
Precautions.................................................................... Icons........................................................................ General Safety......................................................... Safety Considerations.............................................. 4
4
4
4
Unpacking Your TCD Frame......................................... 5
Powering Your Tester.................................................... Power Surge Suppressor......................................... Electrical Wiring and Connections........................... Select Mains Power Source..................................... Replacing Fuse........................................................ Mains Power Switch................................................. 19
19
19
19
20
21
TCD Frame Specifications............................................ Conformity................................................................ Performance Specifications..................................... Load Measurement System.............................. Strain Measurement System............................. Distance Accuracy............................................ Speed Accuracy................................................ Power Rating........................................................... 6
6
6
6
6
6
6
6
Jog Wheel Operation.................................................... 21
Emergency Stop Switch............................................... 22
Handling Your TCD Frame............................................ 7
Mechanical Limit Setup................................................ Using Mechanical Limits.......................................... Setting High Limit..................................................... Setting Low Limit...................................................... Testing the Limit Switch........................................... 23
23
23
24
24
Understanding Your TCD System................................ TCD Frame Subsystem........................................... TCD Console Subsystem......................................... TLC Series Load Cell............................................... 8
8
8
8
Cleaning Your TCD Frame............................................ 25
Servicing Your TCD System......................................... 25
Assembling Your TCD System..................................... TCD Console Subsystem......................................... 9
9
Spare Parts Lists........................................................... TCD110 Series......................................................... TCD225 Series........................................................ TCD1100 Series....................................................... 26
26
27
29
Locating Your TCD System.......................................... Temperature Considerations.................................... Relative Humidity Considerations............................ Vibration Considerations.......................................... RFI Considerations.................................................. 10
10
10
10
10
Dimensions.................................................................... 30
Mounting Your TLC Series Load Cell.......................... Correct Mounting of Your TLC Load Cell................. Mounting Your Load Cell Adapter............................ Using SLC Series Load Cells................................... 11
11
11
11
Mounting Your Test Fixture.......................................... Aligning Your Fixture Centerline............................... Fastening Your Fixtures........................................... Threaded Connections...................................... Eye End Connectons........................................ 12
12
14
13
12
Cable Connections........................................................ Connecting TCD Console........................................ Connecting TLC Series Load Cell............................ Power Cord.............................................................. 120V Power...................................................... 230V Power...................................................... 16
17
17
18
18
18
2
TCD Frame User’s Guide
Product Warranty
This instrument is warranted against defects in workmanship, material and design for one (1) year from date of delivery to the extent that
AMETEK will, at its sole option, repair or replace the instrument or any part thereof which is defective, provided, however, that this warranty
shall not apply to instruments subjected to tampering or, abuse, or exposed to highly corrosive conditions.
THIS WARRANTY IS IN LIEU OF ALL OTHER WARRANTIES WHETHER EXPRESS OR IMPLIED AND AMETEK HEREBY DISCLAIMS
ALL OTHER WARRANTIES, INCLUDING, WITHOUT LIMITATION, ANY WARRANTY OF FITNESS FOR A PARTICULAR PURPOSE OR
MERCHANTABILITY. AMETEK SHALL NOT BE LIABLE FOR ANY INCIDENTAL OR CONSEQUENTIAL DAMAGES, INCLUDING, BUT NOT
LIMITED TO, ANY ANTICIPATED OR LOST PROFITS.
This warranty is voidable if the purchaser fails to follow any and all instructions, warnings or cautions in the instrument’s Instruction Manual.
If a manufacturing defect is found, AMETEK will replace or repair the instrument or replace any defective part thereof without charge; however,
AMETEK’s obligation hereunder does not include the cost of transportation which must be borne by the customer. AMETEK assumes no
responsibility for damage in transit, and any claims for such damage should be presented to the carrier by the purchaser.
TCD Frame User’s Guide
3
Precautions
Icons
n Read the TCD Frame User’s Guide and TCD Console
User’s Guide completely before attempting to use the TCD
Series System. By following the instructions contained in
this manual, the optimum accuracy and performance can be
attained.
WARNING
The raised hand icon warns of a situation or conditon that
may lead to personal injury or death. Do not proceed until
the warning is read and thoroughly understood. Warning
messages are shown in bold type.
n Never operate the TCD Series System with the cover removed
from the TCD Console or TCD Frame.
DANGEROUS VOLTAGE
The lightning icon warns of the presence of an uninsulated dangerous voltage within the product enclosure that
might be of sufficient magnitude to cause serious shocks
or death. Never open the enclosures unless you are an authorized
and qualified Chatillon service personnel. Never open any enclosure
when power is connected to the system or its components.
n Use and industrial-quality Power Surge Suppressor with
your TCD System.
n Verify Input Power Source BEFORE operation. The TCD System has a switchable power supply. The tester may operate with
110V or 230V provided the Power Input Module is in the proper
setting corresponding to the source power. Always make sure
that the supply power matches the setting on the Power Input
Module before turning power ON. Failure to do so may cause
serious damage to the tester.
CAUTION
The exclamation point icon indicates a situation or condition that may lead to equipment malfunction or damage.
Do not proceed until the caution message is read and
thoroughly understood. Caution messages are shown in bold type.
n The TCD Frame has a moving crosshead! Exercise extreme
caution during testing or whenever the crosshead is moving.
Never place fingers inside the column.
NOTE
The note icon indicates additional or supplementary
information about the action, activity or concept. Notes
are shown in bold type.
n Class 1 product must be connected to a mains socket outlet
with a protective earth connection.
n Place TCD System so that it is easy to access the mains
power switch and mains power cord.
n Never use the TCD System in a manner not specified by
AMETEK.
n Obey all warning labels on your TCD frame.
GENERAL SAFETY
General safety precautions must be followed when operating the
TCD System. Failure to observe precautions and warnings may
result in damage to the equipment, or injury to personnel.
It is understood that safety rules within companies vary. If a
conflict exists between the material contained in all TCD User’s
Guides and the rules of a company using a TCD System, the
more stringent rules should take precedence.
SAFETY CONSIDERATIONS
The TCD Frame is completely enclosed and provides no potentially
hazardous outputs. Safety considerations are related to the power
connections and physical mountings.
Electronic and mechanical components housed within the TCD covers
are to be serviced by authorized Chatillon representatives only.
4
TCD Frame User’s Guide
Unpacking Your TCD Frame
The TCD frame connects to the TCD Console and uses a TLC Series load cell to provide you with an extremely easy-to-use and accurate measurement system for various types of physical testing.
Carefully remove your TCD frame from its shipping carton.
NOTE
AMETEK recommends the use of a crane when positioning the TCD1100 Series Digital Force Tester.
NOTE
Save the shipping carton and packaging material in
case future reshipment becomes necessary.
The items listed below are supplied standard with your TCD Frame.
TCD110 Series
TCD225 Series
TCD1100 Series
nTCD110 Frame
nTCD Console
nPower Cords
- 120V US Plug (SPK-FM200-034)
- 230V UK Plug (SPK-FM200-022)
- 230V EU Plug (SPK-LTCMUK230)
nConsole-Frame Cable (SPK-TCD-024)
nConsole Mounting Kit (SPK-TCD-002)
nBase Mounting Accessories
- Base Plate
- 5/8” Eye End
- Locking Rings
- #10-32 Thread Adapter
- 5/16-18 Thread Adapter
- Spanner Wrench (NC003030)
n1GB Flash Memory Drive (NC003011)
n5mm Hex Key (NC002924)
n5/32” Hex Key (NC000846)
nTCD225 Frame
nTCD Console
nPower Cords
- 120V US Plug (SPK-FM200-034)
- 230V UK Plug (SPK-FM200-022)
- 230V EU Plug (SPK-LTCMUK230)
nConsole-Frame Cable (SPK-TCD-024)
nConsole Mounting Kit (SPK-TCD-002)
nBase Mounting Accessories
- Base Plate (NC
- 5/8” Eye End (NC
- Locking Rings (NC
- #10-32 Thread Adapter
- 5/16-18 Thread Adapter
- Spanner Wrench (NC003030)
n1GB Flash Memory Drive (NC003011)
n5mm Hex Key (NC002924)
n5/32” Hex Key (NC000846)
nTCD1100 Frame
nTCD Console
nPower Cords
- 120V US Plug (SPK-FM200-034)
- 230V UK Plug (SPK-FM200-022)
- 230V EU Plug (SPK-LTCMUK230)
nConsole-Frame Cable (SPK-TCD-024)
nConsole Mounting Kit (SPK-TCD-002)
nBase Mounting Accessories
- Base Plate
- 5/8” Eye End
- Locking Rings
- #10-32 Thread Adapter
- 5/16-18 Thread Adapter
- Spanner Wrench (NC003030)
n1GB Flash Memory Drive (NC003011)
n5mm Hex Key (NC002924)
n5/32” Hex Key (NC000846)
TCD Frame User’s Guide
5
Specifications
TCD110 Series
TCD225 Series
TCD1100 Series
Load Capacity
110 lbf, 50 kgf, 500 N
225 lbf, 100 kgf, 1 kN
1124 lbf, 5 kN
Maximum Speed (per min)
20 in, 510 mm
50 in, 1270 mm
40 in, 1020 mm
Minimum Speed (per min)
0.001 in, 0.02 mm
0.001 in, 0.02 mm
0.001 in, 0.02 mm
Return Speed
User- Selectable
User- Selectable
User-Selectable
Crosshead Travel
15.0 in, 380 mm
20.0 in, 510 mm
30.0 in, 762 mm
Instrument Weight (approx.)
65 lbs, 30 kg
75 lbs, 34 kg
187 lbs, 85 kg
Shipping Weight (approx.)
86 lbs, 39 kg
96 lbs, 43 kg
216 lbs, 98 kg
Load Measurement System - TLC Series Load Cells
nAccuracy better than 0.1% Full Scale
nCalibrate On-site to Better than 0.25% Reading
nMeasuring system meets or exceeds the following:
ASTM E4, BS 1610, DIN 51221, ISO 7500-1, EN 10002-2,
AFNOR A03-501 (AMETEK recommends system verification
on-site at the time of installation by an authorized Chatillon
Representative, as required by ASTM E4 and ISO 7500-1)
Strain Measurement System
nPosition accuracy better than 0.001 in (0.02mm) or
0.05% displacement (whichever is greater)
n Strain measurement system meets or exceeds the following:
ASTM E83, BS 3846, ISO 9513, EN 10002-4
nDeflection Compensation Standard
Speed Accuracy
nBetter than 1% Full Scale
Distance Accuracy
nBetter than 0.25% of reading unloaded
nDistance Resolution is .001 inch or .02 mm
Data Sampling
n1000Hz
nUser Selectable Sampling/Filters (1-1000 Hz)
Operating Temperature
n40°F to 110°F (5°C to 45°C)
Storage Temperature
n0° to 130°F (-17° to 54°C)
Relative Humidity
n20% to 85%
Single Phase Voltage
n100, 120, 220 or 240Vac +10%, 47 to 63Hz.
Power must be free of spikes, surges, and sags exceeding 10%
of the average voltage.
Warranty
n1 year
Conformance
nThe system conforms to all relevant European standards and
carries the CE mark.
BS EN 61010-1:2001
Safety Requirements for Electrical Equipment
BS EN 61000-6-3:2007
EMC Generic Emissions Standard
BS EN 61000-6-1:2007
EMC Generic Immunity Standard
These specifications were developed in accordance with AMETEK’s standard procedures and
are subject to change without notice.
6
TCD Frame User’s Guide
Handling Your TCD Frame
When attempting to pickup your TCD frame, always make sure that
you are grasping the metal base and NOT the plastic housings that
envelop the metal based.
CAUTION
Always make sure you are grasping onto the metal base
and crosshead when attempting to move your TCD frame.
Do NOT grasp onto any of the plastic housing components.
These components are not designed to carry a load or support the
weight of the frame.
Shown: Correct handling.
CAUTION
The TCD1100 Series frame weighs approximately 190 lbs
(85 kg), therefore extreme care should be taken when moving this machine.
Shown: Incorrect handling.
TCD Frame User’s Guide
7
Understanding
Your TCD System
The Chatillon TCD System is comprised of three subsystems that
connect and integrate together to form a precision force measurement instrument. The following subsections provide a brief description of each of these subsystems that make up your TCD System.
TCD Frame Subsystem
The TCD frame subsystem provides the motion control for your force
measurement testing. This subsystem provides the main power
source for the TCD Console subsystem and TLC Series load cell.
The TCD frame consists of a closed-loop PID motor controller that
accurately positions the crosshead using a precision ball screw assembly.
TCD Console
Subsystem
TCD Console Subsystem
The TCD Console subsystem is the primary user interface for your
TCD System. The TCD Console is used to setup your TCD System
operating parameters; test setups; and how measured results are
displayed to the user. The TCD Console connects to the TCD frame
using a special console-to frame interface cable.
TLC Series Load Cell
The TLC Series load cell is used exclusively with the TCD System to
provide accurate load measurement of your samples in either compressive or tensile directions. The TLC Series load cell is a full-bridge
strain gauge sensor with 15-pin plug that connects to the TCD Console
subsystem.
TCD Frame
Subsystem
Load Cell Adapter
TLC Series Load Cell
Console Arm Adapter
8
TCD Frame User’s Guide
Universal
Mounting Block
Assembling Your TCD System
Mounting the TCD Console
The TCD Console Subsystem comes with two mounting adapters.
The console base adapter fastens directly to the TCD Console. The
TCD Console is secured to the swivel slots on the base adapter by a
shoulder screw, a hex head screw and associated washers as shown.
Assembly the TCD Console to the base adapter as shown. Tighten
the shoulder screw, and then tighten the hex head screw and washers so that the TCD Console can be adjusted to various tilt positions.
Attach the base adapter to the column arm. The column arm has two
mounting slots that use1/4-20 x 3/4” hex head screws and washers.
Secure the column arm to the base adapter by tightening the two hex
head screws and washers with a wrench.
Shown: TCD Console base adapter is connected to the bottom of the TCD
Console with hex head screws.
The column arm adapter has handscrew mechanism that allows you
to position the TCD Console so that it is comfortable for the user.
Support the TCD Console with your hand while you slowly loosen
the handscrew. Once the TCD Console is free to move, position
the console where it can be easily viewed and operated by the user.
Once you have positioned the console, tighten the handscrew so that
the console is secured in the intended position.
CAUTION
Always support the TCD Console whenever adjusting the
column arm or base adapter. If the TCD Console falls from
the mounting location, serious injury or damage to the
equipment can result.
Shown: TCD Console base adapter swivel slot can be adjusted to tilt the
console for optimum viewing.
Shown: Attach swivel arm to ball at bottom of console adapter.
TCD Frame User’s Guide
9
Locating Your TCD System
Vibration Considerations
Your Chatillon TCD System is a sensitive measuring instrument.
Take care to locate your system in a clean, dry and well-lighted
location. Make sure that there is sufficient working area to promote
a safe working environment for the operator(s). Never locate your
TCD System near equipment that may vibrate or that may elicit high
voltage spikes, e.g. generators.
The TCD System is a precision measuring instrument. The system
should be mounted in a location that is free of vibration. Vibration will
effect the load measurement result.
RFI Considerations
Your Chatillon TCD System is specified to provide accurate measurements when operated in an environment that meets this temperature specification:
The TCD System has been determined to meet generic emmissions
and noise immunity standards. However, because the system is a
precision measuring device it should not be placed near equipment
that may produce transient electrical spikes such as generators and
pumps. Load readings may be affected at the following frequencies:
368+/-2 MHz, 405+/-5 Mhz, 460+/-2 MHz, 570+/-2 MHz, 598+/-2
MHz, 644+/-2 MHz, 828+/-2 MHz and 1682+/-2 MHz.
n 40° to 110° F (5° to 45° C)
ESD Considerations
Relative Humidity Considerations
The TCD System may terminate a test if a high voltage discharge
occurs near the connectors, located on the console’s back panel. In
the unlikely event that a high voltage discharge occurs at the back
panel, please power cycle the machine.
Temperature Considerations
Your Chatillon TCD System has been tested to meet its performance
specification where the relative humidity within the work area is between 20% to 85% non-condensing.
n 20% to 85% non-condensing
10
TCD Frame User’s Guide
Mounting Your Load Cell
Your TCD System uses the Chatillon TLC Series load cell for its load
measurement system. Before connecting the TLC load cell cable to
the TCD Console, we suggest that you first mount the TLC load cell
to the load cell adapter (p/n SPK-TCD-051).
CAUTION
Before connecting the TLC Load Cell, make sure that
power to the TCD Console is OFF.
The universal load cell adapter has three different mounting holes
used to connect to your TLC Series load cell’s threads.
Depending on the model TLC Series load cell being used, insert the
appropriate hex cap screw into the TLC load cell being careful not to
apply excessive force onto the sensor by over tightening (finger tight
is sufficient).
Shown: Fasten top of load cell
to bottom of load cell adapter
using cap head screw.
Access cap screw using thruholes on adapter.
The load cell adapter has a retaining wall that helps to ensure that
your TLC load cell is properly aligned. Make sure that the TLC load
cell is in contact with the retaining wall.
CAUTION
Make sure your load cell is mounted correctly using the
proper load cell adapter location. Always make sure the
load cell is mounted so that its surface is flat against the
mounting adapter’s machined surface.
Position the TLC load cell onto the load cell adapter so that the cable
coming from the sensor is positioned nearest the column (left side
of the sensor).
Connect the TLC load cell’s connector to the TCD Console (See
Cable Connections).
Sensor is tight against
the adapter.
Shown: Correct mounting.
Shown: Incorrect mounting.
NOTE
Your Chatillon TLC or SLC Series load cells have an active
side. Looking directly at the load cell, the load cell should
be mounted so that the cell creates an “S” pattern. The load
cell’s part number or capacity should be oriented so that it
can be read rightside upwards.
Shown: Correct load cell mounting.
Sensor is NOT tight
against the adapter.
Shown: Incorrect load cell mounting.
TCD Frame User’s Guide
11
Mounting Your Test Fixtures
The TLC load cells can use threaded or 5/8-inch eye end-type grips
and fixtures.
Chatillon GF Series grips or fixtures mate to the TLC Series load cell
using a threaded connection. Because these grips or fixtures may
have different size threads, it may be necessary to use thread adapters for your connection.
CAUTION
When using threaded-type grips and fixtures, exercise
extreme care not to over tighten the threads. Over
tightening may damage the load cell.
Chatillon TG Series grips and fixtures have a 5/8-inch eye end connection making it easy to mount and align your fixtures. The TLC load cell mounting threads are shown in the table. Also
listed is the fixture mounting accessory kit that comes standard with
your TLC load cell. This kit allows you to easily mount and align
fixtures/grips that have a 5/8-inch eye end/anchor pin.
Model
TLC-250G
TLC-0002
TLC-0010
TLC-0025
TLC-0050
TLC-0100
TLC-0200
TLC-0500
TLC-1000
Thread
Mounting Kit
#10-32F............................. SPK-TLC-001
#10-32F............................. SPK-TLC-001
#10-32F............................. SPK-TLC-001
#10-32F............................. SPK-TLC-001
1/4-28F.............................. SPK-TLC-002
1/4-28F.............................. SPK-TLC-002
1/4-28F.............................. SPK-TLC-002
1/2-20F.............................. SPK-TLC-003
1/2-20F.............................. SPK-TLC-003
Shown: SPK-TLC-001
12
TCD Frame User’s Guide
Shown: SPK-TLC-002
Your TLC Series load cell is supplied with fixture mounting accessories. These accessories are listed below . You may order the
mounting accessories as spare parts.
Load Cell Assemblies
Part No.
Description
SPK-TLC-001
Low Capacity TLC Sensor Assembly (No Load Cell)
NC003141
NC003139
NC003140
SPK-TLC-002
NC000612
NC003137
NC003031
NC003030
SPK-TLC-003
NC000612
NC003138
NC003031
NC003030
Grip Pin, Aluminum
5/8” Eye End with #10-32 Thread, Aluminum
Locking Rings (1 ea), Aluminum
Medium Capacity TLC Sensor Assembly (No Load Cell)
Grip Pin, Stainless Steel
5/8” Eye End with 1/4-28M Thread, Stainless Steel
Locking Rings (2 ea), Stainless Steel
Spanner Wrench
High Capacity TLC Sensor Assembly (No Load Cell)
Grip Pin, Stainless Steel
5/8” Eye End with 1/2-20M Thread, Stainless Steel
Locking Rings (2 ea), Stainless Steel
Spanner Wrench
Notes:
TLC Series load cells are supplied with the above standard accessories.
The SPK-TLC assemblies can be ordered for spares. These assemblies
do NOT contain the TLC Load Cell- only the attachment accessories.
Shown: SPK-TLC-003
Mounting A Threaded Fixture
Mounting An Eye End Fixture
When using threaded grips or fixtures, we recommend the use of a
knurled nut to help ensure that your fixture remains aligned properly.
Eye end connections are easy to use. The eye end contains a 5/8inch diameter post with through hole. The post also has a locking
ring used to tighten down the attached fixture.
Place the knurled nut onto the set screw. Screw the knurled nut
on as fas as it will go. Next, screw on your fixture to the maximum
position to where it is properly aligned to the work area. Then, use
the knurled nut to tighten downward onto the fixture. This will ensure
that the fixture remains tight and in the correct alignment throughout
a test.
Position the fixture onto the post and orient the fixture so that it is
properly aligned. Tighten the fixture into position using the locking
ring. Thread the locking ring so that it is secure against the fixture. Next, place the grip pin through the fixture and the post.
Shown: Slide TG fixture onto eye end post.
Shown: GF-9 Series thread-type testing fixture fastened to base mount
using thread adapter.
Shown: Secure TG fixture with grip pin (p/n NC000612)
Shown: Align TG fixture and use locking ring to tighten onto eye end
adapter with spanner wrench.
TCD Frame User’s Guide
13
Using the Base Mounting Block
Aligning Your Fixture Centerline
The base mounting block mounts securely to the t-slot table using two mounting screws. The mounting block has four (4) different mounting holes that mate to all Chatillon and Lloyd Instruments
brand fixtures and accessories.
Before you fasten your top and bottom fixtures, insert the set screws
or the end end adapters to the top (load cell) and bottom (mounting
block).
Care should be taken when mounting a fixture to the mounting block
to ensure that the centerline of the fixture is aligned with the centerline of the TLC load cell and fixture combination that is fastened to
the TCD crosshead.
5/16-18
UNF
Use the thumbwheel to slowly lower the crosshead downward until
the top thread or eye end is just slightly higher than the lower thread
or eye end. Be careful to not make contact with either set screw or
eye end adapter.
1/4-28
UNF
Shown: Position together using thumbwheel. Use a slow speed to position
eye ends together without touching.
Since the crosshead fixture is basically a fixed object, you can align
your set screw or eye end by adjusting the position of your mounting
block.
M12 x 1.75
(For 5/8” Eye End Mounting)
#10-32
UNF
Slightly loosen the two mounting screws on the mounting block so
that the mounting block can be moved smoothly towards/away-from
the column.
Shown: Loosen mounting block screws.
14
TCD Frame User’s Guide
Use a 90-degree object to align the top set screw or eye end to the
bottom set screw or eye end.
Place the 90-degree object so that it is flush against the top set
screw or eye end. Then slide the lower mounting block so that the
bottom set screw or eye end is also flush against 90-degree object. Once they are aligned, you can tighten the mounting block to the
T-slot table.
NOTE
It may be necessary to slightly loosen the load cell mounting adapter to align the top set screw or eye end with the
bottom set screw or eye end. Remember to retighten the
load cell mounting adapter before fastening the test fixtures or grips.
Move your crosshead upward to allow clearance for your fixtures.
Shown: Position mounting block so that it aligns with 90-degree fixture.
Shown: Loosen and align load cell adapter for parallelism adjustment if
required. Adapter mounting screws located on the back of the crosshead.
Shown: Align the eye-ends using a 90-degree alignment square.
TCD Frame User’s Guide
15
Cable Connections
Your TCD System has three cable connections: console to frame
connection, TLC load cell to console connection; and mains power
cord connection.
CAUTION
Always make sure that the mains power switch is in the Off
position when making cable connections. Connection or
disconnection cables with the mains power switch in the
On position can damage the equipment.
TLC Load Cell
Connection
TCD Console-to-Frame
Connections
Console Power
Connection
Mains Power Switch
Power Input Module
Mains Power
Connection
16
TCD Frame User’s Guide
Connecting TCD Console
The TCD Console is connected to the TCD frame using the Consoleto-Frame Interface Cable (p/n SPK-TCD-024). This cable is 3 ft (1
m) in length and has two 26-pin male D-type connectors.
Connecting TLC Sensor
The TLC Sensor cable has a 15-pin male D-type connector. The
sensor has a retractable cord, that when fully extended, reaches approximately 9 ft (3 m) in length.
Carefully connect the console-to-frame interface cable to the TCD
frame. The connection is located on the back of the TCD frame,
beneath the power cord input connection. Make sure that the pins
are aligned before pushing the connector onto the mating connector.
Be careful not to bend any of the pins. Secure the connection by
tightening the mounting screws on the connector.
Carefully connect the TLC load cell cable to the TCD Console (top
connector). The connection is located on the back of the TCD Console. Make sure that the pins are aligned before pushing the connector onto the mating connector. Be careful not to bend any of the
pins. Secure the connection by tightening the mounting screws on
the connector.
Next, connect the console-to-frame cable to the TCD Console. The
connection is located on the back panel of the TCD Console (bottom
connection). Make sure that the pins are aligned before pushing the
connector onto the mating connector. Be careful not to bend any of
the pins. Secure the connection by tightening the mounting screws
on the connector.
CAUTION
Always make sure that power to the TCD Console is
Off before connecting your TLC Series load cell.
TLC Load Cell Connector
TCD Frame Connector
TCD Frame User’s Guide
17
120V-Type Power Cord
Power Cords
CAUTION
Your TCD System should be connected to an industrialquality power surge suppressor. Your system should not
be directly connected to a source power outlet.
The 120-type power cord (p/n SPK-FM200-034) is supplied with all
TCD Systems that utilize a 120Vac source power connection. This
power cord has a female connector which mates to the back of the
TCD225 frame and a 3-prong male connector for mating to your
power surge suppressor.
The TCD System can be supplied with two types of power cords.
The power cord should be used in conjuction with an industrial quality surge suppressor.
Connect the female connector to the TCD frame before connecting
to the source power outlet.
WARNING
Always make sure that the source power matches the Power Input Module setting of your TCD System before applying power to your system. Always verify the source power
that you will be connecting your Power surge Suppressor and TCD
System to before applying power to your system.
NOTE
Please read and understand the section “Powering Your
Tester” before applying power to your TCD System.
230V-Type Power Cord
Two 230V-type power cord (p/n SPK-FM200-022, SPK-LTCMUK230) are supplied with all TCD Systems that utilize a 230Vac
source power connection. This power cord has a female connector
which mates to the back of the TCD frame and a 2-prong male connector for mating to your power surge suppressor.
Supplied by AMETEK
TCD
Console
TCD Console-to-Frame
Interface Cable
SPK-TCD-024
TCD
Frame
TCD Frame
Power Cable
SPK-FM200-034 (120V US Plug)
SPK-FM200-022 (230V, Euro Plug)
SPK-LTCM-UK230 (230V, UK Plug)
Source
Power Outlet
Surge
Suppressor
Supplied by Customer
Recommended Power Connection- Block Diagram
18
TCD Frame User’s Guide
Powering Your Tester
Electrical Wiring and Connections
The CHATILLON® TCD System requires a stable 120V or 230V
power source. The internal power transformer is switchable and
operates at either 120V or 220V, Frequency 50/60Hz. Current ratins per TCD frame type are:
Perform regular inspections of all connections to your TCD System.
Keep connections clean, secure and tight. Locate cables and cords
away from moving objects. Take care to prevent tripping hazards.
q TCD110 Series q TCD225 Series q TCD1100 Series 120V
1A
2A
4A
220V
.5A
1A
3A
WARNING
Never substutute the required fuse with a higher or lower
rated fuse.
Do not locate the power cord where it can be walked on or where it
may create a tripping hazard.
Connect the power cable to only a 3-wire grounded industrial grade
power surge suppressor. Connect the power surge suppressor to
your source power outlet. Never connect a 2-wire or 3-wire adapter
to the power cord or remove the third ground wire to fit the plug into a
2-wire electrical outlet. Modifying or overriding the third-wire ground
creates a safety hazard and should not be permitted.
WARNING
Always connect the power cord from the source of AC power befor plugging it from the TCDpower connector. The AC
voltage available at electrical outlets is extremly dangerous
and can cause serious injury or death.
Use shield cables to connect to your TCD System’s output ports.
Make sure that cables are properly terminated and firmly and securely connected at both ends.
Selecting Mains Power Source
The TCD System’s Power Entry Module, located on the back panel
of the TCD frame, contains an internal drum. This drum has four
settings:
q
q
q
q
100Vac (Do NOT use)
120Vac (Use for standard 120V operation)
220Vac (Use for standard 220/230V operation)
240Vac (Do NOT use)
Use a flathead screwdriver to open the Power Entry Module. A
small slot located at the top of the Power Entry Module locks the
module closed. To unlock, position the screwdriver into the slot
and carefully apply pressure.
Power Surge Suppressor
Connect your TCD System through a high-quality power surge suppressor. Surge suppressors limit the amplitude of potentially damaging power line transiets caused by electrical machinery or lightning.
CAUTION
Industrial-quality surge suppressors are recommended. Surge suppressors found in inexpensive
power strips are insufficient to protect your TCD System from damage.
Shown: Remove the power input drum. Select 120Vac or 220Vac. Reinsert
drum making sure correct rating is displayed in window.
TCD Frame User’s Guide
19
To set the power input, remove the Power Drum by pulling the
drum from its socket. DO NOT ROTATE THE DRUM FROM
WITHIN THE SOCKET.
CAUTION
Attempting to rotate the drum while still in the socket will
damage the electrical connection. Do not rotate the drum
from within the socket.
Reinsert the drum back into the socket so that respective power
label matches your supply power. Close the Power Entry Module
and make sure the correct label is displayed through the window.
Shown: Replace he power input drum so that the matching source power
appears thru window.
CAUTION
Industrial quality surge surpressors are recommended.
Surge supressors found in inexpensive power strips are
insufficient to protect your TCD System from damage.
Replacing Fuse
The TCD frame uses two fast-blow , cartridge-typefuses (20 x 5mm)
fuses. The fuses are located inside the Power Entry Module.
To inspect and replace the fuses, squeeze together the fuse holders
in the direction of the arrows on each holder and pull the holder out.
The fuse is connected to the holder and can be easily removed and
replaced.
Shown: Press the fuse holder in the direction of the arrow and then pull out
to expose the fuse. Replace with appropriately rated fuses only.
WARNING
Replace the fuses with the exact same type and rating as
the ones supplied from the factory. Replace with fast-blow
type fuses only.
Do not replace with higher or lower rated fuses.
Fuse Ratings & Part Numbers
Frame Model
Fuse
Part No.
TCD110 Series.....................................1A................E09-409
TCD225 Series.....................................3A................E09-825
TCD1100 Series...................................5A................E09-834
20
TCD Frame User’s Guide
Mains Power Switch
The mains power switch, located on the back panel of the TCD frame
is the system’s master power switch. This switch is the only device
that can be used to turn off power to the system.
The mains power switch should be used whenver power is to be
completely turned off to the system.
The mains power switch is a two-position switch with an Off position
(O) and an On position (I). The mains power switch contains an LED
that illuminates when power to the system is On.
TCD Console Power Connection
Mains power switch in the Off position
WARNING
The mains power switch should be turned Off whenever
service is being performed on the TCD System. Always
verify that power to the system is Off be verifying that the
mains power switch is in the Off position. Never assume that power to
the system is Off because the LED on the switch is not lighted.
The only way to completely remove power to the TCD frame, TCD Console and TLC load cell is to place the mains power switch in the Off
position.
Jog Wheel Operation
The jog wheel is located on the front panel of the TCD frame. The
jog wheel is intended for fixture setup and alignment. Rotating the
jog wheel upward causes the crosshead to move in an upward direction. Rotating the jog wheel downward causes the crosshead to
move in a downward direction. The speed of the crosshead movement is controlled by the speed of the jog wheel rotation. The jog
wheel is spring activated and has a home position. Take care when
moving the jog wheel so as not to over-rotate that may damage the
jog wheel mechanism.
CAUTION
The jog wheel is intended for use during fixture setup and
alignment only. It should not be used to manually conduct
a test.
Mains power connection
CAUTION
Certain high voltage discharges near the connector may
cause a test setup to terminate prematurely. In the unlikely
event that a high voltage discharge occurs near the connector, please power cycle the tester.
Shown: Rotating the job thumbwheel upward causes the crosshead to move upward. Rotating the thumbwheel downward
causes the crosshead to move downward.
TCD Frame User’s Guide
21
Emergency Stop Switch
The emergency stop switch is located on the front panel directly beneath the TCD Console mounting.
The emergency stop switch removes power to the TCD System.
Pressing the emergency stop switch removes power to all system
components including the TCD frame and TCD Console. To release
the emergency stop, rotate and release the switch.
WARNING
The emergency stop switch removes power to the system.
When depressed, it removes power to the frame’s motion controller and all system components, including the console.
Emergency
Stop Switch
Shown: The emergency stop is located on the TCD frame’s front
panel, directly beneath the TCD Console.
STOP ACTION SYMBOL
The STOP ACTION symbol identifies the emergency stop
function. When the emergency stop switch is engaged
(pushed in), the motor drive and crosshead will stop. All
motion is discontinued.
22
TCD Frame User’s Guide
Mechnical Limit Setup
The TCD frame has two mechanical limits located on the front of
the column. The mechanical limits are provided as a means of protecting your TCD System from accidental sensor overload situations
caused by crosshead over travel.
When the crosshead is moving upward or downward and makes
physical contact with either of the mechanical limit switches, the
crosshead will immediately stop. Therefore, you should position the
mechanical limit switches at locations that would prevent the crosshead movement that may cause an overload to the TLC sensor.
Using Mechanical Limits
The TCD frame has adjustable mechanical limits that are designed
to help protect your TLC load cell from overloads. These limits are
called extension or deflection limits and are designed to stop the
machine’s crosshead travel when the internal microswitch is contacted by the crosshead.
The front of the TCD column features a ruler with two adjustable
mechanical limits switches. One switch is for the HIGH Limit. The
other switch if for the LOW Limit. The limit switches should be
positioned using the ruler, so that the crosshead will stop when
contact is made with the High or Low switch.
CAUTION
The High and Low Limit switches are provided to prevent
damage to the load cell. Always position and test the mechanical limits to ensure that they prevent the crosshead
from moving to a distance that might result in a measured
load that it greater than the load cell’s capacity.
NOTE
The TCD Console’s bargraph and crosshead status will
illuminate RED when the measured load is at 90% of the
installed load cell’s capacity. We recommend that the
High and Low limits be set to where the bar graph and
crosshead status show in Red.
Shown: Position the upper limit switch at a location that prevents tensile
overloading from occurring. Use the thumbwheel to move the crosshead
upward while viewing the load being measured by the load cell. Loosen the
limit screw and slide the switch to the desired location (90% load capacity).
Re-tighten screw.
Position the lower limit switch at a location that prevents compression overloading from occurring. Use the thumbwheel to move the crosshead downward while viewing the load being measured by the load cell. Loosen the
limit screw and slide the switch to the desired location (90% load capacity).
Re-tighten screw.
Setting HIGH Limit
Limits are supplied to protect your load cell and TCD frame. The
HIGH Limit protects the load cell by preventing the crosshead from
traveling beyond a distance that would apply a load that is greater
than the load cell’s capacity.
The HIGH Limit is designed to protect the gauge when the crosshead is in the UPWARD travel direction.
To set the limit, loosen the thumbscew by turning the screw in a
counterclockwise direction. You only need to loosen the screw
enough so that the switch slides along the internal guide. When
the screw is loose, slide the mechanism to the desired extension
position. Tighten the screw by turning clockwise.
Test your setting using a slow crosshead speed, e.g. 0.4 in/min
(10 mm/min). Move the crosshead in an UPWARD direction and
watch to see where the crosshead makes contact and ensure that
contact with the limit switch stopped the crosshead travel. If the
crosshead stops too soon or too late, adjust the thumbscrew, reposition the limit mechanism and repeat the test.
TCD Frame User’s Guide
23
Setting LOW Limit
Testing the Limit Switch
The LOW Limit is designed to protect the load cell when the crosshead is in the DOWNWARD travel direction.
Once you have positioned your Limit Switch, test to ensure that it
is operating properly.
To set the limit, loosen the thumbscew by turning the screw in a
counterclockwise direction. You only need to loosen the screw
enough so that the switch slides along the internal guide. When
the screw is loose, slide the mechanism to the desired extension
position. Tighten the screw by turning clockwise.
Lower Limit Switch Test
Drive the crosshead in a downward direction. While the crosshead
is moving downward, press downward on the lower Limit Switch.
The crosshead should stop moving.
Upper Limit Switch Test
Drive the crosshead in an upward direction. While the crosshead
is moving upward, press the upper Limit Switch upward. The
crosshead should stop moving.
Switch Engagement
Check to ensure that the crosshead engages both the Upper and
Lower Limit Switches during its travel. You should hear a “click”
when the crosshead makes contact with the switch. The crosshead should stop moving.
CAUTION
Always test the positions of your High and Low limit
swiches. Ensure that they stop the crosshead travel
when engaged.
Shown: Test both limit switches by manually triggering an overload condition. Press down on the Low limit swtich and up on the High limit switch
while the crosshead is moving. Both actions should stop crosshead movement.
24
TCD Frame User’s Guide
Cleaning Your TCD Frame
Use only a soft cloth dampened with water and mild detergent for
clean exterior surfaces. Never use abrasive cleaners and never use
strong detergents or solvents. Only a damp cloth should be used.
Do not use a cloth that is dripping wet.
Keep the t-slot area clean of debris and dust. Use an air hose to
remove debris and dust from the t-slot channels. Be careful to keep
debris and dust from entering the inside of the column.
Have your authorized Chatillon representative perform annual preventive maintenance on your TCD System. This will include cleaning
and preventive maintenance.
NOTE
AMETEK recommends that your TCD System undergo annual preventive maintenance from an authorized Chatillon
represetnative.
Servicing Your TCD Frame
The TCD System is a precision measuring instrument that should
undergo annual preventive maintenance by an authorized Chatillon
representative.
DANGER
Do not open the TCD Console or TCD Frame enclosures.
There are no user-serviceable components or assemblies
inside. All service should be performed by an authorized
Chatillon representative. For a listing of authorized Chatillon representative, please visit
www.chatillon.com.
If you require service for your TCD Console, TCD frame or TLC Series load cell, please contact your authorized Chatillon representative where your purchased your equipment.
TCD Frame User’s Guide
25
Spare Parts Listing
TCD110 Series
Ref No.
1
2
3
4
5
6
7
8
9
10
11
12
13
14
15
16
17
18
19
20
21
22
23
24
25
26
27
26
Part Number
SPK-TCD-001
SPK-TCD-002
SPK-LTCM-003
SPK-TCD110-004
SPK-LTCM-005
SPK-TCD110-006
SPK-TCD110-007
SPK-LTCM-008
SPK-TCD110-009
SPK-TCD110-010
SPK-TCD110-011
SPK-TCD110-012
SPK-TCD-013
SPK-TCD-014
SPK-TCD-015
SPK-LTCM-016
SPK-TCD110-017
SPK-LTCM-018
SPK-LTCM-019
SPK-TCD110-020
SPK-TCD110-021
SPK-TCD110-022
SPK-TCD110-023
SPK-TCD-024
SPK-TCD110-025
SPK-TCD110-026
SPK-TCD110-027
Description
TCD Console Assembly
Console Mounting Assembly
Ruler Insert, 20-inch (510mm)
Cover Spacer, TCD110
Switch, Power
Timing Belt, TCD110
Motor Mounting Plate
Power Entry Module Assembly, 1A
Upper Block, TCD110
Side Plate Assembly
Column Guide Rods, 2 each
Ball Screw Assembly, TCD110
Barrier Assembly
Encoder, TCD
Cable, Encoder Assembly
Ball Screw Pulley
Ram Bearing Block, TCD110
Motor Assembly
Limit Switch, with Brackets, 2 each
Upper Limit Switch Bracket Assy
Lower Limit Switch Bracket Assy
Arm Ram, TCD110
Limit Switch Rod Assy, TCD110
Console-to-Frame Cable Assy
Front Cover Assembly, TCD110
Rear Cover Assembly, TCD110
Top Cover Assembly, TCD110
TCD Frame User’s Guide
Ref No.
28
29
30
31
32
33
34
35
36
37
38
39
40
41
42
43
44
45
46
47
48
49
50
51
52
*
Part Number
SPK-TCD110-028
SPK-TCD-029
SPK-TCD-030
SPK-TCD110-031
SPK-LTCM-015
SPK-TCD-033
SPK-TCD-034
SPK-TCD-035
SPK-TCD110-036
SPK-TCD-037
SPK-TCD-038
SPK-TCD-039
SPK-TCD-040
SPK-TCD-041
SPK-TCD-042
SPK-TCD-043
SPK-TCD-044
SPK-TCD-045
SPK-TCD-046
SPK-TCD-047
SPK-TCD-048
SPK-TCD-049
SPK-TCD110-050
SPK-TCD-051
SPK-FM200-034
SPK-FM200-022
SPK-LTCM-UK230
E09-409
Description
Motor Cover Assembly, TCD110
Base Cover Assembly
Motor Amplifier PCB, Small
Bushing Set, 4 each
Motor Pulley
Power Cord Jumper
Power Outlet Assembly
Jog Wheel Assembly, Calibrated
Transformer Assembly, TCD110
Switch Plate Assembly
Feet Assembly (8)
Bottom Pan
Frame Support Assembly
Bottom Base, T-slot
Bottom, Eye End, 5/8-inch, Assy
Base Fixture Mount
E-Stop Switch Assembly
Motor Amplifier Cable Assembly
Cable Assembly, Limit Switches
Thumb Screw Assembly, 2 each
USB Flash Drive, 1GB
Cable, Motor Assembly
Bottom Block Assembly, TCD110
Load Cell Mounting Adapter
Power Cord, 115Vac, US Mains Plug
Power Cord, 230Vac, EU Mains Plug
Power Cord, 230Vac, UK Mains Plug
1A Fuse (not shown)
Spare Parts Listing
TCD225 Series
Ref No.
1
2
3
4
5
6
7
8
9
10
11
12
13
14
15
16
17
18
19
20
21
22
23
24
25
26
27
Part Number
SPK-TCD-001
SPK-TCD-002
SPK-LTCM-003
SPK-TCD225-004
SPK-LTCM-005
SPK-TCD225-006
SPK-TCD225-007
SPK-TCD225-008
SPK-TCD225-009
SPK-TCD225-010
SPK-TCD225-011
SPK-TCD225-012
SPK-TCD-013
SPK-TCD-014
SPK-TCD-015
SPK-TCD225-016
SPK-TCD225-017
SPK-TCD225-018
SPK-LTCM-019
SPK-TCD225-020
SPK-TCD225-021
SPK-TCD225-022
SPK-TCD225-023
SPK-TCD-024
SPK-TCD225-025
SPK-TCD225-026
SPK-TCD225-027
Description
TCD Console Assembly
Console Mounting Assembly
Ruler Insert, 20-inch (510mm)
Motor Assembly, TCD225
Switch, Power
Timing Belt, TCD225
Motor Mounting Plate
Ball Screw Assembly, TCD225
Ball Screw Pulley
Side Plate Assembly
Linear Rail Assembly, TCD225
Column, Aluminum, TCD225
Barrier Assembly
Encoder, TCD
Cable, Encoder Assembly
Upper Block, TCD225
Ram, TCD225
Cover Brackets, TCD225
Limit Switch, with Brackets (2)
Upper Limit Switch Bracket Assy
Lower Limit Switch Bracket Assy
Arm Ram, TCD225
Limit Switch Rod Assy, TCD225
Console-to-Frame Cable Assy
Front Cover Assembly, TCD225
Top Cover Assembly, TCD225
Rear Cover Assembly, TCD225
Ref No.
28
29
30
31
32
33
34
35
36
37
38
39
40
41
42
43
44
45
46
47
48
49
50
51
52
53
*
Part Number
SPK-TCD225-028
SPK-TCD-029
SPK-TCD-030
SPK-TCD225-031
SPK-TCD225-032
SPK-TCD-033
SPK-TCD-034
SPK-TCD-035
SPK-TCD225-036
SPK-TCD-037
SPK-TCD-038
SPK-TCD-039
SPK-TCD-040
SPK-TCD-041
SPK-TCD-042
SPK-TCD-043
SPK-LTCM-006
SPK-TCD-045
SPK-TCD-046
SPK-TCD-047
SPK-TCD-048
SPK-TCD-049
SPK-TCD225-050
SPK-TCD-051
SPK-TCD225-052
SPK-FM200-034
SPK-FM200-022
SPK-LTCM-UK230
E09-825
Description
Motor Cover Assembly, TCD225
Base Cover Assembly, TCD225
Motor Amplifier PCB, TCD225
Power Entry Module Assy, 3A
Motor Pulley
Power Cord Jumper
Power Outlet Assembly
Jog Wheel Assembly, Calibrated
Transformer Assembly, TCD225
Switch Plate Assembly
Feet Assembly (8)
Bottom Pan
Frame Support Assembly
Bottom Base, T-slot
Bottom, Eye End, 5/8-inch, Assy
Base Fixture Mount
E-Stop Switch Assembly
Motor Amplifier Cable Assembly
Cable Assembly, Limit Switches
Thumb Screw Assembly (2)
USB Flash Drive, 1GB
Cable, Motor Assembly
Bottom Block Assembly, TCD225
Load Cell Mounting Adapter
Limit Switch Actuator Assembly
Power Cord, 115Vac, US Mains Plug
Power Cord, 230Vac, EU Mains Plug
Power Cord, 230Vac, UK Mains Plug
3A Fuse (not shown)
TCD Frame User’s Guide
27
Spare Parts Listing
TCD1100 Series
Ref No.
1
2
3
4
5
6
7
8
9
10
11
12
13
14
15
16
17
18
19
20
21
22
23
24
25
26
27
28
29
30
28
Part Number
SPK-TCD-001
SPK-TCD-002
SPK-LTCM-043
SPK-TCD225-004
SPK-LTCM-005
SPK-TCD1100-006
SPK-TCD1100-007
SPK-TCD1100-008
SPK-TCD1100-009
SPK-TCD1100-010
SPK-TCD1100-011
SPK-TCD1100-012
SPK-TCD-013
SPK-TCD-014
SPK-TCD-015
SPK-TCD1100-016
SPK-TCD1100-017
SPK-TCD1100-018
SPK-LTCM-019
SPK-TCD1100-020
SPK-TCD1100-021
SPK-TCD1100-022
SPK-TCD1100-023
SPK-TCD-024
SPK-TCD1100-025
SPK-TCD1100-026
SPK-TCD1100-027
SPK-TCD1100-028
SPK-TCD1100-029
SPK-TCD1100-030
Description
TCD Console Assembly
Console Mounting Assembly
Ruler Insert, 30-inch (760mm)
Motor Assembly, TCD225
Switch, Power
Timing Belt, TCD1100
Motor Mounting Plate
Ball Screw Assembly, TCD1100
Ball Screw Pulley
Front Plate Assembly
Linear Rail Assembly, TCD1100
Column, Aluminum, TCD1100
Barrier Assembly
Encoder, TCD
Cable, Encoder Assembly
Upper Block, TCD1100
Ram, TCD1100
Top Rear Cover Bracket, TCD1100
Limit Switch, with Brackets (2)
Upper Limit Switch Rod Support
Lower Limit Switch Bracket Assy
Arm Ram Assy, TCD1100
Limit Switch Rod Assy, TCD1100
Console-to-Frame Cable Assy
Front Cover Assembly, TCD1100
Rear Cover Assembly, TCD1100
Top Cover Assembly, TCD1100
Motor Cover Assembly, TCD1100
Base Cover Assembly, TCD1100
Motor Amplifier PCB, TCD1100
TCD Frame User’s Guide
Ref No.
31
32
33
34
35
36
37
38
39
40
41
42
43
44
45
46
47
48
49
50
51
52
53
54
55
56
57
58
*
Part Number
SPK-TCD1100-031
SPK-TCD1100-032
SPK-TCD-033
SPK-TCD-034
SPK-TCD-035
SPK-TCD1100-036
SPK-TCD-037
SPK-TCD-038
SPK-TCD1100-039
SPK-TCD1100-040
SPK-TCD1100-041
SPK-TCD-042
SPK-TCD-043
SPK-LTCM-006
SPK-TCD-045
SPK-TCD-046
SPK-TCD1100-047
SPK-TCD-048
SPK-TCD1100-049
SPK-TCD1100-050
SPK-TCD-051
SPK-TCD1100-052
SPK-FM200-034
SPK-FM200-022
SPK-LTCM-UK230
SPK-TCD1100-054
SPK-TCD1100-055
SPK-TCD1100-056
SPK-TCD1100-057
SPK-TCD-058
E09-834
Description
Power Entry Module Assy, 5A
Motor Pulley, TCD1100
Power Cord Jumper
Power Outlet Assembly
Jog Wheel Assembly, Calibrated
Transformer Assembly, TCD1100
Switch Plate Assembly
Feet Assembly (8)
Bottom Pan, TCD1100
Frame Support Assembly, TCD1100
Bottom Base, T-slot, TCD1100
Bottom, Eye End, 5/8-inch, Assy
Base Fixture Mount
E-Stop Switch Assembly
Motor Amplifier Cable Assembly
Cable Assembly, Limit Switches
Thumb Screw Assembly (2)
USB Flash Drive, 1GB
Cable, Motor Assembly, TCD1100
Bottom Block Assembly, TCD1100
Load Cell Mounting Adapter
Connection Plate Assy, TCD1100
Power Cord, 115Vac, US Mains Plug
Power Cord, 230Vac, EU Mains Plug
Power Cord, 230Vac, UK Mains Plug
Motor Bracket Plate Assy, TCD1100
Rear Column Extrusion, TCD1100
Back Cover Support Assy, TCD1100
Console Mounting Plate, TCD1100
Console Mount Spacer
5A Fuse (not shown)
Spare Parts Listing
TCD1100 Series
TCD Frame User’s Guide
29
M
K
Dimensions
L
H
N
G
D
B
C
M
J
K
E
A
Machine Dimensions
Ref.
L
F
Work Space Dimensions
TCD110
TCD225
TCD1100
A
27.3” (693mm)
27.3” (693mm)
33.0” (838mm)
B
31.25” (794mm)
C
TCD110
TCD225
TCD1100
K
8.75” (222mm)
9.25” (235mm)
8.2” (209mm)
36.5” (927mm) 47.21” (1199mm)
L
12.2” (310mm)
12.2” (310mm)
12.01” (305mm)
21.9” (556mm)
27.1” (688mm) 35.27” (896mm)
M
14.3” (362mm)
14.3” (362mm)
18.88” (480mm)
D
5.16” (131mm)
5.16” (131mm)
N
E
6.06” (154mm)
6.25” (159mm) 10.87” (276mm)
F
7.51” (191mm)
4.95” (126mm)
8.01” (203mm)
G
1.77” (50mm)
2.125” (54mm)
3.48” (88mm)
H
4.86” (123mm)
4.5” (114mm)
5.41” (137mm)
J
15.0” (380mm)
20.0” (510mm)
30.0” (762mm)
5.16” (131mm)
Ref.
H
G
11.2” (284mm) 12.125” (308mm) 10.89” (277mm)
D
B
C
J
Visit us on the web at www.chatillon.com
Americas
AMETEK
Measurement & Calibration
Technologies
8600 Somerset Drive
Largo, Florida 33773
United States of America
Tel +1-727-536-7831
Tel +1-800-527-9999 (USA Only)
Fax +1-727-539-6882
[email protected]
France
AMETEK S.A.S.
Rond Point de l”Epine des Champs
Buro Plus - Bat. D
78990 Elancourt
France
Tel +33 (0) 1 30 68 89 40
Fax +33 (0) 1 30 68 89 49
[email protected]
Publication: NC003125-10
Issue: October 2008
30
TCD Frame User’s Guide
Germany
AMETEK GmbH
Rudolf-Diesel-Strasse 16
D-40670 Meerbusch
Germany
Tel +49 (0) 2159 9136-0
Fax +49 (0) 2159 9136-39
[email protected]
Singapore
AMETEK Singapore Pte.
Ltd.
10 Ang Mo Kio Street 65
#05-12 Techpoint
Singapore 569059
Tel +65 6484 2388
Fax +65 6481 6588
[email protected]
© 2008 by AMETEK, Inc.
Information within this document is subject to change without notice.
A
United Kingdom
AMETEK
Lloyd Instruments Ltd.
12 Barnes Wallis Road
Segensworth East, Fareham
Hants, PO15 5TT
United Kingdom
Tel +44 (0) 1489 486 399
Fax +44 (0) 1489 885 118
[email protected]
E
ISO9001:2000
ISO/IEC17025
F