1
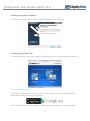
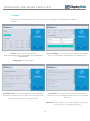
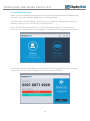
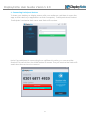
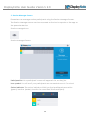
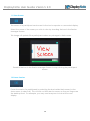
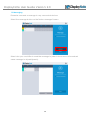
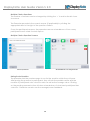
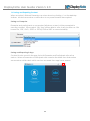
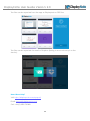
DisplayNote User Guide Version: 2.0
Contents
1. Creating a DisplayNote Account…………………………………………………………...2
2. Downloads…………………………………………………………………………………….…2
2.1. Download for Computer
2.2. Download the App
3. Settings…………………………………………………………………………………………....4
4. Launching DisplayNote……………………………………………………………………….5
5. Connecting a presenter device…………………………………………………………….6
6. Connecting participant devices…………………………………………………………….7
7. Toolbars…………………………………………………………………………………………..8
7.1. Desktop Toolbar
7.2. App Toolbar- Presenter
7.3. App Toolbar-Participant
8. Capturing/Creating Slides……………………………………………………………….…11
8.1. Capturing/Creating Slides as Presenter
8.2. Capturing/Creating Slides as Participant
9. Session Manager Screen…………………………………………………………………….12
10. Collaboration…………………………………………………………………………………..13
11. View Screen……………………………………………………………………………………14
12. Pause Session…………………………………………………………………………………..14
13. Messaging………………………………………………………………………………………15
14. Audio…………………………………………………………………………………………….16
15. Polling……………………………………………………………………………………………17
16. Saving and exporting content……………………………………………………………..22
1
DisplayNote User Guide Version: 2.0
Thank you for choosing DisplayNote. This user guide will give you all the information
you need to get started.
1. Creating a DisplayNote Account
Whether you are starting a free trial or registering a license key; you will need to
create a DisplayNote Presenter Account. Visit:
http://displaynote.com/get-displaynote/
Complete the form on this page and confirm your email address. If you have not
already, download the desktop software (see 2, 2.1 & 2.2) and login using the
account details you have created to start presenting.
2. Downloads
Get the software for your computer. Your computer acts as the host of any
DisplayNote session.
2.1 Download for Computer
Download here:
http://displaynote.com/get-displaynote/downloads/
Minimum Specification:
Recommended Specification:
1.8GHz Processor
1GB Memory
100MB Free Hard Drive Space
Windows XP Home SP3 or Newer
Mac OS X 10.7 or Newer
2.0GHz Dual-Core Processor or Higher
2GB Memory or Higher
500MB Free Hard Drive Space
Windows 7 Home Premium or Newer
Mac OS X 10.7 or Newer
2
DisplayNote User Guide Version: 2.0
Installing DisplayNote- Windows
Follow the on screen instructions to install DisplayNote for Windows.
Installing DisplayNote- Mac
To install DisplayNote on Mac, drag the DisplayNote icon to the application shortcut.
2.2 Download the App
To connect a presenter device or connect participants, you must download the
app from the App Store or Google Play.
Note: Participants can also connect via desktop software (see 2.1 for download)
3
DisplayNote User Guide Version: 2.0
3. Settings
To access the settings click the cog icon on the top right of the DisplayNote splash
screen.
About: Version and login details
Proxy Settings: If you use a proxy, obtain the details
from your network administrator and enter here.
Note: you must be logged in as a Presenter to see your full license
credentials here.
Language: 22 languages
Resolution: You can choose to have the native
resolution of your desktop shared to the connected
devices.
Cloud Services: To use DisplayNote across different
networks ensure the Cloud Services is checked (all
licenses from Version 2.0 support this).
Multicast: If the network you are working on supports
multicast, you can check this box.
4
DisplayNote User Guide Version: 2.0
4. Launching DisplayNote
When you have created your Presenter Account and downloaded the DisplayNote
software, open the desktop application to start presenting.
Click Present if you are sharing content from your desktop. DisplayNote works as a
desktop overlay so you can use any content format.
Note: The first time you present you will be prompted to log in to your Presenter
Account, you can select to ‘Stay Logged In’ in order to avoid logging in every time.
The session will start immediately and a Session ID will be generated. This is a rolling
code which will auto-generating every time your start to Present.
5
DisplayNote User Guide Version: 2.0
If you are using a pre-created DisplayNote file then locate the file using the Open
Content icon.
Once the file is open got to the Session Manager icon and select Present.
5. Connecting a Presenter Device
To connect and present from your iOS or Android device open the DisplayNote app
and select Present (note: you must launch the desktop software first to generate
Session ID).
The first time you present you will be prompted to log in to your Presenter Account,
you can select to ‘Stay Logged In’ in order to avoid logging in every time.
The app will recognise the computers you have started a session on and you can
select the correct one by clicking the green icon.
Alternatively you can type in the Session ID.
6
DisplayNote User Guide Version: 2.0
6. Connecting Participant Devices
To share your desktop or display screen with your audience, ask them to open the
app on their device (or application on their computer). Participants should select
‘Participate’ and enter their name and Session ID number.
Note: If a participant is connecting from a different location you can send the
Session ID via email from the initial Session ID screen. They will receive the Session ID
and instructions on how to connect.
7
DisplayNote User Guide Version: 2.0
7. Toolbars
Desktop Toolbar
Home/Exit, Minimise, Close
Desktop Mouse & Select Tool
Undo/Redo -works for DisplayNote tools
Pen Tool -click twice for extra options
Eraser -click twice for extra options
Notes -opens notepad, select note colour and save note anywhere on screen
Session Manager -presenter only
Backgrounds -click to select any and this will change the background for all
participants. Deselect to go back to desktop
Import -add images from desktop or show feed from inbuilt or external camera/document
camera/webcam
Screen Record
Save- you are also prompted to save when you exit or close the software
Lock Toolbar, Move Toolbar to Left/Right
Floating Toolbar
Session Manager
Active Participants
Session ID
Turn on Audio
View Saved Slides
Slide Capture
Polling Tool
8
Navigate Slides
DisplayNote User Guide Version: 2.0
App Toolbar-Presenter
Home/Exit
Desktop Mouse & Select Tool
Undo/Redo -works for DisplayNote tools
Pen Tool -tap twice for extra options
Eraser -tap twice for extra options
Notes -opens notepad, select note colour and save note anywhere on screen
Camera –take picture using device camera or import from camera roll. This will send to
all participants
Backgrounds -click to select any and this will change the background for all
participants. Deselect to go back to desktop
Export –export current slide as jpeg via email or to Dropbox
Polling Tool –pose questions to participants
Session Manager
Lock Toolbar
PowerPoint Tool
When you open a PowerPoint on your desktop, this toolbar will appear on the
Presenter device:
Open
keyboard
Launch/Close
PowerPoint
Move slides forward/back
9
DisplayNote User Guide Version: 2.0
App Toolbar-Participant
Home/Exit
Desktop Mouse & Select Tool
Undo/Redo -works for DisplayNote tools
Pen Tool -click twice for extra options
Eraser -click twice for extra options
Notes -opens notepad, select note colour and save note anywhere on screen
Camera –take picture using device camera or import from camera roll
Backgrounds -click to select any background. Deselect to go back to desktop
Export –export current slide as jpeg via email or to Dropbox
Message –participant can message presenter
Lock Toolbar
Participant App Icons
Mic
Slides
Scroll Slides
10
DisplayNote User Guide Version: 2.0
8. Capturing and Creating Slides
8.1. Capturing and Creating Slides as Presenter
As a Presenter you can capture slides as you go through a session by clicking the
Capture icon on the desktop or the app:
Capture on desktop
Capture in app
You can also use this method if you are creating slides in advance of a session.
Captured slides can be viewed, recalled and edited during a live session by
selecting the slide icon, or navigating back through slides:
Move back through slides
View all slides
Your captured slides can be saved to your desktop at the end of the session.
Captured slides are auto-saved to your Presenter device.
8.2. Capturing and Creating Slides as Participant
For participants, all slides captured by Presenter in a live session are saved on the
Participant device or can be saved on their desktop.
Participants can capture their own slides at any time by hitting the Capture icon, or
hitting the Return to Presenter icon, which they will see only when they have made
their own notes.
Capture
Return to Presenter
(captures slide and notes)
11
DisplayNote User Guide Version: 2.0
9. Session Manager Screen
Presenters can manage session participants using the Session Manager Screen.
The Session Manager screen can be accessed on the host computer or the app on
the presenter device:
Session manager Icon
Session Manager Screen:
Participant List: Your participant’s name will appear in list, as they join.
Icon symbol: You will see if your participants are connected over wi-fi or cloud
Colour Indicator: The colour indicator will tell you that participants are active
(green), inactive (amber), inactive for more than 30 seconds (red).
12
DisplayNote User Guide Version: 2.0
Session Manager Functions: Presenters can select session manager functions from
the session manager screen.
Collaboration (see Section 10)
View Screen (see section 11)
Audio (see section 14)
Pause (see section 12)
Information: The ‘i’ icon shows the Session ID screen
Message: (see section 13)
10. Collaboration
The Collaboration tool allows you to put one or more Participants into collaboration.
To select someone to collaborate with, check the box beside their name. You can
select more than one person at a time. To Select All, select the downward arrow
below the Collaborate Icon. The participants will receive a notification message on
their device screen.
In collaboration the participants can share:
Pen Tool
Note Tool
Camera Tool
These are added onto the shared screen.
Note: Only presenter can resize these items.
When you have finished collaborating with your participants, you can deselect their
name, or use the up arrow to deselect all. The collaboration screen is seen by
everyone in the session (even if they are not collaborating.) As Presenter, the
Capture button will capture the collaborative work for every connected device and
move the session along.
13
DisplayNote User Guide Version: 2.0
11. View Screen
The screen of a participant can be sent to the host computer or connected display.
Select the name of the screen you wish to view by checking the box in the Session
Manager Screen.
This image will update if the participant makes any changes to their screen.
Deselect the box in the Session Manager Screen to stop viewing the participant
screen.
12. Pause Session
Pause the session for participants by selecting the box beside their names (or the
down arrow to select all.) This will lock out their device screen so they no longer see
the desktop feed. For example, you may want everyone to look at the room
display.
14
DisplayNote User Guide Version: 2.0
13. Messaging
Presenter can send a message to any connected devices.
Select the message button on the Session Manager Screen.
Select who you would like to send the message to (select down arrow to broadcast
same message to all participants).
15
DisplayNote User Guide Version: 2.0
Type the message text in the box and press send.
Participants can reply to your message if required.
Participants can also select the message icon from their toolbar to send a message
to the presenter at any time.
Note: Participants can message the Presenter but not each other.
14. Audio
Presenter can share audio from desktop microphone to connected devices by
selected the microphone icon on the floating toolbar:
If Presenter is logged in via the app, the audio can be shared from the device
microphone by selecting the on screen microphone icon. To stop sharing audio
deselect the audio icon:
16
DisplayNote User Guide Version: 2.0
Audio for Participants
Allow participants to share audio from the device or computer microphone by
selecting the box beside their name in the Session Manager screen.
Participants can request audio by selecting the audio icon on their desktop or app.
Presenter receives a notification and can choose to allow participant to share
audio.
Note: One participant can share audio at a time.
15. Polling
Presenter can pose questions to participants from both the app or computer menu:
Desktop
App
17
DisplayNote User Guide Version: 2.0
There are 5 types of questions that can be posed to connected participants.
Text Question | True/False | Multiple Choice
Rating Scale | Area Plot Question
Note: Presenter can enter question text or pose question verbally and leave text box
blank.
Text Question
Write a question and the correct answer (if applicable) in the available box and
then press the Pose button.
Presenter will then see the number of participants’ answers that are pending, correct
and incorrect. Clicking on these buttons will show a breakdown of participants with
their answer and result. This is applicable for all question types.
Click ‘Share Responses’ to share the result of each of the participants’ answers to
their devices (not necessary).
18
DisplayNote User Guide Version: 2.0
Text Question Screens
Number of Pending/Right/Wrong
(click any of these icons to show breakdown of
responses)
Breakdown of Responses
True/False or Yes/No Question
Enter the question you wish to pose to participants and select a correct answer (if
applicable.) Press ‘Pose’ to send the question to the participants.
True/False Question Screens
Breakdown of Responses
Pose Question
19
DisplayNote User Guide Version: 2.0
Multiple Choice Questions
The number of answers can be changed by clicking the ‘+’ to add or the bin icons
to remove.
The Presenter pre-selects the correct answer (if applicable) by clicking the
appropriate box to the right of the question window.
Once the participants answer, the presenter can see a breakdown of how many
participants have voted for each option.
Multiple Choice Question Screens
Breakdown of Responses
Pose Question
Rating Scale Question
The presenter sets the number range to use for the question which they will pose.
After posing the question to participants, they will see the possible values and the
number of participants who voted for each as well as the average value. Clicking
on the pending answers button will show a breakdown of what each participant has
voted for. Presenter can also see the average/mean feedback.
20
DisplayNote User Guide Version: 2.0
Rating Scale Question Screens
Feedback/Average Response
Pose
Plot Question
This question allows a Presenter to choose either an image or graph to send to
participants with a text instruction on where they should plot their point.
To pose a plot question, choose an image, mark on the image the correct point and
pose to participants. Participants will be asked to replicate that plot point on the
image and submit their answer.
Plot Question Screens
Pose Question
(select image, take picture or choose graph and
mark the correct point then pose question)
Feedback
21
DisplayNote User Guide Version: 2.0
16. Saving and Exporting Content
When a session is finished Presenter can close down by clicking ‘x’ on the desktop
toolbar. All devices receive a notification to say current session has expired.
Saving on Computer
Presenter and participants on computers (Windows or Mac) will be prompted to
save the content. If they select ‘Yes’ they will be able to save in any location as: .DN
Lesson File, .PDF, .PNG, .JPEG or .PPTX (if Office 2007 or newer installed).
Saving and Exporting in App
Content is auto-saved in the app for both Presenter and Participant after a live
session. When a Presenter or Participant exits a session the slides from that session
are saved as a slide deck which can be accessed from app home screen.
22
DisplayNote User Guide Version: 2.0
The files can be exported from the app as DisplayNote or PDF files:
The files can be exported via email or Dropbox (linking to accounts set up on the
device).
Need More Help?
Visit: http://displaynote.com/support/
Email: [email protected]
Call: +44 (0) 2890 730480
23