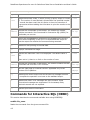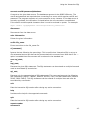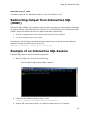
1
DataDirect® OpenAccess™ for ODBC for Salesforce Data Source Installation and User’s Guide November 2008 DataDirect OpenAccess® for ODBC for Salesforce® Data Source Installation and User's Guide Part # OA-SF-V150-DOC-INST © 2008 Progress Software Corporation. All rights reserved. Printed in the U.S.A. DataDirect, DataDirect Connect, DataDirect Connect64, DataDirect Spy, DataDirect Test, DataDirect XML Converters, DataDirect XQuery, OpenAccess, SequeLink, Stylus Studio, and SupportLink are trademarks or registered trademarks of Progress Software Corporation or one of its subsidiaries or affiliates in the United States and other countries. Java and all Java-based trademarks and logos are trademarks or registered trademarks of Sun Microsystems, Inc. in the United States and other countries. MySQL and MySQL Enterprise are registered trademarks of MySQL AB in the United States, the European Union and other countries. Other company or product names mentioned herein may be trademarks or registered trademarks of their respective companies. DataDirect products for the Microsoft SQL Server database: These products contain a licensed implementation of the Microsoft TDS Protocol. DataDirect Connect for ODBC, DataDirect Connect64 for ODBC, and DataDirect SequeLink include: ICU Copyright © 1995-2003 International Business Machines Corporation and others. All rights reserved. Permission is hereby granted, free of charge, to any person obtaining a copy of this software and associated documentation files (the "Software"), to deal in the Software without restriction, including without limitation the rights to use, copy, modify, merge, publish, distribute, and/or sell copies of the Software, and to permit persons to whom the Software is furnished to do so, provided that the above copyright notice(s) and this permission notice appear in all copies of the Software and that both the above copyright notice(s) and this permission notice appear in supporting documentation. Software developed by the OpenSSL Project for use in the OpenSSL Toolkit (http:/www.openssl.org/). Copyright © 1998-2006 The OpenSSL Project. All rights reserved. And Copyright © 1995-1998 Eric Young ([email protected]). All rights reserved. DataDirect SequeLink includes: Portions created by Eric Young are Copyright © 1995-1998 Eric Young ([email protected]). All Rights Reserved. OpenLDAP, Copyright © 1999-2003 The OpenLDAP Foundation, Redwood City, California, US. All rights reserved. DataDirect OpenAccess SDK client for ODBC, DataDirect OpenAccess SDK client for ADO, DataDirect OpenAccess SDK client for JDBC, DataDirect OpenAccess for ODBC for Salesforce Data Source and DataDirect OpenAccess SDK server include: DataDirect SequeLink. No part of this publication, with the exception of the software product user documentation contained in electronic format, may be copied, photocopied, reproduced, transmitted, transcribed, or reduced to any electronic medium or machine-readable form without prior written consent of DataDirect Technologies. Licensees may duplicate the software product user documentation contained on a CD-ROM or DVD, but only to the extent necessary to support the users authorized access to the software under the license agreement. Any reproduction of the documentation, regardless of whether the documentation is reproduced in whole or in part, must be accompanied by this copyright statement in its entirety, without modification Preface About this Manual This manual describes the use, installation, and configuration of the OpenAccess Salesforce Data Source (the Salesforce driver). for ODBC for Specifically, the topics covered include: • Installation and configuration of the Salesforce driver • Testing of the installed components • Using the Salesforce driver Notation Convention The courier font is used for system-dependent keywords and commands to be typed by the user or for code samples and program output. The pipe character ‘|’ is used as a shortcut notation and separator between menus, sub-menus, and items. As an example: ‘File | Open’ means the Open option from the File menu. Technical Support DataDirect Technologies offers a variety of options to meet your technical support needs. Please visit our Web site for more details and for contact information: http://support.datadirect.com The DataDirect Technologies Web site provides the latest support information through our global service network. The SupportLink program provides access to support contact details, tools, patches, and valuable information, including a list of FAQs for each product. In addition, you can search our Knowledgebase for technical bulletins and other information. To obtain technical support for an evaluation copy of the product, go to: http://www.datadirect.com/support/eval_help/index.ssp or contact your sales representative. When you contact us for assistance, please provide the following information: • The serial number that corresponds to the product for which you are seeking support, or a case number if you have been provided one for your issue. If you do not have a SupportLink contract, the SupportLink representative assisting you will connect you with our Sales team. • Your name, phone number, email address, and organization. For a first-time call, you may be asked for full customer information, including location. • The DataDirect product and the version that you are using. • The type and version of the operating system where you have installed your DataDirect product. • Any database, database version, third-party software, or other environment information required to understand the problem. • A brief description of the problem, including, but not limited to, any error messages you have received, what steps you followed prior to the initial occurrence of the problem, any trace logs capturing the issue, and so on. Depending on the complexity of the problem, you may be asked to submit an example or reproducible application so that the issue can be recreated. • A description of what you have attempted to resolve the issue. If you have researched your issue on Web search engines, our Knowledgebase, or have tested additional configurations, applications, or other vendor products, you will want to carefully note everything you have already attempted. • A simple assessment of how the severity of the issue is impacting your organization. Table of Contents INSTALLING THE DATADIRECT OPENACCESS FOR ODBC FOR SALESFORCE DATA SOURCE ............................................................................................................... 1-1 WHAT'S INCLUDED ................................................................................................. 1-1 INSTALLATION OVERVIEW ......................................................................................... 1-2 INSTALLING THE WORKSTATION VERSION....................................................................... 1-2 INSTALLING THE SERVER VERSION ............................................................................... 1-4 REGISTERING THE PRODUCT ...................................................................................... 1-8 Workstation Version ........................................................................................ 1-8 Server Version................................................................................................ 1-9 USING THE SALESFORCE DRIVER ........................................................................ 2-1 OVERVIEW .......................................................................................................... 2-1 ODBC DSN CONFIGURATION .................................................................................... 2-1 Site URL ........................................................................................................ 2-2 Access........................................................................................................... 2-2 MapToLongVarChar ......................................................................................... 2-2 Enable Four Part Naming ................................................................................. 2-2 Trace Options ................................................................................................. 2-2 CREATING A NEW DSN ............................................................................................ 2-3 Creating a new DSN - Workstation .................................................................... 2-3 Creating a new DSN - Server ............................................................................ 2-3 INSERTING RECORDS .............................................................................................. 2-4 JOINING TABLES.................................................................................................... 2-5 WHY ISQL REPORTS ONLY 100 ROWS .......................................................................... 2-5 USING MICROSOFT ACCESS....................................................................................... 2-5 USING LINKED SERVER FROM SQLSERVER ..................................................................... 2-6 Configuring Linked Server to use the Salesforce driver (for SQL Server 2000) ......... 2-6 Configuring Linked Server to use the Salesforce driver (for SQL Server 2005) ......... 2-7 Using four-part query ...................................................................................... 2-9 Using OpenQuery............................................................................................ 2-9 Using OpenRowset .........................................................................................2-10 CONFIGURING THE SALESFORCE DRIVER ........................................................... 3-1 CONFIGURING THE OASQL.INI.................................................................................. 3-1 i DataDirect OpenAccess for ODBC for Salesforce Data Source Installation and User's Guide Common Section ............................................................................................ 3-2 Salesforce Section........................................................................................... 3-2 ENABLING TRACING ................................................................................................ 3-4 DISK CACHE CONFIGURATION .................................................................................... 3-5 When Query Results Are Disk Cached ................................................................ 3-5 How Query Results Are Disk Cached .................................................................. 3-5 Queries That Disable Disk Cache ....................................................................... 3-6 Disk Cache Configuration Parameters ................................................................ 3-6 USING THE INTERACTIVE SQL............................................................................. 4-1 STARTING AND STOPPING INTERACTIVE SQL (ODBC) ....................................................... 4-1 INTERACTIVE SQL COMMAND-LINE SYNTAX .................................................................... 4-1 COMMANDS FOR INTERACTIVE SQL (ODBC) .................................................................. 4-2 REDIRECTING OUTPUT FROM INTERACTIVE SQL (ODBC) .................................................... 4-5 EXAMPLE OF AN INTERACTIVE SQL SESSION ................................................................... 4-5 TROUBLESHOOTING ............................................................................................ 5-1 COMMON ERROR MESSAGES ...................................................................................... 5-1 Connection Errors ........................................................................................... 5-1 INSERT Operation Errors.................................................................................. 5-1 LIST OF TABLES TABLE 3-1: COMMON SECTION SETTINGS ......................................................................... 3-2 TABLE 3-2: SALESFORCE CONFIGURATION SETTINGS ............................................................ 3-2 LIST OF FIGURES FIGURE 1: CLIENT CONFIGURATION ................................................................................ 1-3 FIGURE 2: SERVER CONFIGURATION SCREEN FOR AGENT ....................................................... 1-6 FIGURE 3: SERVER CONFIGURATION SCREEN FOR SERVICE ..................................................... 1-6 FIGURE 4: CLIENT CONFIGURATION ................................................................................ 1-7 FIGURE 5: PRODUCT REGISTRATION - WORKSTATION ........................................................... 1-9 FIGURE 6: REGISTRATION CONFIRMATION - WORKSTATION..................................................... 1-9 FIGURE 7: PRODUCT REGISTRATION - SERVER ...................................................................1-10 FIGURE 8: REGISTRATION CONFIRMATION - SERVER ............................................................1-10 FIGURE 9: ODBC DSN CONFIGURATION DIALOG BOX (WORKSTATION) ..................................... 2-1 FIGURE 10: CREATING A NEW DSN - WORKSTATION ............................................................ 2-3 FIGURE 11: CREATING A NEW DSN - SERVER .................................................................... 2-4 ii i Chapter 1 Installing the DataDirect OpenAccess for ODBC for Salesforce Data Source What's Included The DataDirect OpenAccess for solution includes: ODBC for Salesforce Data Source (the Salesforce driver) • ODBC compliant driver for Salesforce data source for Windows XP, 2003, Vista, and 2008 • Interactive SQL - an interactive SQL application to allow you to query Salesforce database. The Salesforce driver requires: • PC with Microsoft Windows XP, 2003, Vista, or 2008 • .NET Run-time v1.1 or higher • Administrative rights to your system (required to complete the installation) • An Enterprise level subscription to Salesforce.com (the Salesforce driver uses the sforce SOAP API) You can use the Salesforce driver from any application that supports ODBC connectivity. You can also use it from your custom applications written to the Microsoft ODBC specification and linked to the Microsoft ODBC Driver Manager library. The Salesforce driver comes in two versions – Workstation and Server. The Workstation version of the product is a single tier driver that directly interacts with Salesforce.com over the internet. It should be used with desktop installations such as Microsoft Access, Microsoft Excel, Crystal Reports, and other desktop applications. The Server version of the product uses client/server architecture to separate out the ODBC client component and the SQL processing component. In this architecture the Salesforce driver communicates with the OpenAccess Server process that in-turn communicates with 1-1 DataDirect OpenAccess for ODBC for Salesforce Data Source Installation and User's Guide Salesforce.com over the internet. This configuration should be used with SQL Server 2000, 2005, or 2008 or other server based software such as Oracle. Installation Overview This chapter details the steps required for installing the Salesforce driver on Microsoft Windows. Always refer to readme.txt shipped with your software for any updates to this document. Installation of the Salesforce driver involves the following steps: 1. Installing driver files on your system. 2. Testing connectivity to salesforce.com using the Salesforce driver. 3. Using a desktop application such as Microsoft Excel with the Salesforce driver. Installing the Workstation Version Follow the steps in this section to install the Workstation version of the Salesforce driver. Installation is performed by running the setup program and supplying the requested information. The installed software will be fully functional for 15 days from the time of installation. After that you will be required to contact DataDirect to receive instructions for extending the evaluation. NOTE: Version 1.5 can coexist with previous versions of the Salesforce driver. However, if you no longer need a previous version of the Salesforce driver, uninstall it before installing version 1.5. Previous versions used salesforce as the name of the installed ODBC DSN. The setup program performs the following operations: Moves the required files to the specified directory. Adds an ODBC driver named DataDirect OpenAccess for Salesforce (Workstation) 1.5 to the Windows ODBC configuration. Creates a ODBC DSN named salesforce_workstation. Use this DSN from your client applications. 1. Gather the following information: Directory path to which you want to install the software The information about your subscription to salesforce.com: Username and Password 2. Install the workstation driver Download the Workstation driver file oasfodbc32_workstation_1_5_0.exe from the download page and execute it. NOTE: On Windows Vista and Windows Server 2008, the User Account control (UAC) does not display a prompt before starting the installation. To install a product that requires administrator privileges, you must run it with "Run as Administrator". Rightclick the installer executable and choose "Run as Administrator". The Welcome window for the product appears. Click Next t continue. Accept the agreement by clicking the appropriate option. Then, click Next. The Browse for Installation Directory window appears. 1-2 i Installing the Salesforce Driver The Browse for Installation Directory window allows you to change the installation directory from the default location. To change the installation directory, click Browse and select the new installation directory path. Then, click OK to return to the Browse for Installation Directory window. Next, the Salesforce driver configuration screen is displayed. We recommend you accept the defaults. You can change the Data Source Name but do not modify any other fields. If you change the Data Source Name, then use the new name instead of “salesforce_workstation” in steps that refer to “salesforce_workstation”. Click Next to continue. Figure 1: Client Configuration Click Next to accept the default Program Group. Click Next to accept the settings. The setup program will copy the required files to your disk and create a program group with shortcuts for the installed software components. An ODBC System DSN will be created with the name salesforce_workstation. 3. Connect to Salesforce data using the Salesforce driver At this point, you can run the OpenAccess Interactive SQL program to test the Salesforce driver. a. Run Interactive SQL from the DataDirect OpenAccess for ODBC for Salesforce Data Source (Workstation) 1.5 program group by clicking on the Interactive SQL item. b. Connect to the salesforce_workstation data source using your subscription username and password: ISQL> connect "UID"*"PWD"@salesforce_workstation Where UID is replaced by your Salesforce subscription username and PWD with the password. c. Execute a query to test the connection: ISQL> select top 10 name from user; This should generate a list of users from your Salesforce data source. d. Exit by typing exit. 1-3 DataDirect OpenAccess for ODBC for Salesforce Data Source Installation and User's Guide Successful completion of this step indicates the Salesforce driver is set up properly and is able to connect to salesforce.com. 4. Use the Salesforce driver from MS Excel As an example of using an ODBC compliant application to access Salesforce data, here we give step-by-step instructions for using MS Query from MS Excel 2003. a. Start Microsoft Excel 2003 with a new workbook. b. Start MS Query from Excel by selecting menu item Data | Import External Data | New Database Query. The Choose Data Source dialog will appear. c. Uncheck the option Use the Query Wizard to create/edit queries at the bottom of the window. Select the salesforce_workstation DSN name which was added during installation. d. The Logon to OpenAccess Data Source dialog box will appear. Log on using your Salesforce user name and password. Once logged in, you will see the list of tables that are accessible by you in salesforce.com. e. Select the User table and click ADD. Click CLOSE to close the table selection window. Now you can access data from the User table by specifying criteria and the columns to select. To get all the rows and columns in the User table, drag the "*" column into the bottom half of the window. This command may take a while to complete if your system has lots of users. f. Exit MS Query with File | Return Data to Microsoft Excel. g. Select the worksheet location to which you want the data returned. MS Excel will reconnect to the Salesforce driver to execute the query you built in previous steps. The data returned will be shown in the worksheet location selected above. h. Save the Excel workbook to be able to re-execute the same query in the future. Congratulations!!! You have installed the Salesforce driver and have used the ODBC DSN salesforce_workstation to query your Salesforce data. Installing the Server Version Follow the steps in this section to install the Server version of the Salesforce driver. You will first install the server component and then the client component. Installation is performed by running the setup program and supplying the requested information. The installed software will be fully functional for 15 days from the time of installation. After that you will be required to contact DataDirect to receive instructions for extending the evaluation. The setup program performs the following operations: Moves the required files to the specified directory. Adds an ODBC driver named DataDirect OpenAccess for Salesforce (Server) 1.5 to the Windows ODBC configuration. Creates a ODBC DSN named salesforce_server. Use this DSN from your client applications. 1-4 i Installing the Salesforce Driver Installs and registers the OpenAccessSalesforceService and OpenAccessSalesforce_Agent services. These services are setup to start automatically upon reboot. 1. Gather the following information: Directory path to which you want to install the software The information about your subscription to salesforce.com: Username and Password 2. Install the server component Download the server file oasfodbc32_server_1_5_0.exe from the download page and execute it. NOTE: On Windows Vista and Windows Server 2008, the User Account control (UAC) does not display a prompt before starting the installation. To install a product that requires administrator privileges, you must run it with "Run as Administrator". Rightclick the installer executable and choose "Run as Administrator". The Welcome window for the product appears. Click Next to continue. Accept the agreement by clicking the appropriate option. Then, click Next. The Browse for Installation Directory window appears. The Browse for Installation Directory window allows you to change the installation directory from the default location. This is optional. To change the installation directory, click Browse and select the new installation directory path. Then, click OK to return to the Browse for Installation Directory window. Next, the OpenAccess Server Configuration screen is displayed to configure the agent component. On this screen change only the Administrator field. Accept the defaults for the rest of the fields and click Next. 1-5 DataDirect OpenAccess for ODBC for Salesforce Data Source Installation and User's Guide Figure 2: Server Configuration Screen for Agent The OpenAccess Server Configuration screen is displayed to configure the service component. Select the defaults unless you need to run the service at a port different than 60001 and click Next. Figure 3: Server Configuration Screen for Service Click Next to accept the default Program Group. Click Next to accept the settings. The setup program will copy the required files to your disk and create a program group with shortcuts for the installed software components. 3. Install the client Download the client ODBC file oasfodbc32_client_1_5_0.exe from the download page and execute it. The Welcome window for the product appears. Click Next t continue. Accept the agreement by clicking the appropriate option. Then, click Next. The Browse for Installation Directory window appears. 1-6 i Installing the Salesforce Driver The Browse for Installation Directory window allows you to change the installation directory from the default location. To change the installation directory, click Browse and select the new installation directory path. Then, click OK to return to the Browse for Installation Directory window. Next, the Salesforce driver configuration screen is displayed. We recommend you accept the defaults. You can change the Data Source Name but do not modify any other fields. If you change the Data Source Name, then use the new name instead of “salesforce_server” in steps that refer to “salesforce_server”. Click Next to continue. Figure 4: Client Configuration Click Next to accept the default Program Group. Click Next to accept the settings. The setup program will copy the required files to your disk and create a program group with shortcuts for the installed software components. An ODBC System DSN will be created with the name salesforce_server. 4. Connect to salesforce.com using the Salesforce driver At this point, you can run the OpenAccess Interactive SQL program to test the Salesforce driver. a. Run Interactive SQL from the DataDirect OpenAccess for ODBC for Salesforce Data Source (Server)/Client 1.5 program group by clicking on the Interactive SQL item. b. Connect to the salesforce_workstation data source using your subscription username and password: ISQL> connect "UID"*"PWD"@salesforce_server Where UID is replaced by your Salesforce subscription username and PWD with the password. c. Execute a query to test the connection: ISQL> select top 10 name from user; This should generate a list of users from your Salesforce data source. d. Exit by typing exit. 1-7 DataDirect OpenAccess for ODBC for Salesforce Data Source Installation and User's Guide Successful completion of this step indicates the Salesforce driver is set up properly and is able to connect to salesforce.com. 5. Use the Salesforce driver from MS Excel As an example of using an ODBC compliant application to access Salesforce data, here we give step-by-step instructions for using MS Query from MS Excel 2003. a. Start Microsoft Excel 2003 with a new workbook. b. Start MS Query from Excel by selecting menu item Data | Import External Data | New Database Query. The Choose Data Source dialog will appear. c. Uncheck the option Use the Query Wizard to create/edit queries at the bottom of the window. Select the salesforce_server DSN name which was added during installation. d. The Logon to OpenAccess Data Source dialog box will appear. Log on using your Salesforce user name and password. Once logged in, you will see the list of tables that are accessible by you in salesforce.com. e. Select the User table and click ADD. Click CLOSE to close the table selection window. Now you can access data from the User table by specifying criteria and the columns to select. To get all the rows and columns in the User table, drag the "*" column into the bottom half of the window. This command may take a while to complete if your system has lots of users. f. Exit MS Query with File | Return Data to Microsoft Excel. g. Select the worksheet location to which you want the data returned. MS Excel will reconnect to the Salesforce driver to execute the query you built in previous steps. The data returned will be shown in the worksheet location selected above. h. Save the Excel workbook to be able to re-execute the same query in the future. Congratulations!!! You have installed the Salesforce driver and have used the ODBC DSN salesforce_server to query your Salesforce data. Registering the Product The initial installation of the product sets it up for 15 day evaluation period. When you purchase the product, you will be given a serial number and a license key. Use the product registration program as described below to activate your product. Contact sales for instructions on extending the evaluation. Workstation Version 1. Run the Product Registration program from the DataDirect OpenAccess for ODBC for Salesforce Data Source (Workstation) 1.5program group. Enter in the requested information in the Product Registration dialog box and then click Next. 1-8 i Installing the Salesforce Driver Figure 5: Product Registration - Workstation 2. If you entered in the correct serial number and key, a confirmation dialog box is displayed where you need to click Yes to accept to register the specified serial number and key. Figure 6: Registration Confirmation - Workstation Server Version 1. Stop the OpenAccessSalesforceService from the Services management console. The Services management console is opened from the Administrative Tools program group that can is accessed from the Control Panel. 2. Run the Product Registration program from the DataDirect OpenAccess for ODBC for Salesforce Data Source (Server)/Server 1.5program group. Enter in the requested information in the Product Registration dialog box and then click Next. 1-9 DataDirect OpenAccess for ODBC for Salesforce Data Source Installation and User's Guide Figure 7: Product Registration - Server 3. If you entered in the correct serial number and key, a confirmation dialog box is displayed where you need to click Yes to accept to register the specified serial number and key. Figure 8: Registration Confirmation - Server 1-10 i Chapter 2 Using the Salesforce Driver Overview The Salesforce driver leverages the Salesforce Web Services interface to perform read and writes operations. Schema is dynamically generated based on the schema for the current user within Salesforce. Salesforce allows users to add additional objects and attributes and these will be exposed by the Salesforce driver. The Salesforce driver provides the full querying power of SQL to allow joining of data, aggregation, and sorting. Figure 9: ODBC DSN Configuration Dialog Box (Workstation) ODBC DSN Configuration The behavior of the Salesforce driver is controlled by settings in the DSN configuration. This section describes what these settings are. You should not change the Salesforce Service Name or the Salesforce Data Source entries unless asked to do so by a DataDirect support engineer. You modify the ODBC DSN setting by running the ODBC Administration tool from the Control Panel|Administrative Tools or from the Salesforce driver program group. You need to click the System DSN tab and select the DSN associated with the Salesforce driver (salesforce_workstation or salesforce_server). Click on Configure to modify the Configuration. 2-1 DataDirect OpenAccess for ODBC for Salesforce Data Source Installation and User's Guide Site URL Use this setting to connect to your sandbox instead of the production Salesforce server. The valid setting is a URL in the form: https://test.salesforce.com/services/Soap/u/13.0 Leave this field blank to connect to the production Salesforce server located at www.salesforce.com. Access The Salesforce ODBC DSN can be configured to control ReadOnly/ReadWrite access to Salesforce objects. By default the salesforce_workstation and the salesforce_server DSN entries are set up to allow reading and updating the Salesforce data. 1. ReadOnly – In this mode driver does not expose any indexes on the ID and Reference Fields of the Objects. This provides faster access to objects when using from applications such as Microsoft Access. The Salesforce driver also does not permit INSERT/UPDATE/DELETE operations. 2. ReadWrite – In this mode driver exposes Primary Index on the ID fields of all the Salesforce objects and non-unique indexes on Reference fields. This allows user to query for objects using the ID field efficiently. INSERT/UPDATE/DELETE operations are permitted in this mode. MapToLongVarChar This setting controls whether a text column from Salesforce object is mapped to WVARCHAR or WLONGVARCHAR. Some applications, like Microsoft SQL Server, require all text data above 4,000 characters to be returned as WLONGVARCHAR. See the table below for the value to use. The default setting is 0. Application/Functionality SQL Server 2000 (Linked Server) SQL Server 2000 (DTS) SQLServer 2005 (Linked Server) SQLServer 2005 (DTS) MapToLongVarChar Setting 4000 0 4000 0 Enable Four Part Naming Salesforce ODBC DSN configuration by default does not expose QUALIFIER name for the tables. It just exposes Salesforce as the OWNER name. When using the Salesforce driver from SQLServer, QUALIFIER name is required if you want to use the four-part naming feature of Linked Server to refer to external tables. Enable four-part naming to expose SCHEMA as the qualifier. Trace Options Trace Options can be used to enable different levels of tracing in the Workstation version of the Salesforce driver. Refer to the Enabling Tracing for details on enabling tracing in the Server version. For normal usage keep this at “Enable Error Tracing”. The setting should be changed to “Enable Verbose Tracing” to get full set of logs. In some situations the level of tracing has 2-2 i Using the Salesforce Driver to be decreased because the log files can get very large for queries that return lots of data. The log files are placed in the directory logging which is located directly under the product installation directory. For a default installation the log files are located in: C:\Program Files\DataDirect\oaodbcSalesforceWorkstation15\logging. Creating a new DSN This section describes how to create a new ODBC DSN. Creating a new DSN - Workstation 1. Start ODBC data Source Administrator (Control Panel > Administrative Tools > Data Sources (ODBC) ). 2. Click on Add button. 3. Select “DataDirect OpenAccess for Salesforce (Workstation) 1.5” from the available list of ODBC drivers. 4. Clicking on Finish button will bring the following window. Figure 10: Creating a new DSN - Workstation 5. Fill in the Data Source name, Description, and other values. 6. Click on OK to save the DSN. Creating a new DSN - Server 1. Start ODBC data Source Administrator (Control Panel > Administrative Tools > Data Sources (ODBC) ). 2. Click on Add button. 3. Select “DataDirect OpenAccess for Salesforce (Server) 1.5” from the available list of DataSources. 2-3 DataDirect OpenAccess for ODBC for Salesforce Data Source Installation and User's Guide 4. Clicking on Finish button will bring the following window. Figure 11: Creating a new DSN - Server 5. Fill in the Data Source name, Description, and the other fields. The default entries for Service Host and Service Port are localhost and 60001. 6. Click on OK to save the DSN. Inserting Records The Salesforce driver returns the last inserted record's primary key (ID in our case) when a SELECT query with search condition as “Id is NULL” is executed immediately after the INSERT statement. This is the same logic used by MS Access to read the row inserted in a linked table. Below is an example of the query that is generated by MS Access to fill the fields of an inserted row. SELECT "Id","Name","Type","ParentId","BillingStreet","BillingCity","BillingState","Bi llingPostalCode", "BillingCountry","ShippingStreet","ShippingCity","ShippingState","ShippingPost alCode", "ShippingCountry","Phone","Fax","AccountNumber","Website","Sic","Industry","An nualRevenue","NumberOfEmployees","Ownership","TickerSymbol","Description","Rat ing","Site","OwnerId","CreatedDate","CreatedById","LastModifiedDate","LastModi fiedById","SystemModstamp", "UpsellOpportunity__c","SLA__c","SLAExpirationDate__c","SLASerialNumber__c", “NumberofLocations__c", "Active__c","CustomerPriority__c" FROM "Salesforce"."Account" WHERE "Id" IS NULL If you are writing VBA code then you first need to generate an INSERT statement that contains all the required fields, such as OwnerId. The INSERT statement should not specify value for the primary key field Id or other system fields like CreatedDate whose nullable property is false. Then, execute a SELECT statement on that table with a query that has a 2-4 i Using the Salesforce Driver “WHERE ID is NULL” as the where clause. For example, “select id from account where ID is NULL” will return the ID of the newly inserted record. You cannot provide non-null values for fields like Id and CreatedDate whose creatable property is false. These are automatically filled in by Salesforce. An error is reported by Salesforce if you try to provide a non-null value. However, if you supply a NULL value then the Salesforce driver will not supply it to Salesforce and Salesforce will fill it in. The same rules that apply when using the Web Service interface also apply when using the Salesforce driver. Joining Tables One of the advantages of using SQL to access the Saleforce data is the ability to perform joins between the various related objects. For example, you can obtain the list of accounts and contacts by using a query that joins the table Account with the table Contact. select Account.name, Contact.LastName, Contact.FirstName from Account, Contact where Contact.AccountId = Account.id This will generate results: name LastName FirstName Edge Communications Forbes Sean Edge Communications Gonzalez Rose Burlington Textiles Corp of America Rogers Jack … United Oil & Gas Corp. Pavlova Stella United Oil & Gas Corp. Boyle Lauren United Oil & Gas Corp. Song Arthur Why ISQL reports only 100 rows Interactive SQL by default only reports the first 100 rows for a query. You can change this by using maxrows command. Specify 0 as the value to report all the rows. Refer to Chapter 4: Using the Interactive SQL for details on various ISQL command options. ISQL> maxrows 0 Using Microsoft Access When using Microsoft Access with the Salesforce driver in ReadOnly mode, Microsoft Access will prompt user to select unique record identifier. User should click CANCEL and link table. If the Salesforce driver is configured for ReadWrite then the ID field of each table is automatically exposed as a unique index. Exposing indexes changes how MS Access performs the query for external data. For optimal operations, always use a ReadOnly DSN for reading of data. If your application needs to do both, then create one DSN for ReadOnly and another one for ReadWrite and use them accordingly. 2-5 DataDirect OpenAccess for ODBC for Salesforce Data Source Installation and User's Guide Using Linked Server from SQLServer You can configure linked server to allow you to execute distributed queries and distributed transactions on Salesforce objects from SQL Server (2000, 2005, and 2008). The most efficient query execution occurs when OPENQUERY is used to execute a query. This is because four-part queries can get modified by SQL Server before they are sent to the underlying ODBC driver. For example, join queries using the four-part syntax are not sent as-is to the Salesforce driver. Instead, they are executed as individual queries and the join is performed by SQL Server. This will lead to the query executing many times slower than if the entire query had been passed to the ODBC driver. NOTE: Only the Server version of the Salesforce driver is supported for use from SQL Server. Configuring Linked Server to use the Salesforce driver (for SQL Server 2000) 1. Run the Enterprise Manager from the SQL Server. 2. Select security -> Link server. 3. Right click on link server to create a new Linked server. 4. Enter linked server name as "SFDB" a. Select the Provider name as ‘Microsoft OLEDB Provider for ODBC drivers.’ b. Specify the Data Source name as salesforce_server c. Under the Provider Options • Enable: Dynamic Parameters, Allow InProcess • Disable: Nested queries, Level zero only, Non-transacted updates, Index as access path d. Under Server Options. • Select "Collation compatible" option. – This option will delegate filter condition to provider. • Select Data Access, User Remote Collation • Deselect: RPC, RPC Out • Leave Collation Name empty • Leave Connection Timeout and Query Timeout at 0 e. Under the Security tab, select "Be made using this security context" and specify UserName and password of Salesforce.com in the Remote Login and Password fields. You can alternately setup linked server using stored procedure calls: {call sp_addlinkedserver('sfdb', '', 'MSDASQL', 'salesforce_server')}; {call sp_addlinkedsrvlogin('sfdb','false',NULL, '[email protected]', 'userpassword')}; NOTE: Creating the linked server using sp_addlinkedserver does not configure the server options mentioned in step 4d. To delete the linked server, run following commands: 2-6 i Using the Salesforce Driver {call sp_droplinkedsrvlogin('sfdb', NULL)}; {call sp_dropserver('sfdb')}; Configuring Linked Server to use the Salesforce driver (for SQL Server 2005) 1. Run the Microsoft SQL Server Management Studio 2. Under Object Explorer, select Server Objects -> Linked Servers, Right click on linked servers to create a new Linked server. Enter linked server name as "SFDB" 3. Select the Provider name as ‘Microsoft OLEDB Provider for ODBC drivers.’ Specify the Product Name as "DataDirect OpenAccess for ODBC for Salesforce Data Source". Specify the Data Source name as the ODBC DSN that was created by the installer – salesforce_server 4. Select the Server Options on the left side. - Set "Collation compatible" option to True. – This option will delegate filter condition to provider. - Set "Data Access" and "Use Remote Collation" to True. - Set RPC and RPC Out to False - Leave Collation Name empty 2-7 DataDirect OpenAccess for - ODBC for Salesforce Data Source Installation and User's Guide Leave Connection Timeout and Query Timeout at 0 5. Under the Security option, select "Be made using this security context" and specify user name and password of salesforce.com in the Remote Login and Password fields. Now click on OK to create the Linked Server. 2-8 i Using the Salesforce Driver Using four-part query You can use four part query syntax to query Salesforce data source using the linked server. To use four-part query you should modify the Salesforce ODBC DSN configuration to enable Four-part naming and to set the MapLongVarChar to 4000. Sample Queries: select Id, Description, Name from "sfdb"."SCHEMA"."salesforce".Account; select Id, Description, Name from "sfdb"."SCHEMA"."salesforce".Account where Id = '00130000008MbnDAAS'; insert into "sfdb"."SCHEMA"."salesforce".Account(Name, OwnerId) values ('Test New Account-SQLServer', '00530000000cWwPAAU'); update "sfdb"."SCHEMA"."salesforce".Account set Name = 'Test Update-Account SQLServer' where Id = '00130000008q918AAA'; delete from "sfdb"."SCHEMA"."salesforce".Account where Id = '00130000008q918AAA'; Using OpenQuery You can use OpenQuery to execute queries against Salesforce data source using the linked server. This is the recommended way for using the Salesforce driver from SQL Server because it directly passes the query to the Salesforce driver. Sample Queries: select * from OPENQUERY(sfdb, 'select id, name from Account'); select * from OPENQUERY(sfdb, 'select id, name from Account where id = ''00130000008qJ9uAAE'' '); 2-9 DataDirect OpenAccess for ODBC for Salesforce Data Source Installation and User's Guide insert into OPENQUERY(sfdb, 'select Name, OwnerId from Account')(Name, OwnerId) values ('Test New Account-SQLServer', '00530000000cWwPAAU'); update OPENQUERY(sfdb, 'select Id, Name, OwnerId from Account') set Name = 'Test Update Account-SQLServer' where Id = '00130000008sYq4AAE'; delete from OPENQUERY(sfdb, 'select Id, Name, OwnerId from Account') where id = '00130000008qJ9uAAE'; Using OpenRowset You can directly use OpenRowset query syntax to query the Salesforce data source. This does not require linked server configuration. select * from OPENROWSET ('MSDASQL','DSN=salesforce_server;[email protected];PWD=userpass', 'select name from Account'); 2-10 i Chapter 3 Configuring the Salesforce Driver This chapter details the configuration of the Salesforce driver. Reference this chapter to modify the configuration that was set up during the initial install of your software. Refer to this section for: turning on trace to assist in diagnosing a problem setting disk cache parameters changing ODBC properties to customize the Salesforce driver setting DSN-less connection Configuring the OASQL.INI The oasql.ini file contains configuration information that is used by the OpenAccess SQL engine. Initial settings are configured during installation and can later be modified by editing this file. The configuration in Salesforce section of the oasql.ini can be changed by editing the file using a text editor such as notepad. Each line in the file either contains a section name in [section] format or a symbol=value entry. Each symbol/value pair is under a section heading. A semicolon (;) in front of a line is used to comment out that line. In the Workstation version the oasql.ini file is located at $install_dir\ip\bin. In the Server version the oasql.ini file is located in the ip\bin directory of the server component. The changes will take affect on next connection. 3-1 DataDirect OpenAccess for ODBC for Salesforce Data Source Installation and User's Guide Common Section This section contains settings used to control the disk cache, join processing, and logging. Table 3-1: Common Section Settings Entry Description Default Value CacheMemSize It describes threshold for result set in terms of KB of result set size. If result set size exceeds this value then DAM starts disk caching of records. See Disk Cache Configuration for more details. 8192 CacheOptions It contains parameters for controlling the location and size of the cache data file. It is made up of attribute=value pairs. All attribute names are in UPPERCASE. See Disk Cache Configuration for more details. Disk cache is disabled if this entry is not present or if you are not licensed for it. FETCHBLOCK_SIZE Controls how many rows of data are fetched across the network at each time. Controls how many rows of inner table data are retrieved in one query during Block Join Processing. Controls the size of a log generated by the OpenAccess SQL engine. The maximum log file size is set in Kilobytes. Default value is 8192. If you want to make log file size unlimited then set this value to 0. Tracing will stop after reaching the maximum limit. JOINBLOCK_SIZE LogFileMaxSize 100 10 8192 Salesforce Section These settings are used to control the features of the Salesforce driver that are not controlled by the settings in the DSN setup dialog box. Table 3-2: Salesforce Configuration Settings Entry Description Default Value (If no entry) AllowNullsAll Controls whether the nullable property of the field is used or it is always set to allow NULLs. 0 0 – Use the information from Salesforce.com 1 – Mark all columns as allowing NULLs BulkDeleteBlockSize Set this to a value between 1 and 200 to control how many rows are deleted in each batch. If value is <= 0, it will be set to 1.If value in > 200, it will set to 200.This will be traced in log file. 100 BulkUpdateBlockSize Set this to a value between 1 and 200 to control how many rows are updated in each batch. The default value is 100. If value is <= 0, it will be set to 1. If value in > 200, it will set to 200. This will be traced in log file. 100 Index We expose Primary Key (unique index) on “id” field type and non-unique index on “reference” fields. Both these indexes are single column indexes. -1 We can choose to disable Indexes when driver is in ReadWrite mode to speed up read access. -1 = Not Set. Access Mode of the ODBC DSN will control 3-2 i Configuring the Salesforce Driver Entry Description Default Value (If no entry) the behavior. 1 = Enabled 0 = Disable ProxyDomain Domain name of your proxy server ProxyHost Your Proxy server host IP Address ProxyPassword Password to connect to your proxy server ProxyPort The port number your Proxy server is running on. ProxyUsername Username to connect to your proxy server QueryBatchSize Set this parameter to a value between 0 and 2000 to control how many rows are returned in each query call to salesforce.com server. 0 0 = Driver will not explicitly set the QueryBatchSize and Salesforce.com will use the default value which at this time is 2000. 1-2000 = value will be used as QueryBatchSize . Readonly Driver supports Update operations on all tables (INSERT, UPDATE, DELETE). But driver can be forced to support only read-only operations -1 -1 = Not set. AccessMode of the ODBC DSN will control the behavior. 1 = Readonly 0 = Read and Update SessionTimeout How long to wait for a response from a web service call over the internet. The value is in milliseconds. 300000 TableRowSetLimit The number of rows in inner table which is used as a limit to enable caching of table rows to process the entire query. We refer to this as processing the inner table as Table Rowset. Any table whose size is less than this parameter value will be processed as TableRowset and this will reduce the number of calls to salesforce.com for the table data. Increasing the limit value will cause driver to use more memory to cache the results. Set this value based on memory available on the system. 50 TimeOutRetryCount Set this parameter to a value between 1 and 32,000 to control how many time connections to the salesforce.com server is attempted. The default value is 5. Set the value of this parameter to 0 to disable connection retry. 5 The re-connect logic will attempt to re-establish a web service session with Salesforce.com for the number of times indicated by this parameter. UseProxy If you are connecting to Salesforce.com using an internet proxy server, then UseProxy option needs to be enabled. 0 1 = Enabled 0 = Disable 3-3 DataDirect OpenAccess for ODBC for Salesforce Data Source Installation and User's Guide Enabling Tracing The Salesforce driver supports extensive logging to a file to allow the developer and/or support engineer to troubleshoot. In the Workstation version the tracing is enabled from the ODBC DSN setup dialog box. Refer to Trace Options in Chapter 2 for enabling tracing in the Workstation version. In the Server version the tracing is enabled by using the Management Console to configure the ServiceIPLogOption service attribute of the OpenAccessSalesforceService. To configure logging: 1. Run the Management Console from the DataDirect OpenAccess for ODBC for Salesforce Data Source (Server) 1.5/Server program group. 2. Right-click the OpenAccess Agent in the left pane and select Connect from the pop-up window. 3. If a user name and password is required to connect to the OpenAccess Agent, the OpenAccess SDK Management Console will prompt you for that information. Enter the appropriate user name and password in the connection dialog box and click OK. The user name is the one that was specified as the administrator during the installation. 4. Login and select the OpenAccessSalesforceService. 5. Select the Configuration node. 6. Select the Service Settings node. 7. Select the Logging attribute category. 3-4 i Configuring the Salesforce Driver 8. Change the properties for the ServiceIPLogOption service attribute. Selecting Enable Verbose Tracing logs all possible debug information. Start off with this level and reduce it to Full Tracing or Major Events Tracing if the amount of information written or the time taken to finish the queries is not acceptable. 9. Save the configuration file. Next connection will use this setting. The log files are written to the logging directory under where the server component is installed. Disk Cache Configuration The Data Access Manager (DAM) uses disk storage for processing large result sets instead of consuming excessive memory. This note explains which queries are cached to disk, how we store the results on the disk, and the configuration parameters that control the disk cache module. When Query Results Are Disk Cached Results are cached to disk when they exceed the memory size as specified by the configuration parameters. We refer to this parameter as CacheMemSize. A query that includes post-processing options like ORDER BY, GROUP BY, DISTINCT clauses requires that SQL engine retrieves the entire result set and then perform the ORDER BY or GROUP BY processing. If this result set is large, then results will be disk cached and the post-processing option will be processed on disk and results will be retrieved from disk as requested by the client application. This avoids large memory requirement. How Query Results Are Disk Cached Results are written to a file referred to as the CacheData file that is created uniquely per connection. So if a user attempts to execute multiple queries that have large result sets, all these results will be stored in the same cache file. The CacheData file is created when we need to cache results of a query and is used for all queries on that connection. The CacheData file is deleted when the user disconnects. The CacheData file is created using the 3-5 DataDirect OpenAccess for ODBC for Salesforce Data Source Installation and User's Guide configuration parameters that control its initial size, the increment size and the maximum size to which it is allowed to grow. If a result set requires sorting, two additional files Sort1 and Sort2 are created with the same size as the CacheData file and are deleted after completing the sort operation. Based on how many concurrent connections are expected that may require disk caching, you need to reserve disk space sufficient for these cache files. Queries That Disable Disk Cache The results of the following queries will not be cached to disk even if they have large result sets: • Query with UNION : SELECT * FROM emp UNION SELECT * FROM dept • Nested Queries: INSERT INTO newemp SELECT * FROM emp – results of emp table cannot be disk cached SELECT * FROM emp WHERE deptno IN (SELECT deptno FROM dept) – Only results of EMP table can be disk cached. Not results of DEPT table. • In JOIN queries, only the final results are disk cached, not results of the individual tables involved. • ORDER BY is not supported on VARCHAR fields longer than 255 characters and LONGVARBINARY fields. Disk Cache Configuration Parameters The disk cache module uses the following parameters from the configuration file oasql.ini. These parameters should be set up in the Common section of the configuration file. Sample configuration file: [Common] CacheOptions=PATH=C:\Program Files\DataDirect\oaodbcSalesforceWorkstation15\ip\cache;INITIAL_SIZE=10;INCREMENT_SIZE=5;MAX_SIZE =50;DATABLOCK_SIZE=64 CacheMemSize=32768 CacheMemSize: It describes threshold for result set in terms of KB of result set size. If result set size exceeds this value then DAM starts disk caching of records. CacheOptions: It contains parameters for controlling the location and size of the cache data file. It is made up of attribute=value pairs. All attribute names are in UPPERCASE. 3-6 i • PATH: It describes the path to store CacheData and Sort file(s). • INITIAL_SIZE: It describes initial size of file in megabytes (Mb). We recommend that you estimate this size to allow most results to be saved without having to expand it too many times. Default is 10MB. • INCREMENT_SIZE: It describes next increment size of the file (in Mb). Default is 5 MB. • MAX_SIZE: It describes maximum allowable size of the file (in Mb). Default is 50 MB. • DATABLOCK_SIZE: Block size of the file (in Kb). We recommend that keep this size tune with operating system file buffer size for better performance. If we Configuring the Salesforce Driver increase the size of this parameter then performance becomes better. This size determines how DAM writes and read records from the cache file. Default size is 64Kb. Maximum size is 64Kb. 3-7 Chapter 4 Using the Interactive SQL The Interactive SQL uses a command line interface to connect to a data source, execute SQL statements, and retrieve results for display on a terminal. The tools can also be used to verify installation and to execute SQL commands interactively or from a file. ODBCISQL supports a command line interface to connect to a data source, execute SQL statements, and retrieve results for display on a terminal. The command format to run a SQL statement to query or modify a data source is a SQL statement terminated by a semicolon: ISQL> SQL_statement; Starting and Stopping Interactive SQL (ODBC) 1. Start ODBCISQL using either of the following methods: o Double-click Interactive SQL (ODBC) in the DataDirect OpenAccess for ODBC for Salesforce Data Source program group. o From a command prompt change to the directory where the Salesforce driver is installed and execute the ODBCISQL program. 2. The Interactive SQL (ODBC) window appears. Type a command at the ISQL> prompt. Terminate SQL statements with a semicolon. 3. Exit ODBCISQL by typing exit at the ISQL> prompt. Interactive SQL Command-line Syntax ODBCISQL supports the following command line syntax: odbcisql [-c cmdfile] ] [-n ncmdfile] [-v] [-e] [-h] [-b count] [-q] [-t] -f] [-p codepage] 4-1 DataDirect OpenAccess for ODBC for Salesforce Data Source Installation and User's Guide ODBCISQL Command Line Options Option -b count Description Example Enables benchmark mode, in which printing of query results is turned -b 1000 off. The number of rows fetched is printed after the specified number of records has been read. Use this option to time the execution of large queries without adding the time taken to print the results to the screen. -c Executes the commands in the cmdfile. The cmdfile can contain cmdfile multiple commands. See Commands for Interactive SQL (ODBC) for commands you can use. -c test.sql -e Echoes the command being executed to the standard out. Use this option when ODBCISQL is set up to run automated test scripts so that the output file contains the command being executed. -e -f Enables full hex printing of Unicode data. -f -h Displays command line usage. -h -m count Specifies the maximum rows to be displayed. The default value is 100. -m 1000 When set to 0, there is no limit on the number of rows. -n Executes the commands in the cmdfile. The cmdfile contains Unicode -n cmdfile commands and must be in UTF-8 format. utest.sql -p Sets the code page for windows console. Applicable only to the Windows 32-bit platform. -p Codepage -q Enables quiet mode. Output such as the start up message and time to complete the operation is not sent to the standard output. -q -t Enables test mode. Error messages are sent to stdout. Some informational messages are suppressed. For timestamp fields, fractional seconds are not reported. -t -v Specifies print version information. -v Commands for Interactive SQL (ODBC) This section describes the commands available when using ODBCISQL. cmdfile file_name Reads the commands from the given command file. 4-2 Using the Interactive SQL connect userID*password@database Connects to the given data source. The database argument is the ODBC DSN entry. The userID and password are required when connecting to a server which requires userID and password. The program supports only one connection at any instance. If the data source is currently connected, the connection is closed before the new connection is established. If the userID contains special characters then it must be enclosed in quotes. For example: ISQL> connect “[email protected]”*test@salesforce_workstation disconnect Disconnects from the data source. echo information Echoes the given information. errfile file_name Errors are written to the file_name file. # [comment] Ignores the text following the pound sign. This is useful when Interactive SQL is set up to run automated test scripts that can be documented with comment lines. Note that if the -e option is enabled then the comment will be echoed to the standard out. exec sql_stmt; or !sql_stmt; Executes the given SQL statement. The SQL statement can be entered on multiple lines and must be terminated by a semicolon. sql_smt; Executes only the supported set of SQL statements. This command supports the following DML statements (SELECT, INSERT, UPDATE, DELETE, CALL) and DDL statements (CREATE TABLE, DROP TABLE). The SQL statement can be entered on multiple lines and must be terminated by a semicolon. exit Ends the interactive SQL session after closing any active connection. help Provides online help for the supported commands. quit Ends the interactive SQL session after closing any active connection. repeat number command 1 4-3 DataDirect OpenAccess for ODBC for Salesforce Data Source Installation and User's Guide ... end Repeats the given commands for the specified number of times. Any supported command can be repeated, except another repeat command. command n timer start Starts the timer. Any previous timer operation will be reset. timer stop Stops the recently started timer and reports the number of seconds elapsed. resfile {file_name} Logs the results to the specified file. If the file name is not specified, the command logs the results to standard output. wait num_of_secs Waits for the specified number of seconds. autocommit [on | off] Turns on/off auto commit mode. commit Writes pending changes to the database. rollback Rolls back changes to the database. customconnect Connects with a custom connect string, using the following syntax: Customconnect "Driver=name;Database=name; connect_string=value; type=value; schema_path=value;UID=userid;PWD=password" ncmdfile file_name Reads the Unicode commands from the given command file. The command file must be in UTF-8 format. querytimeout num_of_secs Query timeout for the specified number of seconds. The default is 0. There is no timeout. 4-4 Using the Interactive SQL maxrows num_of_rows Truncates rowset at the specified number of rows. The default is 100. Redirecting Output from Interactive SQL (ODBC) Interactive SQL (ODBC) can be easily used from other processes to execute SQL commands to retrieve results, using redirection to execute. This is facilitated by having Interactive SQL (ODBC) output its results and errors to stdout and stderr respectively: • All results, including the column names and the output values, are sent to the stdout. • An error in executing a query is sent to stderr. For example, the following command executes queries from a test.sql file and sends the outputs to output.txt and errors to errors.txt: odbcisql -c test.sql > output.txt 2> errors.txt Example of an Interactive SQL Session A typical ISQL session uses the following sequence: 1. Start the ISQL tool. Do one of the following: The Interactive SQL prompt ISQL> appears. 2. Connect to the Salesforce data source. Type: connect “[email protected]”*pwd@salesforce_workstation; 3. Issue a SQL command to query or modify the data source. For example: 4-5 DataDirect OpenAccess for ODBC for Salesforce Data Source Installation and User's Guide SELECT TOP 10 name FROM user; 4. Disconnect from the data source. Type: disconnect; 5. Exit from the ISQL program. Type: exit; 4-6 Chapter 5 Troubleshooting This chapter provides assistance in troubleshooting. Common Error Messages In this section we cover common error messages and how to resolve them. Connection Errors [DataDirect][ODBC Salesforce driver][Salesforce SQL]INVALID_LOGIN: Invalid username, password, security token; or user locked out. Verify that username and password are valid. You may need to use a security token with your password. INSERT Operation Errors [DataDirect][ODBC Salesforce driver][Salesforce SQL]Integrity constraint violation. Value is not specified for NON-NULLABLE column:OwnerId. This error occurs if INSERT query does not specify values for all the fields whose nillable property is false. Example: insert into account (Name) values ('Error. INSERT Name'); [DataDirect][ODBC Salesforce driver][Salesforce SQL]Insert operation failed. Error Message:<Unable to create/update fields: Id. Please check the security settings of this field and verify that it is read/write for your profile.>. This error occurs if INSERT query specifies Non-NULL value for fields whose createable property is FALSE. Example: insert into account (id, name, ownerid) values ('aaa', 'Error. INSERT Name', '00530000000cWwPAAU' 5-1