1
Installation Guide
Sun™ ONE Portal Server
Version 6.2
816-6754-10
March 2004
Copyright © 2003 Sun Microsystems, Inc., 4150 Network Circle, Santa Clara, California 95054, U.S.A. All rights reserved.
Sun Microsystems, Inc. has intellectual property rights relating to technology embodied in the product that is described in this document. In
particular, and without limitation, these intellectual property rights may include one or more of the U.S. patents listed at
http://www.sun.com/patents and one or more additional patents or pending patent applications in the U.S. and in other countries.
THIS PRODUCT CONTAINS CONFIDENTIAL INFORMATION AND TRADE SECRETS OF SUN MICROSYSTEMS, INC. USE, DISCLOSURE
OR REPRODUCTION IS PROHIBITED WITHOUT THE PRIOR EXPRESS WRITTEN PERMISSION OF SUN MICROSYSTEMS, INC.
U.S. Government Rights - Commercial software. Government users are subject to the Sun Microsystems, Inc. standard license agreement and
applicable provisions of the FAR and its supplements.
This distribution may include materials developed by third parties.
Parts of the product may be derived from Berkeley BSD systems, licensed from the University of California. UNIX is a registered trademark in the
U.S. and in other countries, exclusively licensed through X/Open Company, Ltd.
Sun, Sun Microsystems, the Sun logo, Java, Solaris, JDK, Java Naming and Directory Interface, JavaMail, JavaHelp, J2SE, iPlanet, the Duke logo,
the Java Coffee Cup logo, the Solaris logo, the SunTone Certified logo and the Sun ONE logo are trademarks or registered trademarks of Sun
Microsystems, Inc. in the U.S. and other countries.
All SPARC trademarks are used under license and are trademarks or registered trademarks of SPARC International, Inc. in the U.S. and other
countries. Products bearing SPARC trademarks are based upon architecture developed by Sun Microsystems, Inc.
Legato and the Legato logo are registered trademarks, and Legato NetWorker, are trademarks or registered trademarks of Legato Systems, Inc.
The Netscape Communications Corp logo is a trademark or registered trademark of Netscape Communications Corporation.
The OPEN LOOK and Sun(TM) Graphical User Interface was developed by Sun Microsystems, Inc. for its users and licensees. Sun acknowledges
the pioneering efforts of Xerox in researching and developing the concept of visual or graphical user interfaces for the computer industry. Sun
holds a non-exclusive license from Xerox to the Xerox Graphical User Interface, which license also covers Sun's licensees who implement OPEN
LOOK GUIs and otherwise comply with Sun's written license agreements.
Products covered by and information contained in this service manual are controlled by U.S. Export Control laws and may be subject to the
export or import laws in other countries. Nuclear, missile, chemical biological weapons or nuclear maritime end uses or end users, whether direct
or indirect, are strictly prohibited. Export or reexport to countries subject to U.S. embargo or to entities identified on U.S. export exclusion lists,
including, but not limited to, the denied persons and specially designated nationals lists is strictly prohibited.
DOCUMENTATION IS PROVIDED "AS IS" AND ALL EXPRESS OR IMPLIED CONDITIONS, REPRESENTATIONS AND WARRANTIES,
INCLUDING ANY IMPLIED WARRANTY OF MERCHANTABILITY, FITNESS FOR A PARTICULAR PURPOSE OR NON-INFRINGEMENT,
ARE DISCLAIMED, EXCEPT TO THE EXTENT THAT SUCH DISCLAIMERS ARE HELD TO BE LEGALLY INVALID.
_______________________________________________________________________________________________________________
Copyright © 2003 Sun Microsystems, Inc., 4150 Network Circle, Santa Clara, California 95054, Etats-Unis. Tous droits réservés.
Sun Microsystems, Inc. détient les droits de propriété intellectuels relatifs à la technologie incorporée dans le produit qui est décrit dans ce
document. En particulier, et ce sans limitation, ces droits de propriété intellectuelle peuvent inclure un ou plus des brevets américains listés à
l'adresse http://www.sun.com/patents et un ou les brevets supplémentaires ou les applications de brevet en attente aux Etats - Unis et dans les
autres pays.
CE PRODUIT CONTIENT DES INFORMATIONS CONFIDENTIELLES ET DES SECRETS COMMERCIAUX DE SUN MICROSYSTEMS, INC.
SON UTILISATION, SA DIVULGATION ET SA REPRODUCTION SONT INTERDITES SANS L AUTORISATION EXPRESSE, ECRITE ET
PREALABLE DE SUN MICROSYSTEMS, INC.
Cette distribution peut comprendre des composants développés par des tierces parties.
Des parties de ce produit pourront être dérivées des systèmes Berkeley BSD licenciés par l'Université de Californie. UNIX est une marque
déposée aux Etats-Unis et dans d'autres pays et licenciée exclusivement par X/Open Company, Ltd.
Sun, Sun Microsystems, le logo Sun, Java, Solaris, JDK, Java Naming and Directory Interface, JavaMail, JavaHelp, J2SE, iPlanet, le logo Duke, le
logo Java Coffee Cup, le logo Solaris, le logo SunTone Certified et le logo Sun[tm] ONE sont des marques de fabrique ou des marques déposées
de Sun Microsystems, Inc. aux Etats-Unis et dans d'autres pays.
Toutes les marques SPARC sont utilisées sous licence et sont des marques de fabrique ou des marques déposées de SPARC International, Inc. aux
Etats-Unis et dans d'autres pays. Les produits portant les marques SPARC sont basés sur une architecture développée par Sun Microsystems, Inc.
Le logo Netscape Communications Corp est une marque de fabrique ou une marque déposée de Netscape Communications Corporation.
L'interface d'utilisation graphique OPEN LOOK et Sun(TM) a été développée par Sun Microsystems, Inc. pour ses utilisateurs et licenciés. Sun
reconnaît les efforts de pionniers de Xerox pour la recherche et le développement du concept des interfaces d'utilisation visuelle ou graphique
pour l'industrie de l'informatique. Sun détient une license non exclusive de Xerox sur l'interface d'utilisation graphique Xerox, cette licence
couvrant également les licenciés de Sun qui mettent en place l'interface d'utilisation graphique OPEN LOOK et qui, en outre, se conforment aux
licences écrites de Sun.
Les produits qui font l'objet de ce manuel d'entretien et les informations qu'il contient sont regis par la legislation americaine en matiere de
controle des exportations et peuvent etre soumis au droit d'autres pays dans le domaine des exportations et importations. Les utilisations finales,
ou utilisateurs finaux, pour des armes nucleaires, des missiles, des armes biologiques et chimiques ou du nucleaire maritime, directement ou
indirectement, sont strictement interdites. Les exportations ou reexportations vers des pays sous embargo des Etats-Unis, ou vers des entites
figurant sur les listes d'exclusion d'exportation americaines, y compris, mais de maniere non exclusive, la liste de personnes qui font objet d'un
ordre de ne pas participer, d'une facon directe ou indirecte, aux exportations des produits ou des services qui sont regi par la legislation
americaine en matiere de controle des exportations et la liste de ressortissants specifiquement designes, sont rigoureusement interdites.
LA DOCUMENTATION EST FOURNIE "EN L'ETAT" ET TOUTES AUTRES CONDITIONS, DECLARATIONS ET GARANTIES EXPRESSES
OU TACITES SONT FORMELLEMENT EXCLUES, DANS LA MESURE AUTORISEE PAR LA LOI APPLICABLE, Y COMPRIS NOTAMMENT
TOUTE GARANTIE IMPLICITE RELATIVE A LA QUALITE MARCHANDE, A L'APTITUDE A UNE UTILISATION PARTICULIERE OU A
L'ABSENCE DE CONTREFACON.
Contents
List of Figures . . . . . . . . . . . . . . . . . . . . . . . . . . . . . . . . . . . . . . . . . . . . . . . . . . . . . . . . . . . . . . . . . 7
List of Tables . . . . . . . . . . . . . . . . . . . . . . . . . . . . . . . . . . . . . . . . . . . . . . . . . . . . . . . . . . . . . . . . . . 9
List of Procedures . . . . . . . . . . . . . . . . . . . . . . . . . . . . . . . . . . . . . . . . . . . . . . . . . . . . . . . . . . . . . 11
About This Guide . . . . . . . . . . . . . . . . . . . . . . . . . . . . . . . . . . . . . . . . . . . . . . . . . . . . . . . . . . . . . 13
Who Should Read This Book . . . . . . . . . . . . . . . . . . . . . . . . . . . . . . . . . . . . . . . . . . . . . . . . . . . . . . . . . . . . .
What You Need to Know . . . . . . . . . . . . . . . . . . . . . . . . . . . . . . . . . . . . . . . . . . . . . . . . . . . . . . . . . . . . . . . .
How This Book is Organized . . . . . . . . . . . . . . . . . . . . . . . . . . . . . . . . . . . . . . . . . . . . . . . . . . . . . . . . . . . .
Document Conventions Used in This Guide . . . . . . . . . . . . . . . . . . . . . . . . . . . . . . . . . . . . . . . . . . . . . . .
Monospaced Font . . . . . . . . . . . . . . . . . . . . . . . . . . . . . . . . . . . . . . . . . . . . . . . . . . . . . . . . . . . . . . . . . . .
Bold Monospaced Font . . . . . . . . . . . . . . . . . . . . . . . . . . . . . . . . . . . . . . . . . . . . . . . . . . . . . . . . . . . . . . .
Italicized Font . . . . . . . . . . . . . . . . . . . . . . . . . . . . . . . . . . . . . . . . . . . . . . . . . . . . . . . . . . . . . . . . . . . . . . .
Command-Line Prompts . . . . . . . . . . . . . . . . . . . . . . . . . . . . . . . . . . . . . . . . . . . . . . . . . . . . . . . . . . . . .
Variables . . . . . . . . . . . . . . . . . . . . . . . . . . . . . . . . . . . . . . . . . . . . . . . . . . . . . . . . . . . . . . . . . . . . . . . . . . .
Related Third-Party Web Site References . . . . . . . . . . . . . . . . . . . . . . . . . . . . . . . . . . . . . . . . . . . . . . . . . .
Accessing Sun Documentation Online . . . . . . . . . . . . . . . . . . . . . . . . . . . . . . . . . . . . . . . . . . . . . . . . . . . .
Where to Find This Guide Online . . . . . . . . . . . . . . . . . . . . . . . . . . . . . . . . . . . . . . . . . . . . . . . . . . . . . . . .
13
14
14
15
15
16
16
16
16
17
17
18
Chapter 1 Planning the Installation . . . . . . . . . . . . . . . . . . . . . . . . . . . . . . . . . . . . . . . . . . . . . 19
Sun ONE Portal Server Overview . . . . . . . . . . . . . . . . . . . . . . . . . . . . . . . . . . . . . . . . . . . . . . . . . . . . . . . . 19
Sun ONE Portal Server Components . . . . . . . . . . . . . . . . . . . . . . . . . . . . . . . . . . . . . . . . . . . . . . . . . . . 20
Installation Guidelines . . . . . . . . . . . . . . . . . . . . . . . . . . . . . . . . . . . . . . . . . . . . . . . . . . . . . . . . . . . . . . . 21
Migration Guidelines . . . . . . . . . . . . . . . . . . . . . . . . . . . . . . . . . . . . . . . . . . . . . . . . . . . . . . . . . . . . . . . . 22
Upgrade Guidelines . . . . . . . . . . . . . . . . . . . . . . . . . . . . . . . . . . . . . . . . . . . . . . . . . . . . . . . . . . . . . . . . . 22
Installation Scenarios . . . . . . . . . . . . . . . . . . . . . . . . . . . . . . . . . . . . . . . . . . . . . . . . . . . . . . . . . . . . . . . . 22
Open Mode . . . . . . . . . . . . . . . . . . . . . . . . . . . . . . . . . . . . . . . . . . . . . . . . . . . . . . . . . . . . . . . . . . . . . . 22
3
Secure Mode . . . . . . . . . . . . . . . . . . . . . . . . . . . . . . . . . . . . . . . . . . . . . . . . . . . . . . . . . . . . . . . . . . . . .
System Requirements . . . . . . . . . . . . . . . . . . . . . . . . . . . . . . . . . . . . . . . . . . . . . . . . . . . . . . . . . . . . . . . . . . .
Operating System Requirements . . . . . . . . . . . . . . . . . . . . . . . . . . . . . . . . . . . . . . . . . . . . . . . . . . . . . . .
Hardware Requirements . . . . . . . . . . . . . . . . . . . . . . . . . . . . . . . . . . . . . . . . . . . . . . . . . . . . . . . . . . . . .
Required Software Components . . . . . . . . . . . . . . . . . . . . . . . . . . . . . . . . . . . . . . . . . . . . . . . . . . . . . . .
The Sun ONE Portal Server . . . . . . . . . . . . . . . . . . . . . . . . . . . . . . . . . . . . . . . . . . . . . . . . . . . . . . . .
The Gateway . . . . . . . . . . . . . . . . . . . . . . . . . . . . . . . . . . . . . . . . . . . . . . . . . . . . . . . . . . . . . . . . . . . . .
The Netlet Proxy . . . . . . . . . . . . . . . . . . . . . . . . . . . . . . . . . . . . . . . . . . . . . . . . . . . . . . . . . . . . . . . . . .
The Rewriter Proxy . . . . . . . . . . . . . . . . . . . . . . . . . . . . . . . . . . . . . . . . . . . . . . . . . . . . . . . . . . . . . . .
Browser Recommendations . . . . . . . . . . . . . . . . . . . . . . . . . . . . . . . . . . . . . . . . . . . . . . . . . . . . . . . . . . .
Sun ONE Portal Server Checklists . . . . . . . . . . . . . . . . . . . . . . . . . . . . . . . . . . . . . . . . . . . . . . . . . . . . . . . .
Sun ONE Portal Server And Secure Remote Access . . . . . . . . . . . . . . . . . . . . . . . . . . . . . . . . . . . . . .
Gateway . . . . . . . . . . . . . . . . . . . . . . . . . . . . . . . . . . . . . . . . . . . . . . . . . . . . . . . . . . . . . . . . . . . . . . . . . . .
Netlet Proxy . . . . . . . . . . . . . . . . . . . . . . . . . . . . . . . . . . . . . . . . . . . . . . . . . . . . . . . . . . . . . . . . . . . . . . . .
Rewriter Proxy . . . . . . . . . . . . . . . . . . . . . . . . . . . . . . . . . . . . . . . . . . . . . . . . . . . . . . . . . . . . . . . . . . . . . .
Web Container Checklists . . . . . . . . . . . . . . . . . . . . . . . . . . . . . . . . . . . . . . . . . . . . . . . . . . . . . . . . . . . . . . .
Sun ONE Web Server Checklist . . . . . . . . . . . . . . . . . . . . . . . . . . . . . . . . . . . . . . . . . . . . . . . . . . . . . . . .
Sun ONE Application Server Checklist . . . . . . . . . . . . . . . . . . . . . . . . . . . . . . . . . . . . . . . . . . . . . . . . .
BEA WebLogic Server Checklist . . . . . . . . . . . . . . . . . . . . . . . . . . . . . . . . . . . . . . . . . . . . . . . . . . . . . . .
IBM WebSphere Application Server Checklist . . . . . . . . . . . . . . . . . . . . . . . . . . . . . . . . . . . . . . . . . . .
24
26
26
26
27
27
27
28
28
28
28
29
31
33
34
35
36
36
37
38
Chapter 2 Installing Sun ONE Portal Server . . . . . . . . . . . . . . . . . . . . . . . . . . . . . . . . . . . . . . 39
Installation Overview . . . . . . . . . . . . . . . . . . . . . . . . . . . . . . . . . . . . . . . . . . . . . . . . . . . . . . . . . . . . . . . . . . . 39
Pre-Installation Information . . . . . . . . . . . . . . . . . . . . . . . . . . . . . . . . . . . . . . . . . . . . . . . . . . . . . . . . . . . . . 39
Web Containers . . . . . . . . . . . . . . . . . . . . . . . . . . . . . . . . . . . . . . . . . . . . . . . . . . . . . . . . . . . . . . . . . . . . . 39
Installing Sun ONE Portal Server . . . . . . . . . . . . . . . . . . . . . . . . . . . . . . . . . . . . . . . . . . . . . . . . . . . . . . . . . 40
To Install the Sun ONE Portal Server Software . . . . . . . . . . . . . . . . . . . . . . . . . . . . . . . . . . . . . . . . 40
To Install the Sun ONE Portal Server and the Gateway, the Netlet Proxy, or theRewriter Proxy
on A Separate Node . . . . . . . . . . . . . . . . . . . . . . . . . . . . . . . . . . . . . . . . . . . . . . . . . . . . . . . . . . . . . . . 41
Sun ONE Portal Server Post-Installation Tasks . . . . . . . . . . . . . . . . . . . . . . . . . . . . . . . . . . . . . . . . . . . . . 42
Sun ONE Portal Server . . . . . . . . . . . . . . . . . . . . . . . . . . . . . . . . . . . . . . . . . . . . . . . . . . . . . . . . . . . . . . . 42
Sun ONE Web Server . . . . . . . . . . . . . . . . . . . . . . . . . . . . . . . . . . . . . . . . . . . . . . . . . . . . . . . . . . . . . . 43
Sun ONE Application Server . . . . . . . . . . . . . . . . . . . . . . . . . . . . . . . . . . . . . . . . . . . . . . . . . . . . . . . 43
BEA WebLogic Server . . . . . . . . . . . . . . . . . . . . . . . . . . . . . . . . . . . . . . . . . . . . . . . . . . . . . . . . . . . . . 44
IBM WebSphere Application Server . . . . . . . . . . . . . . . . . . . . . . . . . . . . . . . . . . . . . . . . . . . . . . . . . 46
Secure Remote Access . . . . . . . . . . . . . . . . . . . . . . . . . . . . . . . . . . . . . . . . . . . . . . . . . . . . . . . . . . . . . . . . 47
Gateway . . . . . . . . . . . . . . . . . . . . . . . . . . . . . . . . . . . . . . . . . . . . . . . . . . . . . . . . . . . . . . . . . . . . . . . . . . . 48
Netlet and Rewriter Proxy . . . . . . . . . . . . . . . . . . . . . . . . . . . . . . . . . . . . . . . . . . . . . . . . . . . . . . . . . . . . 48
Configuring Sun ONE Portal Server After A Minimal Install . . . . . . . . . . . . . . . . . . . . . . . . . . . . . . 50
Verifying the Sun ONE Portal Server Installation . . . . . . . . . . . . . . . . . . . . . . . . . . . . . . . . . . . . . . . . . . . 50
Accessing the Sun ONE Portal Server Administration Console and Desktop . . . . . . . . . . . . . . . . . 50
To Access the Sun ONE Identity Server Administration Console . . . . . . . . . . . . . . . . . . . . . . . . 50
To Access the Sun ONE Portal Server Desktop . . . . . . . . . . . . . . . . . . . . . . . . . . . . . . . . . . . . . . . . 51
4
Sun ONE Portal Server 6.2 • Installation Guide • March 2004
Verifying the Gateway Installation . . . . . . . . . . . . . . . . . . . . . . . . . . . . . . . . . . . . . . . . . . . . . . . . . . . . . . . 51
Chapter 3 Uninstalling the Sun ONE Portal Server . . . . . . . . . . . . . . . . . . . . . . . . . . . . . . . . . 53
Chapter 4 Tuning the Sun ONE Portal Server . . . . . . . . . . . . . . . . . . . . . . . . . . . . . . . . . . . . . 55
Introduction . . . . . . . . . . . . . . . . . . . . . . . . . . . . . . . . . . . . . . . . . . . . . . . . . . . . . . . . . . . . . . . . . . . . . . . . . . . 55
Tuning Strategies . . . . . . . . . . . . . . . . . . . . . . . . . . . . . . . . . . . . . . . . . . . . . . . . . . . . . . . . . . . . . . . . . . . . . . 56
Memory Allocation . . . . . . . . . . . . . . . . . . . . . . . . . . . . . . . . . . . . . . . . . . . . . . . . . . . . . . . . . . . . . . . . . . . . . 57
Tuning Instructions . . . . . . . . . . . . . . . . . . . . . . . . . . . . . . . . . . . . . . . . . . . . . . . . . . . . . . . . . . . . . . . . . . . . 57
Solaris Tuning . . . . . . . . . . . . . . . . . . . . . . . . . . . . . . . . . . . . . . . . . . . . . . . . . . . . . . . . . . . . . . . . . . . . . . 58
Kernel Tuning . . . . . . . . . . . . . . . . . . . . . . . . . . . . . . . . . . . . . . . . . . . . . . . . . . . . . . . . . . . . . . . . . . . . 58
TCP Parameters Tuning . . . . . . . . . . . . . . . . . . . . . . . . . . . . . . . . . . . . . . . . . . . . . . . . . . . . . . . . . . . 58
Sun ONE Identity Server Tuning . . . . . . . . . . . . . . . . . . . . . . . . . . . . . . . . . . . . . . . . . . . . . . . . . . . . . . 59
Directory Server Connection Pool . . . . . . . . . . . . . . . . . . . . . . . . . . . . . . . . . . . . . . . . . . . . . . . . . . . 59
LDAP Authentication Service . . . . . . . . . . . . . . . . . . . . . . . . . . . . . . . . . . . . . . . . . . . . . . . . . . . . . . . 59
LDAP Authentication . . . . . . . . . . . . . . . . . . . . . . . . . . . . . . . . . . . . . . . . . . . . . . . . . . . . . . . . . . . . . 60
Sun ONE Identity Server Services Configuration Parameters . . . . . . . . . . . . . . . . . . . . . . . . . . . 60
Sun ONE Directory Server Tuning . . . . . . . . . . . . . . . . . . . . . . . . . . . . . . . . . . . . . . . . . . . . . . . . . . . . . 60
Sun ONE Web Server 6.0 Tuning . . . . . . . . . . . . . . . . . . . . . . . . . . . . . . . . . . . . . . . . . . . . . . . . . . . . . . 62
For Production Optimum . . . . . . . . . . . . . . . . . . . . . . . . . . . . . . . . . . . . . . . . . . . . . . . . . . . . . . . . . . 62
For Production Large . . . . . . . . . . . . . . . . . . . . . . . . . . . . . . . . . . . . . . . . . . . . . . . . . . . . . . . . . . . . . . 63
Sun ONE Application Server 7.0 Tuning . . . . . . . . . . . . . . . . . . . . . . . . . . . . . . . . . . . . . . . . . . . . . . . . 65
Setting Additional Sun ONE Application Server Parameters for Gateway Reliability . . . . . . . 66
Sun ONE Portal Server Desktop Tuning . . . . . . . . . . . . . . . . . . . . . . . . . . . . . . . . . . . . . . . . . . . . . . . . 68
For Production Optimum . . . . . . . . . . . . . . . . . . . . . . . . . . . . . . . . . . . . . . . . . . . . . . . . . . . . . . . . . . 68
For Production Large . . . . . . . . . . . . . . . . . . . . . . . . . . . . . . . . . . . . . . . . . . . . . . . . . . . . . . . . . . . . . . 69
Appendix A Installing Third-party Software . . . . . . . . . . . . . . . . . . . . . . . . . . . . . . . . . . . . . . 71
Installing the jICFS Software . . . . . . . . . . . . . . . . . . . . . . . . . . . . . . . . . . . . . . . . . . . . . . . . . . . . . . . . . . . . . 71
Installing Rhino . . . . . . . . . . . . . . . . . . . . . . . . . . . . . . . . . . . . . . . . . . . . . . . . . . . . . . . . . . . . . . . . . . . . . . . . 72
Appendix B BEA WebLogic Server . . . . . . . . . . . . . . . . . . . . . . . . . . . . . . . . . . . . . . . . . . . . . 73
Setting Up Sun ONE Portal Server on BEA Clusters . . . . . . . . . . . . . . . . . . . . . . . . . . . . . . . . . . . . . . . . . 73
Setting the Cookie Encoding Values . . . . . . . . . . . . . . . . . . . . . . . . . . . . . . . . . . . . . . . . . . . . . . . . . . . . . . 79
Appendix C IBM WebSphere Application Server . . . . . . . . . . . . . . . . . . . . . . . . . . . . . . . . . . 81
Renaming an IBM WebSphere Application Server Instance . . . . . . . . . . . . . . . . . . . . . . . . . . . . . . . . . . 81
Setting the Cookie Encoding Values . . . . . . . . . . . . . . . . . . . . . . . . . . . . . . . . . . . . . . . . . . . . . . . . . . . . . . 82
Appendix D Creating and Deleting Instances of the Server . . . . . . . . . . . . . . . . . . . . . . . . . . 85
To Create an Instance of the Server . . . . . . . . . . . . . . . . . . . . . . . . . . . . . . . . . . . . . . . . . . . . . . . . . . . . . 85
5
To Delete an Instance of the Server . . . . . . . . . . . . . . . . . . . . . . . . . . . . . . . . . . . . . . . . . . . . . . . . . . . . . 87
Appendix E Setting Up the Sun ONE Portal Server to Use Secure External LDAP Directory
Server . . . . . . . . . . . . . . . . . . . . . . . . . . . . . . . . . . . . . . . . . . . . . . . . . 89
Configuring the Directory Server to Run in SSL . . . . . . . . . . . . . . . . . . . . . . . . . . . . . . . . . . . . . . . . . . 90
Creating a Certificate Database . . . . . . . . . . . . . . . . . . . . . . . . . . . . . . . . . . . . . . . . . . . . . . . . . . . . . . . . 91
Creating a Certificate Database . . . . . . . . . . . . . . . . . . . . . . . . . . . . . . . . . . . . . . . . . . . . . . . . . . . . . 92
Using the password.conf File . . . . . . . . . . . . . . . . . . . . . . . . . . . . . . . . . . . . . . . . . . . . . . . . . . . . . . . 92
Installing A Root Certificate Authority (CA) Certificate . . . . . . . . . . . . . . . . . . . . . . . . . . . . . . . . . . . 93
Enabling SSL for the Directory Server . . . . . . . . . . . . . . . . . . . . . . . . . . . . . . . . . . . . . . . . . . . . . . . . . . 93
Appendix F Configuring the Sun ONE Portal Server to Run as User Non-Root . . . . . . . . . . 97
Launching Sun ONE Portal Server . . . . . . . . . . . . . . . . . . . . . . . . . . . . . . . . . . . . . . . . . . . . . . . . . . . . . 99
Index . . . . . . . . . . . . . . . . . . . . . . . . . . . . . . . . . . . . . . . . . . . . . . . . . . . . . . . . . . . . . . . . . . . . . . . . 101
6
Sun ONE Portal Server 6.2 • Installation Guide • March 2004
List of Figures
Figure 1-1
Single Machine Installation . . . . . . . . . . . . . . . . . . . . . . . . . . . . . . . . . . . . . . . . . . . . . . . . . 22
Figure 1-2
Multiple Machines Installation . . . . . . . . . . . . . . . . . . . . . . . . . . . . . . . . . . . . . . . . . . . . . . 23
Figure 1-3
Multiple Gateway and Server Component Installation . . . . . . . . . . . . . . . . . . . . . . . . . . 24
Figure B-1
Sample web.xml File . . . . . . . . . . . . . . . . . . . . . . . . . . . . . . . . . . . . . . . . . . . . . . . . . . . . . . . 76
List of Figures
7
8
Sun ONE Portal Server 6.2 • Installation Guide • March 2004
List of Tables
Table 0-1
Common Variables . . . . . . . . . . . . . . . . . . . . . . . . . . . . . . . . . . . . . . . . . . . . . . . . . . . . . . . . 16
Table 1-1
The Sun ONE Portal Server Components . . . . . . . . . . . . . . . . . . . . . . . . . . . . . . . . . . . . . 20
Table 1-2
Hardware Requirements . . . . . . . . . . . . . . . . . . . . . . . . . . . . . . . . . . . . . . . . . . . . . . . . . . . 27
Table 1-3
Sun ONE Portal Server Installation Checklist . . . . . . . . . . . . . . . . . . . . . . . . . . . . . . . . . . 29
Table 1-4
Gateway Installation Checklist . . . . . . . . . . . . . . . . . . . . . . . . . . . . . . . . . . . . . . . . . . . . . . 31
Table 1-5
Netlet Proxy Installation Checklist . . . . . . . . . . . . . . . . . . . . . . . . . . . . . . . . . . . . . . . . . . . 33
Table 1-6
Rewriter Proxy Installation Checklist . . . . . . . . . . . . . . . . . . . . . . . . . . . . . . . . . . . . . . . . . 34
Table 1-7
Sun ONE Web Server Values Used During Sun ONE Portal Server Installation . . . . 36
Table 1-8
Sun ONE Application Server Values Used During Sun ONE Portal Server Installation
36
Table 1-9
BEA WebLogic Server Values Used During Sun ONE Portal Server Installation . . . . 37
Table 1-10
IBM WebSphere Application Server Values Used During Sun ONE Portal Server
Installation . . . . . . . . . . . . . . . . . . . . . . . . . . . . . . . . . . . . . . . . . . . . . . . . . . . . . . . . . . . . . . . 38
List of Tables
9
10
Sun ONE Portal Server 6.2 • Installation Guide • March 2004
List of Procedures
To Install the Sun ONE Portal Server Software . . . . . . . . . . . . . . . . . . . . . . . . . . . . . . . . . . . . . . . . . . . . . 40
To Install the Sun ONE Portal Server and the Gateway, the Netlet Proxy, or theRewriter Proxy on A
Separate Node . . . . . . . . . . . . . . . . . . . . . . . . . . . . . . . . . . . . . . . . . . . . . . . . . . . . . . . . . . . . . . . . . . . . . . . . . 41
To Access the Sun ONE Identity Server Administration Console . . . . . . . . . . . . . . . . . . . . . . . . . . . . . . 50
To Access the Sun ONE Portal Server Desktop . . . . . . . . . . . . . . . . . . . . . . . . . . . . . . . . . . . . . . . . . . . . . 51
To Create an Instance of the Server . . . . . . . . . . . . . . . . . . . . . . . . . . . . . . . . . . . . . . . . . . . . . . . . . . . . . . . 85
To Delete an Instance of the Server . . . . . . . . . . . . . . . . . . . . . . . . . . . . . . . . . . . . . . . . . . . . . . . . . . . . . . . 87
List of Procedures
11
12
Sun ONE Portal Server 6.2 • Installation Guide • March 2004
About This Guide
This guide explains how to install the Sun™ Open Net Environment (Sun™ ONE)
Portal Server 6.2 software and its accompanying software components. Sun™ ONE
Portal Server provides a platform to create portals for your organization’s
integrated data, knowledge management, and applications. The Sun ONE Portal
Server platform offers a complete infrastructure solution for building and
deploying all types of portals, including business-to-business,
business-to-employee, and business-to-consumer.
This preface includes the following sections:
•
Who Should Read This Book
•
What You Need to Know
•
How This Book is Organized
•
Document Conventions Used in This Guide
•
Accessing Sun Documentation Online
•
Where to Find This Guide Online
Who Should Read This Book
You should read this book if you are responsible for installing Sun ONE Portal
Server at your site.
13
What You Need to Know
What You Need to Know
In order to install Sun ONE Portal Server, you must be familiar with the following
products:
•
Sun™ ONE Directory Server
•
Sun™ ONE Identity Server
•
Sun™ ONE Web Server
•
Sun™ ONE Application Server
This book assumes you have a basic understanding of:
•
The Solaris™ Operating System
•
UNIX command-line utilities and administrative tasks
How This Book is Organized
This book contains the following chapters:
•
About This Guide (this chapter)
•
Chapter 1, “Planning the Installation.”
This chapter discusses the recommendations and requirements for installing
the Sun ONE Portal Server 6.2 software.
•
Chapter 2, “Installing Sun ONE Portal Server.”
This chapter provides pre-install and post-install instructions for installing the
Sun ONE Portal Server software.
•
Chapter 3, “Uninstalling the Sun ONE Portal Server.”
This chapter includes post-installation tasks for reconfiguring the Portal Server
to run as user nobody and user non-root.
•
Chapter 4, “Tuning the Sun ONE Portal Server.”
This chapter provides instructions for removing the Sun ONE Portal Server
software.
•
Appendix A, “Installing Third-party Software.”
This chapter provides instructions for installing third-party software that can
be used by the Portal Server product.
14
Sun ONE Portal Server 6.2 • Installation Guide • March 2004
Document Conventions Used in This Guide
•
Appendix B, “BEA WebLogic Server.”
This appendix provides information for Sun ONE Portal Server deployments
on BEA WebLogic Server™ 6.1 SP5.
•
Appendix C, “IBM WebSphere Application Server.”
•
This appendix provides information for Sun ONE Portal Server deployments
on IBM WebSphere® Application Server.
•
Appendix D, “Creating and Deleting Instances of the Server.”
This appendix provides information for creating and deleting multiple server
instances.
•
Appendix E, “Setting Up the Sun ONE Portal Server to Use Secure External
LDAP Directory Server.”
This appendix provides a number of procedures for setting up the Sun ONE
Portal Server running on the Sun ONE Web Server and the Sun ONE
Application Server web containers to use a secure external LDAP directory
server.
•
Appendix F, “Configuring the Sun ONE Portal Server to Run as User
Non-Root.”
This appendix provides information for re-configuring the server instance to
run as non-root.
NOTE
For information on setting up LDAP replication see the Sun ONE
Directory Server documentation.
Document Conventions Used in This Guide
Monospaced Font
Monospaced font is used for any text that appears on the computer screen or text
that you should type. It is also used for file names, distinguished names, functions,
and examples.
About This Guide
15
Document Conventions Used in This Guide
Bold Monospaced Font
All paths specified in this manual are in Unix format. If you are using a Windows
NT-based Sun ONE Portal Server, you should assume the Windows NT equivalent
file paths whenever Unix file paths are shown in this book.
Bold monospaced font is used to represent text within a code example that you
should type.
Italicized Font
Italicized font is used to represent text that you enter using information that is unique
to your installation (for example, variables). It is used for server paths and names
and account IDs.
Command-Line Prompts
Command-line prompts (for example, % for a C-Shell, or $ for a Korn, or Bourne
shell) are not displayed in the examples. Depending on which operating system
environment you are using, you will see a variety of different command-line
prompts. However, you should enter the command as it appears in the document
unless specifically noted otherwise.
Variables
Table 0-1 is a two column table that describes the common variables used in this
document. The first column lists the variables, and the second column provides a
description of how the variables are used.
Table 0-1
Common Variables
Variable
portal-server-install-root
Description
The Sun ONE Portal Server installation directory. For example,
/opt.
16
Sun ONE Portal Server 6.2 • Installation Guide • March 2004
Related Third-Party Web Site References
Table 0-1
Common Variables
Variable
Description
web-server-install-root
For example
•
Sun ONE Web Server /opt/SUNWwbsvr
•
Sun ONE Application Server /opt/SUNWappserver7
•
BEA WebLogic Server 6.1 /opt/bea/wlserver6.1
•
IBM WebSphere Application Server
/opt/WebSphere/AppServer
directory-server-install-root
The Sun ONE Directory Server installation directory. For example,
/var/opt/mps/serverroot.
identity-server-install-root
The Sun ONE Identity Server installation directory. For example,
/opt/IS6.1.
UserID
User identification. For example, root or nobody.
Related Third-Party Web Site References
Third-party URLs are referenced in this document and provide additional, related
information.
NOTE
Sun is not responsible for the availability of third-party Web sites
mentioned in this document. Sun does not endorse and is not
responsible or liable for any content, advertising, products, or other
materials that are available on or through such sites or resources.
Sun will not be responsible or liable for any actual or alleged
damage or loss caused by or in connection with the use of or reliance
on any such content, goods, or services that are available on or
through such sites or resources.
Accessing Sun Documentation Online
In addition to this guide, Sun ONE Portal Server comes with supplementary
information for administrators as well as documentation for developers. Use the
following URL to see all the Sun ONE Portal Server documentation:
http://docs.sun.com/prod/s1portalsrv
About This Guide
17
Where to Find This Guide Online
Listed below are the additional documents released with the Sun ONE Portal
Server 6.2 documentation suite:
•
Sun ONE Portal Server 6.2 Release Notes
•
Sun ONE Portal Server 6.2 Administrator’s Guide
•
Sun ONE Portal Server 6.2 Migration Guide
•
Sun ONE Portal Server, Secure Remote Access 6.2 Adminstrator’s Guide
•
Sun ONE Portal Server 6.2 Desktop Customization Guide
•
Sun ONE Portal Server 6.2 Developer’s Guide
•
Sun ONE Portal Server 6.2 Deployment Guide
Where to Find This Guide Online
You can find the Sun ONE Portal Server 6.2 Installation Guide online in PDF and
HTML formats. This book can be found at the following URL:
http://docs.sun.com/prod/s1portalsrv
18
Sun ONE Portal Server 6.2 • Installation Guide • March 2004
Chapter 1
Planning the Installation
Before you begin installing your Sun™ ONE Portal Server software, you must plan
your installation carefully. Familiarize yourself with how the installation software
is packaged, what the requirements for your system are, and what information you
must have so that you can complete the installation successfully.
This chapter contains the following sections:
•
Sun ONE Portal Server Overview
•
System Requirements
•
Sun ONE Portal Server Checklists
•
Web Container Checklists
Sun ONE Portal Server Overview
The Sun ONE Portal Server 6.2 product gives end users a portal Desktop, which
provides access to resources and applications. The Sun ONE Portal Server software
also provides a search engine infrastructure that enables intranet content to be
organized and accessed from the portal Desktop. Additionally, in this release, the
Communication Channels are now installed with the Sun ONE Portal Server
software. The communication channels consist of mail, calendar, address book, and
instant messaging channels.
The Sun ONE Portal Server 6.2 release also offers Secure Remote Access support,
which enables remote users to securely access their organization’s network and its
services over the Internet. Additionally, it gives your organization a secure Internet
portal, providing access to content, applications, and data to any targeted
audience--employees, business partners, or the general public.
19
Sun ONE Portal Server Overview
The Sun ONE Portal Server software also includes data migration tools for sites
that are upgrading from previous Sun ONE Portal Server versions.
The layers below the Sun ONE Portal Server software provide functions and
services such as web application container (via the Sun™ ONE Web Server
software or the Sun™ ONE Application Server), user, service and policy
management, authentication and single sign-on, administration console (via the
Sun™ ONE ONE Identity Server software), directory schema and data storage (via
the Sun™ ONE Directory Server software), and protocol support (by standard
browser software). The Sun ONE Portal Server software is installed separately, and
makes use of these services rather than implementing them in the Sun ONE Portal
Server software itself.
The Sun ONE Portal Server is available as a bundled product in the
Sun Java™ Enterprise System. See the Java Enterprise System
installation documentation.
NOTE
Sun ONE Portal Server Components
The Sun ONE Portal Server is composed of several distinct functional components.
These components can be installed on a node with Portal Server (referred to as a
Portal Server node) or a node without Portal Server (referred to as a separate node).
Table 1-1 lists the installable components, their descriptions, and the nodes on
which they can be installed.
Table 1-1
The Sun ONE Portal Server Components
Component
Description
Node
Sun ONE Portal Server
Gives end users a portal Desktop, which provides access to
resources, applications, and a search engine infrastructure.
Portal Server node
Subcomponents include:
Gateway
20
•
Secure Remote Access Support—this configures the Sun
ONE Portal Server to communicate with the gateway, Netlet
Proxy, and Rewriter Proxy.
•
Sample Portal—This provides the sample Desktop.
•
Secure Remote Access Sample
•
Migration Tools
This component provides the interface and security barrier
between remote user sessions originating from the Internet, and
the corporate intranet.
Sun ONE Portal Server 6.2 • Installation Guide • March 2004
Portal Server node,
separate node
Sun ONE Portal Server Overview
Table 1-1
The Sun ONE Portal Server Components
Component
Description
Node
Netlet Proxy
This component extends the secure tunnel from the client through
the gateway to Netlet Proxy that resides in the intranet. It restricts
the number of open ports in a firewall between the demilitarized
zone (DMZ) and the intranet.
Portal Server node,
separate node
Netlet Proxy is an optional component. You can choose not to
install it, or install it later.
It cannot be installed on a gateway node.
Rewriter Proxy
This components extends the secure connection from the gateway
to the Portal Server.
Portal Server node,
separate node.
Install Rewriter Proxy to redirect HTTP requests to the rewriter
Proxy instead of directly to the destination host. Rewriter Proxy, in
turn, sends the request to the destination server. If you do not
specify a proxy, the gateway component makes a direct
connection to intranet computers when a user tries to access one
of those intranet computers.
Installation Guidelines
Consider these guidelines for your installation:
•
The Sun ONE Portal Server can be installed on the same machine as Sun ONE
Directory Server or on a different machine.
❍
❍
NOTE
•
Use the Java Enterprise System installer to install the Sun ONE Directory
Server, a web container, and the Sun ONE Identity Server at the same time
or before installing the Sun ONE Portal Server software.
The machine running Sun ONE Portal Server must be able to access the
machine running Sun ONE Directory Server. Any firewalls between the
systems must not block connections to the Sun ONE Directory Server port.
For better performance, you may want to install the Sun ONE Portal
Server and the Sun ONE Directory Server on separate machines.
The Sun ONE Portal Server must be installed on the same machine as the
Sun™ ONE Identity Server.
Chapter 1
Planning the Installation
21
Sun ONE Portal Server Overview
Migration Guidelines
Sun ONE Portal Server 6.2 supports migration from iPlanet™ Portal Server 3.0
Service Pack 3a, Service Pack 4 or Service Pack 5. The migration tools are
automatically installed with the Sun ONE Portal Server product.
You can install Sun ONE Portal Server 6.2 on an iPlanet Portal Server 3.0 (Service
Pack 3a, Service Pack 4, or Service Pack 5) system for a single-system migration.
For complete migration information see the Sun ONE Portal Server 6.2 Migration
Guide.
Upgrade Guidelines
Sun ONE Portal Server 6.2 supports upgrade from Sun ONE Portal Server versions
6.0 and 6.1. The upgrade tools are installed by the Java Enterprise System installer
as part of the Sun ONE Portal Server.
For complete upgrade information see the Sun ONE Portal Server 6.2 Migration
Guide.
Installation Scenarios
The Sun ONE Portal Server 6.2 product includes support for Secure Remote Access
and can be installed in open-portal mode or secure-portal mode.
•
Open Mode
•
Secure Mode
Open Mode
The Sun ONE Portal Server software can be installed in open mode, that is, without
the gateway.
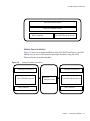
Single Server Installation
Figure 1-1 shows an example installation of the Sun ONE Portal Server, Sun ONE
Identity Server, a web container, and Sun ONE Directory Server on a single
machine.
Figure 1-1
22
Single Machine Installation
Sun ONE Portal Server 6.2 • Installation Guide • March 2004
Sun ONE Portal Server Overview
Sun ONE Portal Server
Sun ONE Identity Server
Web Container
Sun ONE Directory Server
Multiple Server Installation
Figure 1-2 shows an example installation of the Sun ONE Portal Server, Sun ONE
Identity Server, and a web container on multiple machines using Sun ONE
Directory Server on another machine.
Figure 1-2
Multiple Machines Installation
Sun ONE Portal Server
Sun ONE Identity Server
Web Container
Sun ONE Portal Server
Sun ONE
Directory Server
Sun ONE Identity Server
Web Container
Chapter 1
Planning the Installation
23
Sun ONE Portal Server Overview
Secure Mode
Depending on the end user and system requirements, you can install the gateway,
the Netlet Proxy, or the Rewriter Proxy on a single machine with the Portal Server,
or you can install them all on separate machines. A single-machine deployment is
not generally recommended for production environments.
The Portal Server also supports an installation group that includes multiple
gateways communicating with multiple servers. Figure 1-3 shows a diagram of the
Portal Server in an installation that contains multiple gateway and server
components.
See the Sun ONE Portal, Secure Remote Access 6.2 Deployment Guide for other
possible configurations.
Figure 1-3
24
Multiple Gateway and Server Component Installation
Sun ONE Portal Server 6.2 • Installation Guide • March 2004
Sun ONE Portal Server Overview
Browser 1
Browser 2
.
Netlet
Netlet
NetFile
NetFile
Firewall
Load Balancer
DMZ
Gateway 1
Gateway 2
Firewall
Rewriter
Proxy
Rewriter
Proxy
Sun ONE Portal Server 2
Sun ONE Portal Server 1
Other host 2
Other host 1
Netlet
Proxy
Application host 1
Netlet traffic
HTTP traffic
Figure 1-3 shows a sample deployment of Secure Remote Access, consisting of the
following components:
•
Two clients: Browser 1 and Browser 2.
•
Two Gateway hosts: Gateway 1 and Gateway 2. Gateway hosts are in the
demilitarized zone (DMZ).
•
A load balancer is also present in the DMZ to direct the HTTP and Netlet traffic
to the available Gateway host.
•
Two installations of the Portal Server with Secure Remote Access: Sun ONE
Portal Server 1 and Sun ONE Portal Server 2.
•
Sun ONE Portal Server 1 has the Rewriter Proxy installed on it, and Sun ONE
Portal Server 2 has both the Rewriter and the Netlet Proxies installed on it.
Chapter 1
Planning the Installation
25
System Requirements
•
There is one application host: Application host 1.
•
There are two other hosts: Other host 1 and Other host 2.
HTTP and Netlet requests from Browser 1 and Browser 2 are directed to the load
balancer. The load balancer directs this to any available gateway.
The HTTP request from Browser 1 is directed to Gateway 1. This in turns directs
the request to the Rewriter Proxy configured on Sun ONE Portal Server 1. In the
absence of the Rewriter Proxy, HTTP requests to multiple intranet hosts would
result in multiple ports being opened in the firewall. The Rewriter Proxy ensures
that only one port is opened in the firewall. The Rewriter Proxy also extends SSL
traffic from Gateway to the Portal Server node.
The HTTP request from Browser 2 is directed to the load balancer. This in turn
directs the request to Gateway 2. From Gateway 2, the request is passed to Other
host 2 through the Rewriter Proxy installed on Sun ONE Portal Server 2.
The Netlet request from Browser 2 is directed to Gateway 2 by the load balancer.
Gateway 2 directs the request to the required Application host 2 through Netlet
Proxy installed on Sun™ ONE Portal Server 2.
System Requirements
Before installing the Sun ONE Portal Server software, ensure that your system
meets the following requirements.
Operating System Requirements
The Sun ONE Portal Server software requires at least a user distribution of the
Solaris™ 8 Operating System or Solaris™ 9 Operating System.
Hardware Requirements
For a new installation of the software, your system must meet the following
minimal hardware requirements:
26
Sun ONE Portal Server 6.2 • Installation Guide • March 2004
System Requirements
Table 1-2
Hardware Requirements
Hardware Component
Solaris™ Requirement
Operating System
Solaris™ 8 or Solaris ™ 9 Operating System
(SPARC® platforms)
CPU
Sun SPARC or Solaris™ Operating System (x86
Platform Edition) workstation
RAM
512 Mbytes for evaluation install
1.2 Gbytes for deployment
Disk Space
1 Gbyte for Sun ONE Portal Server and associated
applications
Required Software Components
The Sun ONE Portal Server
For installing the Sun ONE Portal Server, the following software products are
required and must be installed before installing the Portal Server.
•
Java™ 2 SDK (J2SDK™) 1.4.1_05
•
A web container—The Sun ONE Portal Server can be deployed on the
following web containers:
❍
Sun ONE Application Server 7.0 MU 1
❍
Sun ONE Web Server 6.1
❍
BEA WebLogic Server™ 6.1 (SP5)
❍
IBM WebSphere® Application Server 4.0.5
•
Sun ONE Directory Server 5.2
•
Sun ONE Identity Server 6.1
•
Sun™ ONE Administration Server 5.2
Install these software products before installing the Sun ONE Portal Server.
The Gateway
For installing the gateway alone, on a separate node, the following software is
required:
Chapter 1
Planning the Installation
27
Sun ONE Portal Server Checklists
•
J2SDK 1.4.1_05
•
Sun ONE Identity Server 6.1 SDK
The Netlet Proxy
For installing the Netlet Proxy alone, on an independent node, the following
software is required:
•
J2SDK 1.4.1_05
•
Sun ONE Identity Server 6.1 SDK
The Rewriter Proxy
For installing the Rewriter Proxy alone, on an independent node, the following
software is required:
•
J2SDK 1.4.1_05
•
Sun ONE Identity Server 6.1 SDK
Browser Recommendations
The following browsers are supported for administration and for accessing the Sun
ONE Portal Server Desktop:
•
Internet Explorer 5.5 and 6.0
•
Netscape™ 4.7x or higher.
Sun ONE Portal Server Checklists
The parameters you define during the Sun ONE Portal Server installation depend
on the components you choose to install. The following checklists describe the
parameters needed for each of the following:
28
•
Sun ONE Portal Server And Secure Remote Access
•
Gateway
•
Netlet Proxy
•
Rewriter Proxy
Sun ONE Portal Server 6.2 • Installation Guide • March 2004
Sun ONE Portal Server Checklists
See “Web Container Checklists” for installation information needed for specific
web containers.
Depending in the type of installation that you are performing, you might or might
not use all the values shown in the following checklists. When using the Java
Enterprise System Installer, you can install several component products at the
same time, or perform different levels of configuration during install.
If you choose a custom installation or a minimal installation using the Java
Enterprise System, you will use the values shown in the following checklist.
If you have performed a minimal installation, you will need to use the Sun ONE
Portal Server configurator script to configure your Portal Server installation.
Sun ONE Portal Server And Secure Remote
Access
Table 1-3 is a three column table that lists all the values that you might need for a
Portal Server installation or post-minimal install configuration. Depending on the
type of installation you perform, the values that you use might vary.
Table 1-3 is an example checklist that assumes a web server deployment. If you are
deploying on Sun ONE Application Server, BEA WebLogic, or IBM WebSphere
Application Server, see the section, “Web Container Checklists,” for those web
container values.
Table 1-3
Sun ONE Portal Server Installation Checklist
Parameter
Default Value
Description
/opt
This is the base directory in which the Sun ONE
Portal Server software is installed.
Sun ONE Web Server
The Sun ONE Portal Server can be deployed on the
Sun ONE Web Server, Sun ONE Application Server,
BEA WebLogic Server, or IBM WebSphere
Application Server.
Installation Directory
Component Installation
Directory
Deployment Information
Deployment Type
This parameter is needed only if installing the Sun
ONE Portal Server.
Chapter 1
Planning the Installation
29
Sun ONE Portal Server Checklists
Table 1-3
Sun ONE Portal Server Installation Checklist (Continued)
Parameter
Default Value
Description
Deployment URI
/portal
The URI is the space on the web server or application
server that the Sun ONE Portal Server uses. By
default, content is deployed in
portal-server-install-root/SUNWps/web-apps/
Server-Instance/URI where the URI, by default, is
/portal.
The value for the deployment URI must have a
leading slash and must contain only one slash.
However, the deployment URI cannot be a “/” by
itself.
Web Container Information (Sun ONE Web Server)
Installed Directory
/opt/SUNWwbsvr
This is the base directory in which the Sun ONE Web
Server software is installed.
Instance
host
The default is the fully qualified host name. The value
is the web server instance you want the Portal Server
to use.
The instance name should not contain spaces.
Document Root Directory
/opt/SUNWwbsvr/docs
The directory where static pages are kept. This
directory is created during the Sun ONE Identity
Server install.
/opt
This is the base directory in which the Sun ONE
Identity Server software is installed.
Identity Server Information
Installed Base Directory
Internal LDAP Authentication
User Password
The Internal LDAP Authentication User Password
chosen during the Sun ONE Identity Server
installation.
This parameter is needed only when installing the
Sun ONE Portal Server.
Administrator (amadmin)
Password
Directory Manager DN
The top level administrator (amadmin) password
chosen during the Sun ONE Identity Server software
installation.
cn=Directory Manager
Directory Manager Password
The LDAP directory manager distinguished name
(DN).
The directory manager password chosen during the
installation of the Sun ONE Directory Server.
Secure Remote Access Information (for configuring Secure Remote Access Support)
Gateway Protocol
30
https
Sun ONE Portal Server 6.2 • Installation Guide • March 2004
The Protocol that the gateway will use to
communicate. The gateway will communicate using
Secure Sockets Layer (SSL).
Sun ONE Portal Server Checklists
Table 1-3
Sun ONE Portal Server Installation Checklist (Continued)
Parameter
Default Value
Description
Portal Server Domain
portal-server-domain-name
The domain name for the machine on which the Sun
ONE Portal Server is installed.
Gateway Domain
gateway-domain-name
The domain name of the gateway machine.
Gateway Port
443
The port on which the gateway listens.
Gateway Profile Name
default
This is the gateway profile that the Rewriter Proxy
needs to use. A gateway profile contains all the
information related to gateway configuration, such as
the port on which gateway listens, SSL options, and
proxy options.
You can create multiple profiles in the gateway
administration console and associate different
instances of gateway with different profiles.
Specify the same profile name specified when you
installed Sun ONE Portal Server or Secure Remote
Access support.
See “Creating a Gateway Profile” in the Sun ONE
Portal Server, Secure Remote Access 6.2 Administrator’s
Guide.
Password Encryption Key
The value of the encryption key. The encryption key
is located in
identity-server-installation-root
/SUNWam/lib/AMConfig.properties as the
parameter am.encryption.pwd.
Log User Password
This allows administrators with non-root access to
look at gateway log files.
Retype Password
Retype to verify password.
Gateway
Table 1-4
Gateway Installation Checklist
Parameter
Default Value
Description
Protocol
https
The protocol that the gateway uses to communicate.
The gateway will usually communicate using Secure
Sockets Layer (SSL).
Host Name
host
The fully qualified host name of the machine on
which the gateway is installed.
Chapter 1
Planning the Installation
31
Sun ONE Portal Server Checklists
Table 1-4
Gateway Installation Checklist (Continued)
Parameter
Default Value
Description
Subdomain
gateway-subdomain-name
The subdomain name of the gateway machine.
Domain
gateway-domain-name
The domain name of the gateway machine.
IP Address
host-ip-address
The IP address of the Sun ONE Portal Server
machine.
Specify the IP address of the machine on which the
Sun ONE Identity Server was installed for the Sun
ONE Portal Server.
Access Port
443
The port on which the gateway machine listens.
Gateway Profile Name
default
A gateway profile contains all the information related
to gateway configuration, such as the port on which
gateway listens, SSL options, and proxy options.
You can create multiple profiles in the gateway
administration console and associate different
instances of gateway with different profiles.
Specify the same profile name specified when you
installed Sun ONE Portal Server or Secure Remote
Access support.
See “Creating a Gateway Profile” in the Sun ONE
Portal Server, Secure Remote Access 6.2 Administrator’s
Guide for more information
Log User Password
Start the gateway after
installation
This allows administrators with non-root access to
look at gateway log files.
Checked
The gateway can be started automatically (if this
option is checked) or it can be started later.
To start the gateway manually use the following
command located in
portal-server-install-root/SUNWps/bin:
./gateway -n gateway-profile-name start
Certificate Information
Organization
MyOrganization
The name of your organization.
Division
MyDivision
The name of your division.
City or Locality
MyCity
The name of your city or locality
State or Province
MyState
The name of your state
Two-Letter Country Code
us
The two letter country code for your country.
Certificate Database
Password
This can be any password you choose.
Retype Password
Retype the password to verify.
32
Sun ONE Portal Server 6.2 • Installation Guide • March 2004
Sun ONE Portal Server Checklists
Netlet Proxy
Table 1-5
Netlet Proxy Installation Checklist
Parameter
Default Value
Description
Host Name
hostname
The host name of the machine on which you want to
install the Netlet Proxy.
Subdomain
localhost-subdomain-name
The sub-domain name of the machine on which the
Netlet Proxy is installed.
Domain
localhost- domain-name
The domain name of the machine on which the Netlet
Proxy is installed.
IP Address
host-ip-address
The IP address of the Sun ONE Identity Server
machine.
Specify the IP address of the machine on which the
Sun ONE Identity Server was installed for the Sun
ONE Portal Server.
Access Port
10555
The port on which the Netlet Proxy listens.
Gateway Profile Name
default
A gateway profile contains all the information related
to gateway configuration, such as the port on which
gateway listens, SSL options, and proxy options.
You can create multiple profiles in the gateway
administration console and associate different
instances of gateway with different profiles.
Specify the same profile name specified when you
installed Sun ONE Portal Server or Secure Remote
Access support.
See “Creating a Gateway Profile” in the Sun ONE
Portal Server, Secure Remote Access 6.2 Administrator’s
Guide for more information.
Log User Password
Start Netlet Proxy after
installation
This allows administrators with non-root access to
look at gateway log files.
checked
The Netlet Proxy can be started automatically (if this
option is checked) or it can be started later. To start
the Netlet Proxy manually use the following
command located in
netlet-proxy-install-root/SUNWps/bin
./netletd -n default start
Certificate Information
Organization
MyOrganization
The name of your organization.
Division
MyDivision
The name of your division.
Chapter 1
Planning the Installation
33
Sun ONE Portal Server Checklists
Table 1-5
Netlet Proxy Installation Checklist (Continued)
Parameter
Default Value
Description
City or Locality
MyCity
The name of your city or locality.
State or Province
MyState
The name of your state or province.
Two-letter Country Code
us
The two-letter country code for your country.
Certificate Database
Password
This can be any password you choose.
Retype Password
Retype the password to verify.
Rewriter Proxy
Table 1-6
Rewriter Proxy Installation Checklist
Parameter
Default Value
Description
Host Name
hostname
The host name of the machine on which you want to
install the Rewriter Proxy.
Subdomain
localhost-subdomain-name
The sub-domain name of the machine on which the
Rewriter Proxy is installed.
Domain
localhost- domain-name
The domain name of the machine on which the
Rewriter Proxy is installed.
IP Address
host-ip-address
The IP address of the Sun ONE Identity Server
machine.
Specify the IP address of the machine on which the
Sun ONE Identity Server was installed for the Sun
ONE Portal Server.
Access Port
10443
The port on which the Rewriter Proxy listens.
Gateway Profile Name
default
A gateway profile contains all the information related
to gateway configuration, such as the port on which
gateway listens, SSL options, and proxy options.
You can create multiple profiles in the gateway
administration console and associate different
instances of gateway with different profiles.
Specify the same profile name specified when you
installed Sun ONE Portal Server or Secure Remote
Access support.
See “Creating a Gateway Profile” in the Sun ONE
Portal Server, Secure Remote Access 6.2 Administrator’s
Guide for more information.
34
Sun ONE Portal Server 6.2 • Installation Guide • March 2004
Web Container Checklists
Table 1-6
Rewriter Proxy Installation Checklist (Continued)
Parameter
Default Value
Log User Password
Description
This allows administrators with non-root access to
look at gateway log files.
Start the Rewriter Proxy
after installation
Checked
The Rewriter Proxy can be started automatically (if
this option is checked) or it can be started manually
later.
To start the Rewriter Proxy manually use the
following command located in
rewriter-proxy--install-root/SUNWps/bin
./rwproxyd -n default start
Certificate Information
Organization
MyOrganization
The name of your organization.
Division
MyDivision
The name of your division.
City or Locality
MyCity
The name of your city or locality.
State or Province
MyState
The name of your state or province.
Two-letter Country Code
us
The two-letter country code for your country.
Certificate Database
Password
This can be any password you choose.
Retype Password
Retype the password to verify.
Web Container Checklists
The Sun ONE Portal Server installation has dependencies on some web container
parameters. The following checklists describe the parameters that will be needed
during the Sun ONE Portal Server installation process. See the checklist that
pertains to the web container on which you are deploying the Sun ONE Portal
Server product.
•
Sun ONE Web Server Checklist
•
Sun ONE Application Server Checklist
•
BEA WebLogic Server Checklist
•
IBM WebSphere Application Server Checklist
For more information about using the supported application servers with the Sun
ONE Portal Server, see the appendix in this guide that pertains to your application
server deployment.
Chapter 1
Planning the Installation
35
Web Container Checklists
Sun ONE Web Server Checklist
Table 1-7
Sun ONE Web Server Values Used During Sun ONE Portal Server Installation
Parameter
Default Value
Description
Installed Directory
/opt/SUNWwbsvr
The base directory in which the Sun ONE Web
Server is installed.
Instance
host
The web server instance you want the Portal Server
to use.
The instance name should not contain spaces.
Document Root
Directory
/opt/SUNWwbsvr/docs
The directory where static pages are kept. This
directory is created during the Sun ONE Identity
Server install.
Sun ONE Application Server Checklist
Table 1-8
Sun ONE Application Server Values Used During Sun ONE Portal Server Installation
Parameter
Default Value
Description
Installed Directory
/opt/SUNWappserver7
Directory in which the Sun ONE Application Server is
installed.
Domain
/var/opt/SUNWappserver7/
domains/domain1
The Sun ONE Application Server domain contains a
set of instances. The domain specified will contain
the instance used by the Sun ONE Portal Server.
This domain must already be configured.
Instance
server1
The name of the Sun ONE Application Server
instance to which the Sun ONE Portal Server will be
deployed. This instance must already be configured.
The instance name should not contain spaces.
Document Root
Directory
/var/opt/SUNWappserver7/
domains/domain1/server1/
docroot
The directory where static pages are kept. This
directory is created during the Sun ONE Identity
Server install.
Administrator
admin
The administrator user ID.
Administration Port
4848
The port number of the administration server.
Administration
Password
36
Sun ONE Portal Server 6.2 • Installation Guide • March 2004
The administration server password.
Web Container Checklists
BEA WebLogic Server Checklist
Table 1-9
BEA WebLogic Server Values Used During Sun ONE Portal Server Installation
Parameter
Default Value
Description
Installed Directory
/bea/wlserver6.1
The directory in which the BEA WebLogic Server
software is installed.
Domain
mydomain
The BEA WebLogic Server domain contains a set of
instances. The domain specified will contain the
instance used by the Sun ONE Portal Server. This
domain must already be configured.
Instance
myserver
The name of the BEA WebLogic Server instance to
which the Sun ONE Portal Server will be deployed.
This instance must already be configured.
The name must not contain a space.
If you are installing Sun ONE Portal Server on an
administration server instance this will be the name of
the administration server instance. Otherwise it will
be the name of the managed server instance.
Document Root
Directory
/bea/wlserver6.1/config/
mydomain/applications/
DefaultWebApp
The document root value of DefaultWebApp needs to
be deployed to the BEA WebLogic Server instance
you are running the Portal Server software on.
DefaultWebApp is the default web application, from
which is served static content in a BEA WebLogic
Server. By default it is only deployed to the domain
(mydomain) and the server instance defined or
created during the BEA WebLogic Server install. This
means that if you create your own BEA WebLogic
Server or domain, you need to deploy the
DefaultWebApp to it, either by copying the directory
to the new server’s deployment directory, or by using
the BEA WebLogic Server administration console.
See the BEA WebLogic Server documentation for
more detail on how to configure a default web
application.
Administrator
system
The administrator’s user ID.
Administration
Password
Administration
Protocol
The system password.
http
Protocol on which the administration server of BEA
WebLogic Server runs on.
Chapter 1
Planning the Installation
37
Web Container Checklists
Table 1-9
BEA WebLogic Server Values Used During Sun ONE Portal Server Installation (Continued)
Parameter
Default Value
Description
Administration Port
7001
Port on which the administration server of BEA
WebLogic Server is running. If the Sun ONE Portal
Server is installed on the BEA WebLogic Server
administration server itself, the port on which Portal
Server runs and the administration port of BEA
WebLogic Server will be the same.
IBM WebSphere Application Server Checklist
Table 1-10
IBM WebSphere Application Server Values Used During Sun ONE Portal Server Installation
Parameter
Default Value
Description
Installed Directory
/opt/WebSphere/AppServer
The directory in which the IBM WebSphere
Application Server software is installed.
Virtual Host
default_host
Node
machine-name
Instance
Default_Server
The name of the instance to which the Sun ONE
Portal Server will be deployed. This instance must
already be configured.
Portal Server cannot be installed into an application
server instance or domain whose name contains a
dash or a space, for example, Default-Server or
Default Server.
For instructions on renaming an instance, see
Appendix C, “IBM WebSphere Application Server.”
Document Root
Directory
38
/opt/IBMHTTPD/htdocs/
en_US
Sun ONE Portal Server 6.2 • Installation Guide • March 2004
The directory where static pages are kept. This
directory is created during the Sun ONE Identity
Server installation.
Chapter 2
Installing Sun ONE Portal Server
Installation Overview
The Sun™ ONE Portal Server and required underlying component products are
installed using the Java™ Enterprise System installer program. Detailed
information and instructions for using the Java Enterprise System installer can be
found in the Java Enterprise System Installation Guide.
This chapter contains the following sections:
•
Pre-Installation Information
•
Installing Sun ONE Portal Server (general installation instructions)
•
Sun ONE Portal Server Post-Installation Tasks
•
Verifying the Sun ONE Portal Server Installation
Pre-Installation Information
Before installing Sun ONE Portal Server software, remove all previous versions of
the web container software and Sun™ ONE Identity Server software.
Web Containers
The Sun™ ONE Web Server and Sun™ ONE application Server web containers can
be installed using the Java Enterprise System installer and can be installed along
with the Directory Server, Identity Server, and Portal Server in a single install
session. If you choose to install the Sun ONE Portal Server and required
components in a single session, no pre-install steps are necessary.
39
Installing Sun ONE Portal Server
However, if you choose to install the Sun ONE Portal Server later, into an existing
installation of the Sun ONE Web Server or the Sun ONE Application Server, the
web container instance must first be restarted.
If you choose to deploy the Sun ONE Portal Server on BEA WebLogic Server™ or
IBM WebSphere® Application Server web containers, these products must first be
installed and started according to their product documentation.
Installing Sun ONE Portal Server
The Sun ONE Portal Server is installed as a component product of the Java
Enterprise System enterprise solution. The Java Enterprise System provides a
common installer that is used to install the Sun ONE Portal Server and the required
component products required to run Sun ONE Portal Server.
Based on the information gathered from the checklists in Chapter 1, if you have
performed a minimal installation with the Java Enterprise System installer, use the
configurator script to configure the Sun ONE Portal Server. The configurator
script is located in portal-server-install-root/SUNWps/lib.
Sun ONE Portal Server components that can be installed are:
•
Sun ONE Portal Server
•
Sun ONE Portal Server, Secure Remote Access
•
Gateway
•
Netlet Proxy
•
Rewriter Proxy
The Sun ONE Portal Server, Sun ONE Portal Server Secure Remote Access, the
gateway, Netlet Proxy, and Rewriter Proxy, can be installed on a single machine
(on the Sun ONE Portal Server web application node), or they can be installed on
separate nodes. However, the gateway should be installed on a separate node.
In this release, the communication channels are now installed with the Sun ONE
Portal Server software. The communication channels consist of mail, calendar,
address book, and instant messaging channels.
To Install the Sun ONE Portal Server Software
To install the Sun ONE Portal Server software:
1.
40
Use the Java Enterprise System install wizard to select Sun ONE Portal Server.
Sun ONE Portal Server 6.2 • Installation Guide • March 2004
Installing Sun ONE Portal Server
2.
Select the Sun ONE Portal Server components you want to install.
The Sun Java Enterprise System install wizard lets you select multiple Sun
ONE Portal Server components to be installed on one machine. For example,
you can choose to install the following components on a single machine:
❍
Sun ONE Portal Server portal software
❍
Sun ONE Portal Server, Secure Remote Access Support
❍
Netlet Proxy
❍
Rewriter Proxy
NOTE
3.
When installing the gateway, Netlet Proxy, or Rewriter Proxy, you
must select secure remote access support to be installed on the
Portal Server node.
Use the Java Enterprise System install wizard to complete the configuration
and to install the selected components.
To Install the Sun ONE Portal Server and the Gateway, the Netlet
Proxy, or theRewriter Proxy on A Separate Node
To install Sun ONE Portal Server, with the gateway, the Netlet Proxy, or the
Rewriter Proxy on a node other than the Sun ONE Portal Server node:
1.
Use the Java Enterprise System install wizard to select the following
component install options.
❍
Identity Server SDK Alone Install.
❍
The gateway, or the Netlet Proxy, or the Rewriter Proxy.
The gateway, or the Netlet Proxy or the Rewriter Proxy, need to be installed on
a machine with the Sun ONE Identity Server SDK.
2.
Use the Java Enterprise System install wizard to complete the configuration
and to install the selected components.
NOTE
When installing the gateway, or the Netlet Proxy, or the Rewriter
Proxy, you must select secure remote access support to be installed
on the Portal Server node.
Chapter 2
Installing Sun ONE Portal Server
41
Sun ONE Portal Server Post-Installation Tasks
NOTE
When installing the Sun ONE Identity Server SDK, give the same
encryption password key as the one that was given when the Sun
ONE Identity Server was installed.
Make sure to give the correct Sun ONE Identity Server details when
installing the Sun ONE Identity Server SDK.
For more installation details and specific download instructions see the Java
Enterprise System Installation Guide.
Sun ONE Portal Server Post-Installation Tasks
Post-installation tasks need to be performed for each of the following components:
•
Sun ONE Portal Server
•
Secure Remote Access
•
Gateway
•
Netlet and Rewriter Proxy
Sun ONE Portal Server
To access the Portal Server or the Identity Server administration console the
directory server and the web container must first be started.
Use the following command to start a local installation of the directory server:
/var/opt/mps/serverroot/slapd-hostname/start-slapd
NOTE
To provide UNIX login for your users, configure UNIX
authentication in the Portal Server administration console, then stop
and restart the amserver:
/etc/init.d/amserver stop
/etc/init.d/amserver start
42
Sun ONE Portal Server 6.2 • Installation Guide • March 2004
Sun ONE Portal Server Post-Installation Tasks
The following post-installation tasks depend on the type of web container on
which you deployed the Sun ONE Portal Server.
•
Sun ONE Web Server
•
Sun ONE Application Server
•
BEA WebLogic Server
•
IBM WebSphere Application Server
Sun ONE Web Server
To start the Sun ONE Web Server:
1.
Start the admin instance. In a terminal window type:
cd web-server-install-root/https-admserv
./start
2.
Access the Sun ONE Web Server administration console.
3.
Click Apply Changes to restart the web container.
Sun ONE Application Server
Configuring the Application Server Instance
1.
Start the admin instance. In a terminal window, type:
cd /var/opt/SUNWAppserver7/domains/domain1/admin
./start
2.
In a browser, go to the Sun ONE Application Server administration console.
The default URL is
http://hostname:4848
3.
In the left navigation frame, click on the key to left of App Server Instances.
4.
Select server1 or the name of the application server instance on which Sun
ONE Identity Server was installed.
5.
Click Apply Changes.
Stopping and Starting the Sun ONE Application Server
Start the Sun ONE Application Server instance.
Chapter 2
Installing Sun ONE Portal Server
43
Sun ONE Portal Server Post-Installation Tasks
In a terminal window, change directories to the application server’s instances
utilities directory and run the startserv script. The following example assumes
that the default application server domain and instance have been used.
cd /var/opt/SUNWappserver7/domains/domain1/server1/bin
./startserv
To stop and start the Sun ONE Application Server using the asadmin utility or
from the Sun ONE Application Server administration console, consult the Sun
ONE Application Server documentation.
Changing the MIME Mapping for Secure Remote Access
If You have installed Secure Remote Access on the Sun ONE Portal Server node:
1.
Replace the following mime mapping entry in each gateway profile, from
something similar to:
JAVASCRIPT=application/x-javascript
to:
JAVASCRIPT=application/x-javascript:text/javascript
2.
Save the profile.
3.
Restart the gateway.
4.
Modify /var/opt/SUNWappserver7/domains/domain1/server1/config/
server.policy as follows:
permission java.net.SocketPermission”*”,”connect,accept,listen,resolve”
permission
java.io.FilePermission”<<ALLFILES>>”,”read,write,execute,delete”
5.
Restart the application server.
BEA WebLogic Server
When deploying the Portal Server on BEA WebLogic Server, perform the following
steps following the installation of the Sun ONE Portal Server software.
44
Sun ONE Portal Server 6.2 • Installation Guide • March 2004
Sun ONE Portal Server Post-Installation Tasks
1.
Check the
/var/sadm/install/logs/Java_Enterprise_System_install.B/MMddhhmm file for
errors.
MM = month
dd = day
hh = hour
mm = minute
2.
Run the perftune script.
3.
Comment out the following line in the startWebLogic.sh script. An example
location for this script is
/opt/bea/wlserver6.1/config/mydomain/startWebLogic.sh
#JAVA_OPTIONS="-hotspot $JAVA_OPTIONS"
Using the -hotspot option causes the server to hang with out-of-memory
errors.
4.
Stop all BEA WebLogic Server instances (the admin and managed servers).
5.
Start the BEA WebLogic admin server instance. If you have installed on a
managed instance, start the managed instance too.)
6.
From the command line, execute the following:
portal-server-install-root/SUNWps/bin/deploy
Choose the default for the deploy URI and server instance name, and enter the
BEA WebLogic Server admin password when prompted.
7.
Execute the following command:
portal-server-install-root/SUNWps/lib/postinstall_PortletSamples
Enter the BEA WebLogic Server admin password and the Identity Server
admin password when prompted.
This deploys the portletsamples.war file.
8.
Restart the BEA WebLogic Server instance into which Sun ONE Portal Server
was deployed.See your web container documentation for instructions on
starting the web container instance.
Chapter 2
Installing Sun ONE Portal Server
45
Sun ONE Portal Server Post-Installation Tasks
NOTE
In the case of a managed server installation, the .war files do not get
deployed. The .war files should be deployed using the BEA
WebLogic Server administration console.
If you will be supporting multiple authentication methods, for example, LDAP,
UNIX, Anonymous, you must add each authentication type to the Core
authentication service to create an authentication menu. See the Sun ONE Portal
Server 6.2 Administrator’s Guide for further information.
IBM WebSphere Application Server
1.
Check the
/var/sadm/install/logs/Java_Enterprise_System_install.B/MMddhhmm file for
errors.
2.
Stop and restart the application server instance and the application server
node. See your web container documentation for instructions on starting the
web container instance.
When downloading the NetFile, NetMail and Netlet applet archives, the
content-type is set to text/html in the response header. You need to explicitly
associate the .jar and .cab extension to mime type application/octet-stream in the
portal web application deployment descriptor file. By default, the deployment
descriptor file is located at:
/opt/WebSphere/AppServer/installedApps/PortalURI.ear/portal.war/
WEB-INF/web.xml
1.
Add the following lines to the file after the line containing:
</session-config>:
<mime-mapping>
<extension>jar</extension>
<mime-type>application/octet-stream</mime-type>
</mime-mapping>
<mime-mapping>
<extension>cab</extension>
<mime-type>application/octet-stream</mime-type>
</mime-mapping>
46
Sun ONE Portal Server 6.2 • Installation Guide • March 2004
Sun ONE Portal Server Post-Installation Tasks
NOTE
2.
During migration the mime mappings configuration necessary for
the Secure Remote Access product are removed. These mappings
need to be added again after migration is done.
Restart the application server.
Secure Remote Access
When using the Sun ONE Portal Server with the gateway, the gateway Certificate
Authority (CA) certificate must be added to the Sun ONE Portal Server trusted CA
list, regardless of whether the Sun ONE Portal Server is running in HTTP or HTTPs
mode.
When a user session time out or user session logout action happens, the Sun ONE
Identity Server sends a session notification to the gateway. Even when the Sun
ONE Identity Server is running in HTTP mode, it will act as an SSL client using
HttpsURLConnection to send the notification. Since it is connecting to an SSL
server (the gateway), it should have the gateway CA certificate as part of the
Trusted CA list or it should have an option to allow self signed certificate.
NOTE
The method for adding the CA to the trusted CA list depends on the
protocol handler defined.
To create HttpsURLConnection, the Java Virtual Machine (JVM™) property
-Djava.protocol.handler.pkgs needs to be set.
If Sun ONE Portal Server is running on the Sun ONE Web Server, this property is
correctly set to -Djava.protocol.handler.pkgs by default. The Sun ONE Identity
Server com.iplanet.services.comm package has the implementation of
HttpsURLConnection and it provides an option to add the flag
com.iplanet.am.jssproxy.trustAllServerCerts=true to accept self-signed
certificates from any SSL server.
The -Djava.protocol.handler.pkgs is not set by default for the Sun ONE
Application Server, BEA WebLogic Server and IBM WebSphere Application
Server. The HttpsURLConnection implementation for supported application
servers must use their own default handler (this could be JSSE or custom SSL
implementation).
Chapter 2
Installing Sun ONE Portal Server
47
Sun ONE Portal Server Post-Installation Tasks
Gateway
1.
Start the gateway using the following command:
gateway-install-root/SUNWps/bin/gateway -n new-profile-name start
default is the default name of the gateway profile that is created during
installation. You can create your own profiles later, and restart the gateway
with the new profile. See Creating a Gateway Profile in Chapter 2 of the Sun
ONE Portal Server, Secure Remote Access 6.2 Administrator’s Guide.
If you have multiple gateway instances, use:
gateway-install-root/SUNWps/bin/gateway start
NOTE
This step is not required if you chose y for the Start Gateway after
installation option during the gateway installation.
CAUTION
Ensure that only the configuration files for the instances that you
want to start are in the /etc/opt/SUNWps directory.
If you want to stop all the gateway instances that are running on that particular
node, use the following command:
gateway-install-root/SUNWps/bin/gateway stop
The Netlet and the gateway need Rhino JavaScript™ parser (bundled as
rhino/js.jar) for PAC file support. This must be installed in the Gateway and
Portal Server node. To install, copy rhino/js.jar to ${JAVA_HOME}/jre/lib/ext
directory.
Netlet and Rewriter Proxy
Before starting the Netlet Proxy and the Rewriter Proxy, ensure that the gateway
profile is updated with the Netlet Proxy and the Rewriter Proxy options.
•
If you did not choose the option to start the Netlet Proxy during installation,
you can start the Netlet Proxy manually. In the directory,
portal-proxy-install-root/SUNWps/bin, type:
./netletd -n default start
48
Sun ONE Portal Server 6.2 • Installation Guide • March 2004
Sun ONE Portal Server Post-Installation Tasks
•
If you did not choose the option to start the Rewriter Proxy manually during
installation, you can start it manually. In the directory
portal-proxy-install-root/SUNWps/bin, type:
./rwproxyd -n default start
NOTE
Ensure that you enable the Access List service for all users, to allow
access through the gateway.
The Sun ONE Portal Server Gateway, Netlet Proxy, and Rewriter Proxy work only
with the JSS 3.2, NSS 3.4.2, and NSPR 4.2. After installing Gateway, Netlet Proxy,
and Rewriter Proxy:
1.
Download and copy the required JSS, NSS, or NSPR versions into the
/usr/share/lib directory.
2.
Restart the Gateway, Netlet Proxy, and Rewriter Proxy.
NOTE
This should be done only for the stand alone installation of
Gateway, Netlet Proxy, and Rewriter Proxy.
The Sun ONE Portal Server software NetFile needs jCIFS libraries (bundled as
SUNWjcifs) for Windows access. This needs to be installed in Portal Server node
only. To install, use the following steps.
1.
Add this package by running pkgadd -d . SUNWjcifs from the current (this)
directory.
2.
Run portal-server-install-root/SUNWps/bin/postinstall_JCIFS
3.
Run portal-server-install-root/SUNWps/bin/undeploy followed by
portal-server-install-root/SUNWps/bin/deploy command.
4.
Restart the server.
Chapter 2
Installing Sun ONE Portal Server
49
Verifying the Sun ONE Portal Server Installation
Configuring Sun ONE Portal Server After A
Minimal Install
After performing a minimal configuration installation with the Java Enterprise
System installer, use the Portal Server configurator script to configure the Sun ONE
Portal Server component product. The checklists in Chapter 1 of this guide
describe the parameters used to configure the Sun ONE Portal Server component
product.
To run the configurator:
1.
As root in a terminal window, go to the directory that contains the configurator
script:
cd portal-server-install-root/lib
2.
Run the configurator script by typing:
./configurator
NOTE
To turn on debugging:
configurator -DPS_CONFIG_DEBUG=y
If you turn on debugging, passwords are displayed on the screen as
well as the debugging information.
Verifying the Sun ONE Portal Server Installation
Accessing the Sun ONE Portal Server
Administration Console and Desktop
To Access the Sun ONE Identity Server Administration Console
1.
Open a browser.
2.
Type protocol://hostname.domain:port/amconsole
For example,
http://example.com/amconsole
50
Sun ONE Portal Server 6.2 • Installation Guide • March 2004
Verifying the Gateway Installation
3.
Enter the administrator’s name and password to view the administration
console.
This is the name and password you specified at the time of installing the Sun
ONE Identity Server software.
To Access the Sun ONE Portal Server Desktop
Verify the Sun ONE Portal Server installation by accessing the Desktop. Use the
following URL to access the Desktop:
protocol://fully-qualified-hostname/portal-URI
For example,
http://example.com/portal
When you access the Desktop, the Authless Desktop is displayed. This allows users
accessing the Desktop URL to be authenticated automatically and granted access to
the Desktop.
If the sample Portal Desktop displays without any exception, then your Portal
Server installation is good.
Verifying the Gateway Installation
1.
Run the following command to check if the gateway is running on the specified
port:
netstat -an | grep port-number
where the default gateway port is 443.
If the gateway is not running, start the gateway in the debug mode, and view
messages that are printed on the console. Use the following command to start
the gateway in debug mode:
portal-server-install-root/SUNWps/bin/gateway -n profilename start debug
Also view the log files after setting the gateway.debug attribute in the
platform.conf.profilename file to message. See the section Understanding the
platform.conf File in Chapter 2, “Administering Gateway” in the Sun ONE
Portal Server, Secure Remote Access 6.2 Administrator’s Guide, for details.
Chapter 2
Installing Sun ONE Portal Server
51
Verifying the Gateway Installation
2.
Run the Portal Server in secure mode by typing the gateway URL in your
browser:
https://gateway-machine-name:portnumber
If you have chosen the default port (443) during installation, you need not
specify the port number.
3.
Login to the directory server administration console as administrator using the
user name amadmin, and using the password specified during installation.
You can now create new organizations, roles, and users and assign required
services and attributes in the administration console.
52
Sun ONE Portal Server 6.2 • Installation Guide • March 2004
Chapter 3
Uninstalling the Sun ONE Portal
Server
The Sun™ ONE Portal Server software, the gateway, the Netlet Proxy and the
Rewriter Proxy are uninstalled using the Java™ Enterprise System uninstaller. For
instructions on how to remove the software, see the Java Enterprise System
Installation Guide.
The uninstall log is located at:
/var/sadm/install/Java_Enterprise_System_uninstall.B/MMddhhmm
After removing the Sun ONE Portal Server software, stop and start the Sun™ ONE
Identity Server instance or instances.
1.
Stop all instances using:
/etc/init.d/amserver stopall
2.
Restart all the instances using:
/etc/init.d/amserver startall
NOTE
If you are uninstalling a Sun ONE Portal Server deployed on Sun™
ONE Web Server and have created server instances with the
multiserverinstance command, you need to delete each created
instance. See Appendix D “Creating and Deleting Instances of the
Server”for instructions on removing instances.
53
54
Sun ONE Portal Server 6.2 • Installation Guide • March 2004
Chapter 4
Tuning the Sun ONE Portal Server
This chapter describes the configuration parameters for optimizing the
performance and capacity of the Sun™ ONE Portal Server. The perftune script (in
portal-server-install-root/SUNWps/bin directory), bundled with Sun ONE Portal Server,
automates most of the tuning process discussed in this chapter.
Introduction
The perftune script:
•
Tunes the Solaris™ Operating System Kernel and TCP settings (see Solaris
Tuning)
•
Modifies the following configuration files as part of:
❍
Sun ONE Web Server 6.0 Tuning:
•
web-server-install-root/SUNWwbsvr/webserver-instance/config/
magnus.conf
•
web-server-install-root/SUNWwbsvr/webserver-instance/config/
web-apps.xml
•
web-server-install-root/SUNWwbsvr/webserver-instance/config/
server.xml
•
❍
Sun ONE Directory Server Tuning:
•
❍
web-server-install-root/SUNWwbsvr/https-admserv/start-jvm
/var/opt/mps/serverroot/slapd-hostname/config/dse.ldif
Sun ONE Identity Server Tuning:
•
directory-server-install-root/SUNWam/config/ums/serverconfig.xml
55
Tuning Strategies
•
❍
Sun ONE Portal Server Desktop Tuning
•
•
directory-server-install-root/SUNWam/lib/AMConfig.properties
/etc/opt/SUNWps/desktop/desktopconfig.properties
Modifies properties of the Sun ONE Portal Server Desktop service and Sun™
ONE Identity Server authentication service.
Tuning Strategies
When you run the perftune script, performance tuning options for two typical
usage scenarios, called Production Optimum and Production Large, is offered.
These scenarios are defined to address the majority of Sun ONE Portal Server
usage patterns. These deployment scenarios are characterized by the following:
•
Production Optimum:
❍
Higher level of concurrent user requests
❍
Small number of connected users (few hundreds per instance)
❍
CPU bound
❍
❍
•
Most important Java™ Virtual Machine (JVM™) performance factors are
throughput and promptness
Predominance of short-lived objects life time distribution
Production Large:
❍
Lower level of concurrent user requests
❍
Large number of connected users (couple thousands per instance)
❍
Memory bound
❍
Most important JVM performance factor is JVM memory capacity
❍
Predominance of long-lived objects life time distribution
For example, during peak hours in a business to enterprise portal, a significant
number of the company’s employees connect to the portal at the same time in a
production large environment.
56
Sun ONE Portal Server 6.2 • Installation Guide • March 2004
Memory Allocation
Memory Allocation
The larger amount of memory to allocate per JVM is determined by two
parameters:
1.
Maximum size of physical memory per CPU. On E45* class of machines it is
about 1 GB
2.
Recommended number of instances per CPU for performance and scalability is
still 1:1 (one instance per CPU) for Sun ONE Portal Server for optimum
performance. For production large, the ratio is rather 1:2 (one instance per 2
CPUs) which allows a maximum JVM heap size of 2 GB.
The JVM performance matrix driving the tuning effort looks at the throughput,
footprint, and promptness as defined below. The second, third, and fourth
columns show the level of performance in the areas of throughput, footprint, and
promptness for production optimum and production large environments
respectively.
throughput
footprint
promptness
production optimum
high
less critical
high
production large
less critical
low
less critical
Here:
•
throughput refers to the time not spent in GC
•
footprint refers to a working set of process
•
promptness refers to the time between when a object becomes dead and when
memory it occupies becomes available
Tuning Instructions
When you run the perftune script, you can specify whether or not to execute the
following tuning recommendation. Review the recommendations carefully and use
the perftune script to execute these recommended modifications.
To run the perftune script:
Chapter 4
Tuning the Sun ONE Portal Server
57
Tuning Instructions
1.
Log in to the machine and become super user.
You need root access to run this script.
2.
Change directories to portal-server-install-root/SUNWps/bin.
3.
Enter:
./perftune.
The perftune script performs start and stop operation of servers during tuning
process. It creates backup copies of modified files in filename-orig-date-pid format.
Reboot the system after running the script to take effect tuning changes.
Solaris Tuning
Kernel Tuning
To the /etc/system file, the script appends the following setters:
•
•
File Descriptor Limits - Number of open files limits
❍
set rlim_fd_max=16384
❍
set rlim_fd_cur=16384
Stream queue Size - The depth of the syncq (number of messages) before a
destination streams queue generates a QFULL
❍
•
set sq_max_size=0
TCP Connection Hash Size (<= file descriptors)
❍
set tcp:tcp_conn_hash_size=8192
TCP Parameters Tuning
Changes to TCP parameters (shown within parenthesis) in /dev/tcp include:
58
•
TCP Time Wait Interval (tcp_time_wait_interval) - The amount of time a TCP
socket will remain in the TIME_WAIT state (after the connection is closed) is
set to 60000
•
TCP Fin Wait 2 Interval (tcp_fin_wait_2_flush_interval) - The amount of
time a TCP socket will remain in the FIN_WAIT_2 state (after the connection is
closed) is set to 60000
Sun ONE Portal Server 6.2 • Installation Guide • March 2004
Tuning Instructions
•
TCP Maximum Connection Size (tcp_conn_req_max_q) - The maximum number
of fully established connection is set to 8192
•
TCP List Queue (tcp_conn_req_max_q0) - The size of the queue containing
unestablished connections is set to 8192
•
TCP Packet Drop Time (tcp_ip_abort_interval) - The amount of time before a
packet is dropped is set to 60000
•
TCP Keep Alive Interval (tcp_keepalive_interval) - This is set to 90000
•
TCP Maximum Retransmit Interval (tcp_rexmit_interval_max) - This is set to
6000
•
TCP Minimum Retransmit Interval (tcp_rexmit_interval_min) - This is set to
3000
•
TCP Initial Retransmit Interval (tcp_rexmit_interval_initial) - This is set to
500
•
TCP Smallest Anonymous Port (tcp_smallest_anon_port) - This is set to 1024
•
TCP Initial Packets for Slow Start Algorithm (tcp_slow_start_initial) - This is
set to 2
•
TCP Transmit/Receive Buffer Size Limit (tcp_xmit_hiwat and tcp_recv_hiwat)
- These are set to 32768 each
In order to execute the ndd commands automatically when the system is rebooted,
the perftune script copies the S99ndds_tcp file into /etc/rc2.d/ directory.
Sun ONE Identity Server Tuning
Directory Server Connection Pool
Changes made to the portal-server-install-root/SUNWam/config/ums/serverconfig.xml
file are as follows:
•
Increases the minimum connection pool size to 10
•
Increases the maximum connection pool size to 90
LDAP Authentication Service
•
Updates LDAP connection pools default size (min:max) to 10:90
Chapter 4
Tuning the Sun ONE Portal Server
59
Tuning Instructions
LDAP Authentication
•
Specifies DN to Start User Search to ou=people,o=<organization>,o=isp
•
Specifies Search Scope to OBJECT
Sun ONE Identity Server Services Configuration Parameters
Changes are made to the portal-server-install-root/SUNWam/lib/AMConfig.properties
file as follows:
•
Specifies com.iplanet.am.logstatus to INACTIVE
•
Increases com.iplanet.am.session.maxSession (default 50000) if expected
number of concurrent sessions exceeds this value
•
Disables com.iplanet.am.session.httpSession.enabled
The following threadpool properties in the /opt/SUNWam/lib/AMConfig.properties
file are exposed in Sun ONE Portal Server 6.2:
•
com.iplanet.am.notification.threadpool.threshold. This property indicates
the maximum size of the task queue in the thread pool. The thread pool will
reject further requests if the number of unprocessed tasks in the queue exceeds
that threshold value. This number depends on the system memory resource.
Each task requires about 3k. You should decide how many tasks can be queued
given the size of thread pool. A task is queued only when no thread in the pool
is available.
The default value is set at 100. This might be high for your particular usage,
and can be adjusted. For example use a value of 40 for a 4-CPU Ultra Sparc II or
III machine.
•
com.iplanet.am.notification.threadpool.size. This parameter allows
reliable authentication for Sun ONE Portal Server on Sun™ ONE Application
Server under a heavy load. The default value is 10 but can be changed. For
example, a value of 50 should be used for a 4-CPU Ultra Sparc II or III machine.
Sun ONE Directory Server Tuning
If the Sun™ ONE Directory Server is shared by other applications, you may need
to verify that those parameters are not conflicting with the other application’s
parameters tuning.
60
Sun ONE Portal Server 6.2 • Installation Guide • March 2004
Tuning Instructions
Enough virtual memory space must be provisioned for /tmp/slapd-DSinstance1 and
the total amount of used memory, including the allocated for database caching,
should not exceed the size of physical memory to avoid paging. In any events, the
cumulative values of nsslapd-dbcachesize + nsslapd-cachememsize + fixed
memory used for slapd process itself cannot exceed the 4 GB of process address
space. Nslapd is a 32-bit application.
With regard to the sizing of resources pooling (connections and threads), Sun ONE
Directory Server provides best performance with a concurrency level of around 15
for search type of operations.
The perftune script tunes ns-slapd threading, db cache and database file system
mapping in the /var/opt/mps/serverroot/slapd-hostname/config/dse.ldif file as
follows:
•
Under dn: cn=config LDAP entry:
❍
Adds the line nsslapd-threadnumber to nThreads. In most cases, default
value (30) should be fine unless a fair amount of profile changes (LDAP
writes) is expected, in which case, the script applies the following formula:
nThreads = 30 for 1 CPU, nThreads = 45 for 2 CPUs, nThreads = 60 for
3 CPUs, nThreads = 90 for 4 CPUs.
❍
•
Under dn: cn=config,cn=ldbm database,cn=plugins,cn=config LDAP entry:
❍
Adds the line nsslapd-db-home-directory to /tmp/slapd-dsame1
❍
Changes the line nsslapd-maxthreadsperconn to 20
❍
•
Specifies nsslapd-accesslog-logging-enabled to off to disable access log
Modifies the line nsslapd-dbcachesize to newSize where newSize = 1.2 *
size of all db3 files located under
/var/opt/mps/serverroot/slapd-hostname/db/userRoot.
Under dn: cn=userRoot,cn=ldbm database,cn=plugins,cn=config LDAP entry,
modifies the line nsslapd-cachememsize to newSize where newSize = 3 * the
size of id2entry.db3.
NOTE
If you are tuning the Sun ONE Directory Server manually, you need
to stop the Sun ONE Directory Server before tuning these
parameters.
Chapter 4
Tuning the Sun ONE Portal Server
61
Tuning Instructions
Sun ONE Web Server 6.0 Tuning
The following describe the JVM Tuning offered by the perftune script to help tune
Sun™ ONE Web Server for Sun ONE Portal Server performance in the Production
Optimum and Production Large environments.
For Production Optimum
Heap size
Heap size is the most significant option that needs attention. Consult the Sun ONE
Web Server tuning guide for details on these parameters. The perftune script:
1.
2.
Specifies the following in magnus.conf located at
web-server-install-root/SUNWwbsvr/https-hostname/config
❍
RqThrottle 256
❍
StackSize 393216
❍
ThreadIncrement 20
❍
ConnQueueSize 20000
Specifies the following (modifications shown in bold) in web-apps.xml file
located at web-server-install-root//https-/hostname//config. That is, it:
❍
Defines the following session manager above the web-app tags:
<session-manager
class="com.iplanet.server.http.session.IWSSessionManager>
<init-param>
<param-name>maxSessions</param-name>
<param-value>50000</param-value>
</init-param>
<init-param>
<param-name>timeOut</param-name>
<param-value>360</param-value>
</init-param>
<init-param>
<param-name>reapInterval</param-name>
<param-value>180</param-value>
62
Sun ONE Portal Server 6.2 • Installation Guide • March 2004
Tuning Instructions
</init-param>
</session-manager>
❍
❍
Increases maxSession (default 50000) if expected number of concurrent
sessions exceeds this value.
Defines the classes reload interval to 5 minutes (default 30 seconds)
<class-loader classpath="[...]" delegate="false"
reload-interval="300"/>
3.
Specifies the following in server.xml file at
web-server-install-root//https-/hostname//config for JVM Tuning
4.
❍
jvm.minHeapSize=1073741824
❍
jvm.maxHeapSize=1073741824
❍
jvm.option=-Xrs
❍
jvm.option=-server
❍
jvm.option=-XX:MaxPermSize=128M
❍
jvm.option=-XX:PermSize=128M
❍
jvm.option=-XX:+OverrideDefaultLibthread
❍
jvm.option=-XX:MaxNewSize=256M
❍
jvm.option=-XX:NewSize=256M
Specifies the following in start-jvm file for alternate T2 libthread
NSES_JRE_RUNTIME_LIBPATH=/usr/lib/lwp:${NSES_JRE}/lib/sparc/server:${NSES_
JRE}/lib/sparc:${NSES_JRE}/lib/sparc/classic:${NSES_JRE}/lib/sparc/native_
threads;export NSES_JRE_RUNTIME_LIBPATH
For Production Large
1.
2.
Specifies the following in magnus.conf located at
web-server-install-root/SUNWwbsvr/https-hostname/config
❍
RqThrottle 256
❍
StackSize 131072
Specifies the following in web-apps.xml file located at
web-server-install-root//https-/hostname//config.
Chapter 4
Tuning the Sun ONE Portal Server
63
Tuning Instructions
❍
Defines the session manager as follows above the web-app tags.:
<session-manager
class="com.iplanet.server.http.session.IWSSessionManager>
<init-param>
<param-name>maxSessions</param-name>
<param-value>50000</param-value>
</init-param>
<init-param>
<param-name>timeOut</param-name>
<param-value>360</param-value>
</init-param>
<init-param>
<param-name>reapInterval</param-name>
<param-value>180</param-value>
</init-param>
</session-manager>
❍
3.
Increases maxSession (default 50000) if expected number of concurrent
sessions exceeds this value.
Specifies the following in server.xml file at
web-server-install-root//https-/hostname//config for JVM Tuning
jvm.minHeapSize=1073741824
jvm.maxHeapSize=2147483648
jvm.option=-Xrs
jvm.option=-server
jvm.option=-XincGC
jvm.option=-XX:+UseLWPSynchronization
jvm.option=-XX:MaxPermSize=128M
jvm.option=-XX:PermSize=128M
jvm.option=-XX:+OverrideDefaultLibthread
jvm.option=-XX:MaxNewSize=256M
jvm.option=-XX:NewSize=256M
64
Sun ONE Portal Server 6.2 • Installation Guide • March 2004
Tuning Instructions
4.
Specifies the following in start-jvm file for alternate T2 libthread
NSES_JRE_RUNTIME_LIBPATH=/usr/lib/lwp:${NSES_JRE}/lib/sparc/server:${NSES_
JRE}/lib/sparc:${NSES_JRE}/lib/sparc/classic:${NSES_JRE}/lib/sparc/native_
threads;export NSES_JRE_RUNTIME_LIBPATH
NOTE
JVM Memory Heap size is 1 GB minimum and 2 GB maximum.
Young generation is proportionally smaller than for optimum
production so that more space is available for connected users.
Incremental (or Train) GC is more suitable to large production
because GC speed is less of a concern than long pauses due to the
potential large size of the old generation.
NOTE
If you have deployed the Sun ONE Portal Server on an application
server web container, the setup script changes the JVM maximum
heapsize and minimum heapsize to 128 MB for the application
server instance on which the Sun ONE Portal Server is installed. To
use a different minimum and maximum JVM heap size, go into the
Application Server’s administration console and set the minimum
and maximum JVM heap size values of your choice
Sun ONE Application Server 7.0 Tuning
When deploying the Sun ONE Portal Server on the Sun ONE Application Server,
the minimum and maximum heap size for the application server instance is set.
The recommended JVM options for Sun ONE Application Server 7.0 are as follows
for both JDK 1.4.1_01 and 1.4.2.
If the machine for the server can accommodate only 4 GB of physical memory, then
the value -Xms2048M can be used instead of -Xms3072M; with only 4 GB of the
physical memory, the JVM will not start if -Xms3072M is set. These JVM options
should override the JVM options set by the perftune script.
The full set of JVM parameters includes:
•
-Xms3072M
•
-Xmx3072M
Chapter 4
Tuning the Sun ONE Portal Server
65
Tuning Instructions
•
-XX:NewSize=256M
•
-XX:MaxNewSize=256M
•
-XX:PermSize=256M
•
-XX:MaxPermSize=256M
•
-XX:SurvivorRatio=128
•
-XX:SoftRefLRUPolicyMSPerMB=0
•
-XX:MaxTenuringThreshold=1
•
-XX:+UseParNewGC
•
-XX:+UseConcMarkSweepGC
•
-XX:+DisableExplicitGC
•
-XX:+OverrideDefaultLibthread
Setting Additional Sun ONE Application Server Parameters for
Gateway Reliability
To achieve optimal performance using Secure Remote Access, configure your
implementation as follows:
1.
Modify the identity-server-install-root/SUNWam/lib/configAmConfig.properties file
to set the notification threadpool size for the application server. At the top of
the file just below the following lines:
Sun, Sun Microsystems, the Sun logo, and iPlanet
* are trademarks or registered trademarks of Sun Microsystems,
* Inc. in the United States and other countries.
add the following lines to set the threadpool size to 200:
/*Notification Thread Pool Size*/
com.iplanet.am.notification.threadpool.size=200
66
2.
Log into the Portal Server administration console with the user name amadmin
and the passphrase you entered during the installation.
3.
Select Service Management in the View menu.
4.
Select SRA Configuration and then Gateway.
5.
Select the default server and click Edit.
Sun ONE Portal Server 6.2 • Installation Guide • March 2004
Tuning Instructions
6.
Check the Enable HTTP Connections checkbox.
7.
In the HTTP Port field, type 80 and click Save.
8.
Log in to the Sun ONE Application Server administration console as
administrator (admin) by entering http://fullservername:port in your browser’s
web address field. The default port is 4848. Use the password you entered at
installation.
9.
Select the application server instance where you installed the Identity Server.
10. Click JVM Settings and then JVM Options.
11. In the JVM Option field, enter the following string:
-Dhttp.keepAlive=false
12. Click Add and then Save.
13. Select the application server instance on which you will install Portal Server.
The right pane shows that the configuration has changed.
14. Click Apply Changes.
15. Click Restart.
16. The application server should automatically restart.
17. On the server where the gateway is installed, go to the /opt/SUNWps/bin/perf
directory and enter the following to run a script that will set tuning parameters
for Secure Remote Access:
./srapperftune
18. Modify the identity-server-install-root/SUNWam/lib/configAmConfig.properties file
to set the notification threadpool size for the gateway. At the top of the file just
below the following lines:
Sun, Sun Microsystems, the Sun logo, and iPlanet
* are trademarks or registered trademarks of Sun Microsystems,
* Inc. in the United States and other countries.
add the following lines to set the threadpool size to 200:
/*Notification Thread Pool Size*/
com.iplanet.am.notification.threadpool.size=200
Chapter 4
Tuning the Sun ONE Portal Server
67
Tuning Instructions
19. Go to the /opt/SUNWps/bin directory and modify the gateway file to set the
-Dhttp.keepAlive option to false and to increase the settings for the -Xms and
-Xmx heap size options.
By default, the srapperftune script sets the -Xms and -Xmx heap size options
to 1024. In the line defining the CMD settings options, increase the default
values defined for -Xms and -Xmx options to 2048 and add the string
-Dhttp.keepAlive=false. For example, the correct lines would be:
CMD="$JAVA_HOME/bin/java -server -Xms2048M -Xmx2048M
-XX:+OverrideDefaultLibthread -XX:ThreadStackSize=128
-XX:MaxPermSize=128M -XX:PermSize=128M -XX:MaxNewSize=256M
-XX:NewSize=256M -Dhttp.keepAlive=false -classpath ${CLASSPATH}
$DEFINES $PROXY_DEFINES $INSTANCE_DEFINES
com.sun.portal.netlet.eproxy.EProxy"
20. Modify the /etc/opt/SUNWps/platform.conf.default file to set the
gateway.protocol parameter to http and the gateway.port parameter to port 80
as follows:
gateway.protocol=http
gateway.port=80
21. Restart the gateway for the changes to take effect by typing the following
command:
portal-server-install-root/SUNWps/bin/gateway -n default start
•
where default is the default gateway profile created during installation.
Sun ONE Portal Server Desktop Tuning
For Production Optimum
•
For optimizing the Desktop Sessions, it disables Enable XML Parsing
Validation
Desktop sessions are different and disjoint from Sun ONE Identity Server
SSOToken sessions. If a Desktop session times out before the Sun ONE Identity
Server session expires, the Desktop transparently rebuilds the Desktop session
when it is queried. Decreasing Desktop sessions idle time-out helps reclaiming
memory used by session objects assuming production optimum is
characterized by short-lived user sessions.
68
Sun ONE Portal Server 6.2 • Installation Guide • March 2004
Tuning Instructions
•
The caller parameters are used to size the thread pool to render content
through the providers. The caller pool is initialized to size 0. Items are added to
to the pool as they are used and returned. The caller pool can expand to a very
large size, however, in the normal case it will only be as big as the number of
channels on the user’s Desktop. In cases where there are multiple concurrent
threads with the same sid, the pool may expand to an size that is n * m, where
n = the number of concurrent same-sid threads and m = the number of
channels on the Portal Desktop for the given sid.
The perftune script changes the following parameters for optimizing Provider
Caller Resource Pooling, in the
/etc/opt/SUNWps/desktop/desktopconfig.properties file:
❍
Increases callerPoolMinSize to 128
❍
Increases callerPoolMaxSize to 512
❍
Increases callerPoolPartitionSize to 16
❍
Increases templateScanInterval to 3600
For Production Large
The caller parameters are used to size the thread pool to render content through
the providers. The caller pool is initialized to size 0. Items are added to the pool as
they are used and returned. The caller pool can expand to a very large size,
however, in the normal case it will only be as big as the number of channels on the
user’s Portal Desktop. In cases where there are multiple concurrent threads with
the same sid, the pool may expand to an size that is n * m, where n = the number of
concurrent same-sid threads and m = the number of channels on the Portal
Desktop for the given sid.
The perftune script changes the following parameters for optimizing the Provider
Caller Resource Pooling, in the
/etc/opt/SUNWps/desktop/desktopconfig.properties file:
•
Increases callerPoolMinSize to 128
•
Increases callerPoolMaxSize to 512
•
Increases callerPoolPartitionSize to 16
•
Increases templateScanInterval to 3600
To minimize unnecessary memory growth due to spawning of Portal Desktop
caller threads when performing long-run tests, these properties (except for
templateScanInterval) should be changed back to their original default values.
Make the following changes to these properties:
Chapter 4
Tuning the Sun ONE Portal Server
69
Tuning Instructions
70
•
Change callerPoolMinSize back to 0
•
Change callerPoolMaxSize back to 0
•
Change callerPoolPartitionSize back to 0
•
Increase the templateScanInterval property from 30 to 3600
Sun ONE Portal Server 6.2 • Installation Guide • March 2004
Appendix A
Installing Third-party Software
This appendix provides information on installing and using third-party software
with Sun™ ONE Portal Server.
A separate third-party software CD called Sun Java Enterprise System Accessory
CD Volume 2 is packaged along with the Sun Java Enterprise System. This CD
contains the following software components to provide support required for some
features of Sun ONE Portal Server, Secure Remote Access:
•
JCIFS
•
Rhino (which provides JavaScript™ for Netlet file support)
Other third-party software that is supported by Sun ONE Portal Server, but that is
available as download-only software is nsco.jar file for IBM WebSphere
Application Server support
This appendix includes the following sections:
•
Installing the jICFS Software
•
Installing Rhino
Installing the jICFS Software
If you want to allow NetFile users access to Microsoft Windows networks, you
must install the jICFS server software on the Sun ONE Portal Server node.
NOTE
After installation, you need to specify the Samba client path in the
NetFile administration console, in the SMB Client Location field. By
default, this value is /usr/sfw/bin.
71
Installing Rhino
To Install the jICFS Software:
1.
As root, mount the third-party CD on the Portal Server node.
2.
Run the setup script.
./setup
3.
Select the option to install the Samba client.
The Samba software is installed in the /usr/sfw/bin directory. You do not have the
option of changing the installation path.
Installing Rhino
Rhino is a JavaScript that is required for Netlet file support.
To Install Rhino Software:
1.
As root, mount the third-party CD labeled on the Portal Server node.
2.
Change to the thirdparty/rhino directory.
3.
Copy the file js.jar to j2Sdk-path/jre/lib/ext.
where j2sdk-path is the path to the J2SDK installation on your machine.
72
Sun ONE Portal Server 6.2 • Installation Guide • March 2004
Appendix B
BEA WebLogic Server
Setting Up Sun ONE Portal Server on BEA
Clusters
This section gives a brief description and example of how the Sun™ ONE Portal
Server software can be used with BEA WebLogic Server™ clusters.
NOTE
•
For a cluster, all the machines must be on the same subnet. All
BEA WebLogic Server instances participating in the cluster
must listen on the same port. In order to run the Portal Server
software with session failover successfully you need three
managed servers running the Portal Server software.
•
Do not run perftune if you are planning on using clusters.
•
SRA does not work with clusters.
•
The BEA WebLogic Server proxy does not load balance. All
server instances in a BEA WebLogic cluster must use the same
listen port. The new cluster servlet needs to be used for
weblogic.servlet.proxy.HttpClusterServlet.
•
Resonate 3.3 cannot load balance a BEA WebLogic cluster.
For our example, there are five machines. All the machines must be on the same
subnet. One has a directory server only (DSmach). Another is the BEA WebLogic
administration server (AS). There are three cluster machines (CS1, CS2, and CS3). If
you want to support load balancing, an additional machine or the administration
server machine may be configured as a proxy servlet for load balancing. You may
also use a hardware-based load balancer. Load balancing is needed for clusters. In
this example, the proxy is on the administration server.
73
Setting Up Sun ONE Portal Server on BEA Clusters
Install the directory server on DSmach. Install BEA WebLogic Server on all four of
the other machines using the default installation. Check that all servers are
working correctly.
On the four machines with BEA WebLogic Server, using the BEA WebLogic
instructions, create a new domain (NEWDOMAIN on all machines) consisting of
an administration server with listen port of 7001 (ADMINSERVER on all machines)
and another server with a listen port of 80 (PORTALSERVER on all machines).
Each listen port should be the same; the example uses 80.
Next install the Portal Server software on the four machines to the managed server
instance (PORTALSERVER).
1.
Respond n to the question: Use these settings? [y]/n
A list of questions follows.
2.
Accept the default values except for these questions. These questions show the
values that need to be changed and important default values. This example is
for the BEA WebLogic administration server. The installation values for the
cluster machines is similar.
What is the Application Server domain? [mydomain] NEWDOMAIN
What is the Application Server instance? [myserver] PORTALSERVER
What is the Application Server administration port? [7001]
What port should be used to access the Portal Server? [80]
Use an existing Directory Server? y/[n] y
What is the name of the directory server?[...] DSmach
Answer the questions about the directory server appropriately.
3.
Stop and restart all the servers (the Portal Server, the managed server and the
administration server) on all the machines.
4.
Check and see that the installations were successful.
5.
Log in to the Sun ONE Identity Server admin console as administrator.
By default, Identity Management is selected in the location pane and All
created organizations are displayed in the navigation pane.
74
6.
Choose Service Configuration in the location pane.
7.
Click on the Properties arrow next to Platform in the navigation pane.
Sun ONE Portal Server 6.2 • Installation Guide • March 2004
Setting Up Sun ONE Portal Server on BEA Clusters
8.
Check that the Server List has the full-ps-servername for the machine you plan to
put the proxy on. In our example, the machine is http://AS.example.com:80.
9.
Click Save.
To set up a cluster:
1.
Using the administration console of the admin machine AS
(http://AS:7001/console), create a server for each of the machines to be in the
cluster.
a.
Select Servers, configure new Server.
b.
Use the machine name for the new servername: CS1, CS2, and CS3.
2.
Stop all the servers on the machines to be in the cluster.
3.
Restart those servers, but have them connect to the administration server AS.
For example,
./startManagedWebLogic.sh CS1 AS:7001
4.
Using the administration console of the administration machine AS
(http://AS:7001/console), create the cluster.
a.
Select Clusters, Configure a new Cluster.
For Name, the example uses NEWCLUSTER.
b.
For Address, put in the names for the servers representing the machines to
be clustered: CS1,CS2,CS3.
c.
Inside this same window, select the Servers tab, then select the servers CS1,
CS2, and CS3; move them from the Available box to the Chosen box.
For more detail, see the BEA WebLogic Server instructions to set up a cluster.
As you set up clusters remember the following:
•
Stop and restart all the servers each time you change the cluster configuration.
•
Set up your cluster on the administration server (AS) machine in the
NEWDOMAIN ADMINSERVER BEA WebLogic Server administration
console.
•
Use the BEA WebLogic Server tool to test for multicasting.
Appendix B
BEA WebLogic Server
75
Setting Up Sun ONE Portal Server on BEA Clusters
Check to see that cluster is set up correctly by going the BEA WebLogic Server
administration console, selecting Cluster in the left pane, selecting the Monitoring
tab in the right pane, then select Monitor server participation in cluster. If one or
more of the started server instances does not appear in the display, use the BEA
WebLogic Server tool to verify the correct multicast addresses and port numbers.
NOTE
If you want to start and stop the BEA WebLogic managed servers
remotely from the administration console, you need to configure
and run a BEA Node Manager. See the BEA WebLogic Server
documentation for detailed information.
If you are going to use a proxy servlet for load balancing, create a web.xml file for
your cluster to use to configure the load balancing servlet. Using a temporary
directory make a subdirectory WEB-INF. The web.xml file is the only file in a
directory (WEB-INF). Use the fully qualified machine names in the file.
Figure B-1
Sample web.xml File
<!DOCTYPE web-app PUBLIC "-//Sun Microsystems, Inc.
//DTD Web Application 2.2//EN"
"http://java.sun.com/j2ee/dtds/web-app_2_2.dtd">
<web-app>
<servlet>
<servlet-name>HttpClusterServlet</servlet-name>
<servlet-class>
weblogic.servlet.proxy.HttpClusterServlet
</servlet-class>
<init-param>
<param-name>WebLogicCluster</param-name>
<param-value>
CS1.domain.COM:80:7002|CS2.domain.COM:80:7002|CS3.domain.COM:80:7002
</param-value>
</init-param>
</servlet>
<servlet-mapping>
<servlet-name>HttpClusterServlet</servlet-name>
<url-pattern>/</url-pattern>
</servlet-mapping>
<servlet-mapping>
<servlet-name>HttpClusterServlet</servlet-name>
<url-pattern>*.jsp</url-pattern>
</servlet-mapping>
76
Sun ONE Portal Server 6.2 • Installation Guide • March 2004
Setting Up Sun ONE Portal Server on BEA Clusters
Figure B-1
Sample web.xml File
<servlet-mapping>
<servlet-name>HttpClusterServlet</servlet-name>
<url-pattern>*.htm</url-pattern>
</servlet-mapping>
<servlet-mapping>
<servlet-name>HttpClusterServlet</servlet-name>
<url-pattern>*.html</url-pattern>
</servlet-mapping>
</web-app>
1.
Make web.xml with your cluster server values into a .war file. In a terminal
window, type:
jar cvf proxy.war WEB-INF
2.
Deploy the .war file on the BEA WebLogic administration server using the java
weblogic.deploy command supplied by the BEA WebLogic Server software.
3.
In the BEA WebLogic Server administration console on the administration
server, expand Servers and select PORTALSERVER:80.
4.
Click the HTTP tab.
5.
Set the Default Web Application to the proxy.
6.
Restart the Portal Server.
Or after making the .war file, copy the .war file to the applications directory in
the new domain on the administration machine (AS).
7.
Select Web Applications.
8.
Click Configure a new Web Application.
9.
Enter proxy as the Name and give the complete path to the .war file.
10. Click Create.
11. In the left pane under Web Applications, click proxy.
12. In the right pane, click the Target tab, and move Portal Server from the
Available box to the Chosen box.
Next you need to deploy the Portal Server software to the cluster. For each web
application (amconsole, amserver, amcommon, ampassword and portal) follow
these steps.
Appendix B
BEA WebLogic Server
77
Setting Up Sun ONE Portal Server on BEA Clusters
1.
Go to the BEA WebLogic Server administration console for the administration
server (AS:7001/console).
2.
Expand Web Applications in the left pane, then select one of the Portal Server
software web applications (amconsole, amserver, amcommon, ampassword
and portal).
3.
Undeploy the admin server (you have installed Portal on the PORTALSERVER
server, but it is not part of the cluster, so now you remove it from this server).
a.
Select the Target tab, then the Servers sub-tab.
b.
Move your server name from Chosen to Available box and click Apply.
4.
Click the Edit Web Application Descriptor link; click the Configure a new Web
App Ext Descriptor link.
5.
In the left pane under WebApp Ext, Select Session Descriptor.
6.
In the right pane, change Persistent Store Type to replicated. Click Apply.
7.
Select top topic in the left pane, Web Descriptor or Identity Server Services.
Select Persist. Close this window.
8.
Select the Target tab, then the Cluster sub-tab.
9.
Move your cluster name (NEWCLUSTER) from Available to Chosen box and
click Apply.
10. For each of the three Portal Server machines, go to the
identity-server-install-root/SUNWam/lib directory and open the
AMConfig.properties files with a text editor.
11. Set the following values on all the machines:
com.iplanet.am.session.failover.enabled=true
com.iplanet.am.replica.enable=true
com.iplanet.am.naming.url=http://AS.example.com:80/amserver/namingservi
ce
com.iplanet.am.notification.url=http://AS.example.com:80/amserver/notif
icationservice
com.iplanet.am.session.server.host=AS.example.com
com.iplanet.am.server.host=ASNMS.example.com
com.iplanet.services.cdsso.CDCURL=http://AS.example.com:80/amserver/cdc
servlet
78
Sun ONE Portal Server 6.2 • Installation Guide • March 2004
Setting the Cookie Encoding Values
com.iplanet.services.cdc.authLoginUrl=http://AS.example.com:80/amserver
/login
12. Stop and restart all the servers. For the managed servers, on each machine,
type:
./startManagedWebLogic.sh managed-servername http://AS.example.com:80
13. Check to see if all is working well.
Setting the Cookie Encoding Values
The com.iplanet.am.cookie.encode property in the AMConfig.properties file
should be set to “true” when the target web container is BEA WebLogic Server or
WebSphere Application Server. This is necessary because WebLogic does not
automatically encode cookie values set by web applications.
Setting com.iplanet.am.cookie.encode to “true” under BEA WebLogic Server and
IBM WebSphere Application Server will prevent characters like the comma,
semi-colon and white space to be set in cookie values by Sun ONE Identity Server
without being escaped or encoded. When characters such as comma, semi-colon
and white space are set as cookie values directly without being encoded or
escaped, some web browsers will not parse the cookie value correctly. Thus, the
application will receive corrupted cookie values in subsequent requests.
When the target web container is WebLogic, edit the AMConfig.properties file and
set the value of the com.iplanet.am.cookie.encode property to true.
Appendix B
BEA WebLogic Server
79
Setting the Cookie Encoding Values
80
Sun ONE Portal Server 6.2 • Installation Guide • March 2004
Appendix C
IBM WebSphere Application Server
Sun™ ONE Portal Server 6.2 can be deployed on an WebSphere Application Server
4.0.5 Advanced Edition using it as its web application container.
Renaming an IBM WebSphere Application Server
Instance
To install the Portal Server, the application server instance to which you install
must already exist. You can create a new application server instance or use an
existing instance; however, the instance name must not contain a space.
The default instance name for IBM WebSphere Application Server is called
“Default Instance.” If this instance is not being used for other purposes, you can
deploy Sun ONE Portal Server to this instance, but you must change the instance
name to something that does not include a space.
To rename an IBM WebSphere Application Server instance:
NOTE
The admin server instance must be running.
The IBM WebSphere Application Server instance should not be
running.
1.
Access the WebSphere administration console by running.
/opt/WebSphere/AppServer/bin/adminclient.sh
2.
Expand the tree under Nodes to access the application server instance settings .
For example:
a.
Select Nodes.
81
Setting the Cookie Encoding Values
b.
Select Application Server.
c.
Select Default Server.
3.
In the Application Server field, change the instance name to one without a
space, for example Default_Server.
4.
Select Apply.
5.
Regenerate the WebSphere plugin.
a.
Right click on the deploy node.
b.
In the menu, select Regen Webserver Plugin.
6.
Stop the node.
7.
Restart the node.
If you want to create a new instance for deploying the portal server, use the Create
Application Server wizard in the administration console before starting the portal
server install.
To create a new instance:
1.
Open the admin console. For example, to start the console installed in the
default base directory of /opt, type:
/opt/WebSphere/AppServer/bin/adminclient.sh
2.
Click Console, Wizards, and Create Application Server.
3.
On the Specifying Application Server Properties page, enter the following:
Application Server: new_instance_name
Node to install server on: node_name
where node_name is the machine name on which the application server is
installed.
4.
Click Next and Finish.
Setting the Cookie Encoding Values
The com.iplanet.am.cookie.encode property in the AMConfig.properties file
should be set to “true” when the target web container is BEA WebLogic Server or
WebSphere Application Server. This is necessary because WebLogic does not
automatically encode cookie values set by web applications.
82
Sun ONE Portal Server 6.2 • Installation Guide • March 2004
Setting the Cookie Encoding Values
Setting com.iplanet.am.cookie.encode to “true” under WebLogic and WebSphere
will prevent characters like the comma, semi-colon and white space to be set in
cookie values by Sun ONE Identity Server without being escaped or encoded.
When characters such as comma, semi-colon and white space are set as cookie
values directly without being encoded or escaped, some web browsers will not
parse the cookie value correctly. Thus, the application will receive corrupted
cookie values in subsequent requests.
When the target web container is WebLogic, edit the AMConfig.properties file
and set the value of the com.iplanet.am.cookie.encode property to true.
Appendix C
IBM WebSphere Application Server
83
Setting the Cookie Encoding Values
84
Sun ONE Portal Server 6.2 • Installation Guide • March 2004
Appendix D
Creating and Deleting Instances of
the Server
An instance is a server that listens on a particular port, bound to either one or more
IP addresses. For the Sun™ ONE Portal Server, an instance corresponds to a web
server process listening on a port and running a single Java™ Virtual Machine
(JVM™).
NOTE
Multiple-instances are supported only with Sun™ ONE Web Server.
To Create an Instance of the Server
1.
Log in to the server running the Sun ONE Portal Server.
2.
Go to the Sun™ ONE Identity Server utilities directory
cd identity-server-install-root/SUNWam/bin
3.
Run the following command:
./amserver create
4.
Enter a name for the new instance when prompted.
5.
Enter an unused port for the new instance when prompted.
6.
If you want to create more instances, type y and press Enter when asked the
question:
Do you want to create more server instances? y/[n] y.
Repeat Step 4 and Step 5 for each instance that you wish to create. Otherwise
press Enter to create the server instances.
85
7.
Enter the amadmin password when prompted.
8.
Go to the web server install directory.
9.
To verify that the instance has been created, use the ls command.
10. Go to the directory for the newly created instance.
cd https-new-instance-name
11. Run the start script for the newly created instance.
./start
12. Go to the Portal Server utilities directory.
cd portal-server-install-root/SUNWps/bin
13. Run the multiserverinstance script.
./multiserverinstance
14. Enter the name of the instance from Step 4.
15. Enter the port of the new instance from Step 5.
16. If you have portlets, redeploy them. For instructions to redeploy portlets,
consult the Sun ONE Portal Server 6.2 Administrator’s Guide.
17. After the multiservinstance script exits, go to the web server instance directory.
cd web-server-install-root/https-new-instance-name
18. Stop the web server instance.
./stop
19. Restart the web server instance.
./start
20. Go to the newly created instance in a browser.
21. Repeat steps Step 9 through Step 20 for each newly created instance.
22. In a browser, enter:
❍
❍
http://hostname.domain:instance-portnumber/amconsole to access the
administration console through the new instance
http://hostname.domain:instance-portnumber/portal to access the default URL for
the Portal Desktop through the new instance
86
Sun ONE Portal Server 6.2 • Installation Guide • March 2004
If you create any additional server instances and you want to run them as non-root
or nobody, comment out the following lines for each instance at
identity-server-install-root/SUNWam/bin/amserver.instance-nickname
if [ ‘$ID | $AWK ’{print $1}’‘ != "uid=0(root)" ]; then
$ECHO "You must be root user. $BELL_CHAR"
exit 1
fi
To Delete an Instance of the Server
1.
Log in to the server running the Sun ONE Portal Server.
2.
Change directories to portal-server-install-root/SUNWps/bin.
cd portal-server-install-root/SUNWps/bin
3.
If you have portlets, remove them. For instructions, see the Sun ONE Portal
Server 6.2 Administrator’s Guide
4.
Enter:
./multiserverinstance delete -instance instance-name
5.
If you are also removing the Sun ONE Identity Server, change directories to the
Identity Server utilities directory.
cd identity-server-install-root/SUNWam/bin
6.
Enter:
./amserver delete instance-name
Appendix D
Creating and Deleting Instances of the Server
87
88
Sun ONE Portal Server 6.2 • Installation Guide • March 2004
Appendix E
Setting Up the Sun ONE Portal
Server to Use Secure External LDAP
Directory Server
In the default install, the Sun™ ONE Portal Server, the Sun™ ONE Identity Server,
and the Sun™ ONE Directory Server software are all running on the same host.
However, depending on the performance, security, and integration requirements
of your deployment, you might want to run the directory server on a separate,
external host and have the Portal Server access the directory over a secure
connection using Secure Sockets Layer (SSL). In order to access the Directory
Server over a secure connection, the Sun™ ONE Application Server must be
configured to trust the certificate authority that signed the directory’s certificate.
Setting up the Sun ONE Portal Server to use an external LDAP directory, requires
the following procedures:
•
Installing the Sun ONE Portal Server. See “Installing Sun ONE Portal Server”in
Chapter 2 of this guide.
•
Configuring the Directory Server to run SSL. See “Configuring the Directory
Server to Run in SSL.”
•
Creating a certificate database. See “Creating a Certificate Database.”
•
Installing a root Certificate Authority (CA) certificate. See “Installing A Root
Certificate Authority (CA) Certificate.”
•
Enabling SSL for the Directory Server. See “Enabling SSL for the Directory
Server.”
89
Configuring the Directory Server to Run in SSL
1.
Verify that both the Directory Server (ns-slapd process) and the administration
server (ns-httpd process) are started and running.
2.
As root, in a terminal window start the directory server console by typing:
/var/opt/mps/serverroot/startconsole
3.
In the login window that is displayed, enter admin as the user name and the
passphrase for the Directory Server.
4.
In the left pane of the console, expand the directory until you see the Directory
Server instance under Server Group.
5.
Select Directory Server instance and click Open.
6.
Select Tasks and then Manage Certificates.
The first time you perform this task, you’ll be asked to create a certificate
database by entering a password. Make a note of this password as you will
need it later to start up the Directory Server.
7.
Click Request.
The Certificate Request Wizard appears. Follow the wizard and complete the
steps to generate a certificate request. The request is sent to a Certificate
Management Server (CMS) for approval. The CMS returns the real certificate.
Save a copy of the certificate request by copying the request data to a file.
8.
After the certificate request is sent to the CMS, have the administrator of the
CMS approve the request and send back the approved certificate.
9.
Get the generated certificate for the DS and the CMS certificate.
Since the CMS generated the certificate for DS, the CMS will also have to be
trusted by importing its certificate as a root CA.
10. Select Manage Certificates, Server Certificates and then click Install.
The Certificate Install Wizard appears.
11. Copy and paste the approved certificate data from Step 8 into the text area and
follow the steps of the wizard to install the certificate.
When the certificate is successfully installed, the certificate displays as a line
item on the Server Certificates tab.
90
Sun ONE Portal Server 6.2 • Installation Guide • March 2004
12. Select Manage Certificates and CA Certificates, and then click Install.
Copy and paste the CMS certificate data into the text area and follow the steps
of the wizard to install the certificate.
13. Click Close to close the Manage Certificates window.
14. Select Configuration.
15. In the right pane, select Settings.
16. Verify or specify a valid port number in the Encrypted port field and click
Save.
The default is 636.
17. Click Encryption, check the Enable SSL for this server and Use the cipher
family: RSA check boxes and click Save.
18. Restart the Directory Server and supply the certificate database password
entered in Step 6.
Your Directory is now listening on port 636 (default) for SSL connections.
Creating a Certificate Database
When you create the certificate database, you specify a password that will be used
for a key-pair file. You will also need this password to start a server using
encrypted communications. For a list of guidelines to consider when changing a
password, see Changing Passwords or PINs.
In the certificate database you create and store the public and private keys, referred
to as your key-pair file. The key-pair file is used for SSL encryption. You will use
the key-pair file when you request and install your server certificate. The certificate
is stored in the certificate database after installation. The key-pair file is stored
encrypted in:
/var/opt/SUNWappserver7/domains/deploy-domain/deploy-instance/config/
key3.db.
The procedure for creating a certificate database depends on the type of web
container that you are using. The following instructions are for creating a certificate
database on the Sun ONE Web Server and can also be found in Sun ONE Web
Server, Enterprise Edition Administrator’s Guide at http://docs.sun.com.
Appendix E
Setting Up the Sun ONE Portal Server to Use Secure External LDAP Directory Server
91
For instructions on creating a certificate database on the Sun ONE Application
Server refer to Sun ONE Application Server 7 Administrator’s Guide to Security on
http://docs.sun.com.
Creating a Certificate Database
To create a certificate database on the Sun ONE Web Server, perform the following
steps:
1.
Access either the Administration Server or the Server Manager and choose the
Security tab.
For the Server Manager you must first select the server instance from the
drop-down list.
2.
Click on the Create Database link.
3.
Enter a password for the database.
4.
Repeat.
5.
Click OK.
6.
For the Server Manager, click Apply, and then Restart for changes to take
effect.
Using the password.conf File
By default, the web server prompts the administrator for the key database
password before starting up. If you want to be able to restart an unattended web
server, you need to save the password in a password.conf file. Only do this if your
system is adequately protected so that this file and the key databases are not
compromised.
Normally, you cannot start an Unix SSL-enabled server with the /etc/rc.local or
the /etc/inittab files because the server requires a password before starting.
Although you can start an SSL-enabled server automatically if you keep the
password in plain text in a file, this is not recommended. The server’s
password.conf file should be owned by root or the user who installed the server,
with only the owner having read and write access to them. On Unix, leaving the
SSL-enabled server’s password in the password.conf file is a large security risk.
Anyone who can access the file has access to the SSL-enabled server’s password.
Consider the security risks before keeping the SSL-enabled server’s password in
the password.conf file.
92
Sun ONE Portal Server 6.2 • Installation Guide • March 2004
Installing A Root Certificate Authority (CA)
Certificate
The procedure for installing a root CA certificate depends on the type of web
container that you are using. The following procedure describes how to install a
root CA on the Sun ONE Web Server, and can also be found in Sun ONE Web
Server, Enterprise Edition Administrator’s Guide at http://docs.sun.com.
For instructions on installing a root CA certificate on the Sun ONE Application
Server refer to Sun ONE Application Server 7 Administrator’s Guide to Security on
http://docs.sun.com.
1.
Go the Web Server console and click on Install Certificate.
2.
Click on Certificate for this Server.
3.
Enter the Certificate Database password in the Key Pair File Password field.
4.
Paste the certificate into the provided text field, or check the radio button and
enter the filename in the text box. Click Submit.
The browser will display the certificate, and provide a button to add the
certificate.
5.
Click Install Certificate.
6.
Click Certificate for Trusted Certificate Authority.
Enabling SSL for the Directory Server
To enable SSL for the Directory server, edit the AMConfig.properties file. This
step is container independent and must be done for Sun ONE Web Server as well
as Sun ONE Application Server.
Change the following settings in the AMConfig.properties file from:
com.iplanet.am.directory.ssl.enabled=false
com.iplanet.am.directory.host=server12.example.com (if it needs to be changed)
com.iplanet.am.directory.port=51389
to
Appendix E
Setting Up the Sun ONE Portal Server to Use Secure External LDAP Directory Server
93
com.iplanet.am.directory.ssl.enabled=true
com.iplanet.am.directory.host=server1.example.com
com.iplanet.am.directory.port=51631 (port on which DS uses encryption)
If you are using the Sun ONE Application Server as your web container, edit the
AMConfig.properties file to point to the certificate database path and prefix used
by Sun ONE Application Server.
Change the following settings from:
com.iplanet.am.admin.cli.certdb.dir=/opt/SUNWappserver7/SUNWam/servers/alias
com.iplanet.am.admin.cli.certdb.prefix=https-myappserver.example.com-example-
to:
com.iplanet.am.admin.cli.certdb.dir=/var/opt/SUNWappserver7/domains/domain1/\
server1/config
com.iplanet.am.admin.cli.certdb.prefix=
Change the connection port and the connection type values in the
serverconfig.XML file to change from open mode to SSL.
Edit the serverconfig.XML file and change the following line from:
<Server name="Server1" host="gimli.example.com"
port="51389"
type="SIMPLE" />
to:
to
<Server name="Server1" host="gimli.example.com"
port="51636"
type="SSL" />
94
Sun ONE Portal Server 6.2 • Installation Guide • March 2004
After making these changes to the configuration files (AMConfig.properties and
serverconfig.xml) restart the web container
If using Sun ONE Web Server type:
amserver stop
amserver start
Or use the appropriate method for stopping and starting the application server on
which Sun ONE Portal Server is installed.
Appendix E
Setting Up the Sun ONE Portal Server to Use Secure External LDAP Directory Server
95
96
Sun ONE Portal Server 6.2 • Installation Guide • March 2004
Appendix F
Configuring the Sun ONE Portal
Server to Run as User Non-Root
The following optional, post-install procedure describes the steps to configure a
Sun™ ONE Portal Server installation that is running as root user to run as a
non-root user. This procedure assumes that the web container and the Sun™ ONE
Directory Server are running as root user.
NOTE
The Java Enterprise System installer provides a way to install the
Sun ONE Directory Server and the Sun™ ONE Web Server or Sun™
ONE Application Server to run as a non-root user.
Perform all steps as superuser, except as noted. After installing the Sun™ ONE
Portal Server software, use the following procedure to configure the Sun ONE
Portal Server to run as user non-root.
1.
Change the web container’s user instance from root to a non-root value.
Consult your web container’s documentation for instructions on changing the
running user.
For example, to change the Sun ONE Web Server’s running user, edit the
web-server-install-root/SUNWwbsvr/https-hostname.domain/config/
magnus.conf file.Change the entry User root to User Userid.
2.
Change the web container’s admin instance from root to a non-root value.
Consult your web container’s documentation for instructions on changing the
running admin user.
For example, to change the Sun ONE Web Server’s admin user, edit the
web-server-install-root/SUNWwbsvr/https-admserv/config/magnus.conf file.
Change the entry User root to User Userid.
97
3.
Change the Sun ONE Directory Server’s user instance from root to a non-root
value. Consult the Sun ONE Directory Server documentation for instructions
on changing the running user.
For example, edit the
/var/opt/mps/serverroot/slapd-hostname/config/dse.ldif file.
Change nsslapd-localuser: root to nsslapd-localuser: Userid
4.
Change the Sun ONE Directory Server admin user instance from root to a
non-root value. Consult the Sun ONE Directory Server documentation for
instructions on changing the running admin user.
For example:
a.
Edit /var/opt/mps/serverroot/admin-serv/config/local.conf file.
Change configuration.nsSuiteSpotUser: root to
configuration.nsSuiteSpotUser: Userid
b.
Edit /var/opt/mps/serverroot/admin-serv/config/magnus.conf file.
Change the entry User root to User Userid
5.
Change the ownership of the following directories from root to
Userid:UserGroup. That is, enter:
❍
chown -R Userid:UserGroup /opt/SUNWps
❍
chown -R Userid:UserGroup /etc/opt/SUNWps
❍
chown -R Userid:✵▲❅❒✧❒❏◆❐ /var/opt/SUNWps
If you did not use the Java Enterprise System installer to install the Sun ONE
Identity Server as non-root, consult the Identity Server documentation for
information on changing the Identity Server directories.
6.
Set the following permissions for the Portal Server directories:
❍
chmod 0755 /opt/SUNWps
❍
chmod 0755 /etc/opt/SUNWps
❍
chmod 0755 /var/opt/SUNWps
7.
Restart the directory server as the non-root user.
8.
Run /etc/init.d/amserver stop.
A non-root user can run identity-server-install-dir/SUNWam/bin/amserver stop.
98
Sun ONE Portal Server 6.2 • Installation Guide • March 2004
9.
Ensure that all of the processes are stopped.
To verify, type:
ps -ef | grep SUNWam
ps -ef | grep directory-server-base-dir
10. Kill off any processes that did not get shutdown. As root enter:
/var/opt/mps/serverroot/stop-admin
Launching Sun ONE Portal Server
1.
Become superuser or log in as user Userid.
2.
Start the directory server.
a.
Go to /var/opt/mps/serverroot/slapd-instancename
b.
Type:
./start-slapd
3.
Start the web server by entering /etc/init.d/amserver start
Appendix F
Configuring the Sun ONE Portal Server to Run as User Non-Root
99
100
Sun ONE Portal Server 6.2 • Installation Guide • March 2004
Section B
Index
B
production optimum 56, 62, 68
browsers 28
R
H
hardware requirements 26
requirements
hardware 26
operating system 26
K
S
kernel tuning 58
Solaris
tuning 58
version 26
Sun ONE Directory Server
tuning 60
Sun ONE Portal Server
accessing the administration console 51
browser recommendations 28
creating multiple instances 85
deleting an instance 87
Desktop tuning 68
hardware requirements 26
multiple machines installation 23
non-root configuration 97
operating system requirements 26
single machine installation 22
M
migration
tools 20
P
perftune 55, 57, 62
production large 56, 63, 69
Index
101
Section T
tuning instructions 55
usage patterns 56
Sun ONE Web Server
tuning 62
T
tuning
for Production Large 56, 63, 69
for Production Optimum 56, 62, 68
Solaris 57
Sun ONE Directory Server 60
Sun ONE Portal Server 55
Sun ONE Portal Server Desktop 68
Sun ONE Web Server 62
TCP parameters 58
the kernel 58
102
Sun ONE Portal Server 6.2 • Installation Guide • March 2004