1
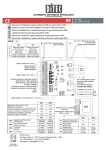
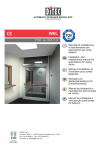
Technical Data
Operating voltage
Relay contacts
Max. switching current
Max. switching voltage
Display
Display range
Sensor
Measurement range
Target temperature T1
Target temperature T2
Control type
Hysteresis
Stirrer:
- resting time (interval)
- stirring time
Housing
BxHxD
Electrical connection
Permissible ambient temperature
Storage temperature
230 V, 50 Hz / 60Hz
2 voltage-free make-contacts
16 A AC 1 each
250 V ~ each
3-digit, 13 mm LED
-9,9 to 99,9
NTC thermistor 2.2 k Ohm/25°C
-9,9° to 50°C
Factory-set to 8°C
Factory-set to 4°C
2-step regulator
0.3 K to 2 K adjustable
Installation and Operating Instructions
Electronic Milk Refrigeration Thermostat ETM-W200
15 min. / 30 min adjustable
2 min.
Wall mounted housing
80 x 160 x 86 mm
screw connection
-10°C to +50°C
-20°C to +70°C
-30.0
Setp
.
Act.
2. m
in
Auto
C o nt
.
Special versions on request.
OFF
ALWAYS CHANGE THE SENSOR WHEN CHANGING THE
THERMOSTAT !
The ETM-W200 is an electronic milk refrigeration thermostat with automatic afterstirring control.
ADJUST SETPOINTS AFTER 5 MINUTES OPERATION !
The thermostat has two separately adjustable setpoints which can be selected by
means of an internal slide switch.
© by WELBA - 10/09/03
The current milk temperature is displayed
continuously.
If the milk temperature exceeds the selected setpoint, the compressor and agitator
are switched on automatically. When the
setpoint is reached, the compressor switWELBA GmbH
Electronic Control Engineering
Gewerbepark Siebenmorgen 6
D-53547 Breitscheid
ches off first, followed two minutes later by
the agitator.
Between refrigeration periods, the agitator motor switches on again for 2 minutes,
optionally every 15 or 30 minutes, in order
to ensure a uniform temperature throughout the milk.
Independently of this, the agitator can be
switched on for 2 minutes by pushbutton
or can be switched to continuous operation.
Phone:
Fax:
E-mail:
Net:
+49 (0)2638 / 9320-0
+49 (0)2638 / 9320-20
[email protected]
www.welba.de
Setting by Installation
Sp 1
Sp 2
Zero
P1
P2
P3
Sp 2
-
Sp 1
P4
P5
35o
Hyst.
15 Min.
! Potentiometer ‘P5’ can be used to reduce or
increase the hysteresis if required.
Interval time
! Slide switch set to 15 minutes:Between refrigeration periods, the agitator motor switches on for 2 minutes every 15 minutes.
Key functions
! Slide switch set to 30 minutes:Between refrigeration periods, the agitator motor switches on for 2 minutes every 30 minutes.
Setp.
Act.
Display setpoint
For display of the current
setpoint
2.min
A two-minute agitation period
can be initiated with this
pushbutton switch
AUTO
AUTO
The thermostat operates in
AUTO mode1).
Cont.
CONT The agitator motor
operates in continuous mode.
The compressor remains OFF.
OFF
OFF
Switch thermostat OFF
K2
Comp.
Transformer
K2
Handling
Connection terminal
Temperature setpoint 1 (4°)
(only when other temperature required)
°C
30.0
L1
N
8 9
Sensor
230V / 50 Hz
IMPORTANT Do not apply the supply voltage until agitator, compressor and sensor have been connected !
! Carry out electrical connection in accordance with the above circuit diagram.
! Connect supply voltage (230 V) to terminals
‘A1’ and ‘A2’.
! Depress the ‘Setpoint/Actual’ key: the current temperature setpoint will be displayed.
Setp.
Act.
2.min
! Adjust potentiometer ‘P1’ until the required
temperature setpoint appears on the display.
Temperature setpoint 1 (4°)
(only when other temperature required)
! Adjust potentiometer ‘P2’ until the required
temperature setpoint appears on the display.
AUTO mode:
temperature (4° / 8°). The agitator motor is
running continuously.
- After reaching the preset temperature, the
compressor switches off.
- Two minutes later the agitator motor switches
off.
AUTO
Cont.
! Set slide switch to ‘Setpoint 2’
! Depress the ‘Setpoint/Actual’ key: the current temperature setpoint will be displayed.
1)
- The milk is refrigerated down to the preset
! Set slide switch to ‘Setpoint 1’
1 2 3 4 5 6 A1 7 A2
Agitator Compressorcontactor
Compressor ON
Compressor is in operation
The milk refrigeration thermostat has been
adjusted in our factory. Please do NOT alter
the settings of potentiometers ‘P3’ and ‘P4’ !
Electrical connection
N L1
Agitator ON
Agitator is in operation
IMPORTANT:
30 Min.
K1
Agitator
Sensor installation
For operation of the milk thermostat, it is ESSENTIAL to use the temperature sensor provided.The sensor lead may be shortened or extended.
M
Status - LED
Intervall
Casing installation
By virtue of its construction, the milk refrigeration thermostat can be installed in practically
any location.
! Unscrew the housing cover.
! Attach the housing base to the wall with four
screws.
K1
Hysteresis
(switching temperature difference)
(Factory preset to 0.7 K)
Switching point
+
Installation
Following settings are only allowed by authorized personnel:
-
The milk refrigeration thermostat and the installations connected to it contain live components.
When installing the milk refrigeration thermostat, it is ESSENTIAL to comply with the
relevant regulations for electrical installation !
Only authorized specialist personnel are to
be allowed access to the area when connected !
+
Safety
OFF
- In the intervals between refrigeration, the agitator motor switches on again for 2 minutes,
optionally every 15 or 30 minutes, in order to
ensure a uniform temperature throughout the
milk.
- If the milk temperature exceeds the setpoint,
the compressor and agitator are switched on
automatically.