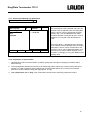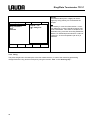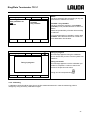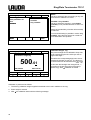
1
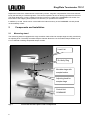
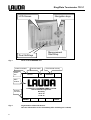
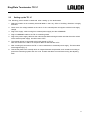
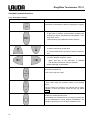
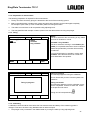
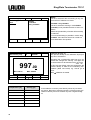
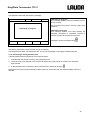
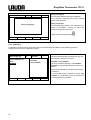
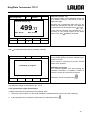
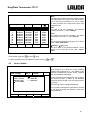
Operating Instructions
Ring/Plate-Tensiometer
TD 1C
06/05
TD 1C_E
LAUDA DR. R. WOBSER
GMBH & CO. KG
P.O. Box 1251
97912 Lauda-Königshofen
Germany
Phone: (+49) (0) 9343/ 503-0
Fax: (+49) (0) 9343/ 503-222
e-mail [email protected]
Internet http://www.lauda.de
Ring/Plate Tensiometer TD 1C
CONTENT
Chapter
Page
1
INTRODUCTION
1.1 Short description and applications
1.2 Operating principle
2 COMPONENTS AND INSTALLATION
2.1 Measuring stand
2.2 Control panel Command
2.3 Setting up the TD 1C
2.4 Command control functions
2.4.1
2.4.2
2.4.3
2.4.4
2.4.5
2.4.6
3
TESTING SURFACE TENSION
3.1 Using the plate
3.1.1
3.1.2
3.1.3
3.1.4
3.1.5
3.2
3.3
Checking and Setting ring parameters
Preparation of measurement
Taring
Calibrating
Performing a ring measurement
The display of measured surface /interface tensions
3.3.1
3.3.2
Plate measurement
Ring measurement
MEASURING DENSITY AND WEIGHT
4.1 Density measurement
4.1.1
4.1.2
4.1.3
4.1.4
4.1.5
4.2
Setting of parameters
Preparation of measurement
Taring
Calibrating
Performing a density measurement
Weight measurement
4.2.1
4.2.2
4.2.3
4.2.4
4.2.5
2
Preparation of measurement
Checking and Setting plate parameters
Taring
Calibrating
Performing the plate measurement
Using the ring
3.2.1
3.2.2
3.2.3
3.2.4
3.2.5
4
Description of keys.
Main Menu
Sub-Menu „Experiment New“
Sub-Menu „Experiment View“
Sub-Menu „Settings“
Sub-Menu „Tools“
Setting of parameters
Preparation of measurement
Taring
Calibrating
Performing a weight measurement
5
5
5
6
6
7
9
10
10
12
12
13
13
14
14
14
14
15
16
17
18
18
19
19
20
21
23
24
24
25
26
26
26
27
27
27
29
31
31
31
31
32
33
Ring/Plate Tensiometer TD 1C
5
VIEWING MEASURED RESULTS
5.1 Results overview
5.2 View of details
6 APPENDIX
6.1 Reference values for checking the TD 1C
6.2 Cleaning test glasses and materials used
6.2.1
6.2.2
6.3
Platinum test bodies
Test glasses and glass body
Literature references
34
34
35
36
36
36
36
36
37
3
Ring/Plate Tensiometer TD 1C
1
Introduction
This instruction provides you the necessary information about the use of the TD 1C
1.1
Short description and applications
The LAUDA automatic Tensiometer TD 1C consists of the measuring stand and the COMMAND unit and is
used for measuring surface and interfacial tension, for determining liquid density, as well as for measuring
weights. In contrast with other instruments of this type the TD 1C has been specially developed as a low
cost easy to handle measuring device to combine high-quality measurement system with documentation and
represents an interesting and less expensive alternative to automatic systems. The TD 1C is particularly
suitable for:
•
universities, colleges, teaching institutes and other educational establishments,
•
industrial and quality control laboratories
•
research and development departments
There is a wide range of applications, including:
•
evaluating and testing of physical properties of the above types on organic and inorganic liquids, solutions, liquid/liquid and liquid/solid dispersions emulsions etc.
•
development and testing of surfactants (detergents emulsifiers etc.) and their detection in effluents and
streams.
The combination of precision weighing technology with a high- performance electronic system provides for a
wide range of measurements using a variety of test bodies.
For surface and interfacial tension measurement these are:
•
platinum/iridium plate after Wilhelmy
•
platinum/iridium ring according to ASTM D 971 and DIN 53914
and for density measurement:
•
glass displacement plunger
By using an optional jacketed vessel (incl. cover) to take the sample beaker it is possible to operate the
system over a wide temperature range with the aid of a LAUDA thermostat e.g. of type ECOLINE, RE104
It is strongly recommended to read this manual carefully prior to power-up the TD 1C!
1.2
Operating principle
Determination of the surface or interfacial tension with a plate or ring consists of measuring the vertical force
which the surface or interface of the liquid exerts on the test body. For this purpose the TD 1C incorporates
a manual driven sample stage which permits upward and downward movement of the test liquid without any
vibration. After defining the measuring parameters and the measuring method the movement of the table is
started manually by turning a knob. In case of ring method the mechanism allows for automatic detection of
the maximum force. In case of plate, the sample table has to be brought into first contact of the plate with the
sample and stopped. The surface tension values appear immediately including all corrections on the high
resolving screen of the COMMAND and can be stored or printed out buy pushing a buttton. The measurement of this force requires an extremely sensitive force cell which is the core element of the TD 1C.
5
Ring/Plate Tensiometer TD 1C
Displacement free force measurement is achieved by electro- magnetic compensation of the force transmitted by the test body to a measuring beam. The current required to do this is directly proportional to the force.
The value obtained by current / voltage conversion is shown in a table of the COMMAND LCD-screen. Determination of the weighing beam position is achieved by an optoelectronic detector.
In addition up to 500 results can be stored within the internal memory of the COMMAND unit and printed
out immediately or later.
2
2.1
Components and Installation
Measuring stand
The measuring stand is equipped with a high-resolution load cell and an sample stage smoothly movable by
an adjusting knob. The easily accessible sample chamber allows the use of standard sample beakers up to
8 cm in diameter including temperable sample vessels.
Load Cell
Du Noüy Ring
Movable stage with
sample beaker
Adjusting knob for
sample stage
Control Unit
COMMAND
Fig. 1.
6
Front View and description of main components
Ring/Plate Tensiometer TD 1C
C A N - P o r t fo r
COMMANDM o d u le
R S 2 3 2 fo r P ro to c o l
p rin te r (O p t) N O
P C -c o n n e c t o r !
E x te r n a l P o w e r
s u p p ly
Fig. 2
2.2
Rear side of TD 1C with electrical connections to accessory components
Control panel Command
This convenient control panel allows the complete operation, input of measuring parameters, start of measurement and transfer of data to a printer or to internal storage. The high-resolution graphical display offers
menu-based user guidance and displays individual measurements and results in tabular format.
7
Ring/Plate Tensiometer TD 1C
LCD-Screen
Navigation keys
Measurement
Start/Stop
Dual SoftKeys
Fig. 3
Parts of the COMMAND-unit
Actual command
Status
line
Device status
TD 1C
ok
Free internal memory
Free432
Main
window
Soft key
functions
LAUDA DR. R. WOBSER GMBH & CO.KG
97912 Lauda-Koenigshofen
Germany
16.07.04
11:02:16
MENU
Fig. 4
8
HELP
Segmentation of the LCD Screen.
Here the information screen immediately after switching on is shown,
Ring/Plate Tensiometer TD 1C
2.3
Setting up the TD 1C
The following points should be observed when setting up the tensiometer:
1. Select its location on an accurately horizontal table so that any effect of building vibrations is largely
excluded.
2. Check that the voltage marked on the back of the external power unit agrees with the local supply
voltage
3. Plug-in the supply cable coming from external power supply into the COMMAND
4. Plug-in COMMAND cable to the TD 1C measuring stand.
5. Plug-in the power supply cable into the mains socket. Before doing this take care that the mains switch
of the external power supply should be set to 'OFF'.
6. The optional printer is connected at the back (9-pole) of TD 1C
Note: this Connector is ONLY for the printer NOT for data transfer to PC
7. After checking all connections the TD 1C can be switched on at external power supply. The information
screen appears (Fig. 3)
8. Take off the plastic tube carefully which is clamped between sample table and transducer housing to
protect the measuring system and the hook. Therefor the table is moved down turning the adjusting
knob.
9
Ring/Plate Tensiometer TD 1C
Command control functions
2.4.1 Description of keys.
Command Key Pad
Enter Key ,
confirmation of the selection and/or accepting the changes.
Escape Key:
1. to get back to previous screen without accepting the
changes at menus “Measurement Parameters”, “Settings” and “Tools”
2. interrupts taring and calibration without changes
Menu navigation keys: up/down
1. to select menu items up and down
2. to increment/decrement numerical values of parameters
Menu navigation keys (left/right)
1. To switch between selection menus:
Right: first item of the sub-menu is selected
Left: last item of the main menu is selected
2. Select letter/digit of parameters
Duo keys
above: decimal point key
below: minus sign (not used)
Soft keys
5 keys, which have the functions shown in the display
above.
Soft key inputs are marked in the manual with a frame.
Example: To print the results, press the duo key below
PRINT .
If NOT illuminated, the preselected measurement will be
started from measurement screen.
If illuminated, the measurement is running By pressing the
key the measurement will be stopped immediately. The
evaluation will be done over the last completed cycles.
10
Ring/Plate Tensiometer TD 1C
Soft Keys at Start and “Main
menu” screen
MENU
Screen switches to the Main Menu (Fig.3)
HELP
Not available yet
Soft Keys at Result Screen
MENU
Screen switches to the Main Menu (Fig.4)
SAVE
The data of the result line, together with the numerical sample ID code, and
measurement parameters are saved in the internal memory of the
COMMAND. Max. 500 sets can be stored. The free number of sets is displayed in the status line of the result screen (here: Free432)
PRINT
The data of the result line, together with the numerical sample ID code, and
measurement parameters will be printed out at the protocol printer.
NEW
Defines a new measurement followed by the menu “Experiment new”
opens
11
Ring/Plate Tensiometer TD 1C
2.4.2 Main Menu
TD 1C
ok
Experiment new
Experiment view
Settings
Tools
After entering MENU the main menu opens
which enables the selection of following sub
menus using the navigation keys:
Free432
Density
Plate
Ring
Weight
Experiment new:
Selection of measuring mode for a new measurement
Experiment view:
Viewing results of previously saved measurements
Settings
Defining and changing important base settings
concerning date ,display, language
ABOUT
HELP
Tools
test functions for system and printer. Memory
cleaning
2.4.3 Sub-Menu „Experiment New“
TD 1C
Experiment new
Experiment view
Settings
Tools
ok
After selecting Experiment new and confirmation the corresponding Sub-Menu opens, where
following modes can be selected:
Free432
Density
Plate
Ring
Weight
Density
Enables determination of density of liquids by
measuring buoyancy using a displacement
plunger
Plate
Surface/Interface tension measurement using
Wilhelmy method
Ring
Surface/Interface tension measurement using du
Noüy method
ABOUT
12
HELP
Weight
Measurement of small weights (max. 5g)
Ring/Plate Tensiometer TD 1C
2.4.4 Sub-Menu „Experiment View“
TD 1C
ok
Experiment new
Experiment view
Settings
Tools
Free432
After selecting Experiment view by cursor the
results of experiments of the different modes can
be displayed.
Density
Plate
Ring
Weight
ABOUT
HELP
2.4.5 Sub-Menu „Settings“
TD 1C
Experiment new
Experiment view
Settings
Tools
ok
Calendar
A date can be entered or modified
Free432
Calendar
Clock
Display brightness
Display contrast
Language
Acoustic signal
Date view format
Clock
A time can be entered or modified
Display brightness
can be modified in 8 levels
Display contrast
can be modified in 8 levels
Language
English or German language can be selected
Acoustic signal
Loudness can be adjusted in 4 steps
ABOUT
HELP
Date view format
DD.MM.YY or MM.DD.YY can be selected
13
Ring/Plate Tensiometer TD 1C
2.4.6 Sub-Menu „Tools“
TD 1C
ok
Experiment new
Experiment view
Settings
Tools
Free432
Selftest
Keyboard test
Data memory clean
Self test
Results of the self test, always performed after
switching on is displayed, showing system information and the status CPU and RAMs
Keyboard test
Is a functional test of all keys of the COMMAND
module
Data memory clean
To erase all stored results
ABOUT
3
3.1
HELP
Testing surface tension
Using the plate
3.1.1 Preparation of measurement
The following preparation is required for this measurement:
9
The TD 1C is switched on by means of the external power supply switch
9
Use adjusting knob to move the table in a position giving space enough for changing of beakers and to
attach the plate
9
The plate supplied is attached to the hook of the measuring system. Ensure that the plate has no contact
with the test liquid.
14
Ring/Plate Tensiometer TD 1C
3.1.2 Checking and Setting plate parameters
Select “Experiment new”. After confirmation the sub-menu “New Plate exp” opens:
MENU -> Experiment new ->Plate ↵
New plate exp.
ok
Measuring parameters
Plate parameter set
Tare
Calibrate
L
The exact length of the plate has to be entered.
Here the values of the accessory plate, according
DIN 53914, is shown. It can be adjusted between
10 and 30 mm in case of deviations or other.
Free432
L = 19.90 mm
D = 0.10 mm
D
The exact thickness of the plate has to be entered. Here the value according DIN53914 is
shown, which is appropriate to the accessory
plate. It can be adjusted between 0.05 and 0.5
mm in case of deviations or other plates are being used.
MENU
New plate exp.
ok
Measuring parameters
Plate parameter set
Tare
Calibrate
MENU
HELP
Free432
Q
Exp.ID = 123
Exp.ID
A numerical value (max. 3 digits) can be assigned by using soft keys to the sample
HELP
15
Ring/Plate Tensiometer TD 1C
3.1.3 Taring
The probe weight has to be tared prior to the first measurement or in case of the measuring probe being
changed before the plate touches the liquid by using the function “Tare” in the “New plate exp.” -menu
New plate exp.
ok
Measuring parameters
Plate parameter set
Tare
Calibrate
Free432
Q
Stable
Unstable
Very unstable
Stable
Has to be selected if the surrounding is very stable and free of vibrations or winds.
Unstable / Very Unstable
Has to be selected if a taring in mode Stable
(Unstable) is not possible because of outer conditions.
Note that reproducibility of results will eventually
be reduced.
MENU
New plate exp.
HELP
ok
Free432
Q
If no successful taring is possible in mode “very
unstable” the instrument has to be moved to a
more disturbation free position.
Taring in progress
This message appears when taring is executed
Do not disturb this process. Prevent system from
vibrations
Taring in progress
Taring successful
This message appears after completing the taring procedure. Confirm to switch the screen back
to previous sub menu.
Taring can be interrupted using
16
Ring/Plate Tensiometer TD 1C
3.1.4 Calibrating
A calibration check should be done with accessory calibration weights prior to the first measurement and in
case the measuring probe has been changed,.
New plate exp.
ok
Measuring parameters
Plate parameter set
Tare
Calibrate
Stable
Has to be selected if the surrounding is very stable and free of vibrations or winds.
Free432
Stable
Unstable
Very unstable
Unstable / Very Unstable
Has to be selected if a taring in mode Stable
(Unstable) is not possible because of outer conditions.
Note that reproducibility of results will eventually
be reduced.
MENU
HELP
New plate exp.
ok
Calibration weight, mg
The precise weight of the calibration stirrup has
to be entered using the Duo-soft keys now assigned with digits
Free432
Calibration weight,mg
Therefore the corresponding digit has to be selected and changed via soft key. The digits can
be incremented or decremented using
or
500.01
Min 490 00
If no successful taring is possible in mode “very
unstable” the instrument has to be moved to a
more disturbation free position.
In this case the last digit was changed into „1“,
according to the precise weight of the stirrup
(500.01 mg). With ↵ calibration is started.
Max:510 00
1
2
3
4
5
6
7
8
9
0
Calibration has to be done as follows
1. The 500 mg calibration weight supplied is attached to the hook in addition to the plate.
2. Exact weight is entered.
17
Ring/Plate Tensiometer TD 1C
3. After ↵ the calibration starts with the following message:
New plate exp.
ok
Free432
Calibrating in progress
This message appears during the calibration
Do not disturb or interrupt this process. Prevent
system from vibrations
Calibrating in progress
Calibration successful
This message appears once the calibration procedure is completed . Confirm to switch the
screen to the previous sub menu.
Calibration can be interrupted using
4. After confirmation (↵) the calibration weight is removed. If not successful , the calibration have to be
repeated.
3.1.5 Performing the plate measurement
A measurement with the plate is performed in the following steps:
1. The sample table is moved down by adjusting knob and the test liquid in the beaker supplied is placed
on the table.
2. The sample table with the liquid is moved up carefully.
3. If the force sensor feels the contact with the liquid surface or interface the movement has to be stopped.
stops. Immediately on contact with the surface the display shows a jump of the force value. This value is
the absolute surface/interface tension in 'mN/m'.
4. The force values and the evaluated surface tension is shown in the result screen (see below)
Note that this value is correct only if the plate is completely wetted, i.e. a uniform meniscus can be observed
at the bottom end of the plate and the liquid film on the plate shows no visible non-uniformities. -
3.2
Using the ring
Unlike in the case of the plate, measurement with the ring does not show a direct proportionality between
measured force and surface /interface tension, because of the lamella drawn up with the ring the measurement includes a weight in addition to the surface tension.
Further information on ring measurement and its correction can be found in the following publications:
Du Noüy, P. L.,: J. Gen. Physiol. New York, 1(1919), S.521
Harkins, M. + Jordan H. : J. Am. Soc. 52 (1930), S.I 751 Zuidema, H. + Waters C. W. : Ind. Eng. Chem.
Analyt. 13 (1941), S.312
Fox, H. W. + Chrisman C. H.: J. phys. Chem. 56 (1952), S.284
In addition reference should be made to the literature reference section attached.
18
Ring/Plate Tensiometer TD 1C
3.2.1 Checking and Setting ring parameters
MENU -> Experiment new -> Ring ↵
New ring exp.
ok
Measuring parameters
Ring parameters
Tare
Calibrate
R
The exact radius of the horizontal ring has to be
entered. Here the (default) value according DIN
53914 is shown, which is appropriate to the accessory ring. It can be adjusted to the real dimensions between 9.00 and 9.99 mm in case of
deviations or a ring with other dimensions is
used.
Free432
R = 9.55 mm
r = 0.20 mm
MENU
HELP
r
The exact radius ( = diameter/2) of the wire has
to be entered. Here the (default) value according
DIN 53914 is shown, which corresponds to the
accessory ring. It can be adjusted between 0.10
and 0.30 mm in case of radius changes (i.e. by
corrosion or coatings) or a ring with different wire
is being used.
3.2.2 Preparation of measurement
1. Use adjusting knob to move the table in a position giving space enough for changing of beakers and to
attach the ring
2. The ring supplied is attached to the hook of the measuring system without any contact with the test liquid
surface or in case of interface tension dipped into the lower phase without any contact to the interface.
(this has to be done before pouring the upper phase on top)
3. Select Experiment new -> Ring”. After confirmation the sub-menu “New Ring experiment” opens:
19
Ring/Plate Tensiometer TD 1C
New ring exp.
ok
Measuring parameters
Ring parameters
Tare
Calibrate
MENU
Exp.ID
A numerical value (max. 3 digits) can be assigned by using soft keys to characterize the
sample
Free432
Exp.ID = 123
∆ρ = 0.99 g/cm³
∆ρ
The density, in case of surface tension or density difference (in case of interface tension) has
to be entered here. This value is needed for the
automatical ring correction according Zuidema &
Waters. For diluted aqueous solutions a value of
0.99 g/cm³ at room temperature (18-25°C) is
sufficient.
HELP
3.2.3 Taring
The probe weight has to be tared prior to the first measurement or in case of the measuring probe being
changed before the ring touches the liquid by using the function “Tare” in the “New ring exp.” -
20
Ring/Plate Tensiometer TD 1C
New ring exp.
ok
Measuring parameters
Plate parameter set
Tare
Calibrate
Stable
Has to be selected if the surrounding is very stable and free of vibrations or winds.
Free432
Stable
Unstable
Very unstable
Unstable / Very Unstable
Has to be selected if a taring in mode Stable
(Unstable) is not possible because of outer conditions.
Note that reproducibility of results will eventually
be reduced.
MENU
New ring exp.
HELP
ok
Free432
Q
If no successful taring is possible in mode “very
unstable” the instrument has to be moved to a
more disturbation free location.
Taring in progress
This message appears during the calibration
Do not disturb this process. Prevent system from
vibrations
Taring in progress
Taring successful
This message appears once the calibration procedure is completed . Confirm to switch the
screen to the previous sub menu.
Taring can be interrupted using
3.2.4 Calibrating
A calibration check should be done prior to the first measurements and in case the measuring probe is
changed by using accessory calibration weights.
21
Ring/Plate Tensiometer TD 1C
New ring exp.
ok
Measuring parameters
Plate parameter set
Tare
Calibrate
Stable
Has to be selected if the surrounding is very stable and free of vibrations or winds.
Free432
Stable
Unstable
Very unstable
Unstable / Very Unstable
Has to be selected if a taring in mode Stable
(Unstable) is not possible because of outer conditions.
Note that reproducibility of results will eventually
be reduced.
MENU
HELP
New ring exp.
ok
Calibration weight, mg
The precise weight of the calibration stirrup has
to be entered using the Duo-soft keys now assigned with digits
Free432
Calibration weight,mg
Therefore the corresponding digit has to be selected and changed via soft key. The digits can
be incremented or decremented using
or
500.01
Min 490 00
If no successful taring is possible in mode “very
unstable” the instrument has to be moved to a
more disturbation free position.!
In this case the last digit was changed into „1“,
according to the precise weight of the stirrup
(500.01 mg). With ↵ calibration is started.
Max:510 00
.
1
2
3
4
5
6
7
8
9
0
Calibration is performed as follows:
1. The 500 mg calibration weight supplied is attached to the hook in addition to the ring.
2. Exact weight is entered.
3. After ↵ the calibration starts with the following message:
22
Ring/Plate Tensiometer TD 1C
New ring exp.
ok
Free432
Calibrating in progress
This message appears during the calibration
Do not disturb this process. Prevent system from
vibrations
Calibrating in progress
Calibration successful
This message appears once the calibration procedure is completed . Confirm to switch the
screen to the previous sub menu.
Calibration can be interrupted using
4. After confirmation (↵) the calibration weight is removed. If not successful , the procedure has to be repeated.
3.2.5 Performing a ring measurement
A measurement with the ring is performed in the following steps:
1. The sample table is moved down by turning adjusting knob to the a low position, to allow the change of
sample beaker.
2. The test liquid in a sample beaker (different sizes possible) is placed on the table.
3. The ring supplied with the equipment is attached to the hook of the measuring system.
4. The table with the liquid is moved up again until the ring is at least 2 - 3 mm below the liquid surface.
5. Only in case of interface tension:: The second lighter phase (Oil) is poured carefully on top of the heavier phase (water) until the sheet gets a thickness of about 1 cm. Be sure that during this the liquid surface is not disturbed and the ring does not to touch the oil.
6. For the test the table has to be moved downwards carefully and a lamella attached to the ring is shown
7. The force displayed at COMMAND will increase until a maximum is reached.
8. The passing the maximum and the detection of it is marked by a “beep”
9. The movement has to be stopped, if possible before detachment of lamella.
10. The surface tension calculated from the measured maximum force is displayed and can be stored or
printed out.
11. The correction factor for the ring is calculated by the COMMAND software according to Zuidema & Waters.
23
Ring/Plate Tensiometer TD 1C
3.3
The display of measured surface /interface tensions
3.3.1 Plate measurement
Before plate touches the sample),
New plate exp.
0 mg
Free432
σ, mN/m
0.0
σ, mN/m
After touching the liquid
New plate exp.
here the surface tension calculated from the
actual measured force is displayed.
932 mg Free432
Please note:
σ, mN/m
This value corresponds to the real surface
tension of sample if the plate just touches the
surface without dipping in and if the plate is
perfectly wetted.
72.0
Note: take sure by thoroughly cleaning that
wetting of plate is optimum.
To get the “static” equilibrated surface/interface tension it has to be waited until
this value will become stable.
MENU
NEW
SAVE
PRINT
This result at each time can be saved using
SAVE into internal storage or printed out using PRINT together with sample ID and parameters
For the next measurement with the plate use “NEW” If the measuring mode has to be changed go back via
“MENU”
24
Ring/Plate Tensiometer TD 1C
3.3.2 Ring measurement
before ring is in contact with the sample) and after dipping in
Ring exp. running
0 mg
Free432
σ, mN/m
0.0
σ, mN/m
During extraction form the liquid
Ring exp. running
476 m
σ, mN/m
Free432
here the wetting force of the lamella units of
mN/m tension calculated from the actual
measured force is displayed.
Please note:
34.7
As long no “beep” sound can be heart and
the values still increasing by lowering the
table this value does not corresponds to the
real surface tension of sample..
After “beep” measurement has to be stopped
using again . to get the result.
25
Ring/Plate Tensiometer TD 1C
After stop of the measurement (detecting the maximum)
Exp. end:user
476 m
Free432
Following message appears in status line:
“Exp. end: user”
Buttons for saving and storing appear After “
σ, mN/m
σ, mN/m
here the surface tension calculated from the
detected maximum force is displayed and
should correspond to the surface tension.
72.0
MENU
NEW
This result can be saved using SAVE into
internal storage or printed out using PRINT
together with sample ID and parameters
SAVE
PRINT
For the next measurement with the plate use “NEW”. If the measuring mode has to be changed go back via
“MENU”
4
Measuring density and weight
4.1
Density measurement
4.1.1 Setting of parameters
MENU -> Experiment new -> Density ↵
opens the following „Measuring Parameter menu: where the conditions for the test have to be specified.
New density exp.
Meas. parameter
Tare
Calibrate
MENU
26
ok
Exp.ID
A numerical value (0-999) can be assigned by
using soft keys to characterize the sample
Free432
Exp.ID = 815
HELP
Ring/Plate Tensiometer TD 1C
4.1.2 Preparation of measurement
The following preparation is required for this measurement:
1. The dry and clean accessory plunger is attached to the hook of the measuring system.
2. Select a sample beaker or bottle which is deep enough that the plunger can be submerged completely
into sample or pure water (in case of calibration) without touching the bottom.
3.
The table is moved down as far as possible using adjusting knob.
4.
The test glass filled with sample or water is placed onto the table without touching the plunger
4.1.3 Taring
The plunger weight has to be tared in air prior to the first
measurement
in case of
being by using the
New densityorexp.
okthe plunger
Free432
function “Tare” in the “New density exp.” –menu
Measuring parameters
Stable
Tare
Unstable
Calibrate
Very unstable
Stable
Has to be selected if the surrounding is very stable
and free of vibrations or winds.
Unstable / Very Unstable
Has to be selected if a taring in mode Stable (Unstable) is not possible because of outer conditions.
Note that reproducibility of results will eventually
be reduced.
If no successful taring is possible in mode “very
unstable” the instrument has to be moved to a
more disturbation free position.
MENU
HELP
New density exp.
ok
Free432
Taring in progress
This message appears during the calibration
Do not disturb this process. Prevent system from
vibrations
Taring in progress
Taring successful
This message appears once the calibration procedure is completed . Confirm to switch the screen
to the previous sub menu.
Taring can be interrupted using
4.1.4 Calibrating
A calibration check should be done before the first measurements and always if the measuring probe is
changed. This has to be done using distilled water as reference liquid
1. The plunger is fully immersed in the distilled water by moving the table up using adjusting knob
27
Ring/Plate Tensiometer TD 1C
New density exp.
ok
Measuring parameters
Tare
Calibrate
Stable
Has to be selected if the surrounding is very stable and free of vibrations or winds.
Free432
Stable
Unstable
Very unstable
Unstable / Very Unstable
Has to be selected if a taring in mode Stable
(Unstable) is not possible because of outer conditions.
Note that reproducibility of results will eventually
be reduced.
MENU
HELP
New density exp.
ok
Calibrate density, g/l
The precise density of the calibration liquid (water) has to be entered
Free432
Calibrate density,g/l
Therefore the corresponding digit has to be selected and changed via soft key. The digits can
be incremented or decremented using
or
997.00
Min: 900.00
1
2
6
7
With ↵ calibration is started.
3
4
5
8
9
0
Density [g/l]
15
998
16 - 22
997
23 - 26
996
27 - 29
995
30 - 33
994
33 - 35
993
28
In this case the default value was changed to the
precise density of water at the measuring temperature (table see below) e.g. 997.00 g/l at
20°C.
Max: 999.00
Temperature [°C ]
If no successful taring is possible in mode “very
unstable” the instrument has to be moved to a
more disturbation free position.
In this table the commonly used density values of pure water
are shown. Because of restricted accuracy of the buoyancy the
reference density has to be entered only with 3 significant digits.
Ring/Plate Tensiometer TD 1C
The calibration starts with the following message:
New density exp.
ok
Free432
Calibrating in progress
This message appears while the calibration procedure is running.
Do not disturb this process. Prevent system from
vibrations
Calibrating in progress
Calibration successful
This message appears once after finishing the
calibration procedure is completed. Confirm to
switch the screen to the previous sub menu.
Calibration can be interrupted using
The table is moved down again until the plunger is released.
The test glass with water is removed from the TD 1C and the plunger is thoroughly cleaned and dried.
4.1.5 Performing a density measurement
A density measurement is performed in the following steps:
1. The table with the sample moved up using adjusting knob
2. The motion has to be stopped in the moment where the top of the plunger is at least 3 mm below the
liquid surface.
3. If all preparations are complete the force measurement is started by pushing:
Measurement is performed automatically until the maximum time and/or the user defined stability criterion is
reached.
29
Ring/Plate Tensiometer TD 1C
During measurement running::
Density running.
997
During measuring of the density 100 single
force values are measured approx. ca. 2
seconds while the mean value and standard
deviation are calculated..
Free432
Density (ρ), g/l:
Than the measurement will be stopped by
the system (Exp.end: Time)
997
Exp.end: user
997
After stop of measurement the density
measurement is displayed in the result window.
Free432
Density (ρ), g/l:
This result can be printed via the external
printer using the appropriate Soft-Keys. Alternatively the data can be stored in the
internal memory.
997
MENU
30
NEW
SAVE
PRINT
Ring/Plate Tensiometer TD 1C
4.2
Weight measurement
4.2.1 Setting of parameters
MENU -> Experiment new -> Weight ↵
opens the following „Measuring Parameter menu: where the conditions for the test have to be specified.
New weight exp.
Meas. parameter
Tare
Calibrate
ok
Exp.ID
A numerical value (0-999) can be assigned by
using soft keys to characterize the sample
Free432
Exp.ID = 815
MENU
HELP
4.2.2 Preparation of measurement
The following preparation is required for this measurement:
1. The table is moved down far enough to mount the holder for the material to be measured at the hook.
2. The actual weight of the hook together with the holder has to be tared.
4.2.3 Taring
Taring has to be done prior to the first measurement using the function “Tare” in the “New weight exp.” –
menu
New weight exp.
ok
Measuring parameters
Tare
Calibrate
Stable
Has to be selected if the surrounding is very stable and free of vibrations or winds.
Free432
Stable
Unstable
Very unstable
Unstable / Very Unstable
Has to be selected if a taring in mode Stable
(Unstable) is not possible because of outer conditions.
Note that reproducibility of results will eventually
be reduced.
If no successful taring is possible in mode “very
unstable” the instrument has to be moved to a
more disturbation free position.
MENU
HELP
31
Ring/Plate Tensiometer TD 1C
New weight exp.
ok
Taring in progress
This message appears during the calibration
Free432
Do not disturb or interrupt this process. Prevent
system from vibrations
Taring successful
This message appears once the calibration procedure is completed . Confirm to switch the
screen to the previous sub menu.
Taring in progress
Taring can be interrupted using
4.2.4 Calibrating
A calibration check should be done before the first measurements and always if the measuring probe is
changed using accessory calibration weights.
New weight exp.
ok
Measuring parameters
Plate parameter set
Tare
Calibrate
Stable
Has to be selected if the surrounding is very stable and free of vibrations or winds.
Free432
Stable
Unstable
Very unstable
Unstable / Very Unstable
Has to be selected if a taring in mode Stable
(Unstable) is not possible because of outer conditions.
Note that reproducibility of results will eventually
be reduced.
MENU
32
HELP
If no successful taring is possible in mode “very
unstable” the instrument has to be moved to a
more disturbation free position.
Ring/Plate Tensiometer TD 1C
New weight exp.
ok
Calibration weight, mg
The precise weight of the calibration stirrup has
to be entered using the Duo-soft keys now assigned with digits
Free432
Calibrate weight, mg:
Therefore the corresponding digit has to be selected and changed via soft key. The digits can
be incremented or decremented using
or
499.77
Min: 490.00
In this case the last digit was changed into „7“,
according to the precise weight of the stirrup
(499.77 mg). With ↵ calibration is started.
Max: 510.00
1
2
3
4
5
6
7
8
9
0
After ↵ the calibration starts with the following message:
New weight exp.
ok
Free432
Calibrating in progress
This message appears while the calibration procedure is running.
Do not disturb or interrupt this process. Prevent
system from vibrations
Calibrating in progress
Calibration successful
This message appears once after finishing the
calibration procedure is completed. Confirm to
switch the screen to the previous sub menu.
Calibration can be interrupted using
.
The calibration weight is removed from the TD 1C
4.2.5 Performing a weight measurement
A weight measurement is performed in the following steps:
1. The probe to be measure in to the holder attached or attached directly to the hook of the measuring
2. If all preparations are complete the measurement is started by pushing:
33
Ring/Plate Tensiometer TD 1C
During measurement running::
Weight running.
125
During measuring of the weight the actual
value is displayed.
Free432
The measurement can be stopped by the
user (Exp.end: user)
Weight, mg/l:
125
Result screen for weight test:
Exp.end: user
125mg
After stop of measurement the weight
measurement is summarized in the result
window.
Free432
Weight, mg/l:
These data can be printed via the external
printer using the appropriate Soft-Keys. Alternatively the data can be stored in the
internal memory.
125
MENU
5
5.1
NEW
SAVE
PRINT
Viewing measured results
Results overview
MENU -> Experiment view -> {Method} ↵
Opens the following „View {method} exp.: where all end results of the selected method (ring, plate, density
or weight) are shown in the following way:
34
Ring/Plate Tensiometer TD 1C
Result overview screen for ring experiments
View ring exp.
overview
Mem
5
6
7
8
12
15
16
17
20
Time
11:10:33
11:15:58
11:20:43
11:45:10
17:13:03
09:20:35
09:25:54
09:33:47
13:34:01
Date
27.04.03
27.04.03
27.04.03
27.04.03
28.04.03
02.05.03
02.05.03
02.05.03
10.05.03
Free0
ID
815
816
817
818
711
521
522
523
123
MENU
Q
σ[mN/m]
46.26
46.14
46.25
46.17
72.65
29.37
27.45
28.36
65.43
HELP
Scroll the list using keys,
up and
Date
The date of the test completion. Two different
formats can be set. -> menu settings
Time
The clock time of the test completion. Two different formats can be set. -> menu settings
ID
The sample identification code given from user in
menu „meas. parameters“
σ[mN/m] or ρ [g/l] or mg
The end results of the selected method as displayed in the result line of the menu „experiment“
down.
To select a specific result for details or to print use keys
5.2
Mem
Number of the location where the results together
with parameters are stored in the internal memory. In this case at locations 9-11, 18-19 results
of other methods are stored and hence NOT
displayed here
and
.
View of details
Results detail screen for ring data
View ring Exp.
Date 27.04.03
Time 11:10:33
Exp. ID = 815
σ = 72.0 mN/m
Mem 5
After selection of a result line in the overview
window and confirmation by ↵ the details of the
selected measurement will be shown, together
with all parameters associated.
Free432
∆ρ = 0.99 g/cm³
R = 9.55 mm
r = 0.20 mm
In this example all ring data which are located in
the memory position “5” (Mem 5) are displayed
here and can be printed out at an optional protocol printer.
The data can not be changed afterwards.
For the other measurement methods the window
is the same but filled with different result units
and parameters.
MENU
PRINT
35
Ring/Plate Tensiometer TD 1C
6
6.1
Appendix
Reference values for checking the TD 1C
To verify the accuracy of the equipment it is possible to carry out tests on known systems.
It is important to note, however, that these values taken are from the literature. Verification requires considerable effort and can usually only be achieved over brief periods. Certain deviations can therefore be expected.
Surface tension [mN/m]:
Interfacial tension referred to water [mN/m]
System
15°C
20°C
25°C
System
20°C
Water
73.5
72.8
72.00
Benzene
35.0
Benzene
29.5
28.9
28.2
Chloroform
10.7
Ethanol
22.7
22.3
21.4
Diethylether
32.8
Diethylether
6.2
17.0
Cleaning test glasses and materials used
6.2.1 Platinum test bodies
1. First Rinsing by an appropriate liquid able to solve the sample (e.g. water in case of aqueous solutions)
to remove the sample residues.
2. If the cleaning solvent used before is not volatile enough to dry at ambient air, perform a second rinsing
by a volatile solvent (e.g. ethanol or water) to remove the traces of former rinsing agent
3. Heating of the wetted parts to red heat in the flame of a gas or liquid which burns without any residue.
The use of ethanol or methanol (analytical grade) in an alcohol burner has proved very successful. In order
to avoid damage it is important not to heat to white heat or for prolonged periods.
6.2.2 Test glasses and glass body
Prior to the first time use, wetted glass parts should be cleaned with chromic-sulfuric acid and then rinsed
with BI-distilled water until a neutral reaction is obtained.
DANGER: Chromic-sulfuric acid is highly corrosive!
The following safety recommendations should be observed:
1. Never work without goggles!
2. Always avoid contact with the skin (gloves!)
3. Avoid breathing the fumes (always work in a fume cupboard!) In addition observe the appropriate regulations for disposal!
For cleaning in-between measurements it is usually sufficient to rinse with pure ethanol or acetone or to use
a special glass cleaner. It is very important that any residue of the cleaning agent is completed removed by
rinsing in distilled water. It is essential to avoid accelerated drying by use of volatile solvents such as ethanol, acetone etc.
36
Ring/Plate Tensiometer TD 1C
6.3
Literature references
1. Bartell and Miller, J. Am. Chem. Soc. 50, 1961-7
2. Harkins, Brown and Davies, Ibid, 39, 357 (1917)
3. Laprince-Ringuet, Pub. aci. tech. ministere air (France) No. 52 (1934)
4. Lawrence, "Science of Petroleum", Vol. II, pp.1369-74, Oxford University Press (1938)
5. Trillat and Laprince, compi. rend. 196, 124-16 (1933)
6. Vellinger, Petroleum Z. 31, No. 34, 17-21 (1935)
7. Vellinger and Radulesco, World Petroleum Congress, London,p. 407 (1933)
8. Von Fochs, Wilson and Ediund, Ind. Eng- Chem., Anal. Ed., 13,306 (1941)
9. W. D. Harkins, T.F. Young and L. H. Cheng, Science, 64, 33(1926)
10. W. D. Harkins and H. F. Jordan, J. Am. Chem. Soc., 52, 1751(1930)
11. B. B. Freud and H. Z. Freud, ibid. 52, 1772 (1930)12. S. Sudgen, "The Parachor and Valency",
A. A. Knopf pp. 215-216(1930)
13. N. K. Adam, "The Physics and Chemistry of Surfaces", 3rd Ed.,Oxford Univ. Press, London, p. 370
(1941)
14. A. I. Vogel, J. Chem. Soc., 133 (1946)
15. Cantor, Wied. Ann., 47, 399 (1892)
16. Lohnstein, Ann. Physik, 25, 815 (1908)
17. Lenard, ibid., 74, 395 (1924)
18. Tichanowsky, Physik. Zeit., 25, 300 (1924); 26, 523 (1925)
19. MacDougall, Science, (N.S.) 62, 290 (1955)
20. P. L. Du Nouy, J. Gen. Physioi., New York, 1, p. 521 (1919)
21. H. Zuidema and C. M. Waters, Ind. Eng. Chem. Analyt. 13, p. 312 (1941)
22. H. W. Fox and C. H. Chrisman, J. Phys. Chem. 56, p. 284 (1952)
23. B. Hartmann, Ann. Phys. 64, p. 24 (1949)
24. R. Finzel, PTB-Bericht IB-4, p. 89 (1976)
25. H. R. Baker and W. A. Zisman, Ind. Eng. Chem. 40, 2338 (1948)
26. Egon Matkijevic, "Surface and Colloid Science", ISBN 471576301, Pub: Wiley-Interscience / Division
of John Wiiey + Sons
27. Drew Meyers, "Surfactant Science and Technology", VCH Publisher: ISBN 0895733390,
VCH Verlagsgem.: ISBN 352726695X
28. L. Wilhelmy, Ann. Physik 119, 117 (1864)
29. J. F. Padday, Dr. R. Russel, J. Colloid Sci. 15, 503 (1960)
30. M. J. Schwuger, H. M. Rostek, Chemie Ing. Techn. 43, 1075 (1971)
31. Barthoioma, Schafer, Mellian Textilberichte 31, 1075 (1971)
32. J. F. Padday Surface and Colloid Science, Vol. I, edited by Egon Matkijevic, Pub: Wiley-Interscience
(1969)
37
BESTÄTIGUNG / CONFIRMATION / CONFIRMATION
An / To / A:
LAUDA Dr. R. Wobser
•
LAUDA Service Center
•
Fax: +49 (0) 9343 - 503-222
Von / From / De :
Firma / Company / Entreprise:
Straße / Street / Rue:
Ort / City / Ville:
Tel.:
Fax:
Betreiber / Responsible person / Personne responsable:
Hiermit bestätigen wir, daß nachfolgend aufgeführtes LAUDA-Gerät (Daten vom Typenschild):
We herewith confirm that the following LAUDA-equipment (see label):
Par la présente nous confirmons que l’appareil LAUDA (voir plaque signalétique):
Typ / Type / Type :
Serien-Nr. / Serial no. / No. de série:
mit folgendem Medium betrieben wurde
was used with the below mentioned media
a été utilisé avec le liquide suivant
Darüber hinaus bestätigen wir, daß das oben aufgeführte Gerät sorgfältig gereinigt wurde,
die Anschlüsse verschlossen sind, und sich weder giftige, aggressive, radioaktive noch
andere gefährliche Medien in dem Gerät befinden.
Additionally we confirm that the above mentioned equipment has been cleaned, that all connectors are closed
and that there are no poisonous, aggressive, radioactive or other dangerous media inside the equipment.
D’autre part, nous confirmons que l’appareil mentionné ci-dessus a été nettoyé correctement, que les
tubulures sont fermées et qu’il n’y a aucun produit toxique, agressif, radioactif ou autre produit nocif ou
dangeureux dans la cuve.
Stempel
Datum
Betreiber
Seal / Cachet.
Date / Date
Responsible person / Personne responsable
Formblatt / Form / Formulaire:
Erstellt / published / établi:
Änd.-Stand / config-level / Version:
Datum / date:
UNBEDENK.DOC
Unbedenk.doc
LSC
0.1
30.10.1998
LAUDA DR. R. WOBSER GmbH & Co. KG
Pfarrstraße 41/43
Tel:
D - 97922 Lauda-Königshofen
Fax:
Internet: http://www.lauda.de
E-mail:
+49 (0)9343 / 503-0
+49 (0)9343 / 503-222
[email protected]