1
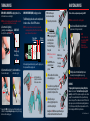
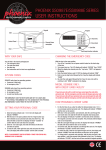
ADDITIONAL INSTRUCTIONS
SAMPLING TIPS
•
•
•
•
•
•
•
•
•
•
Avoid damaging card label and sampling paper.
Cards need to be removed immediately after analysis.
Cards are not reusable.
Carefully follow card label instructions for sampling procedure.
Swiping requires fair amount of pressure applied to be fully effective.
Powderize crystals (e.g. crack cocaine or ammonium nitrate prill) by
grinding a grain-of-sand-sized sample with the sampling paper.
Remove excess powder by shaking it off or tapping card once.
Avoid collecting excess dust or dirt, as this can interfere with detection
processing.
For liquids, apply small drop on sampling paper (with cotton swab, eye
dropper, etc.) Allow liquid to dry slightly.
Avoid damaging card label when sampling.
CLEANING
Clean the inside of card carrier
with cleaning accessory. Clean as needed or
at a minimum of every 20 samples. Refer to
cleaning accessory packaging instructions.
NOTE: Avoid contact between swab and
internal parts of the unit other
than card carrier.
VERIFYING UNIT
The cards and unit may be verified to ensure proper performance.
For negative detection for each card type, analyze new (unused)
sampling card (green “NOT DETECTED” light should come on).
For positive detection use the verification system provided with your
unit. Follow the instructions included in the verification system
packaging.
If results differ, call technical support at +49 - 4102 - 800 90.
BASIC OPERATION
TROUBLESHOOTING
1. Press POWER button (release when
A detection cycle does not begin when door is closed
Card
Check for damage to switch or card bump (detection triggering
mechanism). Fully insert card into carrier and close door firmly. Make
sure unit is fully powered on (power button should be on and not
blinking).
it lights, WAIT until blinking stops)
2. Collect sample and insert
card (press both latches to pull
door open)
Both “DETECTED” and “NOT DETECTED” lights turn solid
yellow a few seconds after starting a detection cycle
(indicates the card label was not recognized)
Try a new card making sure label isn’t dirty, damaged or peeling.
Close door firmly in a swift singular motion. Make sure card type is
supported by firmware version.
Both “DETECTED” and “NOT DETECTED” lights blink yellow
(indicates a system error requiring manual reset)
Perform a manual reset: Hold power button down for 15 sec, release,
wait 10 sec, then power unit on. Try a new card.
Unit does not turn on or a detection result is not returned
after 3 minutes (may indicate system computer is busy)
Perform a manual reset: Hold power button down for 15 sec, release,
wait 10 sec, then power unit on. Do not attempt to power on within
15 seconds after powering off. Note: Ensure battery has not drained
(plug unit in and power on).
Detected
LED
Not Detected
LED
Power
Button
Battery
Status
Positive
detection
(analysis
completed)
Processing
Powering up
Low
(firmly)
No detection
(analysis
completed)
For technical support, to place orders, obtain sampling card MSDSs and for
firmware upgrades contact:
ulti med Products (Deutschland) GmbH
Reeshoop 1, 22926 Ahrensburg GERMANY
[email protected] • www.ultimed.org
Ready
Charging*
Charging
complete*
The XCAT is used for presumptive field testing. Field conditions and
sampling efficiency can affect results.
TECHNICAL SUPPORT AND ORDERING
3. Close
card
door
INDICATOR KEY
Card error
Green ON
Yellow ON
Red ON
Yellow blink
System error
* Indicators will light only when unit is
powered on and plugged in. Unit will
still charge in power-off state.
5. Check
indicators
for result
Door
latch
Plug
cover
4.
Wait until
“NOT
DETECTED”
LED stops
blinking
(see chart)
6. Remove card (place in original bag for protection)
NOTE: To power off, hold Power Button until light goes off.
Do not touch card’s paper portion after analysis.
TAKING SAMPLES
ANALYZING SAMPLES
NOTE: Do not touch sampling paper with your hand. Make sure crystals
are powderized. Shake off excess/loose powder.
a) direct method - grinding
(grinding the card’s sampling paper
directly into the sampled surface)
CARD EDGES
GUNSHOT RESIDUE (GSR) sampling procedure:
The GSR sampling card can be used to sample hands,
clothes or surfaces. Follow STEPS as shown.
NOTE: Do not sample wet hands or surfaces, blood, or materials
containing red particles (e.g. fibers). Do not contact sampling
paper or adhesive with your own hands.
b) direct method - swiping* c) indirect method (use
(hand or surface swipe)
STEP 2
(see reverse)
STEP 1
Plain paper
for swiping
When sampling hands inform subject you will be applying a very
firm pressure with the sampling card.
cotton swab or glove)
GSR contamination is
typically concentrated in
the blue areas shown.
After collection, analyze sample using the XCAT.
1. Remove the protective liner.
NOTE: Make sure unit is on before conducting analysis.
a.
1. Open door and slide card into carrier channels
(paper down, label facing towards unit)
2. DAB tacky adhesive
strip over areas marked
in blue, beginning with
back of hand, then
webbing between
thumb and forefinger,
then palm.
NOTE: Dab hand a minimum
of 50 times.
3. Next SWIPE the same
areas using paper
portion.
Card
carrier
channels
Back
Palm
Dab first using
tacky strip
then swipe
with paper
4. Lift the red tab and fold adhesive
onto sampling paper.
Press
Pull
Press
6. While still pressing on
* Swipe must be FIRM. Not all cards may be used for hand sampling; check
card label. If card has protruding bottom edge, use that edge for swiping.
Avoid excess dirt on sampling paper.
b.
2. Firmly close door to start detection process
(leave unit positioned upright while processing)
NOTE: Remove card immediately after analysis. Card is not reusable.
WARNINGS
5. Press adhesive to paper firmly with
thumb (to prevent tearing). Then
pull red tab to fully extend liner.
NOTE:
Certain cards may not be
supported by your XCAT’s
currently installed
firmware option.
Firmware is upgradable.
1 :
EP ple
ST t samesive
ec h e
d
Coll ab a swip
d en
2
th
EP e)
ST revers
e
(se
Protruding edge
or
Recessed edge
Collect sample:
dab adhesive,then swipe
Tacky adhesive
for dabbing
STEPS for GSR sample
collection and analysis:
1 :
EP ple
ST sam sive
ect dhe e
Coll ab a swip
d en
2
th
E P e)
ST revers
e
(se
EXPLOSIVES or NARCOTICS sampling methods (follow
label instructions on each card type):
adhesive, tightly wrap the liner
around the sampling card.
Analyze in XCAT, then repeat these steps
on the other hand with another card.
Wrap
• Tampering will void any warranty and may affect performance (do not break seal) • Cards must be stored properly for
accuracy (see box label) • Do not operate near ignition sources or while
smoking • Use in a well-ventilated area • Do not operate if housing is
removed or damaged • Do not allow water to enter unit • Do not touch
sample paper on processed cards • Maximum operating temperature is
120 ºF • Do not expose battery to flame or temperatures above 130 ºF •
Refer to Sampling Card MSDSs for safety information.
© 2015 RedXDefense | v 26