1
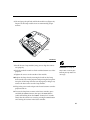
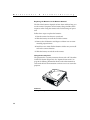
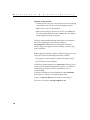
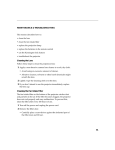
MAINTENANCE & TROUBLESHOOTING
This section describes how to:
•clean the lens
•replace the projection lamp
•replace the batteries in the remote
•use the security lock feature
•troubleshoot the projector
Cleaning the Lens
Follow these steps to clean the projection lens:
1 Apply a non-abrasive camera lens cleaner to a soft, dry cloth.
• Avoid using an excessive amount of cleaner, and don’t
apply the cleaner directly to the lens.
• Abrasive cleaners, solvents or other harsh chemicals might
scratch the lens.
2 Lightly wipe the cleaning cloth over the lens in a circular
motion.
3 If you don’t intend to use the projector immediately, replace
the lens cap.
Replacing the Projection Lamp
The lamp hour counter in the Status menu counts the number of
hours the lamp has been in use. After 2,000 hours of use, the message “Change Lamp” temporarily appears on the screen when
the projector is turned on. Change the lamp within the next 50
hours. After 2,050 hours, the LED flashes orange and the lamp
will not light. You can order new lamp modules from your InFocus dealer. See “Accessories” on page 42 for information.
Follow these steps to replace the projection lamp:
WARNING: To avoid burns,
allow the projector to cool for at
least 30 minutes before you open
the lamp module door. Never
extract the lamp module while the
projector is operating.
1 Turn off the projector and unplug the power cord.
2 Wait 30 minutes to allow the projector to cool thoroughly.
33
M
a
i
n
t
e
n
a
n
c
e
&
T
r
o
u
b
l
e
s
h
o
o
t
i
n
g
3 Invert the projector on a soft flat surface, then insert a small
screwdriver or other flat object into the tabs on the lamp module door (Figure 20) and gently pry the door up.
WARNING: Be extremely careful
when removing the lamp module.
In the unlikely event that the bulb
ruptures, small glass fragments
may be generated. The lamp
module is designed to contain
these fragments, but use caution
when removing the lamp module.
FIGURE 20
Removing the lamp door
4 Pull the lamp door up and remove it.
CAUTION: Never operate the
projector with the lamp door open
5 Loosen the two non-removable screws on the outside of the
module (Figure 21).
or removed. This disrupts the air
flow and causes the projector to
overheat.
FIGURE 21
Loosening the screws on the lamp module
34
6 Lift and grasp the pull tab and lift the module out (Figure 22).
Dispose of the lamp module in an environmentally proper
manner.
pull tab
FIGURE 22
Removing the lamp module
7 Install the new lamp module, being sure to align the connectors properly.
WARNING: Do not drop the
8 Push the module in until it is flush with the bottom case of the
projector.
lamp module or touch the glass
9 Tighten the screws on the outside of the module.
cause injury.
bulb! The glass may shatter and
10 Replace the lamp door by inserting the hooks on the lamp
door into the slots on the projector and pressing the lamp door
into place. If the lamp door does not fit properly or bulges out,
remove the door and re-seat the lamp module.
11 Plug in the power cord and press the Power button to turn the
projector back on.
12 To reset the lamp hour counter in the Status window, press
and hold the volume - button, then press the menu button
(while still holding down the volume - button) for 5 seconds.
Verify that the counter was reset by pressing the menu button
and viewing the counter in the Status window.
35
M
a
i
n
t
e
n
a
n
c
e
&
T
r
o
u
b
l
e
s
h
o
o
t
i
n
g
Replacing the Batteries in the Remote Control
The life of the batteries depends on how often and how long you
use the remote. Symptoms of low battery charge include erratic
responses when using the remote and a reduced range of operation.
Follow these steps to replace the batteries:
1 Turn the remote face down in your hand.
2 Slide the battery cover off the end of the remote.
3 Remove the old batteries and dispose of them in an environmentally proper manner.
4 Install two new AAA alkaline batteries. Make sure you install
each in the correct direction.
5 Slide the battery cover back on the remote.
Using the Security Lock
The projector has a security connector for use with a PC Guardian
Cable Lock System (Figure 23). See “Optional Accessories” on
page 43 for ordering information. Refer to the information that
came with the lock for instructions on how to use it to secure the
projector.
FIGURE 23
Installing the security lock
36
Troubleshooting
Problem: The projector is not running
•Make sure that the power cord is properly connected to a fully
functional AC electrical outlet. Make sure that the power cord
is also properly connected to the projector.
•If the projector is plugged into a power strip, make sure the
power strip is turned on.
•Make sure the projector is turned on.
Problem: Projector is running, but nothing appears on projection screen
•Make sure you have removed the lens cap on the projection
lens at the front of the projector.
•Make sure the lamp has not been in use for over 2,050 hours.
The lamp automatically shuts off at 2,050 hours and the LED
blinks orange. See “Replacing the Projection Lamp” on
page 33.
•Check the projector’s lamp to ensure that it is securely con-
nected in the lamp module. Make sure the lamp door is
installed. See “Replacing the Projection Lamp” on page 33.
Problem: Only the start-up screen displays
•Verify that the cables are connected correctly. See page 9
through page 10 for connection procedures.
•Make sure that the cables do not have any bent pins.
•Verify that the proper input source is connected. See “Source
(keypad only) or Computer and Video (remote only)” on
page 18.
•You might need to turn everything off and power up the
equipment again in the proper order. Refer to your computer’s documentation to determine the correct order.
•Make sure your laptop’s external video port is turned on. See
the “Portable and Laptop Activation Chart” on page 44 or
your computer’s manual for details.
37
M
a
i
n
t
e
n
a
n
c
e
&
T
r
o
u
b
l
e
s
h
o
o
t
i
n
g
•Make sure your computer’s video board is installed and con-
figured correctly.
•Make sure your computer has a compatible video board. The
projector isn’t CGA, EGA or SXGA compatible.
If you’re using Windows 98:
1 Open “My Computer” icon, the Control Panel folder and
then the Display icon.
2 Click the Settings tab.
3 Verify that the Desktop area is set to 1024x768 or less.
Problem: Color or text not being projected
•You might need to adjust the brightness up or down until the
text is visible. Refer to “Brightness” on page 21 for more information.
Problem: The screen resolution is not right
•Make sure the computer’s video card is set for a resolution of
no greater than 1024x768.
Problem: Image isn’t centered on the screen
•Move the projector to reposition the image.
•Reposition the image using the menu. Refer to “Horizontal
position” on page 26 and “Vertical position” on page 26.
•Be sure the projector is at a 90 degree angle to the screen.
Problem: Image is too wide or narrow for screen
•Adjust the zoom or projector placement.
•Adjust the resolution of your video card if it’s greater than
1024x768.
Problem: Image is out of focus
•Turn the projection lens to focus the image.
•Make sure the projection screen is at least 5 feet (1.5 m) from
the projector.
•Check the projection lens to see if it needs cleaning.
38
Problem: Image and menus are reversed left to right
•Rear projection mode is probably turned on. Turn Rear Projection off in the Controls menu. The image should immediately
return to forward projection. See “Rear Projection” on
page 28.
Problem: the projector displays vertical lines, “bleeding” or
spots
•Adjust the brightness. See “Brightness” on page 21.
•Check the projection lens to see if it needs cleaning.
Problem: no sound
•Adjust volume.
•Verify audio/input connections.
•Adjust audio source.
Problem: Image is “noisy” or streaked
Try these steps in this order.
1 Deactivate the screen saver on your computer.
2 Turn Auto Image off and then back on again. See “Auto
Image” on page 24.
3 Turn Auto Image off and adjust the synchronization and tracking manually to find an optimal setting. See “Manual Sync”
on page 25 and “Manual Tracking” on page 25.
•The problem could be with your computer’s video card. If
possible, connect a different computer.
Problem: Projected colors don’t match the computer or video
player’s colors
•Just as there are differences in the displays of different monitors, there are often differences between the computer image
and the projected image. Adjust the brightness, tint and/or
contrast from the Display menu. See “Brightness” on page 21,
“Tint” on page 21 and “Contrast” on page 21.
Problem: Lamp seems to be getting dimmer
•The lamp begins to lose brightness when it has been in use for
a long time. Replace the lamp as described in “Replacing the
Projection Lamp” on page 33.
39
M
a
i
n
t
e
n
a
n
c
e
&
T
r
o
u
b
l
e
s
h
o
o
t
i
n
g
Problem: Lamp shuts off
•A minor power surge may cause the lamp to shut off. Unplug
the projector, wait at least a minute, then plug it back in.
•Make sure the vents are not blocked.
•Make sure the lamp has not been in use for over 2,050 hours.
The lamp automatically shuts off at 2,050 hours. See “Replacing the Projection Lamp” on page 33.
The most current troubleshooting information can be found in
the Service and Support section of our website at
http://www.infocus.com/service. You’ll also find a Technical
Library, FAQs, and support contacts including a technical support e-mail form.
Before calling your dealer or InFocus Technical Support for assistance, please have the following information available:
•the projector’s serial number (located on the bottom label)
•the resolution of your computer.
Call InFocus Technical Support at 1-800-799-9911 between 6 a.m.
and 6 p.m. PST, Monday through Friday. Service is available in
North America after hours and on weekends for a fee at
1-888-592-6800.
In Europe, call InFocus in The Netherlands at (31) 35-6474010
between 8 a.m. and 6 p.m. Central European Time.
In Asia, call (65) 332-0659 between 9:30 a.m. and 5:30 p.m.
Or, send us an e-mail at [email protected]
40