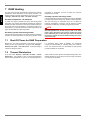
1
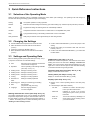
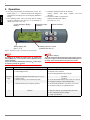
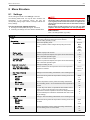
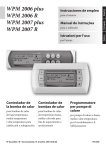
Operating instructions for users Manuel d’utilisation à l‘usage de l‘utilisateur WärmepumpenManager Heat pump manager Gestionnaire de pompe à chaleur für Nieder-, Mittel- und Hochtemperatur–Wärmepumpen zum Heizen und Kühlen for low, medium and high temperature heat pumps for heating and cooling pour pompes à chaleur à température basse, moyenne ou haute pour le chauffage et le rafraîchissement Bestell-Nr. / Order no. / No de commande : 452114.66.48 Deutsch für den Benutzer English Bedienungsanleitung Français WPM 2006 plus WPM 2006 R WPM 2007 plus WPM 2007 R FD 8705 DE GB Einstellung der Sprache SE MENUE-Taste für einige Sekunden gedrückt halten Håll MENY-tangenten intryckt några sekunder Auswahl des Menüpunktes 1 Einstellungen mit den Pfeiltasten (⇑ und ⇓) und bestätigen durch Drücken der ENTER-Taste (↵) Välj menyposten 1 Einstellungen med piltangenterna (⇑ och ⇓) och bekräfta genom att trycka på ENTER-tangenten (↵) Auswahl des Untermenüpunktes Sprache mit den Pfeiltasten (⇑ und ⇓) und bestätigen durch Drücken der ENTER-Taste (↵) bis Cursor zum Einstellwert springt Välj undermenyposten Sprache med piltangenterna (⇑ och ⇓) och bekräfta genom att trycka på ENTER-tangenten (↵) till dess att markören flyttar sig till ”Inställningsvärde” Gewünschte Sprache mit Pfeiltasten (⇑ und ⇓) einstellen Ställ in önskat språk med piltangenterna (⇑ och ⇓) Gewählte Sprache mit ENTER-Taste (↵) bestätigen oder durch die ESC-Taste verwerfen Bekräfta det valda språket med ENTER-tangenten (↵) eller välj bort det med hjälp av ESC-tangenten How to set the desired language CZ MENI -Tipko držimo nekaj sekund pritisnjeno. Select the 1 Einstellungen menu item with the arrow buttons (⇑ and ⇓) and confirm by pressing the ENTER button (↵) Izbiro tipk za meni 1 Einstellungen s pomočjo tipk (⇑ in ⇓) in potrjujemo s pomočjo tipke ENTER- (↵). Select the Sprache submenu item with the arrow buttons (⇑ and ⇓) and confirm by pressing the ENTER button (↵) Pojem izbiramo s pomočjo tipk označenih s puščico (⇑ in ⇓) in potrjujemo s pomočjo tipke ENTER- (↵), dokler se puščica ne postavi na izbrano mesto. Želeni jezik uravnavamo s tipkama (⇑ in ⇓). Confirm the selected language with the ENTER button (↵) or revoke with the ESC button Réglage de la langue Izbrani jezik s tipko ENTER- (↵) potrdimo ali s tipko ESC odklonimo. PL Tenir appuyée la touche MENU pendant quelques secondes Wybór punktu menu 1 Einstellungen przy pomocy klawiszy strzałek (⇑ i ⇓) i potwierdzenie wciśnięciem klawisza ENTER (↵) Sélectionner l’option Sprache avec les touches pourvues de flèches (⇑ et ⇓) puis confirmer avec la touche ENTREE (↵) Régler la langue souhaitée avec les touches pourvues de flèches (⇑ et ⇓) Wybór punktu podmenu Sprache przy pomocy klawiszy strzałek (⇑ i ⇓) i potwierdzenie wciśnięciem klawisza ENTER (↵) aż kursor przeskoczy na wartość ustawianą Confirmer la langue avec la touche ENTREE (↵) ou rejeter la sélection avec la touche ECHAP Ustawić pożądany język klawiszami strzałek (⇑ i ⇓) Potwierdzić pożądany język klawiszem ENTER (↵) lub porzucić wciśnięciem klawisza ESC Nastavení jazyka Stiskněte na několik sekund klávesu MENU. RC NL 语言设置 按住菜单键几秒钟 Zvolte bod menu 1 Einstellungen pomocí kláves se šipkami (⇑ a ⇓) a potvrďte jej stisknutím klávesy ENTER (↵). IT Ustawienia j zyka Przycisk MENU wcisnąć i przytrzymać na kilka sekund Sélectionner l’option 1 Einstellungen avec les touches pourvues de flèches (⇑ et ⇓) puis confirmer avec la touche ENTREE (↵) SI Nastavitev jezika Hold MENUE button depressed for several seconds Set the desired language with the arrow buttons (⇑ and ⇓) FR Inställning av språk 菜单点项的选择 "1 Einstellungen" 调上下箭头键 (⇑ 和 ⇓),然后按确认键(↵)确认 Zvolte bod podmenu Sprache pomocí kláves se šipkami (⇑ a ⇓) a potvrďte jej stisknutím klávesy ENTER (↵), dokud nepřeskočí kurzor na nastavení hodnoty. 次级菜单点项的选择 "Sprache" 调上下箭头键(⇑ 和 ⇓), 然后按确认键(↵)直到光标跳到调整值 Nastavte potřebné jazyky pomocí kláves se šipkami (⇑ a ⇓). 调上下箭头键(⇑ 和 ⇓)来设置所需语言 Potvrďte zvolené jazyky klávesou ENTER (↵) nebo je zrušte klávesou ESC. 用确认键(↵)来确认所选语言,或者通过ESC-键拒绝对这个 语言的选择。 Impostare la lingua PT Definição do idioma Tenere premuto per qualche secondo il pulsante MENUE Manter a tecla MENUE premida durante alguns segundos Selezionare la voce di menu 1 Einstellungen con i pulsanti a freccia (⇑ e ⇓), confermare premendo il pulsante INVIO (↵) Selecção do ponto do menu 1 Einstellungen através das teclas de setas (⇑ e ⇓) e confirmar premindo a tecla ENTER (↵) Selezionare la voce sottomenu Sprache con i pulsanti a freccia (⇑ e ⇓), confermare premendo pulsante INVIO (↵) finché il cursore si troverà sul valore dell’impostazione Selecção do ponto do submenu Sprache das teclas de setas (⇑ e ⇓) e confirmar premindo a tecla ENTER (↵) até o cursor saltar para o valor de definição Settare la lingua desiderata con i pulsanti a freccia (⇑ e ⇓) Definir o idioma pretendido através das teclas de setas (⇑ e ⇓) Con il pulsante INVIO (↵) confermare la lingua selezionata oppure annullare con il pulsante ESC. Confirmar o idioma seleccionado através da tecla ENTER (↵) ou cancelar através da tecla ESC De taal instellen ES Seleccionar el idioma De MENU-toets enkele seconden ingedrukt houden Mantener pulsada la tecla MENUE durante algunos segundos Het menupunt 1 Einstellungen met de pijltjestoetsen (⇑ en ⇓) selecteren en bevestigen door middel van de ENTER-toets (↵) Seleccionar la opción 1 Einstellungen con las teclas de flecha (⇑ y ⇓) y confirmar pulsando la tecla ENTER (↵) Het submenupunt Sprache met de pijltjestoetsen (⇑ en ⇓) selecteren en bevestigen door middel van de ENTER-toets (↵) tot de cursor naar de instellingswaarde springt Seleccionar la subopción Sprache con las teclas de flecha (⇑ y ⇓) y confirmar pulsando la tecla ENTER (↵) hasta que el cursor salte al valor de ajuste De gewenste taal met de pijltjestoetsen (⇑ en ⇓) instellen Configurar el idioma deseado con las teclas de flecha (⇑ y ⇓) De geselecteerde taal met de ENTER-toets (↵) bevestigen of door de ESC-toets afwijzen Confirmar el idioma elegido con la tecla ENTER (↵) o desechar la selección de idioma pulsando la tecla ESC Table of Contents Table of Contents 1 General Information........................................................................................................................................ E-2 3 Quick Reference Instructions ........................................................................................................................ E-3 3.1 Selection of the Operating Mode................................................................................................................................................... E-3 3.2 Changing the Settings................................................................................................................................................................... E-3 3.3 Settings and Operating Data......................................................................................................................................................... E-3 4 Operation ......................................................................................................................................................... E-4 5 Operating Modes............................................................................................................................................. E-5 6 Adjustment of Heating Operation.................................................................................................................. E-5 7 DHW Heating ................................................................................................................................................... E-6 7.1 Shut-Off Times for DHW Preparation............................................................................................................................................ E-6 7.2 Thermal Disinfection ..................................................................................................................................................................... E-6 8 Menu Structure................................................................................................................................................ E-7 8.1 Settings ......................................................................................................................................................................................... E-7 8.2 Operating Data............................................................................................................................................................................ E-10 8.3 History ......................................................................................................................................................................................... E-12 9 Displays ......................................................................................................................................................... E-13 9.1 Normal Operating Statuses......................................................................................................................................................... E-13 9.2 Fault Messages........................................................................................................................................................................... E-15 E-1 English 2 Heat Pump Manager ....................................................................................................................................... E-2 1 1 General Information English For installation, operation and maintenance refer to the installation and operating instructions. This unit should only be installed and repaired by an experienced technician. Poorly carried out repairs can endanger the safety of the user. According to current regulations, the installation and operating instructions must always be available and should be handed to the technician working on the device for his/her information. Should ownership change, these installation and operating instructions must be passed on to the new user or owner. Do not connect the device if it is visibly damaged. In this event, ask the supplier for advice. Ensure that only original spare parts are used to prevent consequential damage. All environmentally-relevant requirements regarding the recovery, recycling and disposal of materials and components should be observed in accordance with the applicable standards. Regulations and Safety Information! Any adjustments to the settings within the device may only be carried out by an authorised technician<. The heat pump manager should only be operated in dry rooms with temperatures ranging between 0 °C and 35 °C. Ensure that no condensation forms on the device. To ensure that the antifreeze function of the heat pump works properly, the heat pump manager must remain connected to the power supply and the flow must be maintained through the heat pump at all times. 2 Heat Pump Manager The heat pump manager is essential for operation of air-to-water, brine-to-water and water-to-water heat pumps. It regulates a bivalent, monovalent or mono energy heating system and monitors the safety components in the refrigerating circuit. The heat pump manager is either installed in the heat pump casing or is delivered with the heat pump as a wall-mounted controller. It carries out regulation of both the heating system (radiators and circulation pump) and the heat source system. Overview of functions Convenient 6-button operation Large and clear illuminated LC display with indicators for operating status and service information Conforms with utility company requirements Dynamic menu navigation, customised for the configured heat pump system Remote control interface with identical menu navigation Return temperature-controlled regulation of heating operation based on external temperature, adjustable fixedsetpoint or room temperature Control of up to 3 heating circuits Priority switching – Cooling first – DHW preparation first – Heating first – Swimming pool E-2 Control of a 2nd heat generator (oil or gas boiler, or immersion heater) Control of a mixer for a 2nd heat generator (oil, gas, solid fuel boiler, or renewable heat source) Special program for a 2nd heat generator to ensure minimum runtimes (oil boiler) or minimum heating times (main cylinder) Control of a flange heater for targeted reheating of domestic hot water with adjustable time programs, and for thermal disinfection Optional control of up to 5 circulating pumps Defrost management system to minimise the energy required for defrosting using variable, self-adjusting defrosting cycle times Compressor management system to ensure balanced loading of the compressors for heat pumps with two compressors Operating hours counter for compressors, circulating pumps, 2nd heat generator and flange heater Keyboard block, child lock Alarm memory with time and date Interface for communication via PC with optional display of heat pump parameters Automatic program for targeted heat drying of screed floors and saving the start and finish times Quick Reference Instructions 3.3 3 Quick Reference Instructions Selection of the Operating Mode Select the desired operating mode by repeatedly pressing the modus button (text message). The operating mode will change 10 seconds after altering the setting (symbol changes on the display). Cooling The system operates in cooling operation. Summer Domestic hot water heating and swimming pool water heating only. Antifreeze (frost protection) is ensured. Auto Programmed raising and lowering times are automatically activated. Vacation Temperature reduction and domestic hot water block for an adjustable time period. Party A programmed lowering of the heating characteristic curves is overridden. Heat generator 2 Heat pump is blocked. Heat is generated by the 2nd heat generator. 3.2 Changing the Settings Hold the MENU button depressed for several seconds Select the desired menu item with the arrow buttons (⇑ and ⇓) Confirm with the ENTER button (↵) until cursor jumps to the setting Confirm by pressing the ENTER button (↵) Change the setting to the desired value with the arrow buttons (⇑ and ⇓) Select the desired submenu item with the arrow buttons (⇑ and ⇓) Confirm new value with the ENTER button (↵) or revoke with the ESC button 3.3 Settings and Operating Data Menu for setting system-specific parameters (see Chap. 8 on p. 7). Dynamic menus hide non-essential settings. Time Sets the time and activates an automatic summer/winter changeover. Operation Various operating mode settings available (see Chap. 3.2 on p. 3) DHW heating (see Chap. 7 on p. 6) Besides the hot water temperature, a shut-off-time for the DHW heating can be set in the menu item “Settings – Domestic hot water”. This can be used to switch DHW preparation e.g. to the night hours. There is also the option of time-controlled reheating of domestic hot water using a flange heater. Heating circuit 1 Settings for heating circuit 1 Operating data menu (see Chap. 8.2 on p. 10) Heating circuit 2 Settings for heating circuit 2 Display of measured sensor values Heating circuit 3 Settings for heating circuit 3 History menu (see Chap. 8.3 on p. 12) Cooling Settings for cooling operation Display of runtimes and stored data (e.g. faults) Domestic hot water Settings for DHW preparation Swimming pool Settings for swimming pool heating Date Sets the date (required for leap years only) Language Sets the language desired for menu navigation Displays (see Chap. 9 on p. 13) Display of the current operating status of the heat pump system Fault messages: (ESC button flashes) - HP fault Indication of a fault in the heat pump. Inform your after-sales service. - Plant fault Indication of a fault or an incorrect setting in the system. Inform your local technician. - Short-circ. or break This can be caused by a breakage or a sensor which is short circuiting. Inform your local technician. Heating characteristic curves (see Chap. 6 on p. 5) The heating characteristic curve can be adjusted to individual temperature requirements using the Warmer/colder buttons on the main display. Increase or reduce the temperature with the ⇑ / ⇓ buttons. For heating circuit 2/3, make this setting in the menu “Heating circuit 2/ Heating circuit 3”. E-3 English 3.1 4 4 Operation English The heat pump manager is operated using 6 keys: Esc, Modus, Menu, ⇓, ⇑, ↵ . Different functions are assigned to these buttons according to the current display (Standard or Menu). The operating status of the heat pump and the heating system is indicated in plain text on a 4 x 20 character LC display (see Chap. 9 on p. 13). [FKDUDFWHUGLVSOD\ %DFNOLW The menu consists of 3 main levels: Settings, Operating data, History (see Chap. 6 on p. 5) 2SHUDWLQJPRGH V\PEROV 6WDWXVGLVSOD\+3 OLQH Fig. 4.1: 6 different operating modes can be selected: Cooling, Summer, Auto, Party, Vacation, 2nd heat generator. %XWWRQIXQFWLRQV +HDWLQJZDUPHUFROGHU LQGLFDWRUEDUOLQH Standard LC display - main display with operator buttons NOTE NOTE Contrast: The display can be adjusted for contrast. Do this by depressing the buttons (MENU) and (↵) at the same time until the adjustment process has been completed. Increase the contrast by simultaneously pressing the (×) button. Reduce the contrast by pressing the (Ø) button. Button Esc Standard display (Fig. 4.1 on p. 4) Keyboard block, child lock! To prevent unintentional adjustment of the heat pump manager, press the button (Esc) for approx. 5 seconds until KEY BLOCK ACTIVE appears on the display. Cancel the keyboard block using the same procedure. Change of setting (Chap. 8 on p. 7) Activates or deactivates the keyboard block Exits the menu and returns to the main display Acknowledges a fault Returns from a submenu Exits a setting without saving changes Operation Menu Selects the operating mode (see Chap. 5 on p. 5) Jumps to menu No action No action ⇓ Shifts the heating curve downwards (colder) Scrolls downwards between menu items on one level ⇑ Shifts the heating curve upwards (warmer) Scrolls upwards between menu items on one level Changes a setting in a downward direction Changes a setting in an upwards direction ↵ No action Selects a setting in the corresponding menu item Exits a setting and saves changes Jumps to a submenu Tab. 4.1: Operator button functions E-4 Operating Modes 6 5 Operating Modes NOTE Heat pump operation block The heat pump is blocked in the 2nd heat generator operating mode. Heating operation and DHW preparation in mono energy systems is carried out using electric heating elements. In the case of bivalent systems, the 2nd heat generator is used. COOLING Selectable only when the cooling controller is connected (see Installation and Start-up) The system operates in cooling operation. The individual control functions are active. This operating mode can only be activated if a cooling controller is connected to the heat pump manager and the cooling function has been enabled in the preconfiguration. SUMMER Only domestic hot water and swimming pool water are heated up in the SUMMER operating mode. Space heating is not activated. Antifreeze (frost protection) is ensured. AUTO The heat pump operates in automatic operation. Programmed lowering times, raising times and shut-off-times for heating and DHW heating are activated automatically. DHW heating, heating and swimming pool heating are activated according to priority. The heat pump and the 2nd heat generator are switched on or off as required. VACATION (lower operation) A lowering of the heating characteristic curves and a hot water block are activated in the VACATION operating mode. Both functions are independent of any relevant timings, but the lower values set for these functions still apply. The duration of the VACATION operating mode can be set in the menu “1 Settings – Operation – Vacation mode”. After this time period has elapsed, the system switches automatically back to automatic operation again. PARTY (daytime operation) A programmed lowering of the heating characteristic curves is overridden in the PARTY operating mode. The duration of the PARTY operating mode can be set in the menu “1 Settings – Operation – Party mode”. After this time period has elapsed, the system switches automatically back to automatic operation again. 2nd heat generator (HG2) The heat pump is switched off in this operating mode and the entire heat supply is provided by the 2nd heat generator (HG2). This is the immersion heater in mono energy systems. In bivalent systems it is the oil or gas heating. Time programs and heating curve settings remain active. 6 Adjustment of Heating Operation During start-up, the heating characteristic curve is adjusted to suit the building and local conditions. This heating characteristic curve can be adjusted to individual temperature requirements using the Warmer/Colder arrow buttons on the main display. Increase the temperature with the ⇑ button. The indicator bar in the last line will move to the right. Decrease the temperature with the ⇓ button. The indicator bar in the last line will move to the left. For heating circuits 2/3, make this setting in the “Heating circuit 2/3” menu. NOTE Energy-efficient operation For energy-efficient operation of the heat pump heating system, the temperature level to be generated by the heat pump should be as low as possible. In well-insulated buildings, constant heating operation without lowering times will normally result in lower energy costs. This is because power peaks with high flow temperatures are avoided and the same degree of comfort is attained at lower temperatures. Shut-off times can be compensated for by a temperature rise that begins 1 hour before the shut-off time takes effect. The set heating characteristic curves can be lowered or raised on a time-controlled basis. For example, in poorly insulated buildings the heating characteristic curve can be lowered, or raised before the shut-off time to prevent significant cooling of the heating surfaces. If the raising and lowering operations overlap each other, the raising operation has priority. E-5 English 6 different operating modes can be selected using the button (Modus). There is a time delay between switching modes. The operating mode can be changed each time the button is pressed in the order shown below. 7 7 DHW Heating English The heat pump manager automatically calculates the maximum possible hot water temperature in heat pump operation. The desired domestic hot water temperature can be set in the menu “Settings – Domestic hot water – Hot water set temp”. Hot water temperature - HP maximum To attain the highest possible heat pump ratio during DHW preparation, the controller automatically calculates the maximum possible hot water temperature in heat pump operation based on the current heat source temperature. The lower the heat source temperature (e.g. external temperature, brine temperature), the higher the attainable hot water temperature. Hot water cylinder without flange heater If the hot water set temperature exceeds the maximum attainable domestic hot water temperature in heat pump operation, DHW 7.1 If the hot water set temperature exceeds the maximum attainable hot water temperature in heat pump operation, DHW preparation with the heat pump is terminated once the so-called HP maximum temperature is reached, and the desired hot water temperature is attained by reheating using the flange heater. NOTE Reheating with flange heater After DHW preparation with the heat pump, the water can be further heated to higher temperatures if the system is provided with a flange heater. DHW heating does not take place again until the HP maximum temperature is undershot. This ensures that basic heating can be carried out by the heat pump. If a sufficiently large cylinder is available, we recommend carrying out DHW heating or reheating during the night-time hours. This means that the more favourable low tariff periods normally available can be utilized. Thermal Disinfection In the menu item “Settings – Domestic hot water – Therm. Disinfection”, it is possible to carry out a thermal disinfection with hot water temperatures of up to 85 °C in bivalent systems or E-6 Hot water cylinder with flange heater Shut-Off Times for DHW Preparation Besides the hot water temperature, shut-off-times for DHW heating can also be programmed in the menu item “Settings – Domestic hot water – Hot water block’’. No DHW heating is carried out during this period. 7.2 preparation is terminated once the so-called HP maximum temperature is reached. systems with hot water cylinders and integral flange heater. The thermal disinfection can be carried out for each day of the week. The start time is selectable. Menu Structure 8.1 8 Menu Structure Settings All user settings are made in the “Settings” menu item. The following table shows not only the menu structure and explanations in the right-hand column, but also the corresponding setting ranges. Values in bold print indicate the factory settings. You can access the settings menu by: Pressing the button (MENU) for approx. 5 seconds Confirming the settings menu item with the ENTER button. NOTE Dynamic menus The following contains a description of the complete menu. During startup, the regulatory functions and the menu structure are adjusted to the specific system. Non-relevant menu items are then hidden according to these settings. Example: Settings for DHW preparation can only be made if the “DHW preparation” menu item is configured with “Yes” in the preconfiguration. Abbreviations: HG2 = 2nd heat generator (e.g. boiler) System-specific parameters Setting range Menu for setting the time. An automatic changeover from daylight International 24 h saving time (summer) to winter time can be selected. display Level for setting operating modes Selects the operating mode It is also possible to make changes directly using the modus button. Duration of party mode in hours After the set period has elapsed, the system returns automatically back to automatic operation again. Duration of vacation mode in days After the set period has elapsed, the system returns automatically back to automatic operation again. Summer Auto Party Vacation HG2 Cooling 0 to 4 to 72 0 to 15 to 150 Settings for heating circuit 1 Sets the desired room set temperature when room temperature regulation is selected 15.0°C to 20.0 °C to 30.0°C Settings to lower the heating characteristic curve of heating circuit 1 Sets the time during which the temperature in heating circuit 1 is to be lowered 00:00 to 23:59 Sets the temperature value by which the heating characteristic curve of heating circuit 1 is to be lowered when the temperature is lowered For each day of the week, it is possible to select whether Time1, Time2, no time or both times are to be active when the temperature is lowered. Operations to lower the temperature that exceed a weekday are activated or deactivated at the end of each day accordingly. 0K to 19K N T1 T2 Y Settings to raise the heating characteristic curve of heating circuit 1 Sets the time during which the temperature in heating circuit 1 is to be raised. 00:00 to 23:59 Sets the temperature value by which the heating characteristic curve of heating circuit 1 is to be raised. 0K to 19K E-7 English 8.1 8.1 System-specific parameters English For each day of the week, it is possible to select whether Time1, Time2, no time or both times are to be active when the temperature is raised. Operations to raise the temperature that exceed a week day are activated or deactivated at the end of each day accordingly. Setting range N T1 T2 Y Settings for heating circuit 2/3 Parallel shift of the set heating curve for heating circuit 2/3. By pressing the arrow buttons once, the heating curve is shifted by 1°C upwards (hotter) or downwards (colder). Indicator bar Settings to lower the heating characteristic curve of heating circuit 2/3 Sets the time during which the temperature in heating circuit 2/3 is to be lowered. 00:00 to 23:59 Sets the temperature value by which the heating characteristic curve of heating circuit 2/3 is to be lowered when the temperature is lowered For each day of the week, it is possible to select whether Time1, Time2, no time or both times are to be active when the temperature is lowered. Operations to lower the temperature that exceed a week day are activated or deactivated at the end of each day accordingly. 0K to 19K N T1 T2 Y All settings to raise the heating characteristic curve of heating circuit 2/3 Sets the time during which the temperature in heating circuit 2/3 is to be raised. 00:00 to 23:59 Sets the temperature value by which the heating characteristic curve of heating circuit 2/3 is to be raised when the temperature is raised. For each day of the week, it is possible to select whether Time1, Time2, no time or both times are to be active when the temperature is raised. Operations to raise the temperature that exceed a week day are activated or deactivated at the end of each day accordingly. 0K to 19K N T1 T2 Y Settings for cooling operation Sets the desired return set temperature when dynamic cooling is selected 10°C to 15°C to 30°C Sets the room set temperature for silent cooling The actual value is measured by room climate control station 1 15.0°C to 20.0°C to 30.0°C Sets DHW preparation Sets the desired hot water temperature 30°C to 45 °C to 85°C Sets the time programs for hot water blocks Sets the times in which DHW preparation is blocked 00:00 to 23:59 For each day of the week, it is possible to select whether Time1, Time2, no time or both times are to be active when the temperature is lowered. Operations to lower the temperature that exceed a weekday are activated or deactivated at the end of each day accordingly. E-8 N T1 T2 Y Menu Structure 8.1 System-specific parameters Setting range Sets the start time for the thermal disinfection English To carry out a thermal disinfection, the DHW is heated up once to the desired temperature. The heating period is terminated automatically when the set temperature is reached or after 4 hours at the latest. 00:00 to 23:59 Sets the desired hot water temperature which is to be reached during thermal disinfection 60°C to 45 °C to 85°C For each day of the week, it is possible to select whether thermal disinfection is desired at the set start time. N By setting Reset to “Yes”, the maximum calculated hot water temperatures in HP operation are reset to a value of 65 °C. The setting is automatically reset to “No”. No Y Yes Sets the preparation of swimming pool water Sets the time programs for swimming pool blocks Sets the times in which swimming pool water preparation is blocked 00:00 to 23:59 For each day of the week, it is possible to select whether Time1, Time2, no time or both times are to be active when the temperature is lowered. Operations to lower the temperature that exceed a week day are activated or deactivated at the end of each day accordingly. N T1 T2 Y Sets the date, year, day, month and week day The language for menu navigation can be selected from the available languages DEUTSCH ENGLISH FRANCAIS ITALIANO NEDERLAND PORTUGUES POLSKY SVENSKA SLOVENSKO ESPANOL CESKY E-9 8.2 8.2 Operating Data All current operating statuses are displayed in the “Operating data” menu item. You can access the operating data menu by: English Pressing the button (MENU) for approx. 5 seconds Selecting the operating data menu item with the arrow buttons and confirming with the ENTER button Depending on the system configuration, the following data can be queried in the “Operating data” menu: Display of sensor and system values The external temperature is used for calculating the return set temperature, for antifreeze functions and for defrosting Display Always Displays the calculated return set temperature for heating circuit 1 Not with silent cooling, only with reversible HP Displays the return temperature of heating circuit 1 measured on the sensor. This temperature is the controlled variable for heating circuit 1. Always Displays the flow temperature measured on the sensor. This temperature is used for antifreeze functions and for safeguarding defrosting. Air HP or sensor connected Displays the calculated set temperature for heating circuit 2 Heating circuit 2 Heating operation Displays the minimum temperature possible with silent cooling, calculated from the dew point plus dew point distance Cooling operation Displays the temperature of heating circuit 2 measured on the sensor. HC2 or Silent cooling only, reversible HP or HC2 cooling operating This temperature is, among other things, the controlled variable for with silent cooling heating circuit 2. only with reversible HP Displays the calculated set temperature for heating circuit 3 Heating circuit 3 Heating operation Displays the temperature of heating circuit 3 measured on the sensor. This temperature is the controlled variable for heating circuit 3. Indicates if a request for heating has been made. Even if there is a request for swimming pool water, it is possible that the heat pump will not operate (e.g. because of the utility company shut-off time). Heating circuit 3 Heating operation Min. 1 heating circuit “Heating system flushing” is displayed when the system is being flushed. An HP block combined with a sufficiently high cylinder temperature is indicated by “Bivalent-renewable”. Indicates which heat generator is available to carry out the heating Heating operation request 1: max. 1 compressors, 2: max. 2 compressors, 3: max. 2 compressors and one 2nd heat generator Sensor for determining the defrost end with hot gas defrosting Air HP with hot gas defrosting Displays the temperature measured in the cylinder in bivalentrenewable systems Bivalentrenewable Displays the measured return temperature during cooling operation measured at the heat exchanger input Passive cooling function Cooling operation Displays the measured flow temperature during cooling operation Cooling function measured at the heat exchanger output passive E-10 Menu Structure 8.2 Display of sensor and system values Displays the temperature measured on the “Antifreeze Cool” sensor. Display Reversible HP Cooling operation Displays the current room set temperature with silent cooling. Cooling function Silent cooling Cooling operation Displays the temperature measured in the room in which room climate control station 1 is installed. This temperature is the controlled variable for silent cooling. Cooling function Silent cooling or Reference room Displays the humidity measured in the room in which room climate Cooling function control station 1 is installed. This value is used for calculating the Silent cooling dew point with silent cooling. Displays the temperature measured in the room in which room climate control station 2 is installed. Cooling function Displays the actual humidity in the room in which room climate control station 2 is installed. This value is used for calculating the dew point with silent cooling. Cooling function Silent cooling This value is used for calculating the dew point with silent cooling. 2 room stations Indicates if a request for cooling has been made Silent cooling 2 room stations Cooling function Cooling operation Displays the current domestic hot water set temperature Domestic hot water Displays the measured domestic hot water temperature. This temperature is the controlled variable for DHW preparation. Domestic hot water Sensors Sensors Indicates if a request for domestic hot water has been made. Even if there is a request for swimming pool water, it is possible that the heat pump will not operate (e.g. because of the utility company shut-off time). An HP block combined with a sufficiently high cylinder temperature is indicated by “Bivalent-renewable”. Domestic hot water Indicates if a request for swimming pool water has been made. Even if there is a request for swimming pool water, it is possible that the heat pump will not operate (e.g. because of the utility company shut-off time). An HP block combined with a sufficiently high cylinder temperature is indicated by “Bivalent-renewable”. Swimming pool Displays the temperature measured at the heat source output or the refrigerating circuit output of the HP. This temperature serves to safeguard the lower operating limit. BW or WW HP with integr.controller Displays the heat pump type identified from the coding resistor. Always Displays the heating controller software version including the boot and bios version, as well as the valid network address. Always Displays the cooling controller software version including the boot Cooling function and bios version, as well as the valid network address. Displays whether a cooling controller is available in the network (Contr. Cooling) and whether the network is operating correctly (Network O.K.). Cooling function NOTE Heating request A heating request is pending if the “Return set temperature” minus the “Hysteresis return temperature” is higher than the current measured “Return temperature”. E-11 English This temperature is used to safeguard the operating limits in cooling operation. 8.3 The hot water temperature display shows which heat generators are used to process a hot water request. English 0QFSBUJOHEBUB )PUXBUFSUFÀ$ 81(&5%8'; /&"6.BY : +HDWSXPS ) )ODQJHKHDWHU = +HDWJHQHUDWRU HJ+HDWSXPSIODQJHKHDWHU 8'; 0D[LPXPDWWDLQDEOHGRPHVWLFKRWZDWHU WHPSHUDWXUHZLWKWKHKHDWSXPSZLWKWKH FXUUHQWKHDWVRXUFHWHPSHUDWXUH Fig. 8.1: Hot water temperature display 8.3 History The “History“” menu can be used to query the runtimes of the compressor(s), circulating pumps and further components in the heat pump heating system. You can access the history menu by: Selecting the history menu item with the arrow buttons and confirming with the ENTER button Depending on the system configuration, the following data is available: Pressing the button (MENU) for approx. 5 seconds Display of runtimes and stored data Display Total runtime of compressor 1 Always Total runtime of compressor 2 2 Compressors Total runtime of 2nd heat generator Total runtime of the brine circulating pump or well pump. The runtime is greater than the total of the compressor runtimes because of pump forerun and afterun. Bivalent or mono energy BW or WW HP Total runtime of the ventilator. The runtime is less than the total of the compressor runtimes because of the defrosting process (the ventilator is switched off during defrosting). AW HP Total runtime of the heat circulating pump Always Runtime of the compressor in cooling operation Reversible HP Total runtime of the hot water circulating pump Domestic hot water Total runtime of the swimming pool circulating pump Runtime during which the flange heater was additionally switched on for DHW preparation Swimming pool Domestic hot water Sensors Immersion heater E-12 Displays the last fault which occurred with the date, time and cause Always Displays the second to the last fault which occurred with the date, time and cause Always Displays the start and end of the last, fully completed initial heating program Always Displays the start and end of the last, fully completed screed drying program Always Displays 9.1 9 Displays 9.1 Normal Operating Statuses The display shows both normal operating statuses and those that are required by utility companies or due to safety functions of the heat pump. Only information about the relevant system configuration and HP type are shown on the display. Heat pump does not operate because there is no request for heating pending. Heat pump operates in heating operation Heat pump operates with active cooling Heat pump operates for DHW preparation and heats the hot water cylinder Heat pump operates and heats the swimming pool water Heat pump and 2nd heat generator operate in heating operation Heat pump and 2nd heat generator operate and heat the swimming pool water Heat pump and 2nd heat generator operate in DHW heating operation and heat the hot water cylinder After expiry of the minimum pause time, the heat pump will start in order to meet the heating request that is pending. The minimum pause time protects the heat pump and can last up to 5 minutes. After expiry of the switch cycle block, the heat pump will start in order to meet the heating request that is pending. The switch cycle block is required by utility companies and can last up to 20 minutes. A maximum of 3 switch-ons per hour are permissible. After expiry of the switch-on delay for the line load, the heat pump will start in order to meet the heating request that is pending. The switch-on delay for the line load is required by utility companies after the voltage is recovered or after a utility block. It can last up to 200 seconds. The heat pump starts after expiry of the utility company shut-off time. The utility company shut-off time is specified by the utility company and lasts up to two hours depending on the utility company. Activation or deactivation is carried out by the utility company. The heat pump was switched off by an external utility blocking signal on input ID4. The heat pump starts after completion of the primary pump forerun. This can last up to 3 minutes (safety function). The heat pump was switched off because the low pressure limit was reached. The heat pump will switch on again automatically. The 2nd heat generator (HG2) undertakes the supply of heat until the heat pump switches on again automatically. The heat pump was switched off because the low pressure limit was reached. The heat pump will switch on again automatically. The 2nd heat generator (HG2) undertakes the supply of heat until the heat pump switches on again automatically. The heat pump was switched off because the lower operating limit was reached. The heat pump will switch on again automatically as soon as the heat source temperature has reached a sufficient level (safety function). The heat pump was switched off because the high pressure limit was reached. It will switch on again automatically (high pressure safety program). The heat pump is blocked. The cause for the block is displayed using the following abbreviations: ET: The external temperature is lower than -25 °C (or -15 °C) or higher than 35 °C. OM: When the "Bivalent-alternative" operating mode is selected, the external temperature is lower than the limit temperature HG2. The 2nd heat generator is released. BR: When the "Bivalent-regenerative" operating mode is selected, the temperature in the cylinder is high enough so that all pending requests (heating, hot water or swimming pool) can be processed by the cylinder. BF: The current return flow temperature is lower than the set limit. DHW: Domestic hot water reheating via the 2nd heat generator is active. SK: A system control was activated in the special functions menu. It will be automatically deactivated after 24 hours. EVS Utility block (EVU) or bridge A1 (ID3-X2) has not been inserted. Def: With measure defrost active the usual lowering of the flow temperature during defrosting did not occur (Special functions measure defrost). E-13 English The current operating status of the heat pump system can be read from the LC display. 9.1 The heat pump is switched off because the operating mode, 2nd heat generator (HG2), was selected. Heat generation is provided by the 2nd heat generator. Flow rate monitoring of the heating water takes place before the evaporator is defrosted. This applies to air-to-water heat pumps only. This process lasts a maximum of 4 minutes. The heat pump defrosts the evaporator. This process lasts a maximum of 8 minutes. English The maximum flow temperature was overshot. Once the temperature drops, the HP will start again automatically (HT HP only). Switching to and from the cooling operating mode activates a time delay of 5 minutes. The heat pump remains switched off during this period. Despite a pending request, the chiller is unable to cool because antifreeze (frost protection) was activated. This state is ended automatically. Despite a pending request, the chiller is unable to cool because the current flow temperature is under the operating limit. This state is ended automatically. Despite a pending request, the chiller is unable to cool because the dew point monitor has been activated (external input). This state is ended automatically. Despite a pending request, the chiller is unable to cool because the dew point calculated from the sensor values from the room climate control stations has been undershot. This state is ended automatically. The heat pump operates in passive cooling and no requests are pending. E-14 Displays Fault Messages Fault messages on the display fall into three broad categories: Heat pump fault System fault and Sensor fault You only need to inform your after-sales service if there is a heat pump fault (HP fault). Make a note of the error message and the software version displayed in the operating data. After rectifying the problem, press the Esc button to acknowledge the fault. The following messages may appear on the display. A heat pump fault indicates a defect in the heat pump. Inform your local technician. Details of the fault (display), the heat pump designation (type plate) and the software version of the heat pump manager (operating data) are required for rapid and precise troubleshooting. Depending on the system type, the following heat pump faults may appear on the display: Low-pressure Hot gas thermostat Antifreeze Compressor load A plant fault indicates a defect or a false setting in the heat pump system. Inform your local technician. Details of the fault, the heat pump designation and the software version of the controller are required for rapid and precise troubleshooting. Depending on the system type, the following plant faults may appear on the display: Motor protection primary Flow rate well High pressure Temp. difference As with a system fault, this can be caused by a breakage or a sensor which is short circuiting. Inform your local technician. Details of the fault, the heat pump designation and the software version of the controller are required for rapid and precise troubleshooting. Depending on the system type, the following sensors may be defective: Return flow sensor Freeze protection sensor Hot water sensor Flow sensor Sensor for heating circuit 2/3 External sensor This message will only be displayed with silent cooling active. It can have the following causes: Break or sensor which is short-circuiting Number of room climate control systems does not match the number of set room climate control stations. Inform your local technician. NOTE System fault In mono energy systems, the minimum return set temperature is set if a heat pump or system fault occurs. Antifreeze (frost protection) is ensured. By manually switching to the 2nd heat generator operating mode, the building is heated exclusively using the immersion heater. E-15 English 9.2 9.2 Garantiebedingungen und Kundendienstadresse Montage- und Gebrauchsanweisung Wärmepumpe. siehe For the terms of the guarantee and after-sales service addresses, please refer to the Installation and Operating Instructions for Heat Pumps. Pour les conditions de garantie et les adresses SAV, se référer aux instructions de montage et d'utilisation de la pompe à chaleur. Irrtümer und Änderungen vorbehalten. Subject to alterations and errors. Sous réserve d’erreurs et modifications. Quick Reference Instructions WPM 2006 plus WPM 2006 R WPM 2007 plus WPM 2007 R 1. Key assignment The heat pump manager is operated using 6 keys: Modus Briefly touch Change the operating mode by pushing the key once or repeatedly: The filled square in the upper right corner of the display indicates the current operating mode. Symbol Operating mode Denotation Auto Fully automatic control of the entire heat pump heating system Vacation Temperature lowering and hot water block for an adjustable time period (in days) Party For overriding programmed temperature lowering for an adjustable time period (in hours) Heat generator 2 Heat pump blocking; Heating and domestic hot water preparation through the second heat source (e.g. oil heater) or the electric heating elements Summer Domestic hot water and swimming pool water preparation; Heating operation blocked Cooling Cooling operation cannot be activated on all heat pumps When the key is pressed, the selected operating mode will be shown as text in the display. The selected operating mode will be activated after approx. 10 seconds. Menue Keep pressed for 2 seconds Jump to the menu to modify Settings. ESC Briefly touch Jump back to a higher menu level. Keep pressed for 3 seconds Jump back to the standard display. Keep pressed for 5 seconds Activate and deactivate the keylock. Briefly touch Confirm changes to settings (Enter key). Briefly touch Press the key once to increase the heating temperature by 1 °C. The indicator bar will move to the right. Briefly touch Press the key once to reduce the heating temperature by 1 °C. The indicator bar will move to the left. 2. Settings menus How to adapt the settings to your requirements: Menue or ESC Keep pressed for 2 seconds Jump to the menu to modify Settings. Briefly touch Confirm the menu item Settings to go to the submenus. Briefly touch Jump to other setting options. Keep pressed for 1 second Jump back to a higher menu level. Note: These quick reference instructions do not replace the enclosed operating instructions, which can also be downloaded from the Internet. Quick Reference Instructions WPM 2006 plus WPM 2006 R WPM 2007 plus WPM 2007 R 3. Domestic hot water preparation How to set the domestic hot water temperature and the hot water block: Menue or or or Keep pressed for 2 seconds Jump to the menu to modify Settings. Briefly touch Confirm the selection of the menu item Settings. Briefly touch Press the key several times to select the menu item Domestic hot water. Briefly touch Confirm selection of the menu item Domestic hot water. Briefly touch Confirm selection of the menu item Hot water set temp. Briefly touch Increase or lower the hot water set temperature as required. Briefly touch Confirm the set value. Briefly touch Select the menu item Hot water block. Briefly touch Confirm selection of the menu item Hot water block. Briefly touch Jump to the setting to start the Hot water block (Time). Briefly touch Increase or lower the setting as required. Briefly touch repeatedly Jump to the other settings until the cursor flashes in the upper corner. Example: Time 1: 06:00-22:00 will block domestic hot water preparation from 6:00 am to 10:00 pm. Briefly touch Select the menu item Hot water block (Mo-Su). Briefly touch repeatedly Jump to the individual weekdays from Monday to Sunday. Briefly touch Briefly touch Select one or both shut-off times per weekday and confirm by pressing the Enter key: N: No shut-off time active T1: Time 1 active as shut-off time T2: Time 2 active as shut-off time Y: Time 1 and Time 2 active as shut-off times Example: SA: N and SU: N will prevent hot water block at weekends. How to return to the standard screen and what to do if you have any problems making settings: ESC Keep pressed for 3 seconds Jump back to the standard display.