1
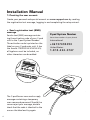
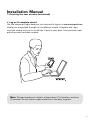
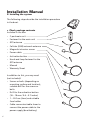
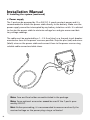
Installation Manual User Guide Reference Manual Troubleshooting Guide © Seakey AB Contents Installation manual – p. 4 1. Creating the user account SMS 2.Installing the system 3.System start-up WWW 4.Finishing the setup 5.Configuring system User Guide – p. 15 • System mode • Alarms • Warnings • Activate and Deactivate Alarms • Triggered alarms • Triggered warnings Reference manual – p. 23 • Text (SMS) commands • Installation test mode • Reboot a unit • Power-cycle a unit • Winter storage/Shut down unit • Activation button flashes Troubleshooting guide – p. 28 • Communication related problems • GPS related problems • Alarm loop related problems • Power related problems • Messaging and notification problems • Web portal problems WWW 3 Installation Manual 1. Creating the user account Create your personal web portal account on www.mycpod.com by sending the registration text message, logging in and completing the setup wizard. a. Send registration text (SMS) message Send a text (SMS) message containing the activation code of your C-pod unit to the C-pod System Number. The activation code is printed on the label on your C-pod main unit. It has the format 1703200-XX-XXXXX-XX; all hyphens must be included, no other characters can be added. The C-pod Server now sends a reply message containing a temporary user name and password. Should the server reject your message, double check that the code is identical to the one on the label and try again. 4 C-pod System Number Store these numbers in your phone! International: + 4 6 7 3 74 9 4 0 9 0 United States: 1 - 8 14 - 2 2 2 - 0 747 Installation Manual 1. Creating the user account (continued) b. Log on & complete wizard Use the temporary login data you just received to log on to www.mycpod.com, where you are guided through an installation wizard. Complete the steps until the wizard tells you to install the C-pod in your boat. Your personal web portal account has been created. Note: The password must contain at least seven (7) characters and one (1) number. Do not choose a password that is too easy to guess! 5 Installation Manual 2. Installing the system The following steps describe the installation procedure in the boat. a. Check package contents Included in the box: – C-pod main unit – Fastener for the main unit – GPS antenna – Cellular (GSM) network antenna – Magnetic intrusion sensor – Power cable – Activation button – H ook-and-loop fastener for the GPS antenna – Manual – Warranty Sheet In addition to this, you may need (not included): – S crews or bolts (depending on mounting surface and location); suitable drill for the screws or bolts – D rill for the activation button (16 – 18 mm / 0.6 – 0.7 inches) – 1 – 2A fuse (slow) and suitable fuse holder – C able connectors/cable shoes to connect the power cable to the power supply (boat battery) 6 Installation Manual 2. Installing the system (continued) b. Find a suitable onboard location for the C-pod The C-pod should be installed in a well hidden and dry place onboard. Other factors that must be considered are cellular (GSM) network and GPS signal reception, access to constant power supply and cable lengths for the supplied equipment. The C-pod main unit is designed to be mounted vertically with antennas facing downwards. A different orientation may affect the cellular (GSM) network signal quality and moisture protection. The cellular (GSM) network antenna is attached directly to the unit and must be well above the water line. Avoid places shielded from cellular (GSM) network signals, e.g. inside metal boxes, enclosed in carbon fiber etc. The C-pod must have a constant power supply to protect your boat even when other equipment is turned off by the battery isolation switch. Make sure that there is an appropriate power source within the range of the power cable. c. Mount the equipment & connect the parts Attach the twist-on fastener in the desired location using two screws or bolts. Secure the C-pod unit by centering the unit’s mounting point to the guiding pin on the fastener and twisting clockwise or counter-clockwise until the unit is locked in place. To detach the C-pod unit, twist in any direction to release it from the fastener. LOCK OPEN OPEN 7 Installation Manual 2. Installing the system (continued) The GSM antenna screws on to the contact marked GSM on the C-pod unit. The GPS antenna has a 3 meter (10 feet) cord that attaches to the contact marked GPS on the unit. The antenna must be placed horizontally with the plastic dome facing upwards. Find a hidden location with as little material between the antenna and the sky as possible. Avoid locations that might be shielded from GPS signals, e.g. close to metal boxes or carbon fiber etc. The antenna is not designed to be mounted outside. The provided hook-and-loop fastener can be used to attach the GPS antenna. Note: The GPS antenna is magnetic and may disturb other equipment, such as compasses. Hint: For sailing boats a placement close to the center line improves the GPS reception when sailing keeled over. 8 Installation Manual 2. Installing the system (continued) The activation button should be discreetly located inside the area protected by the magnetic intrusion sensor, so that it can be reached within 45 seconds of entering the boat to deactivate the alarms. The button has a LED in the center which must be visible. Connect the button to the contact marked I/O on the C-pod. Attach the magnetic intrusion sensor to the desired door or hatch. When the door or hatch is closed the gap between the magnet (no cable) and the reed switch (with cable) must not exceed 15 mm to avoid false alarms. Connect the magnetic intrusion sensor to the contact marked 1 on the C-pod. max 15 mm Note: If you choose not to install the magnetic intrusion sensor, refer to section 5b. Note: If you have purchased optional accessories refer to section 5b. and the instructions on the accessory’s packaging. 9 Installation Manual 2. Installing the system (continued) d. Power supply The C-pod can be powered by 12 or 24V DC. It needs constant power and it is recommended to attach the power cable directly to the battery. Make sure the power supply cannot be interrupted by any battery isolation switch. It is advised to shorten the power cable to minimize voltage loss and give more exact battery voltage readings. The cable must be protected by a 1 – 2 A fuse (slow) or a thermal circuit breaker mounted as close to the power source as possible. Strip the plus (red) and minus (black) wires on the power cable and connect them to the power source using suitable cable connectors/cable shoes. Note: Fuse and fuse holder are not included in the package. Note: Some optional accessories cannot be used if the C-pod is powered by 24V DC. Hint: Before proceeding, it is recommended to measure and verify the received voltage on the power plug using a voltmeter! 10 Installation Manual 3. System start-up Connect the power plug to the power port marked with on the C-pod. The C-pod starts up. Pay attention to the flashing of the activation button, which shows the start-up progress. • T he activation button flashes once every second until the C-pod has connected to the strongest available cellular (GSM) network. • T he activation button flashes once every 3 seconds until a GPS position has been received. • T he activation button flashes once every 30 seconds in normal operating mode to indicate that the system is running. The start-up sequence is completed. For a complete list of flash patterns and their meaning, refer to the Reference manual, section Activation Button Flashes. Note: The start-up sequence normally takes some minutes or more, as the C-pod scans all available network operators and receives configuration settings. Hint: Before leaving the boat it is recommended to double-check that the installation and system start-up has been successful by sending the text (SMS) command status or position to the C-pod System Number. Refer to the Reference manual, section Text (SMS) commands. 11 Installation Manual 4. Finishing the setup Once the installation in the boat is done, log on to the web portal with the personal user name and the password you chose in the installation wizard. Note: In case you have forgotten your login data, send the text (SMS) command login to the C-pod System Number. (See the Reference manual, section Text (SMS) commands.) a. Verify cellular (GSM) network & GPS position Verify that the C-pod has a working communication and has obtained a GPS position. If this is unsuccessful, you need to check the installation of the C-pod unit. Refer to the Troubleshooting Guide, sections Communication related problems and/or GPS related problems, or contact your retailer or the C-pod Technical Support if this does not help. When the verification is completed, you are redirected to your personal web portal (non-subscription systems). b. Billing information (subscription agreements only) In some countries, the monthly service fee can be automatically charged to your credit card. Enter your credit card information and proceed with the first monthly payment through our secure (SSL-encrypted) payment portal. Please note that no credit card data is stored on our servers. When the payment is completed, you are redirected to your personal web portal. 12 Installation Manual 5. Configuring the system Before starting to use the system fully, some settings need to be configured. Navigate by clicking on the menu items to the left. a. Action Plan The Action Plan defines what text (SMS) and/or e-mail messages are sent to which recipient(s) in case an alarm or warning is triggered. The cell phone number you used to create your account is already in the list. Other receivers could be a security company, a guard in your marina or a relative. Note: Some mobile phone operators may charge for received text (SMS) messages. Always inform persons you add to the Action Plan! b. Accessories If you have chosen not to install the magnetic intrusion sensor and have installed no other sensor(s) on Alarm loop 1, you need to disable it on the menu Alarms, then click Send configuration. Activating an alarm loop without any sensor leads to an instant false alarm! If you have purchased extra accessories, they need to be added to the Accessories list. Refer to the instructions on the accessory’s packaging. c. Battery Level Warning The Battery level warning is set to a default value that fits most 12V systems. In the menu Warnings-Battery level-Settings, choose 12V or 24V in the dropdown menu depending on the system in your boat. Select the desired warning threshold. Hint: Check the external battery voltage on the web portal when the boat’s battery is fully charged and choose a slightly lower value as warning level. 13 Installation Manual 5. Configuring the system (continued) d. Communication Warning The Communication warning is turned off by default. It monitors the GPRS data traffic, which requires a good cellular (GSM) network signal quality to work properly. If the cellular (GSM) network is strong at the location of your boat, you can turn it on. As long as no warning message is sent, the system communication is working. If the communication fails four times in a row (i.e. after 4 hours) the communication warning is triggered. It is automatically reset when the GPRS data communication works again. Note: It is common that the strength of cellular networks varies during day and night, so this setting often needs to be evaluated for a while. If the network is too weak, you may occasionally get communication warnings. Consider disabling the warning if this happens regularly. Refer to the Troubleshooting Guide, section Communication related problems. 14 User Guide This part covers the most important operating instructions for your C-pod Security System. The web portal is the most detailed and convenient way to manage your C-pod Security System. There is a more detailed description on each menu. System Mode There are two system modes, which offer different features and system behaviors. (For pre-paid systems using credits, the Active mode has a daily communication cost. The Passive mode is free of charge.) Active mode In Active mode the system is fully operational. Alarms can be activated and deactivated, warnings are on. In case of an alarm or warning event, messages are sent to the recipients specified in the Action Plan. The system data is updated automatically and the GPRS data traffic is checked hourly. Passive mode In Passive mode all alarms and warnings are turned off and there is no active monitoring of the unit by the C-pod Server. No alarms or warning notifications are sent. This mode is intended for longer periods during which you do not need or wish to have alarm protection or receive notifications, e.g. during winter storage in a protected area or when the C-pod is turned off. Status reports Getting a status report from the C-pod System is possible in both modes. This makes it possible to e.g. check the battery voltage during winter storage when the system is in Passive mode. 15 User Guide Alarms There are three different alarm types (four different alarms) which can be switched on and off by the user. If any alarm is triggered, a corresponding alarm message is sent to the recipient(s) specified in the Action Plan. A GPS tracking is started automatically which continues as long as the alarm is in triggered state. If triggered alarms are not reset or deactivated within 6 hours the notifications are resent as a reminder. 16 Geofence The Geofence alarm uses GPS positioning and reacts on unauthorized movement of your boat. Upon activation, the current GPS position is saved. The C-pod compares the saved position to the actual current position several times a minute. If a position more than 250m (275 yards) away is detected, the Geofence alarm triggers. Alarm Loops There are two alarm loops, which work the same way. The choice of external sensors on the loops defines what they will react on. The magnetic intrusion sensor from the basic package is usually connected to Alarm loop 1. Optional equipment can replace the magnetic intrusion sensor or is connected to Alarm loop 2. Refer to the instructions on the accessory’s packaging. If the (normally closed) sensor loop is broken, the corresponding loop triggers an alarm. Depending on which sensors are connected to the loop that triggered, someone entered the boat (magnetic intrusion sensor and motion detector), a fire has started (smoke detector) or water is getting into the boat (water level sensor). When using two or more sensors, we recommend separating intrusion and environment related sensors to different alarm loops. Battery Disconnect If the voltage suddenly drops from the normal value of around 12V (or 24V) to zero, the Battery disconnect alarm triggers. This happens if the power supply to the C-pod is cut. In this case, the alarm loops are turned off to save the back-up battery power and to maximize the GPS tracking duration. User Guide Warnings There are four or five different warnings (depending on the payment model). Warnings are reset automatically if the corresponding parameter reverts to the allowed value. Communication Warning The Communication warning triggers if the GPRS data traffic to and from the C-pod does not work. Normally this is due to a weak cellular (GSM) network where the boat is located, and does not mean that the C-pod System cannot communicate at all. It uses the slower method of data text (SMS) messages instead. Battery Level Warning & Power Save Warning The Battery level warning is triggered if the voltage drops below the user defined value. The Power save warning is triggered if the voltage drops below 11.2V. The two alarm loops are turned off, since a voltage this low has an unstable effect on most sensors. Also, the C-pod reduces the power load on the boat’s battery. Billing/Credit related warnings Depending on the payment model, these warnings alert you if there is a problem with the monthly withdrawal from your credit card (for subscription C-pods), or if your account is running low on credits or the flat rate is about to expire (for non-subscription C-pods). 17 User Guide Activate and Deactivate Alarms Activation Alarms that you wish to use when activating the alarm system have to be enabled on the web portal. All enabled alarms are activated in a group. Alarms in the state disabled are not activated. Alarm loops that have no sensors attached must be disabled; otherwise you get an instant alarm upon activation! There are four ways of activating the alarms. • The activation button located in your boat can be used for activation just before leaving the boat. Press the button for a second and it replies with 4 short flashes as confirmation. You have 45 seconds to leave the protected area of your boat before the alarms are active. 4x 18 • Send the text (SMS) command activate to the C-pod System Number. Any commands must be sent from the main cell phone number; otherwise the system cannot recognize you. Text (SMS) commands can be sent wherever you are. Refer to the Reference manual, section Text (SMS) commands. • Log on to the web portal, go to the menu Alarms and click Activate alarms. Here you can also monitor the activation progress. • Using the remote control (optional accessory), you can stand outside of your boat to activate the alarms. User Guide Activate and Deactivate Alarms (continued) Deactivation All enabled and active alarms are deactivated in a group. Not triggered alarms are deactivated by any of the methods. Triggered alarms cannot be deactivated using the activation button. See section Triggered alarms below. There are four ways of deactivating the alarms. • The activation button located in your boat can be used also for deactivation. Within 45 seconds after entering the protected area onboard, press the button for a second and the button replies with one long flash as confirmation. 1x • Send the text (SMS) command deactivate to the C-pod System Number. Any commands must be sent from your main cell phone number; otherwise the system cannot recognize you. Text (SMS) commands can be sent wherever you are. Refer to the Reference manual, section Text (SMS) commands. • Log on to the web portal, go to the menu Alarms and click Deactivate alarms. Here you also can monitor the deactivation progress. • Using the remote control (optional accessory), you can stand outside of your boat to deactivate the alarms 19 User Guide Triggered alarms When an alarm is triggered, the system responds in the following ways: • Alarm notifications are sent to the recipients specified in the Action Plan. • A GPS tracking starts instantly. The C-pod sends GPS positions automatically every 15 minutes, as long as alarms are triggered and as long as the C-pod has power. These positions can be viewed on the web portal on the menu Map. • A n installed siren (optional) sounds only when an alarm loop triggers. Due to various regulations and laws, the alarm sounds for 3 minutes, in intervals of 10 seconds on, 5 seconds off. It does not sound on Geofence and Battery disconnect alarms; a silent tracking is preferred in these cases. Triggered alarms require immediate user action! Verify what is going on – get a status report and examine the result: • G eofence alarm – check if the boat seems to be moving or if it might have been a temporary fluctuation in the GPS system. • A larm loop – defined by the sensors installed on the triggered loop, determine what is happening on the boat. Deactivate and activate the alarms to rule out a false alarm. • B attery disconnect alarm – check the battery voltage by requesting a status. If the external voltage is shown as (close to) zero the C-pod is not connected to the boat’s battery anymore. It is running on the internal battery which lasts for at least 2 days under normal conditions. Take the necessary action; call someone who is close to the boat, your security company or go see for yourself what is going on. Alarm notifications are resent every 6 hours as a reminder, for all alarms and to all recipients according to the Action Plan. This does not mean that a new alarm has been triggered – triggered alarms cannot trigger again! 20 User Guide Turn off/reset triggered alarms Triggered alarms need to be deactivated to stop the GPS tracking and the reminder notifications. Triggered alarms are deactivated the same way as nontriggered i.e. active alarms, except for the activation button. • S end the text (SMS) command deactivate to the C-pod System Number. Any commands must be sent from your main cell phone number; otherwise the system cannot recognize you. Text (SMS) commands can be sent wherever you are. Refer to the Reference manual, section Text (SMS) commands. • L og on to the web portal, go to the menu Alarms and click Deactivate alarms. Here you also can monitor the deactivation progress. • U sing the remote control (optional accessory), you can stand outside of your boat to deactivate the alarms. ! The activation button located in your boat cannot be used for deactivation. Pressing the button while alarms are triggered has no effect. This prevents a possible intruder to turn off the alarm and tracking functionality. Re-activate the alarms! As soon as you have investigated the problem, you should re-activate the alarms to ensure the protection of your boat! 21 User Guide Triggered warnings As soon as a warning is triggered, warning notifications are sent according to the Action Plan. Warnings do not trigger a tracking of the system. Triggered warnings require user action. • C ommunication warning – check if you can obtain a status. If yes, the C-pod System works but the GPRS data traffic does not. Normally this is due to a weak cellular (GSM) network strength where the boat is located, and does not mean that the C-pod System cannot communicate at all. It uses the slower method of data text (SMS) messages instead. If this warning triggers often, refer to the trouble shooting guide, section Communication related problems. • B attery level warning – the battery voltage has dropped below the userdefined value. The battery most likely needs to be charged soon. If the voltage is allowed to drop further, the Power save warning will trigger. • P ower save warning – the battery needs to be charged immediately. The boat’s battery voltage is below 11.2V. The two alarm loops are turned off, since a voltage this low has an unstable effect on most sensors. Also, the Cpod reduces the power load on the boat’s battery. If this occurs often, refer the Troubleshooting Guide, section Power related problems. • C redit related warning(s) – check if something wrong with your credit card withdrawal (subscription units), if your account is running low on credits or if the flat rate is about to expire (for pre-paid units). Warnings cannot be reset by the user. They are reset automatically if the corresponding parameter reverts to the allowed value. You can choose to disable a warning if you do not wish to be notified about it. 22 Reference manual Text (SMS) commands Text (SMS) commands are a convenient way of obtaining certain data or performing certain tasks. The commands are not case sensitive, but must be spelled correctly and no other characters can be included in the message. Command Position Status Relay [on|off] Activate Deactivate Short P S y [on|off] A D Example P status Y on A dEActiVate Action System sends position report System sends status report Turns relay on or off Activates all (enabled) alarms Deactivates all alarms Installation Test Mode The Installation test mode is mainly intended for testing purposes after a system has been installed by a professional installer. Requirement: The C-pod must be unregistered, i.e. no registration text message can have been sent. The C-pod connects to the C-pod server and checks if it is registered. Entering the Installation test mode is not possible after the registration text (SMS) message has been sent and the account has been created. Perform a basic test - tests the cellular (GSM) network communication, the GPS functionality and the activation button. 1. Connect the activation button and the cellular (GSM) network antenna and the GPS antenna. (Optional: connect one or several sensors to alarm loop 1 and a siren). 2. Connect the C-pod to the external power supply (12 or 24V). 3. Pay attention to the flashing of the activation button, which shows the start-up progress: a. The activation button flashes once every second until the C-pod has connected to the strongest available cellular (GSM) network. b. The activation button flashes once every 3 seconds until a GPS position has been obtained. 23 Reference manual 4. T he button flashes rapidly (2 flashes every second), when the data has been successfully sent to the server. Perform an extended test - test sensors connected to Alarm loop 1 and the siren (optional). To skip the extended test, proceed to Step 5. I. P ress the activation button for 2 seconds while it is flashing rapidly (2 flashes every second). This starts the Alarm loop 1 and siren test. The flashing stops. Note: This has to be done within 5 minutes after Step 4, otherwise you need to reboot the system to get into the Installation test mode, see Repeat/Exit the Installation Test. II. When any sensor on Alarm loop 1 is triggered (loop is broken) the Activation Button lights up. If a siren is connected to connector 2 it sounds (optional). III. Use this to test the Alarm loop 1 installation. If the installation also has sensors on Alarm loop 2, please switch the USB connector for this loop to contact 1 and test the sensors as if they were installed on Alarm loop 1. 5. A fter 5 minutes the systems shuts down by itself and the communication stops. The Installation test mode is completed. Repeat/Exit the Installation Test Before or after the system has shut down (see Step 5), the system can be rebooted by pressing the button for >30 seconds, and then releasing it again. – If the unit has not been registered, the Installation Test will be repeated from Step 3. – If the unit has been activated by sending the registration text (SMS) message (refer to the Installation Manual), it will start up and run in the normal operation mode. If your C-pod system was installed by a professional installer or a boat builder, it is likely that the system has been powered up before the registration text (SMS) message was sent. In this case, the C-pod entered the Installation test 24 Reference manual mode and turned itself off. To start using the system, it needs to be rebooted after the registration message was sent. Reboot a unit Performing a normal reboot of the unit forces it to go through the initial start-up sequence, registering on a cellular (GSM) network and obtaining an updated GPS position. It can solve various problems that might occur with your C-pod. Rebooting a unit only makes sense if the unit already is running, i.e. the activation button is flashing (in any way). While onboard, perform the following steps: • P ress and hold the activation button for >30 seconds (31 seconds to be sure), then release the button. • The C-pod reboots. • The start-up sequence consists of mainly two steps: The C-pod searches for and connects to the strongest cellular (GSM) network available. While searching and connecting, the activation button flashes once every second. The C-pod is obtaining a GPS position. While this is done, the activation button flashes once every 3 seconds. • Once the C-pod is registered on the cellular (GSM) network and has obtained a GPS position, it is in the normal operation mode and the button flashes once every 30 seconds. In case the first step takes a very long time (>5 minutes), or never seems to finish, the C-pod has difficulties finding a good cellular (GSM) network. Refer to the Troubleshooting Guide, section Communication related problems. In case the second step takes a very long time (>10 minutes), or never seems to finish, the C-pod has difficulties finding a good GPS position. Refer to the Troubleshooting Guide, section GPS related problems. 25 Reference manual Power-cycle a unit Power cycling can help a unit to start up if has been without power for a longer time, e.g. after winter storage. Power cycling a unit only makes sense if the unit is not running, i.e. the activation button is not flashing at all. While onboard, perform the following steps: • C onnect the C-pod unit to the power supply and let the internal battery charge for 15 – 30 minutes. • Disconnect the power cable. • Press and hold the activation button for 15 – 20 seconds, then release the button to clear the memory. • Reconnect the power cable. The C-pod starts up; see Reboot a unit above for the description of the start-up sequence. Discharging the internal battery If the power cycle attempt remains unsuccessful, disconnect the unit from the power supply for three days (~72 hours). Reconnect the power and the unit starts up. If this fails, contact your retailer or the C-pod Technical Support for assistance. Winter storage/Shut down unit If you wish to turn off the unit during winter storage, first put the system in Passive mode on the web portal. Go to Settings – System mode and select Passive mode. Then disconnect the power supply. The internal battery discharges and the C-pod turns off. When you wish to use the system again, reconnect the power and check that the system starts up by observing the flashing of the activation button. In rare cases a power cycle is needed; refer to the Reference manual, section Powercycling a unit. 26 Reference manual Activation button flashes System Flashes – these flashes occur independently of user action. Start-up flashes: Once every second: The C-pod has just started/rebooted and is connecting to a cellular (GSM) network. Once every 3 seconds: The C-pod has just started/rebooted and is searching for a GPS position. Once every 30 seconds: The C-pod is in normal operation mode. Error status flashes: Two rapid flashes every 30 seconds: The C-pod has no GPS position. Three rapid flashes every 30 seconds: The C-pod has no cellular (GSM) network connection. Four rapid flashes every 30 seconds: The C-pod has no GPS position and no cellular (GSM) network connection. Only for unregistered units: Twice a second: The unit is in Installation test mode. Refer to the Reference manual, Installation test mode. Response Flashes – these flashes confirm user actions after pressing the button. Activate alarms: Press the button for about 1 second to activate the alarms. The button flashes 4 short times as a confirmation. Deactivate alarms: Press the button for about 1 second to deactivate the alarms. The button flashes 1 long time as a confirmation. 27 Troubleshooting guide The troubleshooting guide gives you hints about how a possible fault can be solved. A more detailed troubleshooting guide is available on the web portal, under the menu Help. In case you are not able to solve the problem using the Troubleshooting Guide, please get in touch with your retailer or the C-pod Technical Support. It is very helpful for us if you can tell us what steps and solution attempts you have tried and what the result was. Communication related problems Symptoms • Communication warning triggers • Alarms show status unknown (after activation/ deactivation) • Getting a status update takes a long time (either on the web portal or by SMS) • Getting a status update fails (either on the web portal or by SMS) Reasons & Solutions • GPRS data traffic is temporarily unavailable or there is a temporary weakness in the cellular (GSM) network. ➔ Wait and see if the communication warning turns back to the state OK. Try requesting a status. If this succeeds the basic text (SMS) message data traffic is working. If it does not succeed, continue the fault search. • The cellular (GSM) network is too weak at the location of the boat or there is no coverage. ➔ Check the network strength by holding a GSM type cell phone next to the C-pod. If your phone shows a very weak network or no network at all, consider moving the C-pod if the network seems stronger somewhere else in the boat. If the network in general is very weak, a better antenna might be necessary. • The C-pod is not turned on/has turned off. ➔ Check that there is a sufficient power supply. If the unit has turned off due to a longer power outage (longer than 2 days), please see the section Power related problems. Note: While onboard, you can request a status text (SMS) message by sending status to the C-pod System Number. In the reply text (SMS) message you can see if the GSM and GPRS communication works. 28 GPS related problems Symptoms • The GPS position and time is not updated when requesting a status update. • The Geofence alarm shows status “unknown” after activation/deactivation. • A pre-programmed tracking does not start. Reasons & Solutions • Low GPS signal quality. ➔ Try waiting for some hours. The GPS satellites are moving constantly, so if this occurs just once this can be a reason. • The GPS antenna is not correctly mounted or mounted in a bad location. ➔ Something may obstruct the GPS antenna or disturb the GPS signals. Try moving the antenna from its current location. If possible, temporarily place the antenna under the free sky, with the plastic dome facing upwards. If this makes the GPS work again, find a more suitable permanent location. Strictly avoid antenna placements with metal or carbon fiber between the antenna and the sky. • The GPS antenna cable, the connector or the antenna itself is damaged. ➔ Check the equipment for damages. Replace if necessary. Note: While still being onboard, you can request a position report text (SMS) message by sending position to the C-pod System Number. If you receive a reply message with an updated timestamp and position, you know that the current placement of the GPS antenna works. Alarm loop related problems Symptoms • Alarms trigger and notifications are sent without anything being wrong on the boat (false alarms) • Alarms cannot be activated • Alarm loops show status unknown Reasons & Solutions • The corresponding port on the C-pod is empty, but is configured as enabled on your web portal. ➔ Disable the alarm loop on the menu Alarms on the web portal. A port without any attached sensor must be disabled! Troubleshooting guide • A port on a hub is left open. ➔ Install a termination plug (end connector) on the open port. There must be something connected to all ports of the hub! • The cable to a sensor or a hub (optional) is damaged. ➔ Check the affected cables. Replace if necessary. • Something is wrong with the sensor/one of the sensors on that loop. ➔ Make sure all conditions for the sensor are right. Ensure a working magnet close to the sensor part for the magnetic intrusion sensor, cover the motion detector with a dark, thick cloth or dry off the water level sensor completely. Activate the alarms and see if a false alarm occurs. If there are several sensors connected to the loop using one or more hubs (optional), replace a suspected sensor with a termination plug and activate the alarms. If the system acts stable with a certain sensor replaced by the termination plug, that sensor likely is causing the false alarms. Repeat this procedure for the remaining sensors if necessary. • Alarm loop is disabled or extra accessories (optional) have not been activated. ➔ Enable the alarm loop on the menu Alarms or activate new sensors on the menu Accessories (refer to the instructions on the accessory’s packaging). • There is a communication problem with the C-pod. The C-pod cannot report the current alarm status to the server. ➔ Refer to section Communication related problems. Power related problems Symptoms • Recurring power related warnings, i.e. battery level and power save warning • Battery Disconnect alarms • Unit does not start up Reasons & Solutions • The power cable is too long which leads to a voltage loss. ➔ When using the power cable in its original length, there is a noticeable power drop along the way. The C-pod shows a lower value than the battery actually has. Shortening the power cable gives a more accurate reading. • There is corrosion and/or moisture on contacts or cable shoes. ➔ Make sure that every connection looks fine and is protected from moisture and dirt. • The battery is old and weak or empty. ➔ Charge the battery or install a new one if necessary. • There are many power consumers onboard. ➔ Some electrical devices draw a considerable current when starting up (i.e. fridges or heaters), which leads to a temporary voltage drop that can trigger a warning. • A shore power converter creates ripple currents. ➔ Some shore power converters have special charging procedures that can confuse the voltage measuring of the C-pod System. This is a likely cause if you only get warnings when connected to shore power. • The start-up sequence was interrupted. ➔ If the unit suffered from a power loss earlier on, it may have shut down in an improper way. Refer to Power cycling the unit. Note: the power consumption of the C-pod increases when the internal battery is being charged. Motion detectors, water level sensors, relays and smoke detectors add to the overall power consumption of the system while the alarm loops are active. Messaging and notification problems Symptoms • No reply messages from system after commands • Error message from the C-pod System Number • No notifications from system Reasons & Solutions • Sending a text (SMS) command to the wrong number. ➔ Usually texting a wrong number will have no result at all. You might get an answer from someone or from another text (SMS) message service. Make sure you have the right number. • Sending a wrong/unknown text (SMS) command. ➔ Given that you send the message to the 29 Troubleshooting guide right number and the communication is working fine, you will get an error message back. Refer to Text (SMS) commands. • Attempting to send commands using a phone not set as main phone number on the web portal. ➔ The C-pod only accepts commands from one number per account. Make sure to use the phone currently set as Main cell phone number on the web portal. Verify or change this number under Settings - User Info - Contact Information. • There are several C-pod Systems registered on the same phone number. ➔ Specify which boat is meant by appending the boat’s name to the text (SMS) command. • The alarm notification is not activated in the Action Plan. ➔ Go to the Action Plan on the web portal and check that the settings are correct. • The alarm/warning recipient number is wrong in the Action Plan. ➔ Go to the Action Plan on the web portal and check that the settings are correct. Delete the wrong number by un-checking all boxes. Add a new recipient with the correct number. Web portal problems Symptoms • Browser error message, page not found • Logon fails • The web portal is displayed wrong or the map view does not work Reasons & Solutions • You entered the wrong address (URL). ➔ Check that you are accessing the correct web address, www.mycpod.com. • The user name and/or the password is wrong. ➔ Double-check that you have the correct login name and password. If you have forgotten your login data, send a text (SMS) message to the C-pod System Number from your main cell phone. The system will send the current login data to you in a reply text (SMS) message. • The version of your browser is too old. ➔ Be sure to have the latest version of your web browser. Our page needs at least Internet Explorer 7 or Mozilla Firefox 3 to work flaw30 lessly. We do not guarantee that the web portal is fully compatible with Chrome, Safari or Opera. • The map does not work/the Java plug-in is missing. ➔ Install the required Java plug-in on your web browser. It is required to display the map and can be found at www.java.com. Notes 31 P1703-161 www.c-pod.com