1
R
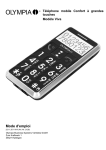
Convenient mobile phone with large
keys Viva model
Operating Instructions
13.01.2012 en/en (Art.-Nr. 2128)
Olympia Business Systems Vertriebs GmbH
Zum Kraftwerk 1
45527 Hattingen
Contents
Starting Up . . . . . . . . . . . . . . . . . . . . . . . . . . . . . . . . . . . . . . . . . . . . . . . . . . . . . . . . . . . . . . . . . . . . . . . . . . . . . 3
Operating Elements . . . . . . . . . . . . . . . . . . . . . . . . . . . . . . . . . . . . . . . . . . . . . . . . . . . . . . . . . . . . . . . . . . . . . 5
Getting Started . . . . . . . . . . . . . . . . . . . . . . . . . . . . . . . . . . . . . . . . . . . . . . . . . . . . . . . . . . . . . . . . . . . . . . . . . 6
Setting Up the Phone Book . . . . . . . . . . . . . . . . . . . . . . . . . . . . . . . . . . . . . . . . . . . . . . . . . . . . . . . . . . . . . . . 9
Making and Receiving Calls . . . . . . . . . . . . . . . . . . . . . . . . . . . . . . . . . . . . . . . . . . . . . . . . . . . . . . . . . . . . . 11
Call List . . . . . . . . . . . . . . . . . . . . . . . . . . . . . . . . . . . . . . . . . . . . . . . . . . . . . . . . . . . . . . . . . . . . . . . . . . . . . . . 13
SMS - Text Messages . . . . . . . . . . . . . . . . . . . . . . . . . . . . . . . . . . . . . . . . . . . . . . . . . . . . . . . . . . . . . . . . . . 13
Mailbox . . . . . . . . . . . . . . . . . . . . . . . . . . . . . . . . . . . . . . . . . . . . . . . . . . . . . . . . . . . . . . . . . . . . . . . . . . . . . . . 15
Other Useful Features . . . . . . . . . . . . . . . . . . . . . . . . . . . . . . . . . . . . . . . . . . . . . . . . . . . . . . . . . . . . . . . . . . 15
Troubleshooting . . . . . . . . . . . . . . . . . . . . . . . . . . . . . . . . . . . . . . . . . . . . . . . . . . . . . . . . . . . . . . . . . . . . . . . . 20
Technical Properties . . . . . . . . . . . . . . . . . . . . . . . . . . . . . . . . . . . . . . . . . . . . . . . . . . . . . . . . . . . . . . . . . . . . 21
Safety Information . . . . . . . . . . . . . . . . . . . . . . . . . . . . . . . . . . . . . . . . . . . . . . . . . . . . . . . . . . . . . . . . . . . . . . 22
Maintenance / Guarantee . . . . . . . . . . . . . . . . . . . . . . . . . . . . . . . . . . . . . . . . . . . . . . . . . . . . . . . . . . . . . . . 23
Konformitätserklärung . . . . . . . . . . . . . . . . . . . . . . . . . . . . . . . . . . . . . . . . . . . . . . . . . . . . . . . . . . . . . . . . . . 24
2
Starting Up
Starting Up
Caution:
Important: Before you start, please read the safety information on Page 22!
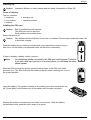
Scope of delivery
The box contains:
1 telephone
1 li-ion battery
1 headset
1 charging unit
1 operating manual
Installing the SIM card
Caution:
Risk of swallowing small objects!
The SIM card can be removed.
Small children can swallow them.
Switch the phone off.
Caution:
Pay attention that the SIM card is not bent or scratched. Prevent any contact with water, dirt
or electrical charges.
Slide the mobile phone's battery compartment cover towards the bottom using a
little force. Lift the battery compartment cover off the phone completely.
If there is already a battery inside, remove it.
Note:
Your telephone number is carried by the SIM card, not the phone. Therefore
if you use a SIM card you had in a previous phone, you will keep the same
phone number.
Slide the SIM card with the golden contacts facing down in the SIM card holder
provided for it. The SIM card must be located under the metal retaining bar to be in
the correct position.
Ñ
Ñ
Ñ
ÑÑ
Ñ
ÑÑÑ
ÑÑ
Insert the battery. The golden contacts on the battery must face towards the top
left. Press lightly on the bottom end of the battery until it snaps into place.
Replace the battery compartment cover back on the phone. Slide the battery
compartment cover upwards until it snaps in to place.
3
Starting Up
Charging the battery
WARNING:
Before starting to charge the battery, check that it has been installed properly. Do not
remove the battery while it is being charged. This could damage the phone.
Note:
When charging the battery for the first time, it should be charged for at least 4 hours. Some
batteries only reach their full capacity after several complete charge/discharge cycles.
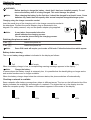
Charging using the charge connection socket
Insert the small plug of the charging unit in the charge connection socket in
the telephone. Connect the power adapter plug as illustrated in the
diagram. For safety reasons, only use the power adapter plug supplied.
Note:
It may take a few seconds before the
phone indicates the charging process.
You can use the phone during the charging process.
Switching the phone on and off
3 sec. b
Switch the phone on
3 sec. b
Switch the phone off
Note:
Some SIM cards will require you to enter a PIN code. Follow the instructions which appear.
Battery status warning
The current battery charge status is indicated in the display as follows:
Full
Half empty
Low
Empty
When the battery charge is low, a corresponding warning message appears in the display.
Note:
Charge the battery.
In cases where the battery charge is extremely low, it is possible that the back-lighting no longer works
and certain functions are no longer available.
When the battery charge drops below the minimum status, the phone switches off automatically.
Checking a network is available
Some networks offer better coverage than others in different areas. The icon on the left-hand side of the
display indicates the availability and strength of a network. The higher the bar in the display icon the
better the reception quality. The name of the network appears in the centre of the display.
100%
4
75%
50%
25%
Operating Elements
10
11
9
8
1
7
12
2
6
5
13
4
3
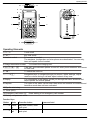
Operating Elements
1m
Torch on/off
2u
Key lock on/off
3 Headset socket
To connect a headset.
The earpiece, loudspeaker and microphone are deactivated. You can only
hear and speak via the headset.
4 Charge connection socket
To connect the charging unit.
5ab0-9
Take call, end call/switch phone on and off, enter phone numbers and names
or enter text.
6g
To switch the radio on.
7qH
Navigation keys to navigate through the menus, define settings, adjust
receiver volume during a call and adjust volume of key tone.
The information in the display guides you through the menu structure and
helps operate the mobile phone.
The voice of the caller can be heard here when no headset is connected and
handsfree mode has not been activated.
8 Display
9 Earpiece
10 Eye for wrist strap
11 Torch (LED)
12 Emergency call button s
Direct dialling of an emergency call number.
13 Battery compartment cover
Function Keys
Button
Mode
q Stand
by
q During
call
Press the button
Key tone volume, loud+
and quietReceiver volume, loud+
and quiet-
Press and hold
5
Getting Started
Button
H
g
Mode
Menu
Stand
by
m Stand
by
u Stand
by
Stand
a
by
Menu
a
b
b
b
#
*
+
,
Stand
by
Menu
During
call
Stand
by
Stand
by
Stand
by
Stand
by
Press the button
Select submenu
Press and hold
Switch on integrated radio
Switch torch on/off
Key Lock on/off
Open calls list.
Confirm selection
Switch phone on/off
Move back / Cancel
End a call (on-hook)
Speed dial memory 1
Speed dial memory 2
Open the main menu
Open the phone book
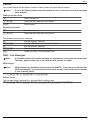
Getting Started
This chapter provides basic information on using the operating instruction manual and the phone.
Setting the display language
+ H Settings a H Phonesetup a H Languages a
Description of operating sequences in the manual
1
2 sec. 1
Hold 1
Press the key depicted briefly
Phonebook
Represents text in the display
Indicates icons in the display
6
Press the key depicted for 2 seconds
Press and hold down the key depicted
Enter numbers or letters
Mobile phone rings
Getting Started
Standby mode
All descriptions in this operating manual assume that the phone is in Standby mode. The system
switches to Standby mode by pressing the b key, several times if necessary. It may be necessary to
deactivate the key lock function.
Energy-save mode
When the phone has been in Standby mode for some time, it automatically switches to Energy-save
mode. The display no longer lights up. Press any button to reactivate Standby mode.
Softkeys
1
The softkeys a and b are always assigned the function a (confirm) and b (end/cancel) in the
various menus.
Navigating in the menu
All the functions can be accessed via the various menus.
+
H
a
H
a
Ha
a
b
b
Open the main menu
Select the submenu required
Open the submenu
Select the function required
Open the function
Select the required setting and confirm it
Use the keypad to enter numbers or letters
Confirm the entries
Move one level back
Cancel programming and saving processes and reactivate Standby mode
Creating phone book entries - example
The way in which to navigate through the menus and define settings is explained by means of the
example Creating phone book entries. Proceed as in this example for all the settings.
+
H Phonebook a
H Addnewcontact a
H ToSIM or ToPhone a
aa
Haa
ba
Open the main menu
Select the phonebook and confirm it
Select the submenu and confirm it
Select the memory location and confirm it
Enter the name and confirm it
Enter the phone number and confirm it
Exit from the menu and confirm the prompt
7
Getting Started
How to enter text and numbers
2
The keys on the keypad are also labelled with letters for the entry of text.
The phone provides various methods by which text can be entered. These are used when creating or
editing contacts in the phone book, when searching for names in the phone book and when writing SMS
text messages.
Note:
Not every method is always available for each application.
Note:
To switch between the text and number entry methods, press the # key.
Capital letters, multitap (English)
Small letters, multitap (English)
Capital letters, auto. ABC (English)
Small letters, auto. ABC (English)
Capital letters, multitap (German)
Small letters, multitap (German)
Capital letters, auto. ABC (German)
Small letters, auto. ABC (German)
Numbers
Methods of entering text
Automatic ABC
The phone can provide support when entering text. When Automatic ABC mode is selected, you only
need to press the key containing the required letter once. Then press the key containing the second
letter of the word you want to enter. The phone then proposes entire words which could be those which
you want. The more characters of the word required are entered, the more accurate the proposed
selection from the phone. If a word in the proposed list corresponds to the one you want, press the H
button to select the word. To continue entering text, confirm your selection by pressing the a button.
8
Setting Up the Phone Book
Multitap
In order to enter text in Multitap mode, press the key labelled with the corresponding letter/character the
corresponding number of times. If the first character of the group is required, press the key once. If the
second character is required, press it twice, and so on.
Note:
To enter two characters assigned to the same key, press the key the respective number of
times to enter the first character. Wait until the cursor skips to the next position and then enter
the next letter.
Punctuation and special characters
When in Editing mode, press the * button. Punctuation marks and special characters are displayed.
Use the H button to select the character required and confirm entry by pressing a. You can also
generate a series of frequently used special characters in Edit mode by pressing the 1 key
repeatedly.
Other entries and functions
0
b
H
Enter a space
Delete a character
Move the cursor
Setting Up the Phone Book 3
The phone book in the phone can store up to 200 entries.
S Always enter phone numbers with the country and area codes.
S When the memory capacity is used up, the corresponding message appears when an attempt is
made to store another entry. Before new entries can be stored, old entries must be deleted.
S The phone book entries are arranged alphabetically. To skip directly to a required phone book
entry, press the corresponding first letter. To search for the entries manually, use the H key.
Entering names
The keys on the keypad are also labelled with letters for the entry of names. Press the corresponding
key the respective number of times to enter letters.
Modifying, editing, deleting phone book entries
+ H Phonebook a H Contactlist a
Select an entry and then:
a
Open the menu
Call
View
Edit
Delete
Copy
Move
Dial the entry selected
View the entry selected
Edit the entry selected
Delete the entry selected
Copy the entry selected
Move the entry selected
Initiate the function required by pressing a and confirm the subsequent prompt by pressing a again.
9
Setting Up the Phone Book
Copying or deleting all entries
+ H Phonebook a H Copyall /Delete a
Select between the SIM or phone memory.
Note:
Groups
The SIM card can only store 100 phone book entries. If you attempt to copy more than 100
phone book entries, data could be lost.
4
You can assign phone book entries to various groups and then assign the groups different ringing
melodies. You can only assign an entry to a group when the entry is stored in the phone memory.
+ H Phonebook a H Callergroups a H Friends /Family /VIP/Business/Others a
Assigning an entry to a group
H Groupmembers a H Empty a
Select an entry and assign it
Haa
bba
Exit from the menu and confirm the prompt
Note:
Only the entries stored in the phone are displayed. Entries which are stored on the SIM card
are not displayed and cannot be selected!
Editing group names
H a
b
a
ba
Select the name of the group and confirm it
Delete old group name character by character
Enter the new group name and confirm it
Exit from the menu and confirm the prompt
Changing the ringing melodies for groups
H Ring1 a
Ha
ba
10
Select a ringing tone and open the menu
Select a melody and confirm it
Exit from the menu and confirm the prompt
Making and Receiving Calls
Making and Receiving Calls
Taking a call
{} a
Take the call
Rejecting a call
{} b
Reject the call
Ending a call
b
End the current call
Making a call
b
a
Enter the phone number
Delete the last digit if incorrect
Dial the phone number
Call list
Your mobile phone stores the last numbers dialled (redialling) as well as calls received and missed in a
call list.
a
Ha
a
H Call a
Open the call list
Select an entry, call information is displayed
Open the options
Select Call and dial the number
Dialling numbers from the phone book
There must be phone numbers stored in the phone book.
,
Ha
H Call a
Note:
Open the phone book
Select an entry and open the options
Select Call and dial the number
To skip directly to an entry, use the digit keys to enter the first letters of the name stored. If
necessary, you must press a button several times in order to enter the respective letters.
11
Making and Receiving Calls
One-touch dialling keys
5
There must be phone numbers stored as one-touch numbers.
3 sec. # or *
Press and hold the one-touch dialling key in Standby mode
Setting the receiver volume
The volume can be adjusted during a call.
q
Select the required volume
Exposure to the receiver at full volume for a long period could cause ear damage.
Talk time display
The duration of a call is displayed in hours, minutes and seconds during the call.
Handsfree
6
This function is used to listen to the caller via the loudspeaker.
While a call is in progress
3 sec. 0
Activate the Handsfree function
3 sec. 0
Deactivate the Handsfree function
Key lock
7
The key lock function is intended to prevent other functions being activated inadvertently.
u
Note:
12
Key lock on/off
Calls can still be taken in the normal way even when the key lock function is activated.
Call List
Call List 8
Your mobile stores the last phone numbers dialled, taken and received but missed.
Note:
If one of the phone numbers received matches an entry in the phone book, the associated
name appears.
Dialling
from the call list
9
a
Haa
Call a
Open the call list
Select an entry and open the options
Dial the entry
Displaying list details
a
Haa
Open the call list
Select an entry and open the options
The following functions are available:
Call
Dial the number selected
Sendtextmessage
Send an SMS text to the number selected
Edit
Edit the number selected
SavetoPhonebook
Save the entry in the phone book
Delete
Delete the entry form the phone book
SMS - Text Messages
Note:
It is possible that not all functions described are supported by every mobile service provider.
Therefore, please contact your local mobile service provider for details.
SMS settings
Note:
SMS messages are distributed via a service centre (SMSC1). If you want to send and receive
SMS text messages, you must enter a service centre number in your mobile phone. Normal
ly, this is already preset.
+ H Messages a H SMSsettings a H Profilesettings a
Delivery report
The corresponding confirmation is received after sending a text.
+ H Messages a H SMSsettings a H Commonsettings a H Deliveryreport a b a
13
SMS - Text Messages
SMS memory status
+ H Messages a H SMSsettings a H Memorystatus a
Note:
The percentage shares of the memory space occupied are displayed for the phone memory
and SIM card.
SMS memory storage
+ H Messages a H SMSsettings a H Preferredstorage a
Writing an SMS text
Note:
A text message can contain up to 457 characters, including spaces. A standard text mes
sage contains 160 characters. Extra costs may be involved for texts in excess of 160 charac
ters.
+ H Messages a H Writemessage a
Write the text
a
Open the menu
Movedtophone a
Conclude writing a text
The following functions are available
Sendonly
Saveandsend
Save
Sendtomany
Sendbygroup
SMS text messages sent and received
Note:
Texts received are indicated by a ringing tone which you have set. A corresponding message
appears in the display.
SMS texts received are stored in the Inbox folder.
SMS texts sent are stored in the Outbox folder when the Saveandsend option has been selected.
14
Mailbox
Mailbox 10
Note:
It is possible that not all functions described are supported by every mobile service provider.
Therefore, please contact your local mobile service provider for details. They may concern
services which are subject to charges.
In order to use the "voice mail" mailbox function, the relevant phone number must be programmed in
your mobile phone. Normally, this has already been set up by your service provider.
Setting up the mailbox
+ H Messages a H Voicemailserver a
Select a profile and confirm it
H Empty a
H Edit a
Select the option and confirm it
a a
Enter the name and number of the mailbox or edit them and save
ba
Exit from the menu and confirm the prompt
Other Useful Features
Speed dialling
11
You can store up to eight phone numbers as speed dial numbers.
Proceed as follows to assign a phone number to a speed dialling key:
+ H Settings a H Callsettings a H Speeddial a H Status a H None/On a
Select the submenu and confirm it
H Setnumber a
H Empty a
Select the digit key to assign the number
H Edit a
Select the option and confirm it
Ha
Select a number from the phone book
b
Return to the main menu
When Standby mode is active, press the button assigned to the phone number for 3 sec. and the
number is dialled.
One-touch dialling keys
12
It is possible to assign phone numbers to the one-touch dialling keys * and # which are then dialled
directly by pressing and holding the corresponding key.
Assigning a phone number to a one-touch dialling key:
+ H Settings a H Phonesetup a H Numberofmaleaffection /Numberoffemaleaffection a
Enter the phone number and confirm it
a
a
Confirm the prompt
SOS key
13
You can assign an emergency call number to the SOS key on the rear of the phone. This number is
then dialled after pressing and holding the SOS key for 3 sec.; an acoustic emergency alarm is also
issued. The Handsfree function is automatically activated with the call. Proceed as follows to assign the
emergency call number to the SOS key:
+ H Settings a H Phonesetup a H SOSnumber a
Enter the phone number and confirm it
aaa
15
Other Useful Features
Date and time
14
This menu option can be used to set and change the date and time.
Open the main menu:
+ H Settings a H Phonesetup a H Timeanddate a H Sethomecity? a
Select the option and confirm it
Ha
H Settime/date a
Select the submenu and confirm it
aa
Enter the hour:minute (HH:MM)
and confirm it
Haëa
Enter the year/month/day (YYYY/MM/DD)
and confirm it
ba
Exit from the menu and confirm the prompt
Language
15
This menu option can be used to set and change the display language.
+ H Settings a H Phonesetup a H Languages a
Preferred text input methods
16
This menu option can be used to set method by which text is entered.
+ H Settings a H Phonesetup a H Pref.inputmethods a
Alarm clock
This menu option can be used to programme 5 different alarm times.
+ H Applications a H Alarm a H 00:00 a
Enter the hour:minute (HH:MM) and confirm
H 00:00 a ë a
H Volume a
Select the entry and confirm it
Ha
Select Volume and confirm it
H Callalerttype a
Select the entry and confirm it
H Vib.andring or Ringonly or Vib.Only a
Select the option and confirm it
H Status a
ba
Select an option, None or Once or Everyday , and confirm it
Exit from the menu and confirm the prompt
Calculator
The phone is provided with a simple calculator to solve basic arithmetic problems.
Use the H key to select the required calculation (+, -, x, /).
Use the * key to display the answer.
Use the # key to set a decimal point.
+ H Applications a H Calculator a
16
Other Useful Features
Example
To execute the calculation 5 x 2.5, you have to type the following keys:
5 = 5, ++ = x, 2#5= 2.5, * = 12.5
b = Delete
Calendar
This menu option opens the calendar. You can select other days. Navigate using the H key.
+ H Applications a H Calendar a
Radio
Connect a headset to the earphone socket to improve radio reception. The headset cable serves as an
antenna.
+ H FMradio a
The radio switches on automatically. Adjust the radio volume using the q button.
H Manualinput a
Select the option and confirm it to set radio programmes manually using the
H button
H Self-tuning a
Select the option and confirm it to start the automatic search for programmes
H Channellist a H a a
Select the option and confirm it to select and play a programme from the list
H Handsearch a
Select the option and confirm it to start the search for programmes manually
using the H button
H TurnofftheFMradio a
Select the option and confirm it to switch the integrated radio off.
Network settings
This menu can be used to select mobile telecommunication networks other than your own mobile
network provider. However, the corresponding agreements must have been concluded.
Note:
It is possible that not all functions described are supported by every mobile service provider.
Therefore, please contact your local mobile service provider for details.
+ H Settings a H Networksetup a H Networkselection a H Selectnetwork a
Security settings
This menu is used to define which functions on the phone or SIM card should be protected by a
password/PIN. The PIN and password can be changed.
Lock/Unlock the SIM
+ H Settings a H Securitysetup a H SIMlock a
Enter the PIN and confirm it
ë a
Lock/Unlock the phone
+ H Settings a H Securitysetup a H Phonelock a
Enter the password and confirm it
ë a
17
Other Useful Features
Changing the PIN & PUK
The PIN (Personal Identity Number) and PIN2 codes are 4 to 8-digit numbers. The PIN and PIN2 codes
are given to you, together with the SIM card, by your network provider.
The PUK (Personal Unblocking Key) and PUK2 codes are 4 to 8-digit numbers. These are only
necessary if you enter the PIN code for the SIM card incorrectly three times in succession and the SIM
card is blocked. The PUK and PUK2 codes are given to you, together with the SIM card, by your
network provider.
+ H Settings a H Securitysetup a H Changepassword a
Select the option and confirm it
H PIN a
Note:
If you deactivate the SIM lock, you need not enter the PIN after switching the mobile phone
on.
It is recommended to leave the SIM lock on to prevent unauthorised persons from using the
mobile phone.
H PIN2 a
H Phonepassword a
Note:
Select the option and confirm it
Select the option and confirm it
The default password programmed at the factory is 1122. If this lock is active, you must first
enter the password for the phone lock after switching the mobile phone on and then enter
the PIN.
Automatic key lock
You can set up the mobile phone so that the key lock is automatically activated after a certain time in
Standby mode.
+ H Settings a H Securitysetup a H Autokeypadlock a
Audio settings
You can activate and edit the various phone profiles stored.
+ H Phoneprofiles a H Normal /Meeting /Outdoor/Indoor/Headset a H Activate a
Or adapt the profile selected to your needs:
+ H Phoneprofiles a H Normal /Meeting /Outdoor/Indoor/Headset a H Edit a
Tonesetup
Volume
Callalerttype
Ringtype
Extratone
Answeringmode
18
To select the corresponding ring melody for the various alert signals
To select the volume of the ring melody for the various alert signals
To select the way in which you want to be alerted to a call
To select whether the ringing melody for a call should increase in volume or
remain normal
To select whether you want to be informed of certain event by means of a
special acoustic signal
To select whether a call can be taken by pressing any key on the keypad or
not
Other Useful Features
Call settings
Note:
It is possible that not all functions described are supported by every mobile service provider.
Therefore, please contact your local mobile service provider for details. They may concern
services which are subject to charges.
Call barring
The following function is used to restrict calls which can be received and made.
+ H Settings a H Callsettings a H Callbarring a
Select the types of call for which should be barred
Outgoingcalls /Incomingcalls /Activateall /Cancelall /Changepassword
Note:
The default password programmed at the factory is 1122.
Automatic redialling
When this function is activated, redialling is initiated automatically if the number dialled is “engaged”.
+ H Settings a H Callsettings a H Autoredial a H None/On a
Caller ID
This function is used to activate/deactivate transmission of the phone number with which you are
making the call.
+ H Settings a H Callsettings a H CallerID a H Setbynetwork /SendID /HideID a
Default settings
The mobile phone is reset to its default (factory) settings.
+ H Settings a H Restorefactorysetting a a
Note:
During the course of the menu, you will be prompted for the phone password. The default
password programmed at the factory is 1122.
19
Troubleshooting
Troubleshooting
Problems and solutions
Problems
The mobile phone
cannot be switched
on.
No signal quality is
displayed.
Solutions
- No battery inserted.
- Battery is not charged.
- No network connection. The mobile phone is in a location where there is no
network service. Move to a different location or contact your service provider.
- The operating speed of the display is reduced in the case of low tempera
tures. This is normal. Use the phone in a warmer location.
Keypad does not
function or only
functions very
slowly.
A message ap
- Many functions can only be used after the respective service has been app
pears in
lied for. Contact your service provider for more details.
the display for
some functions, in
dicating execution/
use is not possible.
Screen frozen or
no
response when
pressing keys.
No connection to
the
mobile telecom
munication net
work.
- Remove the battery for 3 minutes and try again.
The “Insert SIM”
message appears
in the display.
The battery cannot
be charged or is
empty within a
short time.
- Ensure that the SIM card has been installed correctly. Contact your service
provider, if necessary.
- Contact your service provider.
- Battery is defect.
- Place the phone correctly in the charging unit or connect the charging unit
properly. Clean the contact surfaces on the mobile phone and charging unit
with a soft, dry cloth.
- Charge the mobile for 4 hours.
Tips on the battery
Only use batteries and charging unit approved by the manufacturer, otherwise the battery could be
damaged.
Do not short circuit the battery. Always leave the battery in the phone to avoid accidentally short
circuiting the battery contacts.
Keep the battery contacts clean and free of dirt.
The battery can be charged/discharged hundreds of times but its service life is limited. Replace the
battery when the battery power has decreased noticeably.
20
Technical Properties
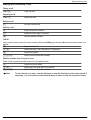
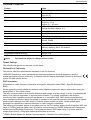
Technical Properties
Feature
Standard
Dimensions
Weight
Power supply
Battery
Standby time
Max. talk time
Display
Languages
Value
GSM1 850, 900, 1800, 1900 MHz Quadband
50 x 104 x 15 mm
(W x H x D)
115 g incl. battery
Input: 100-240 V,
50-60 Hz, 0.2 A
Output: 5 V, 150 mA
3.7 V, 800 mAh
Charge duration: Approx. 4 h
Up to 100 h
Up to 180 min
LCD with back-lighting
German, English, French, Dutch, Spanish, Portuguese,
Danish, Greek
Phone book
Max. 200 contacts
SMS
Standard SMS
Memory capacity: Max. 100 entries
Permissible ambient temperature
Permissible relative humidity
SAR value
-10 °C to +40 °C
30% to 75%
0.4 W/kg
Note:
Specifications subject to change without notice!
Default Settings 17
The default settings can be restored via the menu.
Declaration of Conformity
This device fulfils the requirements stipulated in the EU directive:
1999/5/EU directive on radio equipment and telecommunications terminal equipment and the
mutual recognition of their conformity. Conformity with the above mentioned directive is confirmed
by the CE mark on the device.
SAR Information
Information on radio frequency emissions and specific absorption rates (SAR = Specific Absorption
Rate).
All the applicable safety standards related to radio frequency emissions were implemented during the
development of this mobile phone.
The limit values are based on scientific directives and contain a safety margin in order to guarantee the
safety of all persons regardless of age and state of health. The values specified in the directive
concerning radio frequency emissions are based on a unit called SAR. SAR values are established
using standard methods in which the phone is operated in all possible frequency bands with the highest
power output. Although the SAR values of various phone models can differ, all the models were
developed to maintain the relevant directives on radio frequency emissions.
The following information applies to countries such as the EU member states which accept the SAR limit
value of 2 W/Kg (average value from 10 g fabric) recommended by ICNIRP (International Commission
on Non-lonizing Radiation Protection): The highest measured SAR value using 10 g fabric with this
mobile phone was 0.4 W/kg with measurements taken at the ear.
1 GSM
= Global System for Mobile Communications = Standard for mobile phones.
21
Safety Information
Safety Information 18
Please read this section carefully.
Caution:
Risk of suffocation!
Keep packaging materials and protective foils out of reach of children.
Intended use
This mobile phone is designed for use when connected to a mobile phone network. Any other use is
considered unintended use. Unauthorised modification or reconstruction is not permitted. Under no
circumstances open the device or complete any repair work yourself.
Areas of use
S
S
S
S
Do not use the phone in prohibited areas.
Switch the phone off in the vicinity of medical equipment (e.g. in hospitals).
Do not use the phone in petrol stations or near fuels and chemicals.
Please contact the airline company with regard to use in aircraft.
General information
S Prevent exposure to smoke, dust, vibration, chemicals, moisture, heat and direct sunlight. The
phone is not waterproof; therefore, keep it dry.
S Only use original accessories. Never attempt to connect other products.
S Repairs to this device may only be completed by qualified service personnel.
S All mobile communication equipment is subject to interference which may impair its performance.
S Keep the phone and accessories out of the reach of children.
S The SIM card can be removed. Caution! Small children can swallow them.
S The ringing tone is issued via the loudspeaker. Take an incoming call first and then hold the phone
to your ear.
This prevents any possible hearing damage.
S The phone should only be used in vehicles via the corresponding handsfree equipment. Ensure that
no safety-related functions are interfered with when operating the phone. It is essential to observe
the applicable national laws and regulations.
S Always maintain a distance of at least 15 cm to implanted heart pacemakers to prevent any
possible interference. If you have had a pacemaker implanted, do not carry the phone in a breast
pocket when switched on. Always hold the phone to the ear furthest away from the pacemaker
during calls.
Switch the phone off immediately if you notice or suspect any adverse effects.
S Do not rely on the mobile phone as a safeguard for emergencies. For a variety of technical reasons,
it is not possible to guarantee a reliable connection under all circumstances.
Charging unit
Attention: Only use the charging unit supplied because other adapters could damage the telephone.
Ensure access to the charging unit is not obstructed by furniture or such.
Rechargeable batteries
Attention: Never throw batteries into a fire. Only use batteries of the same type.
Barcode label in the phone
The barcode label contains information on the phone, such as the serial number, for example. Do not
remove it.
22
Maintenance / Guarantee
Disposal
In order to dispose of your device, take it to a collection point provided by your local public waste
authorities (e.g. recycling centre). According to laws on the disposal of electronic and electrical
devices, owners are obliged to dispose of old electronic and electrical devices in a separate
waste container. The symbol indicates that the device must not be disposed of in normal
domestic waste!
Risks to health and the environment from batteries!
Never open, damage or swallow batteries or allow them to pollute the environment. They may contain
toxic, ecologically hazardous heavy metals. You are legally obliged to dispose of power packs and
batteries at the point of sale or in the corresponding containers provided at collection points by local
public waste authorities. Disposal is free of charge. The symbols indicate that the batteries must not be
disposed of in normal domestic waste and that they must be brought to collection points provided by
local public waste authorities.
Packaging materials must be disposed of according to local regulations.
Maintenance / Guarantee
Maintenance
S Clean the housing surfaces with a soft, fluff-free cloth.
S Do not use any cleaning agents or solvents.
Guarantee
Keep in a safe place!
In the case of a defect, please return the device together with the receipt and original packing material
to the point-of-sale.
23
Declaration of Conformity
Declaration of Conformity
24
e
Please note that the copyright for this operating instruction manual lies with Olympia and, there
fore, may not be copied or sold. The data and information in the operating instruction manual is
only intended for personal use.
All rights reserved.