1
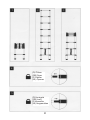
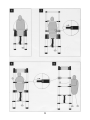
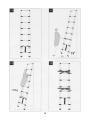
(GB) Operating instructions
Telescopic ladder, Art. No. 60535
Attention: Please read these operating instructions carefully.
Before using this telescopic ladder check compliance with the following general
safety instructions exactly.
Failure to comply may result in damage to the telescopic ladder and injury.
7
(D) Öffnen
(GB) Open
(F) Déplier
(NL) Openen
(D) Verriegeln
(GB) Lock
(F) Verrouiller
(NL) Vergrendelen
2
3
4
1. General
The collapsible telescopic ladder can assume any size: from small (Fig. 1) to each intermediate size (Fig.
2) to the full length (Fig. 3).
The collapsible telescopic ladder must only be used according to the following instructions.
2. Locking mechanism
The collapsible ladder locks each rung with two steel locking pins which are locked in place automatically when the ladder is extended. Each locking pin is connected to a safety lever (Fig. 4) which has two
functions:
1) The extended telescopic ladder is securely locked when both the safety levers are securely locked
in place left and right of the rungs (Fig. 5).
2) When the telescopic ladder is to be collapsed back down, push the locking lever toward the middle
of the rungs (Fig. 4).
3. Extending the telescopic ladder to its full length
1) To fully extend the telescopic ladder (full length) ensure that the ladder is on a flat surface. When extending the telescopic ladder, stabilize it by placing a foot on the bottom rung. (Fig. 6)
2) Always pull with both hands on the ladder section if you want to extend the ladder. Start at the topmost element and then go on to the next-lower. If you have extended a ladder section make sure each
time that the lock pins are correctly locked in place (Fig. 5).
3) Proceed in the same way with all other sections until the ladder is fully extended.
4. Adjusting intermediate lengths
To extend the telescopic ladder to any length, proceed as follows:
1) Make sure the ladder is set up on a flat surface. When extending the telescopic ladder, stabilize it by
placing a foot on the bottom rung (Fig. 6).
2) To not completely extend the ladder always leave a group of ladder sections put together. It must always be the topmost sections which are not extended. (Fig. 9). The remaining sections are then pulled
apart again with both hands. Always pull with both hands on the ladder section if you want to extend
the ladder. Start at the topmost element and then go on to the next-lower. If you have extended a ladder
section make sure each time that the lock pins are correctly locked in place (Fig. 5).
3) Proceed in the same way with all other sections until the ladder is fully extended. All remaining sections in the middle of the ladder must be extended (Fig. 9).
Attention! Check carefully whether each safety pin is correctly locked in place.
5. Collapsing the telescopic ladder
To collapse the telescopic ladder, proceed as follows:
1) Adjust the ladder so it is upright and press the safety lever to the middle of the rungs (Fig. 10).
2) Start at the bottom and push together one section after another.
Attention! When collapsing the telescopic ladder make sure that your hands are not on or between the
rungs – there is a risk of crushing.
6. Changing the length of an already extended telescopic ladder
If you want to change the length of an already open ladder, first slide it completely together (see Collapsing the ladder). Extend the ladder to the desired length (see Adjusting intermediate lengths).
8
7. Using the telescopic ladder
The usual safety instructions for the use of ladders must also be followed for this ladder. In addition,
please note the following:
1) The telescopic ladder should be placed at an angle of 75 degrees (Fig. 11).
2) The telescopic ladder is designed for a maximum load of 150 kg (Fig. 12).
3) The telescopic ladder must be used on a flat, firm and horizontally oriented surface.
4) Never stand on the top three rungs.
5) The telescopic ladder must not be used with an irregular spacing between the rungs (Fig. 13, see
also: Adjusting intermediate lengths).
6) Do not use the ladder in water-filled basins etc., because water and dirt can interfere with the operation of the telescopic tubes or even damage them.
7) Avoid improper handling of the ladder such as hard hits as damage to the tubes can interfere with
the operation or lead to the ladder become defective.
8) Transport the ladder only in the assembled state – this way you avoid unnecessary damage.
9) The telescopic ladder must not be used when it is hung on the top rung (the ladder must always be
on the floor).
10) The telescopic ladder must not be used, put together or pushed apart when it is stood on its head.
11) The telescopic ladder must not be used when it is in a horizontal position (e.g. lying on two sawhorses).
8. Care and maintenance
The telescopic ladder is a quality product that was manufactured precisely under strict controls. To ensure continued enjoyment of this product, please observe the following instructions for care and maintenance.
1) The telescopic tubes must be kept clean. Dirt, chips, splashes of paint, glue, etc. must be wiped off
or removed immediately, and/or before pushing the ladder sections together. Also make sure that the
rungs are always clean.
2) Use only small amounts of liquid detergents. To clean, use a soft cloth. Before you slide the telescopic
tubes into each other, they must be completely dry.
3) The protective caps should never be removed, otherwise dirt, chips, etc. get into the telescopic
tubes, and could cause damage there.
4) The telescopic ladder may not be used without the rubber feet and protective caps.
Guarantee
We grant on this product a guarantee of 24 months, according to the pertinent statutory regulations, from the date of the purchase by
the initial user.
This guarantee covers all material or production defects; however, it does not cover the following: Faults and defects resulting from normal wear, including wearing parts, seals etc.; damages or defects arising or as a result of alteration.
We reserve the right to reject a guarantee claim if the purchase cannot be proven, or if the product was improperly serviced or was obviously erroneously maintained (not or insufficiently maintained; cleaning and servicing).
Please retain the proof of purchase documentation because this is valid as proof of date of purchase.
In case of a guarantee claim, the machine must be returned to the dealer in a clean state, and in its original packaging if possible, and
not disassembled in any way. Proof of purchase must also be included.
Berger + Schröter GmbH - Voerder Straße 83 - 58135 Hagen
Copyright by
All rights reserved. It is not permitted without written approval from Berger + Schröter to reproduce these operating instructions. It is
also not permitted to reproduce extracts in any form that have been created or processed by use of electronic, mechanical or chemical
procedures. Technical changes can be made at any time without prior announcement. The operating instructions are corrected regularly. We assume no liability for technical and typographical errors and their results.
9