1
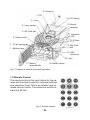
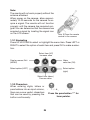
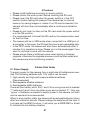
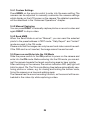
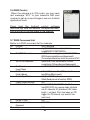
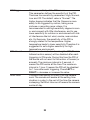
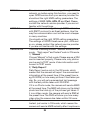
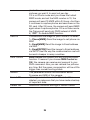
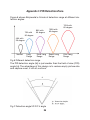
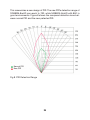
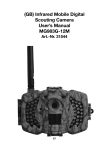
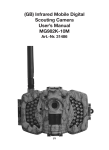
User’s Manual
Infrared Mobile Digital Scouting Camera
SG880MK-8mHD
Item No. 31484
21
Inhaltsverzeichnis
1 Instruction
1.1
General Description
1.2
Camera Body Interfaces
1.3
Remote Control
1.3.1
Navigating
1.3.2
Characters
1.4
Shooting Information Display
1.5
MMS/GPRS function
2 Cautions
3 Quick Start Guide
3.1
Power Supply
3.2
Insert the SD card and the SIM card
3.3
Do the Camera Settings
3.4
Enter into the TEST Mode
3.4.1
Custom Settings
3.4.2
Manual Capturing
3.4.3
Send MMS
3.5
Power on and Enter into the ON Mode
3.6
SMS Control
3.7
SMS Command List
3.8
Power Off
4 Advanced Operations
4.1
Settings Menu
4.2
Default Setting
4.3
Playback
4.3.1
View Photo
4.3.2
Delete Photo or Video
4.4
Laser Pointer
4.5
File Numbering
23
23
23
24
25
25
25-26
26
27
27
27
28
28
28
29
29
29
29
29
30
31
31
31-35
36
37
37
37
37
37
Appendix I: PIR Detection Zone
Appendix II: Technical Specifications
Appendix III: Parts List
38-39
40
40
22
1 Instruction
1.1 General Description
This camera, a digital scouting camera with black IR and MMS function,
is a digital infrared surveillance camera, triggered by any movement of
humans or animals monitored by a high sensitive Passive Infrared (PIR)
motion sensor, and then automatically captures high quality pictures (up
to 8M pixels) or records video clips (720P HD) according to default settings or preset customer settings. It will then send the pictures instantly
to your mobile device or e-mail via GSM/GPRS network. You’ll be alerted
just when the camera is triggered or per custom settings.
It takes color pictures or videos under sufficient daylight. While at night,
the built-in 940nm IR LEDs take clear pictures or videos (monochrome).
It’s invisible to game. And this model has a new design of PIR and this
new PIR is patented.
There is a 1.5” color LCD display screen on the camera and a sound
recorder embedded in the camera. A laser pointer is used to help target
the photo area of the camera. It supports MMS/SMS/E-mail via
GSM/GPRS Network.
It is resistant against water and snow. The camera can also be used as
a portable digital camera.
1.2 Camera Body Interfaces
The camera has the following I/O interfaces: USB connector, SD card
Slot, TV output and external DC power connector.
Take a few moments to familiarize yourself with the camera controls and
displays. It is helpful to bookmark this section and refer to it when reading through the rest of the manual.
23
8. Antenna
7. PIR
9. LCD Display
6. Lens
10. Sound
recorder
5. Laser pointer
4. SD-Card slot
11. Indication
LED
3. Power switch
12. IR flash
2. TV-out connector
13. SIM Card
slot
1. Bottom cover
14. USB
connector
15. Lock
17. Battery
depot handle
16. Battery depot
Fig. 1 Diagram of camera functional indicators
1.3 Remote Control
The remote control is the input device for the camera and is primarily used for customer settings
and password input. This is an infrared type wireless remote control. The maximum remote distance is 30 feet.
Fig. 2 Remote control
24
Note:
The remote will not work properly without the
antenna attached.
When power on the camera, allow approximately 10-20 seconds for the camera to acquire a signal. The remote will not function
properly until the camera has acquired a signal. You can determine that the camera has
acquired a signal by locating the signal icon
on the LCD screen.
Abb. 3 Place the remote
control in the camera
1.3.1 Navigating
Press UP or DOWN to select or highlight the menu item. Press LEFT or
RIGHT to select the option of each item and press OK to make a selection.
Select item (UP)
Increase value
Display menus /Exit
(MENU)
Make
selection (OK)
Select option (LEFT)
Select option
(right)
Select item (down)
Decrase value
1.3.2 Characters
When entering digits, letters or
punctuations into an input column,
there are some useful characters
that can be used by pressing the
button continuously:
25
:
1./:@_
:
0+-
Press the punctuation “*” for
laser pointer.
1.4 Shooting Information Display
When the camera is turned on (the power switch is slid to ON or TEST
position), the current settings will be displayed on screen.
2. Camera
mode
3. Image size
4. Signal strength
5. Batterylevel
1. SIM card
6. Tlecom provide
7. Date (M;D;Y)
8. Time /H;M;S)
Fig.4 Shooting
information display
9. Available space
10. Number of images
1.5 MMS/GPRS function
This camera can send pictures instantly to your mobile device via
GSM/GPRS network. You’ll be alerted just when a picture or video has
been taken. The camera sends MMS message through GPRS network,
so before using this function, you need to open GPRS service from your
service provider. It supports four bands :850MHz, 900MHz, 1800MHz
and 1900MHz.
SIM card Icon:There are two SIM card icons which stand for different
installation situations.
means the SIM card is inserted and it works
well.
means the MMS function can’t work correctly because of loss
of signal or other communication issues.
There are 4 submenu settings within the MMS/GPRS function. They are
Send Mode, MMS Set, GPRS Set and Send to. Send Mode means to
choose a way to send MMS (refer to 4.1 table). MMS Set and GPRS
Set means to have the right MMS and GPRS setting parameters according to your network. Send to means to input the phone number or
email address which you want to send to. All 4 submenus must be correctly set up.
26
2 Cautions
• Please install batteries according to shown polarity.
• Please unlock the write-protect before inserting the SD card.
• Please insert the SD card when the power switch is in the OFF
position before testing the camera. The camera has no internal
memory for saving images or videos. If no SD card is inserted, the
camera will shut down automatically after a continuous indication
sound.
• Please do not insert or take out the SD card when the power switch
is in the ON position.
• It is recommended to format the SD card by the camera when used
for the first time.
• The camera will be in USB mode when connected to a USB port of
a computer. In this case, the SD card function is as a removable disk.
• In the TEST mode, the camera will shut down automatically after 3
minutes if no operation is done. Please turn on the power again if you
want to continue to work with the remote.
• Please ensure there is sufficient power when having a firmware
upgrade, otherwise the upgrade process could be interrupted and
the camera may stop functioning properly
3 Quick Start Guide
3.1 Power Supply
To supply power for the camera, four or eight size AA batteries are needed. The following batteries with 1.5V output can be used:
1. High-density and high-performance alkaline batteries
(Recommended)
2. Rechargeable alkaline batteries
3. Rechargeable NiMH batteries
There are four battery slots. Slot 1 and 2 form one group and is marked
“1”while slot 3 and 4 form the other group and is marked “2”. Only one
“group” of batteries is needed to supply power to the camera, but both
can be used and is recommended.
When in a low-battery state, the camera will be automatically shut down
after two indication sounds. Please change the batteries at this time. If
you have set the MMS function, it will send you a MMS/SMS or Email
to indicate the low battery situation.
27
Dear Customer! Please note! Depending
on battery regulations you are required to
used or defective batteries and accumulators, at no cost to you, return it to us
Every consumer is legally obliged to dispose of WEEE separately from the household waste and to dispose of at a collection
site of his community / City District for example. Electric appliances are marked with
the crossed out dustbin, accepted there for
free.
Fig.5 Battery install
Caution: Risk of explosion if battery is replaced by an incorrect
type. Also dispose of used batteries according to the instructions.
3.2 Insert the SD card and the SIM card
Open the bottom cover. Insert SD card and SIM card into the card slot.
Please note that the SD card is on the “write” (not locked) position otherwise the camera will not function correctly.
3.3 Do the Camera Settings
Down load the camera set up software (BMC_config.zip) from our website. The specified website is written in the last page of the manual.
3.4 Enter into the TEST Mode
Slide the power switch to the TEST position and enter into the TEST
mode. There are some functions in TEST mode: Custom settings, manual capture, preview or send MMS manually. The remote control is needed in this mode.
28
3.4.1 Custom Settings
Press MENU on the remote control to enter into the menu setting. The
camera can be adjusted to manually customize the camera settings
which display on the LCD screen on the camera. The detailed operations
will be described in the “Advanced Operations” chapter.
3.4.2 Manual Capturing
You can press RIGHT to manually capture photos or record a video and
again RIGHT to stop a video.
3.4.3 Send MMS
When the Send Mode is set as “Manual”, you can send the selected
photo to the preset address in TEST mode. ”Daily Report” and “Instant”
mode are used in the ON mode.
Please note that the images can only be sent and video cannot be sent.
If the SIM card is not inserted, the image cannot be sent as well.
3.5 Power on and Enter into the ON Mode
Slide the power switch to the ON position to power on the camera and
enter into the ON mode. Before entering into the ON mode, you can adjust the camera towards the target monitoring area by laser pointer.
After switching on the camera, the motion indication LED (red) light will
blink for about 10s. The 10s is a buffering time before automatically capturing photos or videos, e.g. for closing and locking the bottom cover,
fixing the camera on a tree and walking away.
The camera has the sound recording function, so the sound will be embedded in the video clip while capturing a video.
29
3.6 SMS Control
When the camera is in ON mode, you can send
text message “#T#” to your camera’s SIM card
number to get an on spot image or use our Android
application tools.
Down load the Android control software
(BGTools.zip) from our website. The specified website is written in the last page of the manual.
3.7 SMS Command List
Below is a SMS command list for example.
No Function
SMS Command
1
Set Supper User
#sg880#4321#Tel. no. administrator#
#mg882#4321#13800138000#
2
Set MMS-Parameters
#m#http://mmsc.cingular.com#66.209.11.32#
8080#wap.cingular#account#password#
(The example parameters are for the carrier of AT&T)
3
Set GPRS-Parameters
#s#[email protected]#bmc123#25#
cmnet#smtp.163.com#account#password#
4
Set Normal
#n#13800138001#13800138002#13800138003#
Users Phone
5
Set Receive
#r#[email protected]#[email protected]#
Email Address
bmc3@[email protected]#
6
Get On Spot Photo
#t# (Send MMS to phone)
#t#e# (Send picture to Email by GPRS)
7
Check Camera Settings
#L#
8
Edit Work Parameters
#e#cp#s5#fh#b1#v60#t#l10m#pn#i5s#
Hon08:30-20:30 (cp: camera mode, s5:photo
size fh: video size, b1:photoburst, V60: videolength, t: set clock, l10m: time lapse, pn: PIR
trigger, i5s: PIR-intervall, mp: send to, Hon:
(work hour)
9
Format TF-Kart
#F#
10
Set Administrator`s
#P#0000#
Password
11
Help
#H#
30
3.8 Power Off
Slide the power switch to the OFF position to power off the camera.
Please note that even in the OFF mode, the camera still consumes a
small amount of battery power. Therefore, please remove the batteries
if the camera is not in use for a length of time.
4 Advanced Operations
From the basic operations of the camera previewed in the previous
chapter, we know that the camera has three basic operation modes:
1.
OFF mode: Power switch is in the OFF position.
2.
ON mode: Power switch is in the ON position.
3.
TEST mode: Power switch is in the TEST position.
In the above three modes, the OFF mode is the specified safe mode
when replacing the SD card or batteries and transporting the camera.
This chapter explains the advanced operations for customizing the camera settings. The settings can only be customized in TEST mode and
the wireless remote is needed.
4.1 Settings Menu
To view the camera settings menu, press MENU in the TEST mode (called settings menu in this chapter). The settings menu will be shown on
the LCD of camera.
31
Setting Items
Language
Camera Mode
Set Clock
Photo Size
Photo Burst
Video Size
Video Length
Time Lapse
Description
You can choose language you need. It supports four
language: English, Finnish, German, Swedish
Choose capturing images or recording videos.
Set camera date and time. You can change the date
and time of the device by setting this parameter
when necessary, e.g., after every battery change.
The date format is month/day/year, the time format
is hour: minute: second. The valid value for year is
between 2009 and 2050.
Choose the image size, e.g. 8 mega pixels or 5
mega pixels.
Choose the continuous shooting numbers after
each triggering.
Choose the video size: 1280x720 or 640x480.
Choose duration of recording video. This parameter
is effective and can be adjusted only when the
device in the video mode under ON mode. Its value
extends from 1 to 60 seconds with a step of one
second. The default value is 10 seconds. Press
LEFT and RIGHT to decrease or increase the value
by 1 second.
Time lapse means the camera can capture images
or videos at a preset time interval regardless of
whether motions are detected. The default
parameter is Off, which means the timer function is
disabled. Changing this parameter to a non-zero
value turns on the Time Lapse mode, and camera
will take photos at given time interval.
Please note that if the PIR Trigger is set to Off,
then the Time Lapse can’t be set to Off.
32
PIR Trigger
PIR-Interval
Work Hour
Choose sensitivity of the PIR sensor.
This parameter defines the sensitivity of the PIR.
There are four sensitivity parameters: High, Normal,
Low and Off. The default value is “Normal”. The
higher degree indicates that the Camera is more
easily to be triggered by motion, taking more
pictures or recording more videos. It is
recommended to use high sensitivity degree in room
or environment with little interference, and to use
lower sensitivity for outdoor or environment with lots
of interference like hot wind, smoke, near window
etc. Furthermore, the sensitivity of the PIR is
strongly related to the temperature. Higher
temperature leads to lower sensitivity. Therefore it is
suggested to set a higher sensitivity for high
temperature environment.
This parameter indicates how long the PIR (Passive
Infrared motion sensor) will be disabled after each
triggering in ON mode. During this time the PIR of
the device will not react to the motion of human (or
animals). The minimum interval is 0 second, it
means the PIR works all the time. The maximum
interval is 1 hour. It means the PIR will be disabled
for 1 hour after each triggering. Press LEFT or
RIGHT to decrease or increase the value.
Choose a time period of a day to let the camera
work. The camera will awake at the setting time
duration in a day. In the rest of the time the camera
is sleeping. Set Work Hour as off means the camera
works all day.
33
MMS Set
GPRS Set
Sende Mode
The camera sends MMS message through GPRS
network, so before using this function, you need to
open GPRS service from your service provider. You
should set the right MMS setting parameters. The
settings of MMS: URL, APN, IP and Port. Please
contact the network service provider if you are not
familiar with the settings.
The camera sends image through GPRS network
with SMTP protocol to an Email address. Use this
way the communication cost will be much cheaper
in many countries.
You should set the right GPRS setting parameters.
The settings of GPRS: Email server port, APN and
so on, please contact the network service provider
if you are not familiar with the settings.
There are 3 sending modes: “Manual”works in TEST
mode,“Daily report”and“Instant”work in ON mode.
1) “Manual”:
Choose“Manual” in Test mode. Please ensure a SIM
card is inserted properly; Please note, only photos
can be sent in TEST mode .Video information can’t
be sent in TEST mode.
2) “Daily Report”:
Daily Report works only in the ON mode, which
means that the camera will report the summarized
information at the preset time (if the preset time is,
eg.20:00PM) on how many pictures it had taken per
day. So, you will get a summarized text message
with the last picture taken until 20:00PM.
If it is on Photo mode, the camera will send a MMS
at the preset time. The MMS will show you the latest
photo and the total qty of the pictures get taken. If
it is on Video mode, the camera will send a SMS at
the preset time. The SMS will show you how many
video clips the camera has taken within 24 hours.
3) “Instant”:
Instant, just works in ON mode, which means the
camera will send a MMS instantly after it captures a
34
Send To
SMS Control
Version
Format SD
Default Set
photo. You can choose the number of how many
pictures you want it to send out per day.
If it is on Photo mode and you chose the Instant
MMS mode, and set the MAX number is 10, the
camera will send 10 MMS within 24 hours .And then
it continues to capture photos and save them on the
SD card. After 24 hours, the camera will send MMS
again when it captures photos. If it is on Video mode,
the Camera will send only SMS instead of MMS.
4) “OFF”: To disable MMS function.
Choose send the image to your Phone or to Email.
1> Phone[MMS]: Send the image to cell phone via
WAP.
2> Email[MMS]:Send the image to Email address
via WAP.
3> Email[GPRS]:Send the image to Email address
via SMTP. Use this way the communication cost will
be much cheaper in many countries.
SMS Control can enable two way communication
function. It means if you choose SMS Control as
ON, this camera can receive and respond to your
SMS command. Also you can retrieve live pictures
any time. But the power consumption will be a little
bigger than normal hunting status.
This parameter shows the information about
Firmware and IMEI of this camera.
All images and videos in the SD card will be
deleted, so make sure that you have made a backup
of important data.
Restore all customer settings to default values.
35
4.2 Default Setting
Defaults settings are listed below:
Setting Items
Language
Default
English
Camera Mode
Set Clock
Photo Size
Photo Burst
Video Size
Video Length
Time Lapse
Photo
Enter
8MP
1 Photo
1280x720
10 sec
Off
PIR Trigger
PIR Interval
Normal
5 Sec
Work Hour
MMS Set
GPRS Set
Off
Enter
Enter
Send Mode
Manual
Send to
Phone[MMS]
SMS Control
Version
Format SD
Default Set
Off
Enter
Enter
Save
Options
Suomi
Deutsch
Svenska
Video
Submenu
Adjust Clock
5MP
2/3 Photos
640x480
5–60 sec
5–55Min
1–8Hour
High, Low ,Off
0–55 Sec,
1–60 Min
On
00:00–23:59
URL, APN, IP, Port
Server, Port,
APN
Daily Report,
Instant, Off
E-Mail[MMS],
E-Mail[GPRS]
On
Firmware IMEI
Yes, No
36
4.3 Playback
In playback mode, images or videos can be viewed and deleted. An
image can also be manually sent by MMS or GPRS. It can only be done
in TEST mode.
The images can be viewed on the LCD screen on camera. The videos
can only be viewed on your computer. For simplicity, operations with
PC won’t be introduced here.
4.3.1 View Photo
Press OK of the remote to view the latest picture in TEST mode, UP or
DOWN to view the previous and the next one. And OK to return to info
display. Note that video can not be displayed on the screen.
4.3.2 Delete Photo or Video
View the image (or video) which to be deleted, select the one you want
to delete. Press DELETE and LEFT or RIGHT to select all, then OK to
delete.
4.4 Laser-Pointer
The laser light pointer beam can be turned on as an additional function
for pointing to an object or a certain region of interested (ROI) by pressing ﹡of the remote.
NOTE:
Please note that the laser could be harmful to the eyes if pointed
at another person.
4.5 File Numbering
Images and videos are saved in the pre-named folder. File numbering
continues by adding one to the last number for each new image or
video. Saving names are IMAG0001.JPG or IMAG0001.AVI. Through the
suffix you can distinguish whether the file is an image (with suffix .jpg)
or a video (with suffix .avi).
37
Appendix I: PIR Detection Zone
Figure 6 shows Bolymedia’s 4 kinds of detection range at different detection angles.
73ft with
50 degree
85ft with
55 degree
100ft with
60 degree
120ft with
60 degree
45ft with
35 degree
Normal
Long
Range
Extra Long
Range
Super Long
Range
Ultra Long
Range
Fig.6 Different detection range
The PIR detection angle (❏)) is just smaller than the field of view (FOV)
angle (❏). The advantage of this design is to reduce empty picture rate
and capture most, if not all, motions.
Fig.7 Detection angle VS F.O.V angle
38
This camera has a new design of PIR. The new PIR’s detection range of
SG880M-8mHD can reach to 73ft, while MG882K-8mHD with 85ft in
good environments. Figure 8 shows the compared detection zone between normal PIR and the new patented PIR.
Normal PIR
New PIR
Fig.8 PIR Detection Range
39
Appendix II: Technical Specifications
Image Sensor
5MP Color CMOS,
8MP Interpolation
Lens
F/NO=2.2
FOV (Field of View)=60°
PIR detection range
SG880MK-8mHD: 73ft
MG882K-8mHD: 85ft
Display Screen
1.5” LCD
Memory Card
From 8 MB to 32 GB
Picture Resolution
8MP = 3264 ×2448
5MP = 2560×1920
Video Resolution
1280x720 oder 640×480
PIR-Sensor
Multi Zone
PIR Sensitivity
Adjustable (High/Normal/Low)
Trigger Time
1s
Weight
0.30 kg
Operation/Storage Tem.
-20 - +60°C / -30 - +70°C
Interval
1s – 60 min.
Photo Burst
1–3
Video Length
1–60s
Power Supply
8×AA or 4×AA
Stand by Current
< 0.25 mA (<6mAh/Day)
Power Consumption
>500 MMS(use 8*AA batteries)
Low Battery Alert
LED Indicator
Sound Recording
Available
Mounting
Rope/Belt/Python lock
Dimensions
140 x87 x55 mm
Operation Humidity
5% - 90%
Security Authentication
FCC, CE, RoHS
*without battery
Apendix III: Parts List
Digital Camera
1
Wireless Remote
1
USB Cable
1
Belt
1
User Manual
1
Enhanced Antenna
1
Warranty Card
1
Website-Information:
Down load the APP software from here:
http://www.bolymedia.com/productv/?12-1.html
Berger und Schröter GmbH
Voerder Straße 83 - 58135 Hagen
40