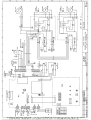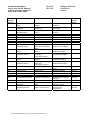
1
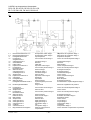
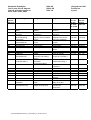
Operating instructions LAUDA Low-temperature thermostats RC 6 CS, RC 20 CS, RC 25 CS, RL 6 CS, RL 7 CS, RK 8 CS, RK 8 KS, RK 20 KS from serie A 01 01/02 YACE 0050 LAUDA DR. R. WOBSER GMBH & CO. KG P.O. Box 1251 D- 97912 Lauda-Königshofen Phone: +49/ (0)9343/ 503-0 Fax: +49/ (0)9343/ 503-222 E-mail info @ lauda.de Internet http://www.lauda.de LAUDA Low-temperature thermostats RC 6 CS, RC 20 CS, RC 25 CS, RL 6 CS, RL 7 CS, RK 8 CS, RK 8 KS, RK 20 KS 1. Brief operating instructions ..........................................................................................................................5 2. Technical Data to DIN 58966 ......................................................................................................................7 3. General construction and technical description.........................................................................................11 3.1 Operating principle .............................................................................................................................11 3.2 Material...............................................................................................................................................11 3.3 Pump ..................................................................................................................................................11 3.4 Control................................................................................................................................................12 3.5 External controller ..............................................................................................................................13 3.6 Refrigeration system ..........................................................................................................................13 3.7 Multifunction connector ......................................................................................................................18 3.8 Mains supply output 34 H ...................................................................................................................19 3.9 Remote operation (FBC) Option.........................................................................................................19 3.10. SAD-connection to NE 28 (Option) ....................................................................................................19 4. 5. 6. 7. 8. Safety devices and warning notes .............................................................................................................21 4.1 Safety functions ..................................................................................................................................21 4.2 Why can a thermostat be dangerous? ...............................................................................................21 4.3 Important notes ..................................................................................................................................21 4.4 Warning notes ........................................................................................................................22 4.4.1 Temperatures..............................................................................................................................22 4.4.2 Mains connection ........................................................................................................................22 4.4.3 Mains cable .................................................................................................................................22 4.4.4 Fume extraction ..........................................................................................................................22 4.4.5 Steam production ........................................................................................................................22 Bath liquids and hose connections ............................................................................................................23 5.1 Bath liquids .........................................................................................................................................23 5.2 Hose connections...............................................................................................................................24 Unpacking, assembly and setting up.........................................................................................................26 6.1 Unpacking ..........................................................................................................................................26 6.2 Setting up, operation as bath thermostat ...........................................................................................26 Connection of external systems ................................................................................................................27 7.1 Closed external circuits ......................................................................................................................27 7.2 Open systems (baths) ........................................................................................................................27 Starting up .................................................................................................................................................30 8.1 Filling ..................................................................................................................................................30 8.2 Connection to supply..........................................................................................................................30 8.3 Basic functions ...................................................................................................................................30 YACE0050 14.03.02 -3- LAUDA Low-temperature thermostats RC 6 CS, RC 20 CS, RC 25 CS, RL 6 CS, RL 7 CS, RK 8 CS, RK 8 KS, RK 20 KS 9. 8.4 External control ..................................................................................................................................32 8.5 Operation with programmer ...............................................................................................................32 8.6 Safety circuit .......................................................................................................................................33 Maintenance ..............................................................................................................................................34 9.1 Safety notes in case of repairs ...........................................................................................................34 9.2 Repairs ...............................................................................................................................................34 9.3 Maintenance of the refrigeration system ............................................................................................34 9.4 Cleaning .............................................................................................................................................35 9.5 Spares ordering..................................................................................................................................35 Appendix Accessories Circuit diagrams YACE0050 / 14.03.02 -4- LAUDA Low-temperature thermostats RC 6 CS, RC 20 CS, RC 25 CS, RL 6 CS, RL 7 CS, RK 8 CS, RK 8 KS, RK 20 KS 1. Brief operating instructions ♦ Even if you find these brief instructions initially sufficient please read the following sections, especially Section 4: "Safety devices and warning notes". For safe operation of the equipment it is essential that the information in these Operating Instructions is observed. ♦ Check thermostat and accessories during unpacking for any transport damage and if necessary inform the carrier or the postal authority. ♦ Assemble the unit according to Section 6 and add extra items as appropriate. ♦ Fitting the tubing to the pump connections: Without external system: for improved circulation within the bath remove the closing plugs from the two pump connections, fit the tubing nipples and link them together with e.g. Perbunan tubing (up to 120°C) or better a metal tubing. Mit With external system: make tubing connections to the external system. Protect tubing with hose clips against slipping off. ♦ Use only softened water or LAUDA bath liquids (Section 5). Fill the bath up to a level about 2 cm below the cover plate. ♦ Check the supply voltage against the details on the label. Insert the mains plug. ♦ Set the potentiometer EXT fully anticlockwise to INT! ♦ RK- Types RK: switch on the unit with the mains switch (green lamp lights up). Types RC and RL: Working without refrigeration (operating temperatures above approx. 40°C). Mains switch (green) on I (ON) (green lamp lights up) "Cooling" switch (yellow) on 0 (OFF) Working with refrigeration (operating temperature below approx. 40°C) Mains switch (green) on I (ON) (green lamp lights up) "Cooling" switch (yellow) on I (ON). When starting up the refrigeration unit after it has been off for a longer period it may take up to 20 min., depending on ambient temperature and equipment type, until the normal cooling performance is available. ♦ Move the temperature setting to the required temperature. Pressing the key shows the operating temperature setpoint on the display. The adjustment is made on the potentiometer moving this control. . Release the locking device before ♦ Set the overtemperature protection at the control to some value above the setpoint. When the red signal lamp lights up, reset the system by pressing the reset key YACE0050 14.03.02 . -5- LAUDA Low-temperature thermostats RC 6 CS, RC 20 CS, RC 25 CS, RL 6 CS, RL 7 CS, RK 8 CS, RK 8 KS, RK 20 KS ♦ When connecting up an external system, ensure that filling this system does not cause the level inside the thermostat to fall more than is permitted. If the setpoint of the bath liquid is reached, the yellow pilot lamp "Heating" flash. Having settled the digital thermometer displays the setpoint. starts to ♦ Operating safety The thermostat must be operated only with non-flammable bath liquids, or with flammable bath liquids up to no more than 25 K below their flashpoint, otherwise there is a possibility that a flammable atmosphere may form (see Item 4.2). ♦ WARNING Parts of the bath cover may reach temperatures above 70°C when working at higher temperatures.The outflow and return pipes of the pumps reach the operating temperature. Touching them is dangerous because of high or low temperatures! YACE0050 / 14.03.02 -6- LAUDA Low-temperature thermostats RC 6 CS, RC 20 CS, RC 25 CS, RL 6 CS, RL 7 CS, RK 8 CS, RK 8 KS, RK 20 KS 2. Technical Data to DIN 58966 Type RC 6 CS Operating temperature range Ambient temperature range Temperature setting/ resolution Bath temperature measurement RL 6 CS RL 7 CS (±°C) built-in digital thermometer with LED display ; 0.1°C resolution; absolute accuracy better than 0.2% of reading + 0.2 K*); temperature probe Pt 100 to DIN IEC 751 built-in separate measuring system using external Pt 100 to DIN IEC 751; 4-wire circuit; can be switched to LED display; accuracy 0.05% of reading + 0.1 K (without temperature probe) PID controller with adjustable external proportion and adjustable Xp 0.02*) 0.02*) 0.02*) 0.02...0.05*) 0.02...0.05*) (kW) 20°C (KW) 0°C –30°C –40°C –50°C –60°C –70°C –80°C Safety system Pump output against zero head Pressure/Suction max. pump pressure Pump connections RC 25 CS -35...150 -35...150 -35...150 -80...100 -85...100 5...40 5...40 5...40 5...40 5...40 digital with 10-turn potentiometer and numerical display/ 0.1 °C External temperature measurement Temperature control Temperature variation at –10°C in the bath Heater power, max. Effective cooling capacity with ethanol at 20°C ambient temperature RC 20 CS (°C) (°C) (°C) (l/min) (bar) 2 2 2 1.2 0.46 0.3 0.3 0.3 0.38 0.24 0.24 0.24 0.30 01 0.1 0.1 0.27 ---------0.25 ---------0.23 ---------0.17 ---------0.05 ---------adjustable overtemperature protection and low-level protection to EN 61010 (DIN 12879 class 2) 1.2 0.46 0.38 0.30 0.27 0.25 0.24 0.19 0.11 20/16 0.32/0.25 M 16x1; nipples Ø13 4...6 150x130 160 140 450 280x375 650 35 230; 50 230; 60 22/0.5/M 16x1; nipples Ø13 4...6 120x105 190 150 540 495x615 740 98 230; 50/60 Filling volume max. Bath opening (B x T) Bath depth Usable liquid depth Height to top of bath Overall size (W x D ) (H) Weight Supply (L) (mm) (mm) (mm) (mm) (mm) Loading (max.) without accessories Current take-up (max.) with accessories Nominal current of fuses on customer's side (kW) 2.4 20/16 20/16 20/16 0.32/0.25 0.32/0.25 0.32/0.25 M 16x1; M 16x1; M 16x1; nipples Ø13 nipples Ø13 nipples Ø13 10...14 19...27 4...6 300x175 300x350 120x105 160 200 190 140 180 150 450 575 540 550x735 375x590 495x615 650 775 740 42 54 98 230; 50 230; 50 230; 50 230; 60 230; 60 230; 60 Protection class 1 nach VDE 106 2.5 2.5 2.5 (A) 15 15 15 16 16 (A) T 16 A T 16 A T 16 A T 16 A T 16 A (Kg) (V;Hz) 2.5 Units are conform to EU Guideline 89/336/EWG (EMC) and 73/23/EWG (low-voltage) and carry the CE mark (230 V; 50 Hz). Ref.-No. 230V; 50Hz 230V; 60Hz 230V; 50/60Hz LCK 170 LCK 270 ---- LCK 172 LCK 272 ---- LCK 174 LCK 274 ---- LCK 182 LCK 282 ---- ------LCK 085 Units of different power supplies have different heating capacities as well as different values for power consumption (see type lable)! *) siehe 4.3 Technical changes reserved! YACE0050 14.03.02 -7- LAUDA Low-temperature thermostats RC 6 CS, RC 20 CS, RC 25 CS, RL 6 CS, RL 7 CS, RK 8 CS, RK 8 KS, RK 20 KS Typ RC 8 CS Operating temperature range Ambient temperature range Temperature setting/ resolution Bath temperature measurement (±°C) built-in digital thermometer with LED display ; 0.1°C resolution; absolute accuracy better than 0.2% of reading + 0.2 K*); temperature probe Pt 100 to DIN IEC 751 built-in separate measuring system using external Pt 100 to DIN IEC 751; 4-wire circuit; can be switched to LED display; accuracy 0.05% of reading + 0.1 K (without temperature probe) PID controller with adjustable external proportion and adjustable Xp 0.02*) 0.02*) 0.02*) Temperature control (kW) 20°C (KW) 0°C –30°C –40°C –50°C –60°C –70°C –80°C Safety system Pump output against zero head Pressure/Suction max. pump pressure Pump connections Filling volume max. Bath opening (B x T) Bath depth Usable liquid depth Height to top of bath Overall size (W x D ) (H) Weight Supply Loading (max.) without accessories Current take-up (max.) with accessories Nominal current of fuses on customer's side RK 20 KS -50...150 -45...150 -40...150 5...40 5...40 5...40 digital with 10-turn potentiometer and numerical display/ 0.1 °C External temperature measurement Temperature variation at –10°C in the bath Heater power, max. Effective cooling capacity with ethanol at 20°C ambient temperature RC 8 KS (°C) (°C) (°C) (l/min) (bar) 2 2 2 0.8 0.8 0.8 0.7 0.7 0.7 ---------0.12 0.12 0.14 ------0.03 ---------------------------adjustable overtemperature protection and low-level protection to EN 61010 (DIN 12879 class 2) (kW) 20/24/18 24/18 0.3/0.5/0.34 0.5/0.34 M 16x1; nipples Ø13 M 16x1; nipples Ø13 M 16x1; nipples Ø13 5.5...8 5.5...8 11...18 150x130 150x130 300x175 200 200 200 180 180 180 575 575 575 400x500 400x500 400x500 775 775 775 62 62 62 230; 50 230; 50 230; 50 230; 60 230; 60 230; 60 Protection class 1 nach VDE 106 2.7 2.7 2.7 (A) 16 16 16 (A) T 16 A T 16 A T 16 A (L) (mm) (mm) (mm) (mm) (mm) (Kg) (V;Hz) Units are conform to EU Guideline 89/336/EWG (EMC) and 73/23/EWG (low-voltage) and carry the CE mark (230 V; 50 Hz). Ref.-No. 230V; 50Hz 230V; 60Hz LCK 176 LCK 276 LCK 178 LCK 278 LCK 180 LCK 280 Units of different power supplies have different heating capacities as well as different values for power consumption (see type lable)! *) siehe 4.3 Technical changes reserved! YACE0050 / 14.03.02 -8- LAUDA Low-temperature thermostats RC 6 CS, RC 20 CS, RC 25 CS, RL 6 CS, RL 7 CS, RK 8 CS, RK 8 KS, RK 20 KS LED-Display LED-Display Indication LED Temperatureinstellung Temperature adjustment Ajsutage de témperature Taster „DisplayUmschaltung“ Key „Shift display“ and „Setpoint“ Touche „Commutation d’affichage“ et „Valeur de consigne“ Arretierung Locking device Arrètage Kontrollleuchte „Kühlung“ (nur bei Option MVC) Pilot lamp „Cooling“ (only at option MVC) Lampe témoin „Réfroidissement“ (uniquement en cas d’option MVC) Kontrollleuchte „Störung“ Pilot lamp „Fault“ Lamp „Perturbation“ Externreglereinstellung Adjustment of external controller Ajustage du régulateur externe Netzschalter Mains switch Interrrupteur général Kontrollleuchte „Heizung“ Pilot lamp „Heating“ Lampe témoin „Chauffage“ Taster „Entsperren“ Push button „Reset“ Touche „Réarmement“ Übertemperatureinstellung Overtemperature adjustment Ajustage de surtémperature Steckverbindung für Schnittstelle SAD (OPTION) Plug connector for interface analog/ digital (OPTION) Connecteur pour interface analogue/ digit (OPTION) Buchse für ext. Pt 100 Socket for external Pt 100 Douille pour sonde Pt 100 externe Abgleichpotentiometer für ext. Pt 100 Trimming potentiometer for external Pt 100 Potentiomètre de tarage pour Pt 100 ext. Netzspannungsausgang Mains supply output Sortie tension secteur Einstellung Xp Adjustment Xp Ajustage Xp Pumpenstutzen Pump nozzles Tubulures de pompe Multifunktionsanschluss Multifunction connector Connecteur d’entréesorties YACE0050 14.03.02 -9- LAUDA Low-temperature thermostats RC 6 CS, RC 20 CS, RC 25 CS, RL 6 CS, RL 7 CS, RK 8 CS, RK 8 KS, RK 20 KS YACE0050 / 14.03.02 - 10 - LAUDA Low-temperature thermostats RC 6 CS, RC 20 CS, RC 25 CS, RL 6 CS, RL 7 CS, RK 8 CS, RK 8 KS, RK 20 KS 3. General construction and technical description 3.1 Operating principle The LAUDA bath/circulation thermostats Series RC, RL and RK with Electronics S differ in bath volume, bath depth, pump type and output as well as in cooling capacity and working temperature range (see also Item 3.6). Laboratory thermostats operate with liquids (operating medium, heat transfer fluid) which serve for energy transfer to the product to be thermostated. The thermostated products can be immersed in the thermostatic bath (bath thermostat), or placed in an external open bath whose liquid is circulated by the pump of the thermostat. When operating as circulator the thermostatic liquid is pumped through an external heat exchanger arranged by the user in which the product is being thermostated (jacketed vessels, reactors, heat exchangers). 3.2 Material All materials in contact with the bath liquid are made from high-grade stainless steel or materials of similar anti-corrosion properties. Materials of PTFE and PETP are also used in the thermostats Series RL. 3.3 Pump All units except Type RK 8 CS are equipped with a centrifugal pressure/suction pump. This can be used to operate both external open baths and closed external systems (reactors). The immersion pumps are supplied in the two performance classes C and K. The thermostat RK 8 CS is fitted with a pure pressure pump since this unit operates specially with external circulation The pumps are driven by external-runner motors with a continuous shaft (except for RL). The pumps operate perfectly up to a viscosity of approx. 70 mm2/s (RK 8 CS approx. 120 mm2/s), with the pump output decreasing rapidly with increasing viscosity. YACE0050 14.03.02 - 11 - LAUDA Low-temperature thermostats RC 6 CS, RC 20 CS, RC 25 CS, RL 6 CS, RL 7 CS, RK 8 CS, RK 8 KS, RK 20 KS Pump characteristic 230 V; 50 Hz 3.4 Control The units employ a Pt 100 resistance thermometer for measuring the bath temperature. The temperature is indicated on a green LED display. The setpoint is selected on a 10-turn precision potentiometer with locking device and is indicated on the LED display. A PID controller produces fully electronic control of the tubular heater (in the bath) using a triac with burst firing action. Tubular heaters with a surface loading of approx. 6 W/cm2 are employed. YACE0050 / 14.03.02 - 12 - LAUDA Low-temperature thermostats RC 6 CS, RC 20 CS, RC 25 CS, RL 6 CS, RL 7 CS, RK 8 CS, RK 8 KS, RK 20 KS 3.5 External controller An additional signal circuit permits connection of an external Pt 100 resistance thermometer to DIN IEC 751 whose indication can be switched to the display; a proportion of this signal can be coupled into the control system. This arrangement greatly reduces the influence of disturbances on the temperature in the external consuming device. The external measurement is also available on the multifunction connector 23 S (see Item 3.7). Pin connections socket 10 S Pt 100 Pin 1 +I current path Pin 2 +U voltage path Pin 3 -I current path Pin 4 -U voltage path Pt 100 4-pin plug for Pt 100 connection Cat. No. EQS 014 Use screened connecting cables. Connect screen to plug case. Cover connectors not in use with protective caps! 3.6 Refrigeration system The refrigeration system consists essentially of a hermetically sealed compressor. The condensation and motor heat is dissipated through a fan cooled finned tube condenser. Fresh air is drawn in at the front, heated and discharged at the back and the sides. To ensure problem-free air circulation the ventilation openings must not be restricted. The compressors are fitted with a temperature monitor which responds to the compressor temperature and its current take-up. The cooling system is additionally protected against excessive pressure by a pressure monitor. RC-units For working temperatures below approx. 40°C the refrigeration system is running continuously and removes a certain amount of heat from the bath, the heater operates against this with the heating power which is automatically adjusted by the control circuit. RL-units Thermostats Series RL work with continuous heating (similar to RC units). Their refrigeration unit consists of a two-circuit cascade with electronic starting control of the lowtemperature stage. RK-units The more powerful refrigeration unit is operated by the automatic electronic compressor control. The LAUDA proportional cooling system controls the cooling capacity through solenoid valves with sound insulation, using the PID temperature controller. This ensures minimum energy consumption and minimal environmental warming on fully automatic operation over the entire working temperature range with differing load conditions. YACE0050 14.03.02 - 13 - LAUDA Low-temperature thermostats RC 6 CS, RC 20 CS, RC 25 CS, RL 6 CS, RL 7 CS, RK 8 CS, RK 8 KS, RK 20 KS Diagram cooling circuit RC F1 J1 J2 J3 J4 J5 M2 M3 Überdruckschalter Trocker Kapillarrohr Verdampferschlange Flüssigkeitsbad Verflüssiger Verdichter Ventilator YACE0050 / 14.03.02 Overpressure switch Drier Capillary Evaporator coil Liquid bath Condenser Compressor Fan - 14 - Disjoncteur de surpression Secheur Tube capillaire Evaporateur à serpentins Bain de liquide Condensateur Compresseur Ventilateur LAUDA Low-temperature thermostats RC 6 CS, RC 20 CS, RC 25 CS, RL 6 CS, RL 7 CS, RK 8 CS, RK 8 KS, RK 20 KS RK F1 J1 J2 J3 J4 J5 J6 J7 J8 M2 M3 Y1 Überdruckschalter Verflüssiger Sammelflasche Trocker Flüssigkeitsabscheider Nachspritzventil Einspritzventil Flüssigkeitsbad Verdampfer Verdichter Ventilator Magnetventil Kühlen Overpressure switch Condenser Receiver Drier Liquid separator Re-injection valve Injection valve Liquid bath Exchanger Compressor Fan Solenoid valve cooling Y2 Magnetventil Heißgas Solenoid valve hot gaz YACE0050 14.03.02 - 15 - Disjoncteur de surpression Condensateur Réceveur Secheur Separateur de liquide Soupape de rè-injection Soupape d’injection Bain de liquide Echangeur Compresseur Ventilateur Vanne solenoide réfroidissement Vanne solenoide LAUDA Low-temperature thermostats RC 6 CS, RC 20 CS, RC 25 CS, RL 6 CS, RL 7 CS, RK 8 CS, RK 8 KS, RK 20 KS RL F1 F2 J1 J2 J3 J4 J5 J6 J7 J8 J9 J 10 J 11 J 12 J 13 Überdruckschalter Stufe 1 Überdruckschalter Stufe 2 Flüssigkeitsabscheider Kontrollventil Saugseite Stufe 1 Verflüssiger Stufe 1 Sammelflasche Filtertrockner Expansionsventil Stufe 1 Kontrollventil Druckseite Stufe 1 Wärmetauscher Verdampfer Stufe 1 Verflüssiger Stufe 2 Absperrventil Expansionsventil Stufe 2 Verdampfer Flüssigkeitsbad Wärmetauscher Flüssigkeitsunterkühler Stufe 2 J 14 Druckausgleichsbehälter J 15 Kontrollventil Saugseite Stufe 2 Absperrventil Kontrollventil Druckseite Stufe 2 Wärmetauscher Enthitzer Stufe 2 Ölabscheider Absperrventil Schauglas Stufe 1 Schauglas Stufe 2 Verdichter Stufe 1 Ventilator Verdichter Stufe 2 Magnetventil Druckausgleich J 16 J 17 J 18 J 19 J 20 J 21 J 22 M1 M2 M3 Y4 YACE0050 / 14.03.02 Overpressure switch stage 1 Overpressure switch stage 2 Liquid separator Control valve suction stage 1 Disjoncteur de surpression étage 1 Disjoncteur de surpression étage 2 Separateur de liquide Vanne de contrôle aspiration étage 1 Condenser stage 1 Receiver Filter drier Expansion valve stage 1 Control valve pressure stage 1 Condensateur étage 1 Receveur Déshydrateur Vanne d’expansion étage 1 Vanne de contrôle pression étage 1 Heat exchanger Exchanger stage 1 Condenser stage 2 Shut-off valve Expansion valve stage 2 Exchanger Liquid bath Heat exchanger Liquid refrigerant pre-cooler stage 2 Surge vessel Echangeur thermique Echangeur étage 1 Condensateur étage 2 Vanne d‘arret Vanne d’expansion étage 2 Echangeur Bain de liquide Echangeur thermique Surrefroidisseur Liquide réfrigérant étage 2 Réservoir d’égalisation de pression Control valve suction stage 2 Vanne de contrôle aspiration étage 2 Shut-off valve Control valve pressure stage 2 Vanne d‘arret Vanne de contrôle pression étage 2 Heat exchanger Heat remover stage 2 Oil separator Shut-off valve Sight glass stage 1 Sight glass stage 2 Compressor stage 1 Fan Compressor stage 2 Solenoid valve pressure compensation Echangeur thermique Extracteur de chaleur étage 2 Separateur d’huile Vanne d’arret Voyant étage 1 Voyant étage 2 Compresseur étage 1 Ventilateur Compresseur étage 2 Vanne solenoide compensation de pression - 16 - LAUDA Low-temperature thermostats RC 6 CS, RC 20 CS, RC 25 CS, RL 6 CS, RL 7 CS, RK 8 CS, RK 8 KS, RK 20 KS Cooling diagram Bath liquid: Ethanol YACE0050 14.03.02 Refrigerant: Time for diagram water-Glycol 1:1 (to –25°C) = x 1,7 - 17 - LAUDA Low-temperature thermostats RC 6 CS, RC 20 CS, RC 25 CS, RL 6 CS, RL 7 CS, RK 8 CS, RK 8 KS, RK 20 KS 3.7 Multifunction connector 15-pin connector 23 S on the back, with multiple function. Use screened connecting cables. Connect screen to plug case. Cover connectors not in use with protective caps! Pin 1: bath temperature recorder connection, correct sign; 10 mV/K; Ri ≈100 Ohm, internal recorder resistance ≥ 1 MOhm (0V pin 3) Pin 2: Pt 100 EXT; 4-wire; - current path Pin 3: 0V reference potential for measurement signals Pin 4: programme or external setpoint input 10 mV/K, added to the selected setpoint. The sum of both setpoints is displayed on pressing key Ri = 20 kOhm (0V pin 3) . Pin 5: output signal, only for accessory units (0V pin 12) Pin 6: setpoint output 10 mV/°C, Ri ≈ 100 Ohm. Load resistance ≥ 10 kOhm (0V pin 3) Pin 7: +12 V supply voltage, max. additional loading 20 mA Pin 8: reference voltage approx. 5 V, load resistance ≥ 10 kOhm (0V pin 3) Pin 9: Pt 100 EXT; 4-wire; - voltage path Pin 10: -12 V supply voltage, max. additional loading 20 mA (0V pin 12) Pin 11: Pt 100 EXT; 4-wire; + current path Pin 12: 0V- load reference potential Pin 13: 18 V, if red fault lamp is alight, i.e. safety circuit to DIN 12879 has operated. Ri ≈ 1 kOhm; I max = 10 mA (0V pin 12) Pin 14: recorder connection for external temperature, correct sign, 10 mV/K, Ri ≈ 100 Ohm; internal recorder resistance ≥ 1 MOhm (0V pin 3) Pin 15: Pt 100 EXT; 4-wire; + current path Pins 2, 9, 11 and 15 Pt 100 EXT are parallel to socket 10 S. They must not be connected up if socket 10 S is in use. In case of a fault the signals appearing at this connector can usefully be employed for the initial investigation of the fault. 15-pin connector Cat. No. EQM 030 Housing for above Cat. No. EQG 017 YACE0050 / 14.03.02 - 18 - LAUDA Low-temperature thermostats RC 6 CS, RC 20 CS, RC 25 CS, RL 6 CS, RL 7 CS, RK 8 CS, RK 8 KS, RK 20 KS 3.8 Mains supply output 34 H The 230 V supply voltage is available at the socket 34 H at the back in normal operation and with the unit switched on. The maximum current which can be drawn there is 2 A. In case of a fault this voltage is switched off. This output can be used e.g. to connect a nonreturn fitting (Cat. No. UD 125). Suitable mating plug 3.9 Cat. No. EQS 045 Remote operation (FBC) Option As an option the units can be converted for remote control; the entire electronics with control panel is removed from the unit and used for remote operation. An adapter for the cable connections is required on the basic unit and the control panel is placed in an extra housing. The conversion must be carried out by a qualified electrician. All necessary components except for the connection cables are supplied as part of the kit. Please specify the length of the connection cables. Conversion kit for remote operation FBC Cat. No. LCZ 960 Set of cables for remote operation FBC 5 m long Cat. No. UK 235 Set of cables for remote operation FBC length as specified Cat. No. UK 238 19" adapter to take the control panel of the remote operation system FBC 5 HE for one or two panels Cat. No. LRZ 009 3.10. SAD-connection to NE 28 (Option) The connector according to NAMUR recommendation NE 28 is located at the back of the control unit if option SAD is fitted. Use screened connecting cables. Connect screen to plug case. Cover connectors not in use with protective caps! 8 S: Pt 100 connection (EXT) (Lemosa plug) 1 = Pt 100 (EXT) I+ 2 = Pt 100 (EXT) U+ 3 = Pt 100 (EXT) U- 4 = Pt 100 (EXT) I- 4-pin plug for Pt 100 conne Cat. No. EQS 022 Note: only one of the Pt 100 inputs, socket 10 S or 8 S, may be used at a time! YACE0050 14.03.02 - 19 - LAUDA Low-temperature thermostats RC 6 CS, RC 20 CS, RC 25 CS, RL 6 CS, RL 7 CS, RK 8 CS, RK 8 KS, RK 20 KS 54 S: signal connection 1 2 3 4 = = = = 5 6 = = external temperature 0 - 10 V (0 V = -100°C / 10 V = 400°C) internal temperature 0-10 V (0 V = -100°C / 10 V = 400°C) earth of measurement signals (pin 1, 2, 5) control signal 4 - 20 mA (4 mA = -100°C / 20 mA = 400°C). at 0°C setpoint setting! control signal 10 mV/°C (parallel to MF 23 S pin 4) earth of the control signal (linked int. to pin 3) 6-pin mating plug Cat. No. EQS 057 Note: of the three control signal (programmer) inputs (23 S pin 4, 54 S pin 4 and 5) only one pin may be used at a time! 12 N: 1 2 3 1, 2 floating contact general fault = = = = n.o. (closing) common n.c. (opening) are closed under normal conditions 3-pin mating socket 14 N: 1 2 3 Cat. No. EQD 047 contact input, fault = = = n.o. (closing) common not used mating plug with link 1, 2 is included in the unit 3-pin mating plug Cat. No. EQS 048 Interface SAD to NE 28 factory fitted or retrofit kit Cat. No. LCZ 959 YACE0050 / 14.03.02 - 20 - LAUDA Low-temperature thermostats RC 6 CS, RC 20 CS, RC 25 CS, RL 6 CS, RL 7 CS, RK 8 CS, RK 8 KS, RK 20 KS 4. Safety devices and warning notes 4.1 Safety functions The built-in overtemperature limiter is adjustable with a tool (screwdriver) between 0°C and 150°C (resp. 100°C). The bath temperature is sensed by a separate Pt 100 resistance thermometer and processed by a separate electronics. When exceeding the set switching point the unit is switched off permanently on all poles (limiter function). lights up and at the multifunction connector 23 S a signal of The red signal lamp approx. 18 V appears at contact 13. A float switch with magnetic coupling acts as low-level cut-out and also switches off the unit (pump and heater) permanently on all poles. The switch-off function of the safety circuit remains stored during a break in the supply or after switching off the supply. Reset is possible only after rectifying the fault, using the reset key . The safety devices are conform to EN 61010-2-010. The pump motor is fitted with a temperature monitor which switches off if the motor winding overheats. The heater is also switched off simultaneously. After the motor winding has cooled down the pump starts up automatically. 4.2 Why can a thermostat be dangerous? Thermostats are equipped with heaters which supply the necessary heat to the thermostating liquid. If the temperature control fails or if the liquid level is too low, the heater may reach temperatures which can lead to a fire in the laboratory, especially in combination with flammable liquids. When using the thermostat as a circulation thermostat a hose may break, causing hot liquid to spill and endangering people and goods. The safety requirements on thermostats therefore depend on whether • non-flammable or flammable liquids are used • operation is with or without supervision. The thermostats described in these Operating Instructions are protected against overtemperature and low liquid level if used according to the descriptions indicated in these Operating Instructions. The units can be operated with non-flammable bath liquids, and with flammable bath liquids up to 25 K below their flashpoint (EN 61010), while DIN 12879 requires a safety spacing of only 5 K to the flashpoint. In each case it is assumed that there is correct adjustment and regular testing (see Item 8.6) of overtemperature and low-level protection. 4.3 Important notes The user is only protected against those hazards which are caused by exceeding the temperature and by low liquid level. Further hazards may arise from the type of product being thermostated, e.g. a shift above or below certain temperature levels or fracture of the container and a reaction with the thermostatic liquid etc. YACE0050 14.03.02 - 21 - LAUDA Low-temperature thermostats RC 6 CS, RC 20 CS, RC 25 CS, RL 6 CS, RL 7 CS, RK 8 CS, RK 8 KS, RK 20 KS Values for temperature variation and indication accuracy apply under normal conditions according to DIN 58966. In special cases high-frequency electromagnetic fields may lead to less favourable values. There is no loss of safety. Units are in accordance with EMC directive EN 61326-1, class A *: Units are only suitable for use in industrial areas as disturbing voltage fluctuations might occur. Warning: The units must only be used according to the descriptions indicated in the Operating Instructions. This includes operation by properly qualified and instructed personnel. The units are not designed for operation under medical conditions according to EN 60601-1 or IEC 601-1! 4.4 Warning notes 4.4.1 Temperatures Parts of the bath cover may reach temperatures above 70°C when working at higher temperatures. The outflow and return pipes of the pumps reach the operating temperature. Touching them is dangerous because of high or low temperatures! 4.4.2 Mains connection Connect the unit only to mains sockets with protective earth contact (PE) which must not have a fuse higher than T 16 A! 4.4.3 Mains cable We have ensured that the mains cable and other plug connections do not touch any hot parts. Please check that there is no contact between the connecting tubings filled with hot liquid, other hot parts and the mains cable! 4.4.4 Fume extraction Depending on the bath liquid used and the operating method there is a possibility that toxic vapours may be produced. In that case it is necessary to provide appropriate fume extraction. Pull out the mains plug before cleaning the bath with solvents. Provide appropriate fume extraction. Before starting up the unit it is absolutely essential to ensure that the bath contains no explosive mixture. If necessary purge it with nitrogen! 4.4.5 Steam production When changing the bath liquid from water to heat transfer fluids for temperatures above 100°C any remaining water - including the one in the hoses and external system - has to be removed completely. Otherwise there is a danger of burns because of delayed boiling. * Notice only valid for EU countries YACE0050 / 30.04.02 - 22 - LAUDA Low-temperature thermostats RC 6 CS, RC 20 CS, RC 25 CS, RL 6 CS, RL 7 CS, RK 8 CS, RK 8 KS, RK 20 KS 5. Bath liquids and hose connections The operating temperature ranges specified for the bath liquids and the tubings are for general information only and may be restricted through the operating temperature range or safety requirements specified in the appropriate standards (see Item 4.2). 5.1 Bath liquids Firepoint Working temperature range Chemical Designation Viscosity (kin) Viscosity (kin) at Temperature Former designation from °C to °C at 20°C mm²/s mm²/s Water +5...+90 deionised -- -- -- LAUDA Designation Ref.No. Quantity 5l 10 l 20 l water ➀ Kryo 20 160 MS -20...+180 Silicone oil 11 28 at -20°C > 230 LZB 116 LZB 216 LZB 316 Kryo 30 ➁ G 100 ➁ -30...+90 Monoethyleneglycol/water 4 50 at -25°C -- LZB 109 LZB 209 LZB 309 UltraTherm XLT -85...+30 Silicone oil 1,76 17 at -80°C > 56 LZB 113 LZB 213 LZB 313 Ultra 350 330 SCB +30...+200 synthetic thermal oil 47 28 bei +30°C > 240 LZB 107 LZB 207 LZB 307 Ultra 300 UltraTherm SW 300N +80...+300 Silicone oil 170 35 ... +80°C > 400 LZB 108 LZB 208 LZB 308 Kryo 85 ☞ ① At higher temperatures ! Evaporation losses ! Use bath covers (➾ Section 10. Accessories). Distilled water or fully deionised water must only be used with the addition of 0.1g sodium carbonate (Na2CO3) /l water, otherwise! danger of corrosion! ➁ Water content falls after prolonged operation at higher temperatures ! mixture becomes flammable (flash point 128 °C). ! Check the mixture ratio with a densitometer. − When selecting bath liquids it should be noted that performance must be expected to worsen at the lower limit of the operating temperature range due to increasing viscosity. The full operating range should only be utilised if really necessary. − The operating ranges of the bath liquids and tubing represent general data which may be limited by the operating temperature range of the unit. Silicone oil causes pronounced swelling of Silicone rubber ! never use Silicone oil with Silicone tubing! DIN Safety data sheets are available on request! YACE0050 14.03.02 - 23 - LAUDA Low-temperature thermostats RC 6 CS, RC 20 CS, RC 25 CS, RL 6 CS, RL 7 CS, RK 8 CS, RK 8 KS, RK 20 KS 5.2 Hose connections Tubing type Int. dia. Ø mm 9 EPDM-tubing uninsulated Temperature range °C 10...120 Application Ref. No. for all bath liquids RKJ 111 except Ultra 350 and mineral oils EPDM-tubing insulated 9 -60...120 LZS 019 for all bath liquids except Ultra 350 and mineral oils EPDM-tubing uninsulated 12 10...120 RKJ 112 for all bath liquids except Ultra 350 and mineral oils EPDM-tubing insulated 12 ext. dia. 35mm approx. -60...120 Silicone tubing, uninsulated 11 -30...100 Silicone tubing, insulated 11 ext. dia. 35mm approx. -60...100 LZS 021 for all bath liquids except Ultra 350 and mineral oils RKJ 059 water, water/glycol mixture water, water/glycol mixture LZS 007 − EPDM-tube not for Ultra 350 and mineral oils! − Silicone oil causes pronounced swelling of Silicone rubber ! never use Silicone oil with Silicone tubing! − Protect tubing with hose clips against slipping off. Metal hoses single-layer insulation MC 50 MC 100 MC 150 MC 200 Pump link Metal hoses with insulation MK 50 MK 100 MK 150 MK 200 Pump link YACE0050 / 21.06.02 Tube Ø i (mm) connection M 16x1 M 16x1 M 16x1 M 16x1 M 16x1 10 10 10 10 10 Tube Ø i (mm) connection M 16x1 10 M 16x1 10 M 16x1 10 M 16x1 10 M 16x1 10 Ø a (mm) Temperature range °C Length Ref. No. 18 18 18 18 18 -10...400 -10...400 -10...400 -10...400 -10...400 50 100 150 200 20 LZM 040 LZM 041 LZM 042 LZM 043 LZM 044 Ø a (mm) Temperature range °C -90...150 -90...150 -90...150 -90...150 -90...150 Length Ref. No. 50 100 150 200 20 LZM 052 LZM 053 LZM 054 LZM 055 LZM 045 44 44 44 44 44 - 24 - LAUDA Low-temperature thermostats RC 6 CS, RC 20 CS, RC 25 CS, RL 6 CS, RL 7 CS, RK 8 CS, RK 8 KS, RK 20 KS Metal hoses with Insulation MGK 50 MGK 100 MGK 150 MGK 200 Tube Ø i (mm) connection M 19x1,5 12 M 19x1,5 12 M 19x1,5 12 M 19x1,5 12 Ø a (mm Metal hoses with triple insualtion MC 50 S MC 100 S MC 150 S MC 200 S Tube Ø i (mm) connection Ø a (mm M 16x1 M 16x1 M 16x1 M 16x1 10 10 10 10 36 36 36 36 34 34 34 34 Temperature range °C -90...150 -90...150 -90...150 -90...150 Length Ref. No. 50 100 150 200 LZM 056 LZM 057 LZM 058 LZM 059 Temperature range °C Length Ref. No. -60...350 -60...350 -60...350 -60...350 50 100 150 200 LZM 046 LZM 047 LZM 048 LZM 049 Further details on thermostatic liquids and hoses can be found in our special publication. YACE0050 14.03.02 - 25 - LAUDA Low-temperature thermostats RC 6 CS, RC 20 CS, RC 25 CS, RL 6 CS, RL 7 CS, RK 8 CS, RK 8 KS, RK 20 KS 6. Unpacking, assembly and setting up 6.1 Unpacking Goods are packed carefully, largely preventing transport damage. If unexpectedly some damage is visible on the equipment, the carrier or the postal authority has to be informed so that it can be inspected. Standard accessories: 1 Bath cover 1 Bath cover 2 Bath cover 1 Bath cover 1 Bath cover 2 Nipplex 13 Ø 2 Screw caps 2 Closing plugs 1 Pump link Pump link Operating instructions 6.2 for RC 6 CS for RC 20 CS, RK 20 KS for RC 25 CS for RL 6 CS, RL 7 CS for RK 8 CS, RK 8 KS nicht bei RK 8 CS bei RK 8 CS Ref. No. HDQ 070 HDQ 067 HDQ 067 and HDQ 068 HDQ 073 HDQ 042 HKO 026 HKM 032 HKN 065 LZM 045 Setting up, operation as bath thermostat Set up the unit conveniently so that the control panel is towards the front and ensure that the air circulation for the refrigeration system through the grid in the lower part of the unit and the ventilating openings at the back of the unit is not restricted. On air-cooled units a minimum spacing of 40 cm between grid and wall is recommended. Close the drain cock at the back of the bath! When operating as bath thermostat - no external system connected up - it is advisible to ensure internal circulation by removing the closing plugs from the pump flow and return connections. Remove the screw caps and link the pump connections together using a piece of tubing. As a permanent arrangement the hose link of flexible insulated metal tubing (Cat. No. LZM 045) is the best and safest solution. NOTE: When loosening or tightening the screw caps (19 mm a/f), hold the threaded nipple on the tubing connections with a spanner (14 mm a/f)! YACE0050 / 14.03.02 - 26 - LAUDA Low-temperature thermostats RC 6 CS, RC 20 CS, RC 25 CS, RL 6 CS, RL 7 CS, RK 8 CS, RK 8 KS, RK 20 KS 7. Connection of external systems 7.1 Closed external circuits Remove the closing plugs by releasing the threaded rings (19 mm a/f) from the outflow and return connections and replace them by the tubing nipples (13 mm dia.) supplied. If the thermostat is connected to closed external circuits, additional liquid must be poured in after the thermostat is switched on until the level in the bath remains at the correct height (approx. 2 cm below top plate). At higher operating temperatures it is necessary to allow during filling for the expected expansion in volume of approx. 8% per 100°C. For suitable tubing materials see Section 5. We recommend metal tubings for temperatures above 100°C. With external systems at a high level it may happen even in closed circuits that the external volume drains down and the thermostat tank overflows if the pump is stopped and air enters the thermostated system! Always ensure the maximum possible flow area in the external circuit (nipples, tubing, system). This results in a larger flow and therefore improved thermostatic control. Always protect tubing with hose clips against slipping off, or use stainless steel hoses with screwed connections. NOTE: When loosening or tightening the screw caps (19 mm a/f) at the tubing connections hold the threaded nipple with a spanner (14 mm a/f)! 7.2 Open systems (baths) The units (except for RK 8 CS) are equipped with a pressure/suction pump. This can be used for circulation to closed external circuits at higher pump outputs and in particular also to open external baths. There are two possibilities for maintaining the level in external baths: 1. The suction tubing is mounted in the external bath so that its end is at the required liquid level. The flow of the pressure stage is restricted with a tubing clamp on the hose from the pressure connection to the external bath so that the flow of the pressure stage is restricted slightly below that of the suction stage. This becomes noticeable by the entry of air into the suction tubing. This operating method is not recommended, in particular at temperatures below 0°C and when using oil at elevated temperatures 2. The preferred solution is the use of the LAUDA level controller (Cat. No. LPZ 901) which provides the functions of adjustable level control with float, srew-on connetion for external bath, and clamp fitting for 4 mm dia. Pt 100 probe. YACE0050 14.03.02 - 27 - LAUDA Low-temperature thermostats RC 6 CS, RC 20 CS, RC 25 CS, RL 6 CS, RL 7 CS, RK 8 CS, RK 8 KS, RK 20 KS Fitting the level controller Ref.No. LPZ 901 The level controlleris mounted on the external bath using the screw clamp ➀. The mounting is suitable for both round and rectangular baths. Height adjustment after loosening the screw ➁. Make sure that there is good circulation and that the float can move freely! Make the hose connections to the thermostat, connect the pressure nipple ➃ to the pressure side and the suction nipple ➄ to the suction side (see diagram). Clamp fitting for Pt 100 probe (4 mm dia.) The clamp ➅ is not required on these units! YACE0050 / 23.04.02 - 28 - LAUDA Low-temperature thermostats RC 6 CS, RC 20 CS, RC 25 CS, RL 6 CS, RL 7 CS, RK 8 CS, RK 8 KS, RK 20 KS It is advisable to set up the external bath at the same level. If the difference in level between the open external bath and the thermostat bath is greater than 0.5 m there is the possibility in certain applications that the control range of the level controller is not sufficient. With higher external bath level the suction hose should then be clamped off to such an extent that a constant level in the bath is obtained at which the float is within its control range. If the external level is low the pressure hose has to be similarly restricted by partly clamping it off. WARNING: If thermostat and external bath are not at the same level it is essential to provide venting of the connecting hoses when the pump is swiched off in order to prevent overflowing. It is preferable to use the Non-Return Fitting (see Accessories) which is mounted at the highest point of hose connection (bath or thermostat connection) and which is linked electrically to the mains output 34 H. Non-Return Fitting Ref.No. UD 125 Always protect tubing with hose clips against slipping off, or use stainless steel hoses with screwed connections. NOTE: When tightening the screw caps (19 mm a/f) at the tubing connections, hold the threaded nipple with a spanner (14 mm a/f)! YACE0050 14.03.02 - 29 - LAUDA Low-temperature thermostats RC 6 CS, RC 20 CS, RC 25 CS, RL 6 CS, RL 7 CS, RK 8 CS, RK 8 KS, RK 20 KS 8. Starting up 8.1 Filling Fill the unit with bath liquid to suit the operating temperature, see Section 5. The filling volume is given under Technical data. In general the thermostat must be filled no higher than 2 cm below the cover plate. When working with thermal oils (e.g. Ultra-Therm 330 SCB) slightly less liquid should be used to allow for expansion. The level must obviously not fall below the minimum, otherwise the low-level protection swiches off the unit (see Safety circuit). The same applies to filling an external system by the pump during start-up. 8.2 Connection to supply Connect the unit only to an earthed socket (PE). Compare the details on the label with the mains voltage (see Item 4.4.2). Model according to EMC directive EN 61326-1 (industrial areas only)!* When working without external system, ensure that the pump connections are linked together (metal hose link Cat. No. LZM 045), or use the closing plugs. 8.3 Basic functions Set potentiometer EXT fully anticlockwise (INT)! Set the potentiometer for the overtemperature switch-off point to suit the required operating temperature, with due consideration for the bath liquid. When operating below ambient temperature the overtemperature cut-out setting must of course be above ambient temperature until the operating temperature is reached. Then the switch-off point can be set slightly above the bath temperature (at least approx. 0°C). Types RK: Switch on the unit with the mains switch. The green signal lamp lights up. Depending on the temperature setting and the energy demand the refrigeration system switches on automatically. The signal lamp. indicates the cooling function. Types RC- and RL: Working without refrigeration (operating temperatures above approx. 40°C) mains switch (green) on I (ON) (green lamp lights up) Cooling" switch (yellow) on 0 (OFF) Working with refrigeration (operating temperature below approx. 40°C) * Notice only valid for EU countries YACE0050 / 14.03.02 - 30 - LAUDA Low-temperature thermostats RC 6 CS, RC 20 CS, RC 25 CS, RL 6 CS, RL 7 CS, RK 8 CS, RK 8 KS, RK 20 KS mains switch (green) on I (ON) (green lamp lights up) "Cooling" switch (yellow) on I (ON) With thermostats Series RL the green LED stage. shows the operation of the low-temperature Depending on the application the low-temperature stage starts running after a period of approx. 10 s to 20 min after the starting of the refrigeration unit. Briefly press the left key Int. The bath temperature is indicated. When the red signal lamp lights up, briefly press the reset key . Using the keys Int and the display can be switched to bath temperature (Int) or the temperature of the external Pt 100 (Ext) irrespective of the control mode selected (INTEXT). The indication is on the green signal lamps Int and Ext. At the same time the display indicates the setpoint when pressing one of the two keys . To adjust the setpoint press one of the keys release the locking device on the setpoint knob and select the setpoint according to the display. Lock the knob again - release the key. shows the operation of the heater. At the control point this lamp flashes The lamp according to the heater power, or the lamp according to the cooling output. obviously starts to flash After the operating temperature has been lowered the lamp only after the set temperature has been reached (on Types RC and RL). The controller gain Xp can be adjusted on the back of the control unit. The adjustment range 1...5 corresponds to a proportional band of 0.4...16°C referred to the heater control signal. The standard setting at which the unit is shipped from the factory is 3. Usually it is not necessary to change the adjustment. The scale is non-linear with the following values: YACE0050 14.03.02 Xp P-Bereich 1 0,4°C 2 1,5°C 3 2,5°C 4 4,5°C 5 16,0°C - 31 - LAUDA Low-temperature thermostats RC 6 CS, RC 20 CS, RC 25 CS, RL 6 CS, RL 7 CS, RK 8 CS, RK 8 KS, RK 20 KS If there are any control oscilliations, e.g. in small baths with bath liquids of low thermal capacity and high viscosity, Xp is set to the next higher setting (e.g. from 2 to 3). 8.4 External control Connect the Pt 100 resistance thermometer to socket 10 S (see Item 3.5). Switch over the display by pressing the key connected. Ext. The temperature display flashes if no external Pt 100 is on the back of the control unit the external Pt 100 can Using the potentiometer Pt 100 be trimmed to a known temperature. This can be done using the bath temperature, for example, if no other temperature reference is available. When used with external control, i.e. the measurement point for the control parameter is located outside the thermostat at a point selected by the user, the potentiometer EXT can be used to select a value between approx. 50% and 90% for the proportion of the external probe. The closer the external Pt 100 probe is connected with the circulated bath liquid, the higher the external proportion (e.g. 90%) can be chosen.This increases the quality of the control results related to the external measuring points. Suggested setting for a 2 litre jacketed reactor with water-glycol, external resistance thermometer in the product space, product slightly stirred. EXT 90 %, Xp 2. With the selected simple control method there remains a permanent deviation between external controlled temperature and setpoint, depending on the proportion of the external measurement parameter; this deviation has to be compensated by re-adjusting the setpoint! Example: selected potentiometer EXT 80, setpoint 80°C. After the system has settled down, the external measured temperature is 79.5°C. Increase the setpoint by 0.5 K, then the external measured temperature rises to 80°C. 8.5 Operation with programmer A programmer Type PM 351-1 can be connected to the multifunction connector 23 S to vary the setpoint of the thermostat according to a given programme. This requires that the energy balance (heating, cooling, load) of the thermostat matches the requirements of the programme (heating rate, cooling rate, operating temperatures). The plug must not be put into 23 S when adjusting the unit setpoint to the lowest temperature of the programme. This value is entered as value A when programming the programmer. Do not change the unit setpoint any more and put in the plug of the programmer connecting cable. indicates on the digital display the current setpoint which Operation of the push buttons is provided by the programmer and on which the unit is operating. For further details refer to the Operating Instructions for the PM 351-1. YACE0050 / 14.03.02 - 32 - LAUDA Low-temperature thermostats RC 6 CS, RC 20 CS, RC 25 CS, RL 6 CS, RL 7 CS, RK 8 CS, RK 8 KS, RK 20 KS 8.6 Safety circuit The operation of the safety devices of the units has already been described in Item 4.1. After starting up the user should confirm the correct operation of the safety devices. If the unit is operating unsupervised we recommend that this check should be carried out daily. For proper operation of the low-level limiter it is essential that the float switch is operating correctly. This can be checked by draining some of the liquid. When the level drops below the minimum level (about 20 mm above the upper heater winding) the pump and the heater are switched off on all poles. The pilot lamp "Fault " For restarting fill in bath liquid and press the Reset key . To check the overtemperature limiter its switch-off point is gradually reduced. When it is below the value shown on the digital thermometer the unit must switch off as under Item 8.6.1. To distinguish between "Overtemperature" and "Level" faults the dot on the right in the display is flashing when the overtemperature switch-off point has been exceeded. Faults in the temperature probe (break, short circuit) also lead to switch-off and flashing of the right dot in the display. Set the switch-off point again above the bath temperature and operate the Reset key. In case of any failure in Items 8.6.1 and 8.6.2 the unit must immediately be taken out of operation and must be tested by a qualified engineer, otherwise its safety is no longer ensured. YACE0050 14.03.02 - 33 - LAUDA Low-temperature thermostats RC 6 CS, RC 20 CS, RC 25 CS, RL 6 CS, RL 7 CS, RK 8 CS, RK 8 KS, RK 20 KS 9. Maintenance 9.1 Safety notes in case of repairs Always pull out the mains plug for all repair and cleaning operations! Repairs on the control unit with cover removed must only be carried out by a qualified electrician. 9.2 Repairs LAUDA thermostats are largely free from maintenance. Dirty thermostatic liquid should be removed through the drain cock and replaced. If the unit should become faulty it may be advisable to return only the faulty module where appropriate. The control unit can readily be removed after removing the cover, releasing 2 screws ➀ (2 turns) behind the front panel and 2 screws at the rear and disconnecting the electrical connections ➁. The module with pump, heater, temperature probe etc. can also be easily separated from the bath. There is no provision for a fuse for the complete unit since the necessary 16A fuse corresponds to the mains fuse usually provided at the location. The control circuit of the unit has a separate fuse; a fuse 5 x 20 F4A is located in the control unit. This is accessible after removing the cover. When the fuse has blown the green lamp in the mains switch does not light up. 9.3 Maintenance of the refrigeration system The refrigeration system operates largely without maintenance. If the unit is being operated in a dusty atmosphere we recommend cleaning the refrigeration system condenser at intervals of 4 to 6 months. This is best done with compressed air or nitrogen by blowing for a few minutes into the ventilation openings. If necessary unscrew the front grille. YACE0050 / 19.04.02 - 34 - LAUDA Low-temperature thermostats RC 6 CS, RC 20 CS, RC 25 CS, RL 6 CS, RL 7 CS, RK 8 CS, RK 8 KS, RK 20 KS Repair and disposal note The cooling circuit of the types RC is filled with the CFC-free refrigerant R 404 A (HP 62), the cooling circuit of the types RK is filled with the mixture of refrigerants HP 80. The high-temperature stage of the RL-units is filled with CFC-free refrigerant R 404 A; their low-temperature stage is filled with CFC-free refrigerant R 23. Repair and disposal only by a qualified refrigeration engineer! 9.4 Cleaning The unit can be cleaned using a cloth moistened with water with the addition of a few drops of (domestic) detergent. No water must find its way into the control unit. The user is responsible for any necessary decontamination if dangerous materials have been spilled on or inside the unit. This applies in particular if the unit is removed for a different use, for repair, storage etc. The method of cleaning or decontamination is determined by the expertise of the user himself. If the user has any doubts on whether this may damage the unit he has to contact the manufacturer. 9.5 Spares ordering When ordering spares please specify the equipment type and number on the label. This avoids queries and prevents supply of incorrect goods! We shall always be happy to deal with queries, suggestions and complaints. LAUDA DR. R. WOBSER GMBH & CO. KG P.O.Box 1251 GERMANY 97912 Lauda-Königshofen Tel: (+49) (0) 9343/ 503-0 Fax: (+49) (0) 9343/ 503-222 E-mail info @ lauda.de Internet http://www.lauda.de YACE0050 19.04.02 - 35 - LAUDA Low-temperature thermostats RC 6 CS, RC 20 CS, RC 25 CS, RL 6 CS, RL 7 CS, RK 8 CS, RK 8 KS, RK 20 KS Accessories for LAUDA Low-Temperature Thermostats RC and RK RS 232 C Interface R 61/2 Cat. No. LRT 013 Using the RS 232 C (V24) Interface with A/D and D/A converter it is possible with all suitably equipped computers to read out temperatures from the thermostat and to transmit a temperature (setpoint) to the thermostat. In addition the fault signal can be called up. Programming and automatic running of ramps and contact programming are possible. Connecting cable PM 351-1 or R 61/2 to thermostat Cat. No. UK 085 length 1.2 m Racks in stainless steel for test tubes, centrifuge tubes etc. Bath RC 20 up to 2 racks 13 RD 18/1 RD 18/2 RD 30 for 56 tubes 10 - 13 dia., 80 mm immersion for 33 tubes 14 - 18 dia., 80 mm immersion for 33 tubes 14 - 18 dia., 110 mm immersion for 14 tubes 24 - 30 dia., 110 mm immersion Cat. No. Cat. No. Cat. No. Cat. No. UG 066 UG 067 UG 068 UG 069 Bath RC 25 up to 4 racks Bath RK 20 up to 2 racks RE 13 RE 18/1 RE 18/2 RE 30 for 56 tubes 10 - 13 dia., 80 mm immersion for 33 tubes 14 - 18 dia., 80 mm immersion for 33 tubes 14 - 18 dia., 110 mm immersion for 14 tubes 24 - 30 dia., 110 mm immersion Cat. No. Cat. No. Cat. No. Cat. No. UG 070 UG 071 UG 072 UG 073 Bath RC 6 1 rack RF 18/1 RF 18/2 for 20 tubes 14 - 18 dia., 80 mm immersion for 20 tubes 14 - 18 dia., 110 mm immersion Cat. No. UG 074 Cat. No. UG 075 Bath RK 8 1 rack RG 18/1 RK 18/2 for 20 tubes 14 - 18 dia., 80 mm immersion for 20 tubes 14 - 18 dia., 110 mm immersion Cat. No. UG 076 Cat. No. UG 077 Details of other racks on request Rising platform for retrofitting size 250x160 mm, with continuous height adjustment suitable for: Bath RC 20 (1 platform) Bath RC 25 (2 platforms) Bath RK 20 (1 platform) YACE0050 / 14.03.02 - 36 - Cat. No. LCZ 012 LAUDA Low-temperature thermostats RC 6 CS, RC 20 CS, RC 25 CS, RL 6 CS, RL 7 CS, RK 8 CS, RK 8 KS, RK 20 KS Gable cover, stainless steel for RC 25 Cat. No. LCZ 011 Gable cover, stainless steel for RC 25 (Beer forcing test for bottles of 0.5 l) Cat. No. LCZ 058 Level controller for thermostating an open external bath using pressure/suction pump Cat. No. LPZ 901 Non-return fitting for automatic venting of the connecting hoses when thermostating an open external bath Cat. No. UD 125 Nipples for pump connections 13 mm dia., 10 mm int. dia. 11 mm dia., 7 mm int. dia. Cat. No. HKO 026 Cat. No. HKO 025 Equipment trolley Cat. No. LCZ 036 for all compact bench thermostats RM 20-, RC-, RKand RL-; movable; stepless height adjustment; cover plate of the units can be adjusted to height of laboratory bench. YACE0050 14.03.02 - 37 - LAUDA Low-temperature thermostats RC 6 CS, RC 20 CS, RC 25 CS, RL 6 CS, RL 7 CS, RK 8 CS, RK 8 KS, RK 20 KS LAUDA Pt 100 platinum resistance thermometers to DIN IEC 751 Class A for external control and other temperature measurement Pt 100-42 Pt 100-42 all-glass version with NS 14/23 ground taper DIN 12242 Temp. range -100...300°C 50% response time 0.8 sec Overall length approx. 115 mm 4-wire circuit Fig. 1 Pt 100-44 all-glass version with NS 14/23 ground taper DIN 12242 Temp. range -100...300°C 50% response time 0.8 sec Overall length approx. 320 mm Fig. 2 Pt 100-66 as Pt 100-44 Overall length approx. 430 mm Fig. 2 Cat. No. ETP 007 Cat. No. ETP 008 Pt 100-90 stainless steel protection tube 4 mm dia. Temp. range -100...300°C 50% response time 1.5 sec Overall length approx. 120 mm 4-wire circuit Fig. 3 Cat. No. ETP 050 Pt 100-70 stainless steel protection tube 4 mm dia. Temp. range -200...300°C 50% response time 1.5 sec Overall length approx. 290 mm 4-wire circuit Fig. 3 Cat. No. ETP 009 Pt 100-92 stainless steel protection tube 4 mm dia. with attached Silicone cable 2 m long and plug Temp. range -100...200°C 50% response time 3 sec Overall length approx. 250 mm 4-wire circuit Fig. 4 YACE0050 / 14.03.02 Cat. No. ETP 049 - 38 - Cat. No. ETP 051 LAUDA Low-temperature thermostats RC 6 CS, RC 20 CS, RC 25 CS, RL 6 CS, RL 7 CS, RK 8 CS, RK 8 KS, RK 20 KS Connecting cable with 4-pin plug for external control on all C-and K-units and for digital thermometer for Pt 100-44 and Pt 100-66 1.5 m length as specified Cat. No. UK 048 Cat. No. UK 213 Pt 100-42, Pt 100-70, Pt 100-90 1.5 m length as specified Cat. No. UK 047 Cat. No. UK 212 Screw clamp fitting stainless steel, with Teflon pressure ring for Pt 100 resistance thermometer 4 mm dia. Fig 5 YACE0050 14.03.02 - 39 - Cat. No. HX 078 LAUDA Low-temperature thermostats RC 6 CS, RC 20 CS, RC 25 CS, RL 6 CS, RL 7 CS, RK 8 CS, RK 8 KS, RK 20 KS Fig. 1 Fig. 2 Fig. 3 Fig. 5 YACE0050 / 14.03.02 - 40 - Fig. 4 Geräteliste Schaltplan List of parts Circuit diagram Liste de schéma connexions 230V; 50Hz / 230V; 60Hz Teil-Nr. Part No. Piéce no. A1 A2 B1 B2 B3 C1 E1 F1 F2 gültig ab Serie V01 at serial no. à partir Bezeichnung Designation Désignation Leiterplatte „Netz“ Leiterplatte „Anzeige“ Pt 100 Fühler Sicherheitskreis Pt 100 Fühler Regelung Niveausensor Motorkondensator Heizkörper Übertemperaturschutz (Umwälzpumpe) Printed circuit board „Mains“ Printed circuit board „Indication“ Pt 100 Probe Safety circuit Pt 100 Probe Controller Level sensor Motor condenser Heater Overtemperature protection (Circulating pump) Overtemperature protection compressor Overpressure switch Circuit imprimé „Secteur“ Circuit imprimé „Affichage“ Pt 100 Sonde Circuit securité Pt 100 Sonde Réglage Niveau sensor Condensateur moteur Corps de chauffe Protection de surpression (Pompe de circulation) F3 Übertemperaturschutz Verdichter Überdruckschalter M1 M2 M3 R1 Pumpenmotor Verdichter Ventilator Potentiometer Sollwert S1 X1 Netzschalter Netzanschluss / Netzkabel Anschlussbuchse Rücklaufsicherung X2 RC 6 CS RC 20 CS RC 25 CS Protection de surpression Compresseur Disjoncteur de surpréssion Pump motor Moteur de pompe Compressor Compresseur Fan Ventilateur Setpoint potentiometer Potentiomètre valeur de consigne Mains switch Interrupteur secteur Mains connection / Mains Branchement secteur / cable Câble de secteur Connection socket Douille de jonction Reflow security valve Protection de refoulement C:\altpc\WOBSER\SPLlist\SPL_neu\RLxx\RC_CS.doc/08.10.01 Best.-Nr. Ref.-No. No.Ref UL 429-3 UL 430-2 ETP 046 ETP 046 EKS 034 ECA 012 EH 162 ---------- ---------ES 035 EM 093 EMV 001 EML 011 UD 339 EST 082 EKN 008 EQD 037+ EQZ 006 Geräteliste Schaltplan List of parts Circuit diagram Liste de schéma connexions 100V; 50Hz / 115V; 60Hz Teil-Nr. Part No. Piéce no. A1 RC 6 CS RC 20 CS RC 25 CS gültig ab Serie V01 at serial no. à partir Bezeichnung Designation Désignation Leiterplatte „Netz“ Leiterplatte „Anzeige“ Pt 100 Fühler Sicherheitskreis Pt 100 Fühler Regelung Printed circuit board „Mains“ Printed circuit board „Indication“ Pt 100 Probe Safety circuit Pt 100 Probe Controller Circuit imprimé „Secteur“ Circuit imprimé „Affichage“ Pt 100 Sonde Circuit securité Pt 100 Sonde Réglage B3 C1 E1 F1 Niveausensor Motorkondensator Heizkörper Übertemperaturschutz (Umwälzpumpe) F2 F3 Übertemperaturschutz Verdichter Überdruckschalter Level sensor Motor condenser Heater Overtemperature protection (Circulating pump) Overtemperature protection compressor Overpressure switch M1 M2 M3 R1 Pumpenmotor Verdichter Ventilator Potentiometer Sollwert S1 X1 Netzschalter Netzanschluss / Netzkabel Anschlussbuchse Rücklaufsicherung A2 B1 B2 X2 UL 430-2 ETP 046 (US 060) ETP 046 (US 060) Niveau sensor EKS 034 Condensateur moteur ECA 010 Corps de chauffe EH 153 Protection de surpression ---------(Pompe de circulation) Protection de surpression Compresseur Disjoncteur de surpréssion Pump motor Moteur de pompe Compressor Compresseur Fan Ventilateur Setpoint potentiometer Potentiomètre valeur de consigne Mains switch Interrupteur secteur Mains connection / Mains Branchement secteur / cable Câble de secteur Connection socket Douille de jonction Reflow security valve Protection de refoulement C:\altpc\WOBSER\SPLlist\SPL_neu\Kt_therm\RC_CS_1.doc/16.10.01 Best.-Nr. Ref.-No. No.Ref UL 429-3 ---------ES 035 EM 099 EMV 001 EML 011 UD 339 EST 085 EKN 007 EQD 037+ EQZ 006 Geräteliste Schaltplan List of parts Circuit diagram Liste de schéma connexions 230V; 50Hz / 230V; 60Hz Bezeichnung Teil-Nr. Part No. Piéce no. A1 RK 8 KS RK 20 KS RK 8 CS Designation Leiterplatte „Netz“ Leiterplatte „Anzeige“ Leiterplatte „Drehzalregelung Lüftermotor“ Pt 100 Fühler Sicherheitskreis Pt 100 Fühler Regelung Niveausensor Fühler Drehzahlregelung Printed circuit board „Mains“ Printed circuit board „Indication“ Printed circuit board „Speed control ventilator motor“ Pt 100 Probe Safety circuit Pt 100 Probe Controller Level sensor Probe Speed control C1 E1 F1 Motorkondensator Heizkörper Übertemperaturschutz (Umwälzpumpe) F2 Übertemperaturschutz Verdichter Stufe 1 F3 Überdruckschalter Motor condenser Heater Overtemperature protection (Circulating pump) Overtemperature protection compressor stage 1 Overpressure switch K1 M1 M2 M3 R1 Anlaufrelais Pumpenmotor Verdichter Ventilator Potentiometer Sollwert S1 X1 Netzschalter Netzanschluss / Netzkabel Anschlussbuchse Rücklaufsicherung A2 A3 B1 B2 B3 B4 X2 Désignation Circuit imprimé „Secteur“ Circuit imprimé „Affichage“ Circuit imprimé „Régulation de vitesse moteur de ventilateur“ Pt 100 Sonde Circuit securité Pt 100 Sonde Réglage Niveau sensor Sonde régulation de vitesse Condensateur moteur Corps de chauffe Protection de surpression (Pompe de circulation) Best.-Nr. Ref.-No. No.Ref Best.-Nr. Ref.-No. No.Ref RK 8 KS RK 20 KS RK 8 CS UL 432-3 UL 432-3 UL 430-2 UL 430-2 UL 473 (UD 349) UL 473 (UD 349) ETP 046 ETP 046 ETP 046 EKS 034 US 041 ETP 046 EKS 034 US 041 ECA 007 EH 149 ---------- ECA 007 EH 149 ---------- Protection de surpression ---------Compresseur étage 1 Disjoncteur de surpréssion Starting relay Relais de demarrage Pump motor Moteur de pompe Compressor Compresseur Fan Ventilateur Setpoint potentiometer Potentiomètre valeur de consigne Mains switch Interrupteur secteur Mains connection / Mains Branchement secteur / cable Câble de secteur Connection socket Douille de jonction Reflow security valve Protection de refoulement C:\altpc\WOBSER\SPLlist\SPL_neu\RLxx\RK_CS_KS.doc/08.10.01 gültig ab Serie V01 at serial no. à partir ---------- ES 035 ES 035 ---------EM 094 ------------------UD 339 ---------EM 094 ------------------UD 339 EST 032 EKN 008 EST 082 EKN 008 EQD 037+ EQD 037+ EQZ 006 EQZ 006 Geräteliste Schaltplan List of parts Circuit diagram Liste de schéma connexions 230V; 50Hz / 230V; 60Hz Teil-Nr. Part No. Piéce no. A1 A2 B1 B2 B3 B4 C1 E1 E3 F1 F2 F4 Designation Désignation Leiterplatte „Netz“ Leiterplatte „Anzeige“ Pt 100 Fühler Sicherheitskreis Pt 100 Fühler Regelung Niveausensor Fühler KTY 81 Motorkondensator Heizkörper Heizband Übertemperaturschutz (Umwälzpumpe) Printed circuit board „Mains“ Printed circuit board „Indication“ Pt 100 Probe Safety circuit Pt 100 Probe Controller Level sensor Probe KTY 81 Motor condenser Heater Heater band Overtemperature protection (Circulating pump) Overpressure switch stage 1 Overtemperature protection compressor stage 1 Overpressure switch stage 2 Overtemperature protection Compressor stage 2 Starting relay (M 2) Circuit imprimé „Secteur“ Circuit imprimé „Affichage“ Pt 100 Sonde Circuit securité Pt 100 Sonde Réglage Niveau sensor Sonde KTY 81 Condensateur moteur Corps de chauffe Ruban de chauffe Protection de surpression (Pompe de circulation) Überdruckschalter Stufe 2 Übertemperaturschutz Verdichter Stufe 2 F5 K 11 Anlaufrelais (M 2) M1 M2 M3 M4 R1 Pumpenmotor Verdichter Stufe 1 Ventilator Verdichter Stufe 2 Potentiometer Sollwert S1 X1 Netzschalter Netzanschluss / Netzkabel Anschlussbuchse Rücklaufsicherung X2 gültig ab Serie A01 at serial no. à partir Bezeichnung Überdruckschalter Stufe 1 Übertemperaturschutz Verdichter Stufe 1 F3 RL 6 CS RL 7 CS UL 430-2 ETP 047 ETP 047 EKS 034 ETP 027 ECA 012 EH 163 UD 387 ---------- Disjoncteur de ES 048 surpréssion étage 1 Protection de surpression ---------Compresseur étage 1 Disjoncteur de ES 048 surpréssion étage 2 Protection de surpression ---------Compresseur étage 2 Relais de demarrage (M 2) Pump motor Moteur de pompe Compressor stage 1 Compresseur étage 1 Fan Ventilateur Compressor stage 2 Compresseur étage 2 Setpoint potentiometer Potentiomètre valeur de consigne Mains switch Interrupteur secteur Mains connection / Mains Branchement secteur / cable Câble de secteur Connection socket Douille de jonction Reflow security valve Protection de refoulement C:\altpc\WOBSER\SPLlist\SPL_neu\Kt_therm\RL7CS.doc/29.01.02 Bestell-Nr. Ref.-No. No.Ref UL 432-3 ---------EM 062 ---------------------------UD 339 EST 082 EKN 008 EQD 037 + EQZ 006 BESTÄTIGUNG / CONFIRMATION / CONFIRMATION An / To / A: LAUDA Dr. R. Wobser • LAUDA Service Center • Fax: +49 (0) 9343 - 503-222 Von / From / De : Firma / Company / Entreprise: Straße / Street / Rue: Ort / City / Ville: Tel.: Fax: Betreiber / Responsible person / Personne responsable: Hiermit bestätigen wir, daß nachfolgend aufgeführtes LAUDA-Gerät (Daten vom Typenschild): We herewith confirm that the following LAUDA-equipment (see label): Par la présente nous confirmons que l’appareil LAUDA (voir plaque signalétique): Typ / Type / Type : Serien-Nr. / Serial no. / No. de série: mit folgendem Medium betrieben wurde was used with the below mentioned media a été utilisé avec le liquide suivant Darüber hinaus bestätigen wir, daß das oben aufgeführte Gerät sorgfältig gereinigt wurde, die Anschlüsse verschlossen sind, und sich weder giftige, aggressive, radioaktive noch andere gefährliche Medien in dem Gerät befinden. Additionally we confirm that the above mentioned equipment has been cleaned, that all connectors are closed and that there are no poisonous, aggressive, radioactive or other dangerous media inside the equipment. D’autre part, nous confirmons que l’appareil mentionné ci-dessus a été nettoyé correctement, que les tubulures sont fermées et qu’il n’y a aucun produit toxique, agressif, radioactif ou autre produit nocif ou dangeureux dans la cuve. Stempel Datum Betreiber Seal / Cachet. Date / Date Responsible person / Personne responsable Formblatt / Form / Formulaire: Erstellt / published / établi: Änd.-Stand / config-level / Version: Datum / date: UNBEDENK.DOC Unbedenk.doc LSC 0.1 30.10.1998 LAUDA DR. R. WOBSER GmbH & Co. KG Pfarrstraße 41/43 Tel: D - 97922 Lauda-Königshofen Fax: Internet: http://www.lauda.de E-mail: +49 (0)9343 / 503-0 +49 (0)9343 / 503-222 [email protected]