1
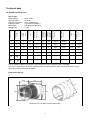
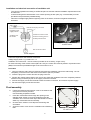
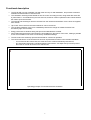
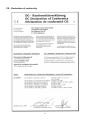
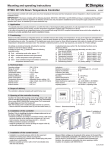
Installation and operating instructions
Local ventilation unit
with heat recovery
DL 60 WR
Table of Contents
Technical data
2
Accessories
3
Scope of supply
3
Assembly instructions
4
Safety information
5
Installation
5
Final assembly
6
Functional description
7
Operation
8
Faults
8
Maintenance
9
After-sales service
10
CE - Declaration of conformity
11
Technical data
DL 60 WR ventilation unit
Device data
Rated voltage:
Nominal output:
Degree of protection:
Protection class:
Dimensions:
Weight (net):
1
1
17
3.5
23.7
On
On
Open
Open
71.29
70.88
2
2
30
4.5
29.9
On
On
Open
Open
71.25
70.86
3
3
45
6.5
35.0
On
On
Open
Open
70.90
70.53
4
4
60
10.0
41.6
On
On
Open
Open
71.56
71.18
Fresh
air
30
4.25
27.5
Off
On
Closed
Open
-
-
Exhaust
air
30
4.25
27.5
On
Off
Open
Closed
-
-
[dB(A) 1m]
The DL 60WR ventilation unit fulfils the requirements for noise protection class 3 (35-39dB).
This can be compared to the sound reduction index of a closed window, which corresponds to the current
valid requirements for thermal insulation.
Dimension Drawings
346,5
370
350
370
380
346,5
Dimensions for ventilation unit and wall casing
2
%
-
Degree of heat
recovery
-
%
Closed
Heat supply
rate
Closed
Fresh air flap
function
Off
Fresh air
ventilator
function
Off
Exhaust air
ventilator
function
-
Noise level
4.0
[W]
0
Nominal output
0
[m³ / h]
Delivery
volume
0
Set fan level
Remote control
display
Exhaust air flap
function
230V~ 50Hz
10 Watts
IP X4 (splash-proof)
II (protective insulation)
See dimension drawings
6.7 kg
Accessories
Remote control FDL 60 U, FDL 60 A – essential for operation
Remote control for controlling the ventilation unit, for either flush mounting or surface mounting.
Order reference
Article no. Type of installation
FDL 60 U
356 350
Flush mounting
FDL 60 A
356 360
Surface mounting
Length of the control line included: 3.0 m.
Adjustment to wall thickness
Order reference
Article no.
ARDL 60
356 390
VRDL 60*
356 420
* to be installed on an exterior wall
Description
External frame
Extension ring (111 mm)
Necessary for:
Wall thicknesses of less than 346 mm
Wall thicknesses of more than 346 mm
Filter set
Order reference
EFDL 60 G4
EFDL 60 F7
Article no.
356 370
356 380
Description
Filter G4 (2 units)
Pollen filter F7 (1 unit)
Scope of supply
The DL 60 WR ventilation unit with heat recovery is composed of:
Body shell set – wall casing with protection plate and stainless steel exterior cover,
Final assembly set – ventilation unit with plastic interior wall cover.
3
Assembly instructions
Body shell set
Ring-shaped wall casing (A) for body shell mounting with a wall opening of
350 mm.
•
Wall casing length 346 mm.
•
For adjustment to the local wall thickness, an additional extension ring
(accessory VRDL 60) measuring 111.5 mm can be installed and then
shortened to the desired length.
A maximum of 5 extension rings can be installed without impairing the
functioning of the ventilation unit.
A
B
C
•
If the wall thickness is less than 346 mm, a compensating frame
(accessory ARDL 60) is installed - allowing for smooth adaption to the
exterior wall.
•
The wall casing is reinforced inside with a Styrofoam support (B) and
equipped with a cover plate (C) inside and outside.
•
Weatherproof stainless steel exterior cover with rust-free mounting screws.
Wall casing for body shell
mounting
Final assembly set
Ventilator insert with aluminium cross-flow heat exchanger composed of:
•
two casing half-shells made of robust EPP foam,
•
two 22V DC motors,
•
two electrically-controlled stainless steel exterior vents with fly screen,
•
a cross-current heat exchanger,
•
two G4 filters for filtering fresh air and exhaust air,
•
control PCB with plug connection for connection line for remote control,
•
plastic interior cover in colour RAL 9016.
8
9
1
2
7
3
5
4
6
Assembly of DL 60 WR ventilation unit with heat recovery
1.
2.
3.
4.
5.
6.
7.
8.
9.
Stainless steel exterior cover
Electrically-controlled exterior vent
22V DC motor
EPP casing half-shell
4
EPP wall casing
Plastic interior cover
Fresh air and exhaust air filters
Switchbox with control PCB
Cross-current heat exchanger
Safety information
The DL 60 WR ventilation unit with heat recovery is intended for installation in an exterior wall for ventilating
and de-aerating a room.
Use is prohibited in rooms which have especially greasy, explosive or dusty air.
Installation, connection and repairs must only be carried out by authorised specialist personnel!
The unit must only be installed and operated in dry, enclosed rooms.
The German Electrical Engineers’ Association (VDE) stipulations and the regulations of the local utility
company must be followed!
Installation
Selecting the installation location
Always mount the ventilation unit on an exterior wall.
It is recommended that the unit be mounted on a wall with windows and as high as possible.
Used, warm air is known to collect in the upper regions and can thus be effectively removed.
Make sure that it does not blow directly onto people. Do not install in the direct vicinity of beds in bedrooms
or directly over seating in living rooms.
Do not block the supply and exhaust flow to and from the device e.g. with curtains or other objects. Do not
install the device behind facades.
The ventilation unit may be installed in protective zone 2 for splash-protected devices!
Do not install the ventilation unit in explosion-protected areas.
The ambient temperature should not be outside the temperature range of -12°C to +40°C.
When installing, make sure that there is easy access for maintenance e.g. for changing filters.
Installation of the wall casing
When installing the ventilation unit, observe the applicable safety and installation regulations.
The ventilation unit is designed for a wall thickness of 346 mm. For adjusting to a wall thickness deviating
from the above, special accessory sets are available (see “Accessories”).
A circular, horizontal wall opening 350 mm in diameter is necessary for installing the wall casing.
When installing the wall casing, heed the OBEN (“UP”) label on the inner cover. Insert the wall casing in
such a way that the ventilation unit can be inserted horizontally.
Remove the stabilisation beam only after the on-site work has been completed. A cover is placed on all the
exterior sides to protect the wall casing from dust during plaster work.
Wall opening in
exterior wall
Inside of room
Horizontal orientation of the wall casing in walls and the insertion of a stabilisation beam
5
Installation and electrical connection of ventilation unit
The current regulations according to VDE 0100 part 701 and the relevant installation requirements must
be observed.
A disconnecting device with at least 3 mm contact opening at each pole (e.g. circuit breaker) must be
provided in the permanently installed wiring.
Disconnect voltage supply before beginning work on the device, and secure against accidental reactivation!
-
230V~ 50 Hz
Remote control plug connector
Pluggable power
supply terminal
Ventilation unit
DL 60 WR
Control line remote control
For flush mounting place in
an M20 protection tube
Pluggable supply connections,
remote control
FDL 60 remote control
Circuit diagram
2 lines are required for the electrical connection:
Voltage supply 230V~ e.g. NYM-O 2 x 1.5.
Ventilation unit control line – remote control (included as an accessory, length 3.0 m).
For flush mounting of the remote control (FDL 60 U set), the control line must be placed in a protection tube
(M20)! The maximum permissible length of the control line is 10 m.
Procedure
1. Vacuum-clean the wall casing if necessary and push the ventilation unit into the wall casing - but not
completely, so that access to the electrical connection space is possible.
2. Insert the plug for the control line into the plug connector.
3. Shorten the voltage supply lead in such a way as to allow the ventilation unit to be completely inserted
without it being necessary to pull on the supply connection terminal.
4. Pull out the supply connection terminal to allow for easier connection, and connect to power supply.
5. Re-insert the supply connection terminal.
Final assembly
6.
7.
8.
9.
Fasten the stainless steel exterior cover to the exterior wall
using the four screws provided.
Use the drilling template included.
Insert the condensate hose through the opening in the
stainless steel exterior cover and completely insert the
ventilation unit. The hose must slope downwards in order to
allow any condensate to drain off easily.
Check that the exterior cover flaps are functioning and
accessible.
Screw the interior cover onto the ventilation unit’s fastening
tabs.
6
8
437
Wall opening dimensions
for outer cover
309
Functional description
•
The DL 60 WR is a local ventilation unit with heat recovery for wall installation, and provides controlled
ventilation and de-aeration of closed rooms.
•
The ventilation unit brings fresh filtered air into the rooms according to need, using either filter class G4
or pollen filter F7. It simultaneously removes used air, and thus creates a pleasant indoor climate without
the need to open the windows.
•
The internal heat exchanger removes the heat from the used air and transfers it to the fresh air supplied
from outside.
•
Up to 70% of the heat from the used exhaust air can be recovered.
•
The constant ventilation of the room considerably reduces the danger of mildew formation from
excessively high room humidity.
•
Energy losses due to windows being left open and unattended are avoided.
•
All mechanical and electrical components are accessible from the interior of the room, making it possible
to use local ventilation units even in multi-storey residential buildings.
•
The DC motors are extremely quiet and well suited for continuous operation.
•
The control electronics of the unit take into account all prescribed functions in the relevant standards:
○
If one of the two DC motors fails, the other DC motor is also automatically switched off,
○
two well-sealed electrically-controlled stainless steel exterior vent flaps with fly screens prevent
the inflow of cold air when the unit is switched off.
Operating principle of controlled domestic ventilation
7
Operation
-
Children or persons who are not capable of operating the unit safely must not operate the ventilation
unit. Ensure that children do not play with the unit.
The functions can be accessed in order with the up and down button.
The following functions can be carried out with the remote control:
Display on the remote
control
Denotation
Setting example
0
Ventilation unit off
Off
1
Fan level 1 on
During absence periods,
night operation
2
Fan level 2 on
Normal operation
3
Fan level 3 on
Increased air exchange
required
Fan level 4 on
Maximum air exchange
required
Fresh air operation
on
Only fresh air, e.g.
cooling operation at
night
Exhaust air
operation on*
Only exhaust air e.g.
dehumidifying bathroom
4
Display
Setting buttons
FDL 60 remote control
*Exhaust air operation creates a vacuum if air cannot flow in at the required levels, which is why exhaust air operation cannot be
carried out in rooms which have fireplaces that rely on indoor air (e.g. open fire places, heating stoves, tile stoves).
Faults
Fault display on the remote control
Display on remote control
Denotation
Required action
See section
F flashes
Set time for filter maintenance
has been reached
Clean or change filters
“Maintenance” see page 9
E
Fault – ventilator defective!
Notify service!
“After-sales service”, page 10
Power failure
Both of the electric external vent flaps automatically open in cases of power failure or interruption. When
voltage is re-applied, the ventilation unit automatically goes into fan level 1.
8
Maintenance
It is recommended that both filters be cleaned at least every 6 months - see also section “Maintenance
display”. The filters should be replaced after approx. 1 year.
1. Remove both plastic screws from the wall covering and then remove wall covering.
2. Remove the filters and clean with a vacuum cleaner.
Filters must not be cleaned with water, as this will cancel out the electrostatic charge necessary for binding
dirt.
•
The use of other filter materials can significantly reduce the air
exchange.
•
The filter material used is precisely attuned to both ventilators
and creates very little air resistance. For this reason, only
original replacement filters must be used.
Loosen screws
• Note: The unit must not be operated without filters!
The DL 60 WR ventilation unit is factory-fitted with filters in the G4
filter class.
The units can also be later equipped with F7 pollen filters.
For replacement filters see “Accessories”.
Remove wall covering
Maintenance display
The remote control comes with a factory-set automatic filter
maintenance display.
After 6 months, the filter maintenance display will flash “F”.
The message can be deleted by pressing both ▲▼ buttons for 2
seconds; the time counter is then re-started. The display will then
return to the set operating mode again.
Setting the time period until the next maintenance
message
The time period can be set in increments of one month, ranging
from 2 to 6 months (the factory setting is 6 months).
Filter removal
Setting
1. Set the LED display to 0 (Press the ▼ button several times if necessary).
2. Access the filter menu by pressing the ▼ button for 5 seconds.
3. The time period (between 2 and 6 months) can be set using the ▲▼ buttons.
The set value is saved after 2 seconds, and the filter maintenance menu is automatically exited.
9
After-sales service
Glen Dimplex Deutschland GmbH After-Sales Service for Complete Systems
Am Goldenen Feld 18
95326 Kulmbach, Germany
E-mail addresses:
Tel: +49 (0) 9221 709 562
Fax: +49 (0) 9221 709 565
[email protected]
Internet:
www.dimplex.de
[email protected]
To process your order, the production number (E-no.), the after-sales service index number (KI), and the
production date (FD) for the unit are required. This information can be found on the type plate in the framed
field.
10
CE - Declaration of conformity
11
Note on disposal
Do not dispose of the unit with general household waste. The unit must be taken to a local waste disposal plant.
Glen Dimplex Deutschland GmbH
Am Goldenen Feld 18
D-95326 Kulmbach, Germany
Telephone: +49 (0) 9221 709 562
Fax:
+49 (0) 9221 709 565
E-mail:
[email protected]
12
Subject to technical changes
Internet: www.dimplex.de
dl60wr-en_ba.doc 11/09/A