1
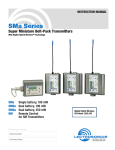
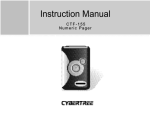
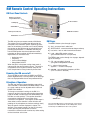
RM Remote Control Operating Instructions
RM Front Panel Controls
Battery Cover Knob/
Lanyard Attachment
UP Arrow Button
LCD Display
AUDIO Button
Battery Level Indicator
DOWN Arrow Button
FREQ Button
The RM unit gives you remote control of SM Series
Transmitters using an audible tone delivered to the
microphone in the wireless system. Operating parameters on the wireless transmitter can be set by holding
the speaker on the RM close to the microphone and
pressing the pushbutton. A “dweedle” tone will play
from the RM speaker into the microphone and the
parameter on the transmitter will be set immediately.
Adjustments can be made to set:
•
•
•
•
Audio input gain
Frequency
Lock or Unlock Modes
Sleep Mode ON/OFF
When the SM is in the power saving sleep mode, it
uses one fifth the normal battery current. The math is
straightforward: having the transmitter sleep for five
hours is equivalent to using it normally for one hour.
RM Pages
The AUDIO button cycles through 4 pages:
1) Aud - set transmitter’s audio level
2) SLEEP/unSLP - cause transmitter to sleep or wake up
3) Loc/unLoc - lock or unlock transmitter’s buttons
4) Loud - adjust RM speaker volume
(press SEND button for a sample tone)
The FREQ button cycles through 2 or 3 pages, depending on the settings:
1) CH - set transmitter’s channel
(using block-independent hex code)
2) b - select a block number
(optional — uncovers next page)
3) 000.000 - set transmitter’s frequency in MHz
(avail. if a block is selected)
Powering the RM on and off
To turn the RM on or off, press the AUDIO and FREQ
buttons together briefly. The unit powers up on the page
that was displayed when the unit was powered off last.
Speaker
Principles of Operation
The RM user interface is organized into pages which
are accessible via the AUDIO and FREQ buttons. Once
on a page, settings can be adjusted with the UP and
DOWN arrow buttons.
To change a transmitter’s setting via the RM, it is
necessary to dial in the new setting on the appropriate
page on the RM, and then press the SEND button (on
the side, near the speaker). The speaker should be
uncovered and held within a few inches of the
transmitter’s microphone. (The longest usable range is
about 6 feet, and the shortest is about 6 inches, depending on the microphone and volume settings used.)
Only the specific function displayed is altered. For
example, if the remote control is on the CH (channel)
screen, pressing the send button will set the
transmitter’s channel but will not affect any other setting
on the transmitter at that time.
SEND Button
The selected RM setting is relayed through a microphone
attached to an SM transmitter via the RM speaker, and is
activated by the SEND button above the speaker.
Operating Notes
•
The SM’s sensitivity to the
remote control varies with the
transmitter’s audio level
setting and the microphone
used, but it should always be
possible to make it work, with
a sufficiently loud remote
signal at close range.
•
If the SM is configured to
respond to the remote control,
it will do so even if the buttons
are locked.
•
When the SM is asleep, it can
only be awakened by the
remote control, or by removing and reinserting the battery.
•
When the SM is asleep, the
PWR led blinks green occasionally.
•
The RM should be held close enough to the microphone to change the settings on the
If a remote command is sent
desired SM, but not be too loud as to affect other SM units nearby.
that would result in the same
display being shown again on
the SM (for example tuning to the channel already
Configuring the SM for
displayed), a row of dashes is displayed briefly, as a
Remote Control Operation
signal that the command was received, but it didn’t
change anything.
The SM transmitter may be
configured to respond to
If you are having trouble getting the SM to respond,
signals from the remote control
make sure you aren’t covering the RM’s speaker
or to ignore them. This setting
with your thumb, and/or turn up the RM’s speaker
is accessed by holding down
volume on the “Loud” page.
the the Down arrow button
If the RM is set to a different block number than the
while powering the transmitter
transmitter and an attempt is made to set the
Remote Control Screens
on. Use the arrow keys to
transmitter’s frequency in MHz, the command will
toggle between “rc on” (remote
still work. The transmitter is simply set to the
control on) and “rc oFF” (remote control off). The default
corresponding channel in the correct block, with a
setting is “rc on.”
matching hex code.
If a remote control signal is detected but the transmitter
Since all SM transmitters respond to the same
is set to “rc oFF”, the message “rc oFF” will be dissignals, take care that the remote control is preplayed briefly on the transmitter’s LCD, to confirm that a
sented only to the desired transmitter, with the
valid signal was received, but that the transmitter is not
minimum speaker volume necessary to do the job
configured to respond to it.
reliably.
Functions available from the remote control are:
•
•
•
rc on
rc oFF
RM Quick Reference
•
Audio Level
Power On/Off
AUDIO+FREQ
•
Frequency
Set SM audio level
Aud page (via AUDIO)
•
Lock/Unlock Buttons
Sleep or Wake SM
SLEEP/unSLP page (via AUDIO)
•
Sleep/Wake (power saving mode)
Lock or Unlock SM
Loc/unLoc page (via AUDIO)
Adjust RM volume
Loud page (via AUDIO)
Set SM channel (hex)
CH page (via FREQ)
Enable MHz display
b (block) page (via FREQ)
Set SM channel (MHz)
000.000 page (via FREQ)
In sleep mode, the SM uses one fifth the normal amount
of current. For example, in sleep mode it will drain the
battery as much in five hours as it would do in one hour
of normal operation. Sleep mode can only be invoked
with the remote control, and can only be revoked with the
remote control or by removing the battery. When in sleep
mode, the PWR LED blinks green occasionally to
indicate that the SM is asleep and not turned off.