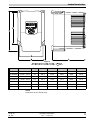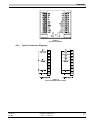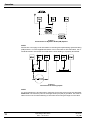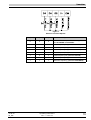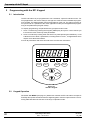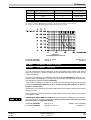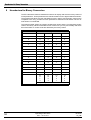
1
®
BERGES
Operating Instructions
®
EF1 Microdrive
Part No. 38005221
Table of Contents
1
Introduction and Safety Tips . . . . . . . . . . . . . . . . . . . . . . . . . . . . . . . . . . . . . . . . . . . . . . . . . . . . . . . . . . . . . 3
1.1 General Information . . . . . . . . . . . . . . . . . . . . . . . . . . . . . . . . . . . . . . . . . . . . . . . . . . . . . . . . . . . . . . . . . 3
1.2 Safety Tips . . . . . . . . . . . . . . . . . . . . . . . . . . . . . . . . . . . . . . . . . . . . . . . . . . . . . . . . . . . . . . . . . . . . . . . . 3
1.2.1 General Safety Tips . . . . . . . . . . . . . . . . . . . . . . . . . . . . . . . . . . . . . . . . . . . . . . . . . . . . . . . . . . . . 3
1.2.2 Proper Usage . . . . . . . . . . . . . . . . . . . . . . . . . . . . . . . . . . . . . . . . . . . . . . . . . . . . . . . . . . . . . . . . . 3
1.2.3 Transport, Storage, Installation . . . . . . . . . . . . . . . . . . . . . . . . . . . . . . . . . . . . . . . . . . . . . . . . . . . . 4
1.2.4 Electrical Connections . . . . . . . . . . . . . . . . . . . . . . . . . . . . . . . . . . . . . . . . . . . . . . . . . . . . . . . . . . 4
1.2.5 Operating Instructions . . . . . . . . . . . . . . . . . . . . . . . . . . . . . . . . . . . . . . . . . . . . . . . . . . . . . . . . . . . 4
1.3 Product Overview . . . . . . . . . . . . . . . . . . . . . . . . . . . . . . . . . . . . . . . . . . . . . . . . . . . . . . . . . . . . . . . . . . . 5
1.4 Manual Overview . . . . . . . . . . . . . . . . . . . . . . . . . . . . . . . . . . . . . . . . . . . . . . . . . . . . . . . . . . . . . . . . . . . 5
1.4.1 Publication History . . . . . . . . . . . . . . . . . . . . . . . . . . . . . . . . . . . . . . . . . . . . . . . . . . . . . . . . . . . . . 5
2
Technical Characteristics . . . . . . . . . . . . . . . . . . . . . . . . . . . . . . . . . . . . . . . . . . . . . . . . . . . . . . . . . . . . . . . 6
2.1 Interpreting Model Numbers . . . . . . . . . . . . . . . . . . . . . . . . . . . . . . . . . . . . . . . . . . . . . . . . . . . . . . . . . . . 6
2.2 Power and Current Ratings . . . . . . . . . . . . . . . . . . . . . . . . . . . . . . . . . . . . . . . . . . . . . . . . . . . . . . . . . . . . 6
2.3 Environmental Specifications . . . . . . . . . . . . . . . . . . . . . . . . . . . . . . . . . . . . . . . . . . . . . . . . . . . . . . . . . . 6
2.4 Electrical Specifications . . . . . . . . . . . . . . . . . . . . . . . . . . . . . . . . . . . . . . . . . . . . . . . . . . . . . . . . . . . . . . 7
2.5 Control Features Specifications . . . . . . . . . . . . . . . . . . . . . . . . . . . . . . . . . . . . . . . . . . . . . . . . . . . . . . . . 7
2.6 Dimensions and Weights . . . . . . . . . . . . . . . . . . . . . . . . . . . . . . . . . . . . . . . . . . . . . . . . . . . . . . . . . . . . . 8
3
Receiving and Installation . . . . . . . . . . . . . . . . . . . . . . . . . . . . . . . . . . . . . . . . . . . . . . . . . . . . . . . . . . . . . . 10
3.1 Preliminary Inspection . . . . . . . . . . . . . . . . . . . . . . . . . . . . . . . . . . . . . . . . . . . . . . . . . . . . . . . . . . . . . . . 10
3.2 Installation Precautions . . . . . . . . . . . . . . . . . . . . . . . . . . . . . . . . . . . . . . . . . . . . . . . . . . . . . . . . . . . . . . 10
3.3 Interference Suppression Measures . . . . . . . . . . . . . . . . . . . . . . . . . . . . . . . . . . . . . . . . . . . . . . . . . . . . 10
3.3.1 General . . . . . . . . . . . . . . . . . . . . . . . . . . . . . . . . . . . . . . . . . . . . . . . . . . . . . . . . . . . . . . . . . . . . . 10
3.3.2 Installation Tips . . . . . . . . . . . . . . . . . . . . . . . . . . . . . . . . . . . . . . . . . . . . . . . . . . . . . . . . . . . . . . . 11
4
Connections . . . . . . . . . . . . . . . . . . . . . . . . . . . . . . . . . . . . . . . . . . . . . . . . . . . . . . . . . . . . . . . . . . . . . . . . . 12
4.1 Introduction . . . . . . . . . . . . . . . . . . . . . . . . . . . . . . . . . . . . . . . . . . . . . . . . . . . . . . . . . . . . . . . . . . . . . . . 12
4.2 General Wiring Information . . . . . . . . . . . . . . . . . . . . . . . . . . . . . . . . . . . . . . . . . . . . . . . . . . . . . . . . . . . 12
4.2.1 Power Wiring. . . . . . . . . . . . . . . . . . . . . . . . . . . . . . . . . . . . . . . . . . . . . . . . . . . . . . . . . . . . . . . . . 12
4.2.2 Control Wiring . . . . . . . . . . . . . . . . . . . . . . . . . . . . . . . . . . . . . . . . . . . . . . . . . . . . . . . . . . . . . . . . 12
4.3 Input Line Requirements . . . . . . . . . . . . . . . . . . . . . . . . . . . . . . . . . . . . . . . . . . . . . . . . . . . . . . . . . . . . . 13
4.3.1 Line Voltage . . . . . . . . . . . . . . . . . . . . . . . . . . . . . . . . . . . . . . . . . . . . . . . . . . . . . . . . . . . . . . . . . 13
4.3.2 Phase Imbalance . . . . . . . . . . . . . . . . . . . . . . . . . . . . . . . . . . . . . . . . . . . . . . . . . . . . . . . . . . . . . 13
4.3.3 Single-phase Operation . . . . . . . . . . . . . . . . . . . . . . . . . . . . . . . . . . . . . . . . . . . . . . . . . . . . . . . . 13
4.4 Power Terminals . . . . . . . . . . . . . . . . . . . . . . . . . . . . . . . . . . . . . . . . . . . . . . . . . . . . . . . . . . . . . . . . . . . 13
4.4.1 Description of the Terminals . . . . . . . . . . . . . . . . . . . . . . . . . . . . . . . . . . . . . . . . . . . . . . . . . . . . . 13
4.4.2 Typical Power Connections . . . . . . . . . . . . . . . . . . . . . . . . . . . . . . . . . . . . . . . . . . . . . . . . . . . . . 14
4.5 Dynamic Braking . . . . . . . . . . . . . . . . . . . . . . . . . . . . . . . . . . . . . . . . . . . . . . . . . . . . . . . . . . . . . . . . . . . 15
4.6 Control Terminals . . . . . . . . . . . . . . . . . . . . . . . . . . . . . . . . . . . . . . . . . . . . . . . . . . . . . . . . . . . . . . . . . . 15
4.6.1 Description of the Control Terminals. . . . . . . . . . . . . . . . . . . . . . . . . . . . . . . . . . . . . . . . . . . . . . . 15
4.6.2 Typical Connection Diagrams . . . . . . . . . . . . . . . . . . . . . . . . . . . . . . . . . . . . . . . . . . . . . . . . . . . . 17
10.06.03
02_GB
Operating Instructions
EF1 — 0.37–4.0
1
Table of Contents
5
Programming with the EF1 Keypad. . . . . . . . . . . . . . . . . . . . . . . . . . . . . . . . . . . . . . . . . . . . . . . . . . . . . . . 20
5.1 Introduction . . . . . . . . . . . . . . . . . . . . . . . . . . . . . . . . . . . . . . . . . . . . . . . . . . . . . . . . . . . . . . . . . . . . . . . 20
5.2 Keypad Operation . . . . . . . . . . . . . . . . . . . . . . . . . . . . . . . . . . . . . . . . . . . . . . . . . . . . . . . . . . . . . . . . . . 20
5.3 LED Displays. . . . . . . . . . . . . . . . . . . . . . . . . . . . . . . . . . . . . . . . . . . . . . . . . . . . . . . . . . . . . . . . . . . . . . 22
5.4 Keypad Display Window . . . . . . . . . . . . . . . . . . . . . . . . . . . . . . . . . . . . . . . . . . . . . . . . . . . . . . . . . . . . . 22
5.4.1 Standard Display . . . . . . . . . . . . . . . . . . . . . . . . . . . . . . . . . . . . . . . . . . . . . . . . . . . . . . . . . . . . . . 22
5.4.2 Special Displays . . . . . . . . . . . . . . . . . . . . . . . . . . . . . . . . . . . . . . . . . . . . . . . . . . . . . . . . . . . . . . 23
5.5 Programming. . . . . . . . . . . . . . . . . . . . . . . . . . . . . . . . . . . . . . . . . . . . . . . . . . . . . . . . . . . . . . . . . . . . . . 23
5.5.1 Accessing Parameters . . . . . . . . . . . . . . . . . . . . . . . . . . . . . . . . . . . . . . . . . . . . . . . . . . . . . . . . . 23
5.5.2 Changing Display Scroll Rate . . . . . . . . . . . . . . . . . . . . . . . . . . . . . . . . . . . . . . . . . . . . . . . . . . . . 23
5.5.3 Programming Procedure . . . . . . . . . . . . . . . . . . . . . . . . . . . . . . . . . . . . . . . . . . . . . . . . . . . . . . . . 23
5.5.4 Restoring Factory Settings . . . . . . . . . . . . . . . . . . . . . . . . . . . . . . . . . . . . . . . . . . . . . . . . . . . . . . 24
5.6 Quick Start. . . . . . . . . . . . . . . . . . . . . . . . . . . . . . . . . . . . . . . . . . . . . . . . . . . . . . . . . . . . . . . . . . . . . . . . 24
6
EF1 Parameters . . . . . . . . . . . . . . . . . . . . . . . . . . . . . . . . . . . . . . . . . . . . . . . . . . . . . . . . . . . . . . . . . . . . . . . 25
6.1 Introduction . . . . . . . . . . . . . . . . . . . . . . . . . . . . . . . . . . . . . . . . . . . . . . . . . . . . . . . . . . . . . . . . . . . . . . . 25
6.2 Level 1 Parameters . . . . . . . . . . . . . . . . . . . . . . . . . . . . . . . . . . . . . . . . . . . . . . . . . . . . . . . . . . . . . . . . . 25
6.3 Description of Parameters . . . . . . . . . . . . . . . . . . . . . . . . . . . . . . . . . . . . . . . . . . . . . . . . . . . . . . . . . . . . 25
7
Troubleshooting . . . . . . . . . . . . . . . . . . . . . . . . . . . . . . . . . . . . . . . . . . . . . . . . . . . . . . . . . . . . . . . . . . . . . . 50
8
Hexadecimal to Binary Conversion. . . . . . . . . . . . . . . . . . . . . . . . . . . . . . . . . . . . . . . . . . . . . . . . . . . . . . . 52
9
Fundamentals of PI Control . . . . . . . . . . . . . . . . . . . . . . . . . . . . . . . . . . . . . . . . . . . . . . . . . . . . . . . . . . . . . 53
9.1 Introduction . . . . . . . . . . . . . . . . . . . . . . . . . . . . . . . . . . . . . . . . . . . . . . . . . . . . . . . . . . . . . . . . . . . . . . . 53
9.2 Configuration of PI Control Parameters . . . . . . . . . . . . . . . . . . . . . . . . . . . . . . . . . . . . . . . . . . . . . . . . . 53
9.2.1 Parameter 801-PRGNO . . . . . . . . . . . . . . . . . . . . . . . . . . . . . . . . . . . . . . . . . . . . . . . . . . . . . . . . 53
9.2.2 Parameter 911-FCORR . . . . . . . . . . . . . . . . . . . . . . . . . . . . . . . . . . . . . . . . . . . . . . . . . . . . . . . . 53
9.2.3 Parameter 915-KP . . . . . . . . . . . . . . . . . . . . . . . . . . . . . . . . . . . . . . . . . . . . . . . . . . . . . . . . . . . . 55
9.2.4 Parameter 916-KI . . . . . . . . . . . . . . . . . . . . . . . . . . . . . . . . . . . . . . . . . . . . . . . . . . . . . . . . . . . . . 55
9.2.5 Parameter 917-KIN . . . . . . . . . . . . . . . . . . . . . . . . . . . . . . . . . . . . . . . . . . . . . . . . . . . . . . . . . . . . 55
9.2.6 Parameter 918-PICFG . . . . . . . . . . . . . . . . . . . . . . . . . . . . . . . . . . . . . . . . . . . . . . . . . . . . . . . . . 55
9.3 Tuning the PI Control Loop . . . . . . . . . . . . . . . . . . . . . . . . . . . . . . . . . . . . . . . . . . . . . . . . . . . . . . . . . . . 56
10
2
Summary of EF1 Parameters . . . . . . . . . . . . . . . . . . . . . . . . . . . . . . . . . . . . . . . . . . . . . . . . . . . . . . . . . . . . 58
Operating Instructions
EF1 — 0.37–4.0
10.06.03
02_GB
Introduction and Safety Tips
1
Introduction and Safety Tips
1.1
General Information
Please read these instructions carefully and take all tips and suggestions they contain into
account before installation and commissioning of the converter.
These instructions must be made available to all users. The user must be familiar with the
unit before any work is performed. This especially includes the safety tips and warnings.
Symbols Used
This symbol is used when the life or health of the user is endangered or considerable property damage may result.
This symbol is found in the operating instructions in places where important points for the
safe and correct operation of this converter are found.
1.2
Safety Tips
All tips found in this chapter must be complied with in order to ensure the safety of users
and machines or equipment.
1.2.1
General Safety Tips
Converters are operated at voltages which may cause shocks which endanger life if
touched. They may contain exposed, high voltage or high temperature surfaces while in operation in accordance with their safety type. Serious danger to persons or property may result from unauthorized removal of the necessary covers, improper use, incorrect installation
or operation.
All work for the transport, installation, commissioning, and start-up, as well as for maintenance, is to be carried out by qualified personnel (IEC 364 or CENELEC HD 384 and national accident prevention measures must be complied with). Qualified personnel as defined by these instructions are personnel who are familiar with the set-up, assembly, commissioning, and operation of the product and have suitable qualifications for such work.
1.2.2
Proper Usage
The use of the converter explained in these instructions is solely for the control of the speed
of three-phase AC motors.
Converters are components which are intended to be installed in electrical equipment or
machines.
Commissioning of the converter is prohibited until it has been ensured that the system or
machine fulfils the provisions of the EU Guidelines 89/392/EWG (Machine Guideline) and
89/336/EWG (EMC Guideline).
The converter fulfils the requirements of the Low Voltage Guideline 73/231/EWG. The harmonized standards of the series EN 50178 are applied.
Those responsible for setting up or operating the system are liable for damage resulting
from improper use of the converter.
10.06.03
02_GB
Operating Instructions
EF1 — 0.37–4.0
3
Introduction and Safety Tips
1.2.3
Transport, Storage, Installation
The converter must be protected from improper stress. No structural elements may be bent
and/or isolation distances may be changed for transport and handling. The units contain
structural elements that are endangered by electrostatic discharges which may be damaged or destroyed as a result of improper handling. Touching structural electronic elements
and contacts should be avoided. Units that display defects to electrical or electronic components may not be put into operation since maintenance of the applicable standards can
no longer be ensured. The minimum distances and adequate cooling must be ensured during installation. The climatic conditions in accordance with EN 50178 are to be maintained.
1.2.4
Electrical Connections
The unit is to be separated from the power supply and suitably secured before any installation and connection work.
After the converter has been safety isolated, you must wait at least 5 minutes until the intermediate circuit condensers have discharged. Only then may work be begun on the unit.
The discharge period may be exceeded considerably in the case of faults.
The converter is planned for use with a fixed connection since leakage currents >3.5 mA
may occur due to the built in EMC filter. See also EN 50178 for dimensioning and placement
of the protective conductor.
The converter is designed for installation in a switchgear cabinet and may only be operated
after it has been grounded.
The installation regulations and the information in these operating instructions must be
complied with for proper operation of the converter.
When using a residual-current-operated protective device (r.c.c.b.), the compatibility to the
converter must be checked in advance. Depending on the type of unit, the following applies:
•
1 phase units: pulse current sensitive r.c.c.b. (Type A) or universal current sensitive
r.c.c.b. (Type B) are permitted.
•
3 phase units: Only universal current sensitive r.c.c.b. (Type B) are permitted.
Otherwise another protective measure like separation from the environment using double
or reinforced insulation, separation from the power supply, or similar is to be employed (EN
50178). The tripping current for the r.c.c.b. must be adequately dimensioned since the capacitive current (cable shields, filters) can easily lead to spurious tripping.
1.2.5
Operating Instructions
The converter can be configured so that it automatically restarts after a fault. The system
may have to be equipped with additional monitoring or protective equipment to avoid the
dangers which result from this (see accident prevention regulations, etc.).
The motor can be stopped by switching off the enabling or the target value. If accidental
start-up is to be prevented for reasons of safety, then the converter is to be isolated in addition, i.e. separated from the power supply.
4
Operating Instructions
EF1 — 0.37–4.0
10.06.03
02_GB
Introduction and Safety Tips
1.3
Product Overview
Although the E-trAC® EF1 Microdrive is small in size, it is big on performance. It is an economical yet powerful solution for many industrial applications. It features remote communications capability (using Modbus® protocol), a keypad for easy configuration, and a standard NEMA 1/IP31 enclosure that removes the need for mounting in a separate enclosure.
The EF1 product family includes a wide variety of models to suit almost any input voltage
requirement. See Section 2.1 on page 6 for information about the model number for a particular model).
1.4
Manual Overview
This manual contains specifications, receiving and installation instructions, configuration,
description of operation, and troubleshooting procedures for EF1 Microdrive devices.
We expressly state that we are not liable for damages and interruptions in operation resulting from non-compliance with these operating instructions.
We reserve the right to make changes to improve the unit and its functions.
Before you read on, please check whether technical changes are attached in the annex to this operating manual!
1.4.1
Publication History
Date
Version
Nature of Change
10.06.2003 02_GB Software revision RVLVL = 036 and RVLVL2 = 104.
10.06.03
02_GB
Operating Instructions
EF1 — 0.37–4.0
5
Technical Characteristics
2
Technical Characteristics
2.1
Interpreting Model Numbers
The model number of the EF1 Microdrive appears on the shipping carton label and on the
technical data label affixed to the model. The information provided by the model number is
shown below:
2.2
Power and Current Ratings
Model
Number
EF1K-
Motor Power
2S003
0.37
Input
Voltage
(Vac)
kW
Output
Current
(A)
[1]
Voltage
(Vac)
4.9
200...230
±15%
Single-phase
2.2
2S007
0.75
2S015
1.5
2S022
2.2
20.7
9.6
40007
0.75
3.0
2.1
40015
1.5
40022
2.2
40030
3.0
40040
4.0
8.0
Current
(A)
14.6
0...230
Three-phase
5.2
380...460
±15%
Three-phase
7.2
3.6
6.8
3.8
0...460
Three-phase
5.7
8.7
6.7
12.0
8.9
[1] Input current listed is at maximum output loading and minimum input voltage.
2.3
6
Environmental Specifications
Operating temperature
0 °C...+40 °C
Storage temperature
–20 °C...+65 °C
Maximum heatsink temperature
100 °C
Humidity
0% to 95% non-condensing
Altitude
1000 m without derating
Maximum vibration
5.9 m/s2 [0.6 G]
Acoustic noise
80 dba sound power at 1 m
Cooling
Natural convection (0.37 and 0.75 kW models).
Fan cooling (1.5 kW and larger models)
Operating Instructions
EF1 — 0.37–4.0
10.06.03
02_GB
Technical Characteristics
2.4
Electrical Specifications
Voltage input
230 Vac Models
460 Vac Models
200...230 Vac ±15%
380...460 Vac ±15%
Line frequency
50...60 Hz ±2 Hz
DC bus voltage for:
Overvoltage trip
Dynamic Brake activation
Nominal undervoltage (UV) trip
2.5
10.06.03
02_GB
407 Vdc
391 Vdc
202 Vdc
805 Vdc
780 Vdc
510 Vdc
Control system
Voltage Vector pulse width modulation (PWM).
Carrier frequency = 4, 6, 8, 12, and 16 kHz
Output voltage
0 to 100% of line voltage, Three-phase
Overload capacity
150% of rated rms for 60 seconds
Rated output frequency
50/60 Hz ±5%
Frequency range
0...1000 Hz
Frequency stability
±0.02 Hz from 0 to 300 Hz (digital)
±0.01 Hz from 300 to 1000 Hz (digital)
0.1% (analog) over 24 hours ±10 °C change
Frequency setting
By keypad or by external signal
(0 to 5 Vdc, 0 to 10 Vdc, 0 to 20 mA, or 4 to 20 mA)
Emitted interference/
immunity to interference
Limit values maintained with filter installed.
Three phase units: Requirements according to
EN61800-3:1996 and A11:2000 for use in industrial
environments.
Single phase units: Requirements according to
EN61800-3:1996 and A11:2000 for use in residential
environments.
Agency listings
UL and cUL Listed, CE Mark
Control Features Specifications
A1 reference input
0...5 Vdc, 0...10 Vdc, 0...20 mA, 4...20 mA (10 kΩ/50 Ω)
A2 reference input
0...10 Vdc (20 kΩ)
Reference voltage
10 Vdc (10 mA maximum)
Digital inputs
Off = 0 to 3 Vdc, On = 10 to 40 Vdc (for the default Active
High mode of operation)
Preset frequencies
3 inputs for seven preset frequencies (selectable)
Control output
2 relay outputs – 130 Vac, 1 A / 250 Vac, 0.5 A
Analog output
2 outputs: 0 to 10 Vdc or 0/4 to 20 mA (500 Ω max.),
software-adjustable programmable function
DC injection braking
Off or on with adjustable voltage (0 to 15%); adjustable time
(0.1 to 20.0 s) or continuous; activation by terminal strip or
frequency
Torque limit
Programmable limit (in percent of the nominal torque of the
motor)
Speed ramps
0.1 to 600.0 s (both primary and alternate ramps)
Operating Instructions
EF1 — 0.37–4.0
7
Technical Characteristics
2.6
Voltage boost
Adjustable 0 to 25% or auto-boost
Voltage characteristic
Linear or Quadratic
Timed overload
Programmable 0...100% of the nominal motor current
Non-defeatable
protective features
Overcurrent, overvoltage, overtemperature, ground fault,
short circuit
Slip compensation
To achieve the speed set at maximum load
Dimensions and Weights
Figure 1
EF1 Microdrive 0.37 kW...0.75 kW – 1 × 230 V
Model
Power
Weight
A
B
C
D
E
EF1K2S003
0.37 kW – 230 V
1.5
178.0
87.0
168.0
75.0
155.0
EF1K2S007
0.75 kW – 230 V
1.5
178.0
87.0
168.0
75.0
155.0
NOTE:
Dimensions in mm. Weight in kg.
8
Operating Instructions
EF1 — 0.37–4.0
10.06.03
02_GB
Technical Characteristics
Figure 2
EF1 Microdrive 1.5 kW...2.2 kW – 1 × 230 V
EF1 Microdrive 0.75 kW...4.0 kW – 3 × 460 V
Model
Power
Weight
A
B
C
D
E
EF1K2S015
1.5 kW – 230 V
2.5
183.0
142.0
137.2
128.8
173.0
EF1K2S022
2.2 kW – 230 V
3.5
226.0
142.5
188.0
128.8
193.0
EF1K40007
0.75 kW – 460 V
2.0
177.0
105.2
137.2
94.0
173.0
EF1K40015
1.5 kW – 460 V
2.5
183.0
142.0
137.2
128.8
173.0
EF1K40022
2.2 kW – 460 V
3.5
226.0
142.5
188.0
128.8
193.0
EF1K40030
3.0 kW – 460 V
3.5
226.0
142.0
188.0
128.8
193.0
EF1K40040
4.0 kW – 460 V
3.5
226.0
142.5
188.0
128.8
193.0
NOTE:
Dimensions in mm. Weight in kg.
10.06.03
02_GB
Operating Instructions
EF1 — 0.37–4.0
9
Receiving and Installation
3
Receiving and Installation
3.1
Preliminary Inspection
Before storing or installing the EF1 Microdrive, thoroughly inspect the device for possible
shipping damage. Upon receipt:
1. Remove the drive from its package and inspect exterior for shipping damage. If damage
is apparent, notify the shipping agent and your sales representative.
2. Read the technical data label affixed to the drive and ensure that the correct horsepower
and input voltage for the application has been purchased.
3. If you will store the drive after receipt, place it in its original packaging and store in a
clean, dry place free from direct sunlight or corrosive fumes, where the ambient temperature is not less than –20 °C (–4 °F) or greater than +65 °C (+149 °F).
EQUIPMENT DAMAGE HAZARD. Do not operate or install any drive that appears damaged. Failure to follow this instruction can result in injury or equipment damage.
3.2
Installation Precautions
Improper installation of the EF1 Microdrive will greatly reduce its life. Be sure to observe the
following precautions when selecting a mounting location:
•
Do not install the drive in a place subjected to high temperature, high humidity, excessive vibration, corrosive gases or liquids, or airborne dust or metallic particles. See Section 2.3 on page 6 for temperature, humidity, and maximum vibration limits.
•
Do not mount the drive near heat-radiating elements or in direct sunlight.
•
Mount the drive vertically and do not restrict the air flow to the heat sink fins.
•
The drive generates heat. Allow sufficient space around the unit for heat dissipation.
Failure to observe these precautions may void the warranty!
3.3
Interference Suppression Measures
3.3.1
General
Frequency converters are electronic devices for use in industrial and commercial equipment. These devices cannot be operated independently according to the EMC Guideline
89/336/EWG, are only intended for further installation by competent equipment and machine producers, and therefore do not need to be labelled. The proof of conformity of the
machine/equipment with the EMC Guideline must be provided by the builder or operator of
the equipment.
Converters of the EF1 Microdrive series are equipped with an internal filter. They fulfil the
requirements of the EMC Product Standard EN61800-3 for generally available products
and are suitable for use in first environments (residential areas).
The evaluation of the conformity took place in a realistic environment under consideration
of the following installation tips.
Other loads connected to the line can cause voltage spikes which can impair the function
of the inverter and can even damage it. Chokes can be additionally used on the line side to
protect the inverter against voltage spikes (resulting from the switching of large loads on the
line).
10
Operating Instructions
EF1 — 0.37–4.0
10.06.03
02_GB
Receiving and Installation
3.3.2
Installation Tips
Electrical/electronic equipment may be influenced or disturbed in its operation via connecting leads or other metallic connections.
The electromagnetic compatibility of the system is greatly influenced by the type and style
of the installation. Measures for grounding, screening, and filtering must be given special
attention. Compliance with the following installation tips ensures compliance with the valid
EMC limit values for the machine/equipment.
•
Converter and optional components such as power line or input reactors are to be provided with large contact surfaces to the grounded installation base plate. Use of galvanised installation base plates is preferred. If painted base plates are used, then the installation surface must be free of paint.
•
Power cable, motor line, and control lines are to be laid at great distances from one another.
•
The motor line is to be shielded and grounded at both ends.
•
Connect the shield on the motor line in the terminal box of the motor with PE. Use of a
metallic cable gland may be necessary.
•
An optional power line reactor is to be installed right next to the converter and connected
to the converter with a shielded cable. Ground the cable shield on both sides.
•
Control lines are to be shielded. Ground the shield on both sides.
•
Twist unshielded control lines.
•
Place cable shields with ground clamps on a large surface area of the bare metallic installation base plate or compensation rails (see Illustration 3).
•
Use a central grounding point for the entire machine/system (installation base plate).
Ground this point using ground lines with large cross sections or grounding bands.
•
Cable shields are not to be extended using a single wire and should not be interrupted.
•
Isolate the power section and the control section when setting up the switchgear cabinet
or system. Shielding between the two parts may be necessary.
•
Inductive contact elements (spools of protective devices or relays) are to be equipped
with interference units (RC elements, free-wheeling diodes, varistors).
Figure 3
Grounding cable shields
10.06.03
02_GB
Operating Instructions
EF1 — 0.37–4.0
11
Connections
4
Connections
HAZARDOUS VOLTAGE!
•
Read and understand this manual in its entirety before installing or operating the EF1
Microdrive. Installation, adjustment, repair, and maintenance of these drives must be
performed by qualified personnel.
•
Disconnect all power before servicing the drive. WAIT 5 MINUTES until the DC bus capacitors discharge. Then measure the DC bus capacitor charge between the B+ and B–
terminals to verify that the DC voltage is less than 45 Vdc.
•
DO NOT short across DC bus capacitors or touch unshielded components or terminal
strip screw connections with voltage present.
•
Install all covers and close door before applying power or starting and stopping the drive.
•
The user is responsible for conforming to all applicable code requirements with respect
to grounding all equipment.
•
Many parts in this drive, including printed circuit boards, operate at line voltage. DO NOT
TOUCH. Use only electrically-insulated tools.
Before servicing the drive:
•
Disconnect all power.
•
Place a “DO NOT TURN ON” label on the drive disconnect.
•
Lock the disconnect in the open position.
Failure to observe these precautions will cause shock or burn, resulting in severe
personal injury or death.
4.1
Introduction
This chapter provides information on connecting power and control wiring to the EF1 Microdrive.
4.2
General Wiring Information
Never connect input AC power to the motor output terminals T1/U, T2/V, or T3/W – or damage to the drive will result.
4.2.1
Power Wiring
Wire cross section and the associated protection for the power line inlet L1/R, L2/S, L3/T
and motor output T1/U, T2/V, T3/W are to be selected in accordance with the information
in Chapter 4.4.2. National and regional regulations must be complied with (VDE/CEI/EVU).
4.2.2
Control Wiring
Control inputs and outputs have double power line isolation and may be touched with no
additional safety measures.
12
Operating Instructions
EF1 — 0.37–4.0
10.06.03
02_GB
Connections
4.3
Input Line Requirements
4.3.1
Line Voltage
See the Power and Current Ratings table on page 6 for the allowable fluctuation of AC line
voltage for your particular EF1 model. A supply voltage above or below the limits given in
the table will cause the drive to trip with either an overvoltage or undervoltage fault.
Exercise caution when applying the EF1 Microdrive on low-line conditions.
For example, an EF1 2S... series inverter will operate properly on a 208 Vac line – but the
maximum output voltage will be limited to 208 Vac. Now if a motor rated for 230 Vac line
voltage is controlled by this drive, higher motor currents and increased heating will result.
Therefore, ensure that the voltage rating of the motor matches the applied line voltage.
4.3.2
Phase Imbalance
Phase voltage imbalance of the input AC source can cause unbalanced currents and excessive heat in the drive’s input rectifier diodes and DC bus capacitors. Phase imbalance
can also damage motors running directly across the line.
4.3.3
Single-phase Operation
EF1 Microdrive converter of the series 2S... (230 V units) are operated using single phase
power. The connection is done using terminals L1 and N. The terminal between L1 and N
is not used.
EQUIPMENT DAMAGE HAZARD! Never use power-factor correction capacitors on motor
terminals T1/U, T2/V, or T3/W of the EF1 Microdrive. Doing so will damage the semiconductors. Failure to follow this instruction can result in injury or equipment damage.
4.4
Power Terminals
4.4.1
Description of the Terminals
Figure 4 shows the power terminals for the EF1 Microdrive. Note that earth ground is not
on this terminal strip; it is located separately ( ). The following table describes the terminals.
10.06.03
02_GB
Terminal
Description
L1/R
L2/S
L3/T
or
L1
N
These terminals are the line connections for input power. Single phase models connect to L1 and N. The terminal between L1 and N is not used.
B–
B+
These terminals provide a connection to the DC Bus. They may be used for
common DC Bus connections or for powering the drive from a DC source.
Alternately, by connecting a dynamic brake unit to these terminals, braking
capacity may be enhanced. See page 15 for more information.
DB
B+
These terminals are the connection point for the internal dynamic brake resistor. If an external resistor is used for dynamic braking, the internal resistor
must be disconnected; see page 15 for more information.
Operating Instructions
EF1 — 0.37–4.0
13
Connections
Terminal
T1/U
T2/V
T3/W
(PE)
Description
These terminals are for motor connections.
The models 2S003 and 2S007 have a terminal for the grounding (PE). The
grounding on all other units is done using the heat sink (screw connection ).
Figure 4
Power Terminals
4.4.2
Typical Power Connections
Figure 4 on page 14 shows the terminals for line power and motor output. See section 4.3
starting on page 13 for input line requirements.
Note that when testing for a ground fault, do not short any motor lead (T1/U, T2/V, or T3/
W) back to an input phase (L1/R, L2/S, or L3/T).
It is necessary to provide fuses and a disconnect switch for the input AC line in accordance
with all applicable electrical codes. The EF1 Microdrive is able to withstand a 150% overload for 60 s.
In order to ensure maximum possible protection for the converter, fusible links should be
used to protect from over-voltage. These fuses should have a switching capacity of 200,000
Aeff. The following tables show the recommended ampere values for all EF1 Microdrive
converters.
For 400 V line supplies we recommend time-lag type NEOZED-fuses.
EF1 Microdrive 1 × 230 V
Model Number
2S003
2S007
2S015
2S022
Inverter power (kW)
0.37
0.75
1.5
2.2
Rated current, fuse (A)
4.0
6.0
10.0
16.0
1.5
1.5
1.5
2.5
1.5
1.5
1.5
2.5
Cable cross section, mains lead (mm2)
2
Cable cross section, motor line (mm )
14
Operating Instructions
EF1 — 0.37–4.0
10.06.03
02_GB
Connections
EF1 Microdrive 3 × 460 V
Model Number
Inverter power (kW)
Rated current, fuse (A)
Cable cross section, mains lead
(mm2
)
Cable cross section, motor line (mm2)
40007
40015
40022
40030
40040
0.75
1.5
2.2
3.0
4.0
2.0
4.0
6.0
6.0
10.0
1.5
1.5
1.5
2.5
2.5
1.5
1.5
1.5
2.5
2.5
The medium time-delay fuses of type “Bussmann FRS-R”, for example, are recommended
in networks with nominal voltages greater than 415 V. The typical operating times are 150
to 250 s for 2× overcurrent and 180 to 1500 ms in the case of 10× overcurrent.
4.5
Dynamic Braking
The EF1 Microdrive is supplied with an integrated dynamic braking (DB) resistor, and is designed to have adequate dynamic braking for most applications. In cases where short stopping times or high inertia loads require additional braking capacity, install an external resistor.
To install an external resistor, first disconnect the internal DB resistor and properly terminate the wires leading to it. Then connect the external resistor to the B+ and DB terminals.
See Figure 7 on page 18 for further information.
You must also set parameter 412-DBCFG to data value 2 and store the computed value of
the DB duty cycle in parameter 413-EDBDC. Use the following equation to compute the duty cycle for the DB resistor:
DB Operating Time
Duty Cycle = --------------------------------------------------- × 100%
Full Cycle Time
Either minutes or seconds can be used as the unit for time variables. Make sure that both
are not used in the same equation.
You should also verify with the manufacturer of the selected resistor that the resistor is indeed appropriate for your application. Contact BERGES for further assistance with other
possible sizing limitations.
4.6
Control Terminals
4.6.1
Description of the Control Terminals
Figure 5 shows the control terminals found on the I/O board of the EF1 Microdrive. See
page 7 for specification information concerning these features. The following table describes the control terminals.
10.06.03
02_GB
Operating Instructions
EF1 — 0.37–4.0
15
Connections
16
Klemmen
Description
AQ1
Analog output 1, which is a dedicated voltage output.
The default signal range is from 0 to 10 Vdc (5 mA maximum). It is proportional to the variable configured by parameter 701-METER (see page 40). It
may be calibrated while the drive is running via parameters 702-M1OFF and
703-M1SPN (see page 40).
AQ2
Analog output 2, which is a dedicated current output.
The default signal ranges from 0 to 20 mAdc (50 to 500 Ω). It is proportional
to the variable configured by parameter 709-MET2 (see page 40).It may be
calibrated while the drive is running via parameters 710-M2OFF and 711M2SPN (see page 40).
A1
Analog Input 1, which is used to provide speed references.
The default input signal is 0 to 10 Vdc or 4 to 20 mAdc (the type of input signal
is selected with parameter 205-A1TYP; see page 28). Parameters 206A1OFF and 207-A1SPN may be used to offset the starting value of the range
and the size of the range, respectively; see page 29 for more information.
If a 0 to 20 mAdc input signal is configured, the burden is 50 Ω. If a 0 to 10
Vdc input signal is configured, the input impedance is 10 kΩ.
A potentiometer with a minimum value of 1 kΩ may be used for this input.
REF
This terminal is a +10 Vdc source for customer-supplied potentiometers. The
maximum load on this supply cannot exceed 10 mAdc.
A2
Analog Input 2, which acts as a dedicated voltage input.
The range of the input signal is 0...10 Vdc and may be adjusted using the parameters 208-A2OFF (offset) and 209-A2SPN (scaling) (see page 29).
The input impedance for this terminal is 20 kΩ.
A potentiometer with a minimum value of 1 kΩ may be used for this input.
CM
The common signal for both analog and digital inputs. Note that while there
are two CM (common) terminals, they both connect to the same electrical
point.
+V
A source for positive nominal 24 Vdc voltage, and is only intended for use with
digital inputs.
D1
Digital input.
This must be a Start or Run input when in terminal strip mode. See parameter
201-MODE on page 27 for more information.
D2...D6
Digital inputs 2...6.
The function of a digital input is configured by the parameter with the same
name as the digital input (for example, D2 is configured by parameter 902D2); see page 44 for more information.
NO2
RCM2
The second auxiliary relay.
The function of the relay is set by parameter 705-R2 (see page 41); the default setting is for the relay to activate when a fault occurs.
Terminal NO2 is the normally-open contact; it will close when the relay is activated. RCM2 is the common terminal.
NC1
NO1
RCM1
The first auxiliary relay.
The function of the relay is set by parameter 704-R1 (see page 41); the default setting is for the relay to activate when the motor is at speed.
Terminal NO1 is the normally-open contact, which closes when the relay is
activated. Terminal NC1 is the normally-closed contact, which opens when
the relay is activated. Terminal RCM1 is the common terminal.
Operating Instructions
EF1 — 0.37–4.0
10.06.03
02_GB
Connections
Figure 5
Control Terminals
4.6.2
Typical Connection Diagrams
Figure 6
2-wire Control/3-wire Control
10.06.03
02_GB
Operating Instructions
EF1 — 0.37–4.0
17
Connections
Figure 7
Connections for Dynamic Brake (DB) Options
NOTE:
See Section 4.5 on page 15 for information on selecting and implementing dynamic braking
(DB) resistors. If a user-supplied DB resistor is to be used with an EF1 Microdrive, the internal DB resistor must be disconnected and the wires leading to it properly terminated.
Figure 8
Connections for Analog Inputs
NOTE:
A1 input impedance is 50 ohms when configured for process current input via parameter
205-A1TYP. The reference point for the target value input (CM) is grounded. This must be
taken into account for serial switching of units with control using the target current value.
18
Operating Instructions
EF1 — 0.37–4.0
10.06.03
02_GB
Connections
Figure 9
Selection of Preset Speeds
10.06.03
02_GB
PS3 (Bit 3)
PS2 (Bit 2)
PS1 (Bit 1)
Speed Selected
0
0
0
Normal reference speed as defined by parameters 201-MODE and 204-FSEL.
0
0
1
Preset frequency F2 (parameter 303-F2).
0
1
0
Preset frequency F3 (parameter 304-F3).
0
1
1
Preset frequency F4 (parameter 305-F4).
1
0
0
Preset frequency F5 (parameter 306-F5).
1
0
1
Preset frequency F6 (parameter 307-F6).
1
1
0
Preset frequency F7 (parameter 308-F7).
1
1
1
Maximum frequency (parameter 302-FMAX).
Operating Instructions
EF1 — 0.37–4.0
19
Programming with the EF1 Keypad
5
Programming with the EF1 Keypad
5.1
Introduction
The EF1 Microdrive is pre-programmed to run a standard, 4-pole AC induction motor. For
many applications, the drive is ready for use right out of the box with no additional programming needed. The digital keypad controls all operations of the unit. The eight input keys allow “press and run” operation of the motor (Operation mode) and straightforward programming of the parameters (Program mode).
To simplify programming, the parameters are grouped into two levels:
1. Level 1 is entered by pressing the Program (PROG) key at any time. Level 1 allows you
to access the most commonly used parameters.
2. Level 2 is entered by holding down the SHIFT key while pressing the PROG key. Level
2 allows access to all EF1 parameters, including those in Level 1, for applications which
require more advanced features.
A list of all parameters and levels is found at the end of these instructions.
Sec
V
°C
Hz
%
RPM
DB
A
FWD
FWD
REV
WRN
PRG
REV
PROG
SHIFT
ENTER
FLT
STOP
Figure 10
The EF1 Keypad
5.2
Keypad Operation
Parameter 201-MODE (see page 27) determines whether the EF1 Microdrive accepts its
Run/Stop and speed commands from the digital keypad or from the input terminals. The following table describes the function of the keys in Operation mode.
20
Operating Instructions
EF1 — 0.37–4.0
10.06.03
02_GB
Programming with the EF1 Keypad
FWD
Initiates forward run when pressed momentarily. If the drive is running in reverse when FWD is pressed, it will decelerate to zero speed, change direction, and accelerate to the set speed.
REV
Initiates reverse run when pressed momentarily. If the drive is running in forward when REV is pressed, it will decelerate to zero speed, change direction,
and accelerate to the set speed.
STOP
Causes a Ramp-to-Stop when pressed. Programmable to Coast-to-Stop by
parameter 401-RSEL (page 31).
When the drive is stopped, pressing this key increases the desired running
speed. When the drive is running, pressing this key increases the actual running speed. The target values are increased in steps of 0.1 Hz or 0.01 Hz depending on the setting of the parameter 801-PRGNO. Pressing SHIFT while
holding the key bypasses the delay.
When the drive is stopped, pressing this key decreases the desired running
speed. When the drive is running, pressing this key decreases the actual running speed. The target values are reduced in steps of 0.1 Hz or 0.01 Hz depending on the setting of the parameter 801-PRGNO. Pressing SHIFT while
holding the key bypasses the delay.
ENTER
When the drive is stopped or running, pressing this key stores the selected
frequency as the initial operating frequency when the drive is powered up.
The frequency is maintained until another frequency is entered.
Program mode is entered by stopping the EF1 Microdrive and pressing the Program
(PROG) key for Level 1 access; or holding down SHIFT while pressing PROG for Level 2
access. The following table describes the function of the keys in Program mode.
PROG
When this key is pressed, the drive enters Program mode and Level 1 parameters are available. (To access Level 2 parameters, hold down SHIFT while
pressing this key.) Once the Program mode is active, pressing this key at any
time returns the drive to the Operation mode. If an Access Code has been
programmed, it must be entered to proceed with programming. See 807ACODE (page 44).
In the Program mode, pressing this key scrolls forward through the parameters. If the PRG indicator is flashing, it increases the value of the parameter.
The ENTER key must be pressed to store the new value.
In the Program mode, pressing this key scrolls backward through the parameters. If the PRG indicator is flashing, it decreases the value of the parameter.
The ENTER key must be pressed to store the new value.
NOTE:
If the PRG indicator is flashing, momentarily pressing and releasing both the
UP and DOWN arrows simultaneously will return the parameter to the factory
default value. Press ENTER to store the new value.
10.06.03
02_GB
SHIFT
Pressing this key while a parameter is displayed allows that parameter to
have its value changed by use of the UP and DOWN arrow keys. The PRG
indicator flashes to show that the parameter can be programmed. Pressing
the button again causes the display to jump back one step. Other parameters
can now be selected for editing.
ENTER
This key must be pressed after the value of a parameter has been changed
to store the new value. The display will show “stored” (STO) for one second
indicating that the new value has been entered into memory.
Operating Instructions
EF1 — 0.37–4.0
21
Programming with the EF1 Keypad
5.3
LED Displays
As shown in Figure 10 on page 20, the digital keypad provides 13 LED indicators. The following table describes what each of these LEDs indicate.
LED
State
FLT
On
Drive is faulted.
On
Forward direction commanded.
Off
Drive is not running in the Forward direction.
On
Reverse direction commanded.
Off
Drive is not running in the Reverse direction.
Off
The drive is in Operation mode.
On
The drive is in Program mode (parameter name displayed).
FWD
REV
PRG
Indication
Flashing The value for the parameter may be configured.
Off
Drive is operating normally.
On
Fault warning. Drive is running under impermissible conditions which
will cause the converter to switch off if not corrected.
Sec
On
The unit of the displayed parameter is seconds.
°C [1]
On
The unit of the displayed parameter is degrees Celsius.
%
On
The value of the displayed parameter is a percentage.
DB
On
Dynamic braking is active.
V
On
The unit of the displayed parameter is volts.
Hz [2]
On
The unit of the displayed parameter is Hertz.
RPM
On
The unit of the displayed parameter is revolutions/minute.
A
On
The unit of the displayed parameter is amperes.
WRN [1]
[1] The joint lighting of the WRN and °C-LED's indicates that a motor PTC connected to digital input D6 (setting
19) was triggered due to an overheated motor.
[2] A blinking Hz LED in the operating mode indicates the target frequency (stopped motor) and a constantly lit
Hz LED indicates the actual frequency (turning motor).
5.4
Keypad Display Window
5.4.1
Standard Display
The LED display provides information on drive operation and programming. The four, large
7-segment displays show drive output and programming data. Special symbols provide further information about drive operation (see the following section). The following figure
shows all segments displayed. (In normal operation, only active segments are displayed.)
22
Sec
V
°C
Hz
%
RPM
DB
A
Operating Instructions
EF1 — 0.37–4.0
10.06.03
02_GB
Programming with the EF1 Keypad
5.4.2
Special Displays
The keypad’s display may show special information under certain conditions. The following
figures shows these displays and what each indicates:
Line Start Lockout.
See 802-START on page 42.
Emergency Stop.
See 802-START on page 42.
Low Voltage.
AC line voltage is too low.
5.5
Programming
5.5.1
Accessing Parameters
When PROG (or SHIFT+PROG) is pressed after the application of power or a fault reset,
parameter 201-MODE is always the first parameter displayed.
If a different parameter is accessed and Program mode is exited, that parameter is the first
one displayed the next time Program mode is entered. The drive remembers a different
“last parameter accessed” for Levels 1 and 2.
If no key is pressed for 10 minutes while in the Program mode, the drive automatically reverts to the Operation mode.
5.5.2
Changing Display Scroll Rate
Three scroll rates are used to speed data entry:
1. The parameter values are adjusted with the normal speed of change by pressing the UP
or DOWN arrows.
2. As soon as one of the arrow keys is pressed after briefly pressing the SHIFT key, the
speed is increased by one step.
3. This may be increased by an additional step when the SHIFT key is pressed again while
the arrow key is held down.
5.5.3
Programming Procedure
To program the value of a parameter, follow these steps:
1. Press the STOP key if the drive is still running.
2. Press the Program (PROG) key to enter Level 1 Program mode. To enter Level 2, press
SHIFT+PROG. The PRG indicator will turn on.
3. Press the UP/DOWN arrow keys to access the desired parameter.
10.06.03
02_GB
Operating Instructions
EF1 — 0.37–4.0
23
Programming with the EF1 Keypad
4. Press the SHIFT key. The blinking PRG display now shows that the parameter value can
be changed. By pressing this key again, the display jumps back one step. Now additional parameters can be selected for editing without any changes in parameters having
been saved.
5. Press the UP/DOWN arrows to select the new value.
6. Press the ENTER key to store the new value. The display shows STO (“stored”) for one
second.
7. Call up additional parameters using the UP/DOWN arrow keys or exit the programming
mode by pressing the PROG key (to save the changed value, the ENTER key must have
been pressed beforehand).
5.5.4
Restoring Factory Settings
Whenever a parameter’s value is being changed (noted by the PRG indicator flashing), the
original factory setting for that parameter may be restored by pressing and releasing both
the UP and DOWN arrows simultaneously and then pressing the ENTER key.
To restore ALL parameters to factory settings, or to recall a previously stored parameter
set, see parameter 801-PRGNO (page 41).
5.6
Quick Start
The following procedure is for operators with simple applications who would like to get up
and running quickly. Be sure to read and understand Sections 5.1 through 5.5 before
proceeding with these instructions. If you are using remote operators, substitute the
speed potentiometer for the UP and DOWN arrows, and the remote Run/Stop switch for the
FWD key in the following instructions.
IMPROPER EQUIPMENT COORDINATION. Verify that proper voltage is connected to the
drive before applying power. Failure to observe this instruction can result in injury or
equipment damage.
1. Follow all precautions and procedures in Section 3 (Receiving and Installation).
2. Apply AC power to the input terminals. For about two seconds the display will show all
segments active. Then, the display will change to all zeros.
3. The factory settings are for keypad only operation in the forward direction – that is, the
REV key is disabled. Press the FWD key, which causes the FWD indicator to become lit.
4. Press the UP Arrow to increase the desired running frequency. When the display gets
to 0.1 Hz, the drive starts to produce an output.
5. When the motor starts to turn, check the rotation. If the motor is turning in the wrong direction, press STOP, remove AC power, and wait for all indicators to go out. After
the STATUS indicator has gone out, reverse any two of the motor leads at T1/U, T2/V,
or T3/W.
6. The EF1 Microdrive is preset to run a typical NEMA B 4-pole induction motor to a maximum speed of 50.0 Hz with both acceleration and deceleration times set to 3.0 seconds.
7. Use the Arrow keys to set the proper running speed of the motor and the FWD and
STOP keys to control its operation.
24
Operating Instructions
EF1 — 0.37–4.0
10.06.03
02_GB
EF1 Parameters
6
EF1 Parameters
6.1
Introduction
The EF1 Microdrive incorporates a comprehensive set of parameters that allow you to configure the device to meet the special requirements of your particular application.
This chapter describes the available parameters and the values or functions that may be
assigned to them. A list of all parameters and levels is found at the end of these operating
instructions.
6.2
Level 1 Parameters
The most commonly configured EF1 parameters are stored in a group named Level 1. This
group is easily accessed by pressing the PROG key as described in Section 5. The following table lists the parameters in this group; for further information on the parameter, please
turn to the indicated page.
Parameter
Name
6.3
Description
See Parameter
Page
Name
See
Page
Description
005-FLT5
Most-recent Fault
26
303-F2
Preset Frequency 2/
Jog Frequency
30
102-FOUT
Motor Output Frequency
26
402-ACC1
Acceleration Time 1
32
103-VOUT Motor Output Voltage
26
403-DEC1
Deceleration Time 1
32
104-IOUT
26
502-BOOST Torque Boost
35
105-LOAD Drive Load
26
605-SLIP
Slip Compensation
38
107-TEMP Drive Temperature
27
607-TOL
Timed Overload Trip
Point
38
110-WARN Warning Code
27
701-METER
Analog Meter Output
AQ1 Selector
40
201-MODE Input Mode
27
704-R1
Relay R1 Selector
41
301-FMIN
Minimum Frequency
30
705-R2
Relay R2 Selector
41
302-FMAX Maximum Frequency
30
709-MET2
Analog Meter Output
AQ2 Selector
40
Motor Output Current
Description of Parameters
002-RVLVL
Software Revision
Read-Only
Parameter 002-RVLVL, the AL Software Revision parameter, displays the application layer
software version.
◊ Range: –
10.06.03
02_GB
Operating Instructions
EF1 — 0.37–4.0
25
EF1 Parameters
003-IRAT
Drive Rated Current
Read-Only
Parameter 003-IRAT, the Drive Rated Current parameter, defines the nominal output current of the EF1 Microdrive. It serves as the 100% reference for all current measurements.
The parameter’s value varies by model; see Section 2.2 on page 6.
Continuous drive capacity is 1.1 times the value of this parameter.
◊ Range: varies
005-FLT5
Most-recent Fault
Read-Only
006-FLT4
Second-oldest Fault
Read-Only
007-FLT3
Third-oldest Fault
Read-Only
008-FLT2
Fourth-oldest Fault
Read-Only
009-FLT1
Oldest Fault
Read-Only
These five parameters store the fault code numbers of the last five faults. Parameter 009FLT1 (“fault 1”) contains the fault code of the oldest fault, while parameter 005-FLT5 (“last
fault”) contains the fault code of the most recent fault.
When one of these parameters is displayed, the value will be of the format “ff.mm”, where
ff is the fault code number and mm is the number of minutes that have elapsed between the
last time the drive was reset and the occurrence of the fault. See Section 7 on page 50 for
the list of fault codes and troubleshooting assistance.
◊ Range: –
102-FOUT
Motor Output Frequency
Read-Only
Display of the target frequency of the converter when the start command has been set. This
frequency is equivalent to the target value set.
◊ Range: 0...1000 Hz
103-VOUT
Motor Output Voltage
Read-Only
Parameter 103-VOUT, the Motor Output Voltage parameter, shows the motor output voltage calculated as a percentage of the applied input voltage.
Range: 0...100%
104-IOUT
Motor Output Current
Read-Only
Parameter 104-IOUT, the Motor Output Current parameter, shows the motor phase-tophase current computed to an accuracy of ±20%.
◊ Range: 0...60 A
105-LOAD
Drive Load
Read-Only
Parameter 105-LOAD, the Drive Load parameter, shows the load on the motor (the true
part of the motor current) as a percentage of the drive rating.
The output current is measured with the motor power factor applied to an accuracy of
±20%. The parameter value will be positive when the motor is pulling a load (“motoring
mode”) and negative when being pulled by a load (“regenerative mode”).
◊ Range: 0...200%
26
Operating Instructions
EF1 — 0.37–4.0
10.06.03
02_GB
EF1 Parameters
107-TEMP
Drive Temperature
Read-Only
Parameter 107-TEMP, the Drive Temperature parameter, shows the temperature of the
drive’s heatsink to an accuracy of ±3 °C. When the heatsink temperature exceeds 105 °C
(221 °F), the overtemperature fault (fault F50; see page 50 for more information) will occur
and the drive will stop.
◊ Range: 0...110 °C
110-WARN
Warning Code
Read-Only
The value of this parameter indicates whether a warning condition exists. The following are
the warning conditions and the code assigned to each:
Data Value
Warning Condition Indicated
0
No warning condition exists.
1
Drive not ready.
2
Internal data error.
3
Drive in torque limit.
4
Low DC bus.
5
Line start lockout active.
6
PTC (parameter 906-D6 must be set to 19 for this to occur).
◊ Range: 0...6
201-MODE
Input Mode
Parameter 201-MODE, the Input Mode parameter, configures the source for speed reference and Run/Stop control input. When programming mode is first accessed, this is the first
parameter displayed.
Data Value
Speed Control
Run/Stop Control
0
Keypad
Keypad (Forward only).
1
Analog Input A1
Keypad (Forward only).
2
Keypad
Terminals (2-wire maintained contact).
3
Analog Input A1
Terminals (2-wire maintained contact).
4
Keypad
Terminals (3-wire momentary).
5
Analog Input A1
Terminals (3-wire momentary).
6
7
EMOP
[1] [3]
Terminals (2-wire).
EMOP
[1] [3]
Terminals (3-wire).
EMOP1
[2] [3]
Terminals (2-wire).
9
EMOP1
[2] [3]
Terminals (3-wire).
10
Keypad
Keypad (Forward and Reverse).
11
Analog Input A1
Keypad (Forward and Reverse).
8
[1] Commanded output frequency returns to the value of parameter 301-FMIN when the drive is stopped.
[2] Commanded output frequency remains at the previous setpoint when the drive is stopped.
[3] The parameters (902-D2...906-D6) that set the functions of the designated digital inputs for EMOP must be
configured as “Speed+” and “Speed–” (data codes 8 and 9) to complete the implementation. See page 44 for
more information.
◊ Range: 0...11
10.06.03
02_GB
Default = 0
Operating Instructions
EF1 — 0.37–4.0
27
EF1 Parameters
204-FSEL
Speed Setpoint Selector
Parameter 204-FSEL, the Speed Setpoint Selector parameter, configures:
•
What input from the terminal strip controls the output frequency (A1 alone, A1 plus A2,
A1 minus A2, or selection of A1 or A2 by digital input);
•
Whether the signal is offset by the value of parameter 206-A1OFF or parameter 208A2OFF; and
•
Whether the signal range is inverted (that is, the minimum input corresponds to the maximum output, while the maximum input corresponds to the minimum output).
The following data values may be assigned to this parameter:
Data Value Offset
Input Signal
0
No
A1, not inverted.
1
No
A1, inverted.
2
Yes
A1, not inverted.
3
Yes
A1, inverted.
4
No
A1+A2, not inverted.
5
No
A1+A2, inverted.
6
Yes
A1+A2, not inverted.
7
Yes
A1+A2, inverted.
8
No
A1–A2, not inverted.
9
No
A1–A2, inverted.
10
Yes
A1–A2, not inverted.
11
Yes
A1–A2, inverted.
12
No
A1 or A2 by digital input, not inverted [1].
13
No
A1 or A2 by digital input, inverted [1].
14
Yes
A1 or A2 by digital input, not inverted [1].
15
Yes
A1 or A2 by digital input, inverted [1].
[1] The parameter (parameter 902-D2...906-D6) that sets the function of the designated digital input must be configured (data code 13) to complete the implementation. See page 44 for information.
◊ Range: 0...15
205-A1TYP
Default = 0
A1 Input Type
Parameter 205-A1TYP, the A1 Input Type parameter, selects the type of signal for analog
input A1. Parameters 206-A1OFF and 207-A1SPN may be used to customize the selected
range. The following data values may be assigned to this parameter:
Data Value
28
Input Signal
0
0 to 10 Vdc.
1
0/4 to 20 mAdc (by default, the input signal range is 4 to 20 mAdc; set parameter 206-A1OFF to 0% to select the 0 to 20 mAdc input signal range).
2
0 to 5 Vdc.
Operating Instructions
EF1 — 0.37–4.0
10.06.03
02_GB
EF1 Parameters
Data Value
Input Signal
3...5
Same as 0–2 except that if the input signal drops below a fixed offset value
(for example, if the configured signal is 4 to 20 mAdc and the input signal
sinks to 2 mAdc) or, if no offset is configured, the input signal is lost, fault F81
will be generated. See page 51 for more information on this fault.
◊ Range: 0...5
206-A1OFF
Default = 0
A1 Offset
Determine the offset for the analogue input A1 (percent value of the programmed maximum
value).
Note that if the input signal drops below the offset value or if the input signal is lost (if no
offset is configured), fault F81 will be generated. See page 51 for more information on this
fault.
◊ Range: 0...100%
207-A1SPN
Default = 20%
A1 Span
Parameter 207-A1SPN, the A1 Span parameter, is used to alter the range of the input signal for analog input A1. For example, if parameter 205-A1TYP selects the 0 to 10 Vdc input
signal, setting this parameter to 50% reduces it to 0 to 5 Vdc.
◊ Range: 0...200%
208-A2OFF
Default = 100%
A2 Offset
Parameter 208-A2OFF, the A2 Offset parameter, configures the offset for analog input A2
expressed as a percentage of the maximum value of the input signal.
◊ Range: 0...100%
209-A2SPN
Default = 0%
A2 Span
Parameter 209-A2SPN, the A2 Span parameter, is used to alter the range of the input signal for analog input A2. For example, if parameter 205-A1TYP selects the 0 to 10 Vdc input
signal, setting this parameter to 50% reduces it to 0 to 5 Vdc.
◊ Range: 0...200%
210-TLSEL
Default = 100%
Torque Limit Source Selection
Parameter 210-TLSEL, the Torque Limit Reference Selector, is used to select how the
torque limit thresholds in the four quadrants of operation (motoring forward and reverse, regenerative forward and reverse) are set. The following data values may be assigned to this
parameter:
10.06.03
02_GB
Data Value
Source for Torque Limit Thresholds
0
Torque limit thresholds in all quadrants are set via preset values; see parameters 601-LTLF, 602-LTLR, 603-RTLF, and 604-RTLR starting on page 37
for more information.
Operating Instructions
EF1 — 0.37–4.0
29
EF1 Parameters
Data Value
Source for Torque Limit Thresholds
1
The torque limit threshold when operating in the forward motoring quadrant
of operation is controlled by the A2 analog input (with the value of parameter
601-LTLF acting as the maximum limit). The torque limit thresholds when operating in the other quadrants are set via parameters 602-LTLR, 603-RTLF,
and 604-RTLR (see page 37).
2
The torque limit thresholds when operating in the forward and reverse motoring quadrants of operation are controlled by the A2 analog input (with the values of parameters 601-LTLF and 602-LTLR acting as the maximum limits for
the two quadrants). The torque limit thresholds when operating in the other
quadrants are set via parameters 603-RTLF and 604-RTLR (see page 37).
3
The torque limit thresholds in all quadrants are controlled by the A2 analog
input. The values of parameters 601-LTLF, 602-LTLR, 603-RTLF, and 604RTLR act as the maximum limits for each quadrant.
◊ Range: 0...3
301-FMIN
Default = 0
Minimum Frequency
Parameter 301-FMIN, the Minimum Frequency parameter, configures the minimum frequency output by the drive.
◊ Range: 0...1000 Hz
302-FMAX
Default = 0 Hz
Maximum Frequency
Parameter 302-FMAX, the Maximum Frequency parameter, configures the maximum frequency output by the drive.
NOTE:
If you want a resolution of 0.01 Hz for this parameter, then Parameter 801-PRGNO must
be set to 150; the maximum frequency, however, is limited to 100 Hz.
◊ Range: 20...1000 Hz
Default: 50 Hz
303-F2
Preset Frequency 2/Jog Frequency
304-F3
Preset Frequency F3
305-F4
Preset Frequency F4
306-F5
Preset Frequency F5
307-F6
Preset Frequency F6
308-F7
Preset Frequency F7
These parameters configure six preset speeds in addition to the normal reference speed of
the drive (as defined by parameters 201-MODE and 204-FSEL) and the maximum frequency of the drive (as set with parameter 302-FMAX). Thus, in effect, you may choose to operate the drive at up to eight different speeds.
The eight speeds are selected by a combination of three digital inputs. A wiring scheme for
utilizing preset speeds is provided on page 19 along with a truth table showing what combination of inputs results in the selection of which speeds.
Note that parameter 303-F2 also serves as the reference frequency for jogging.
Please ensure that if you want a resolution of 0.01 Hz for this parameter, then Parameter
801-PRGNO must be set to 150; the maximum frequency, however, is limited to 100 Hz.
30
Operating Instructions
EF1 — 0.37–4.0
10.06.03
02_GB
EF1 Parameters
◊ Parameter 303-F2
Parameter 304-F3
Parameter 305-F4
Parameter 306-F5
Parameter 307-F6
Parameter 308-F7
309-FTL
Range: 0...1000 Hz
Range: 0...1000 Hz
Range: 0...1000 Hz
Range: 0...1000 Hz
Range: 0...1000 Hz
Range: 0...1000 Hz
Default: 5 Hz
Default: 20 Hz
Default: 40 Hz
Default: 50 Hz
Default: 0 Hz
Default: 0 Hz
Minimum Frequency When Torque Limit Active
Parameter 309-FTL, the Minimum Frequency in Torque Limit parameter, sets the minimum
frequency when the drive is in motoring torque limit mode.
In torque limit mode, if the calculated torque value exceeds that set in parameters 601-LTLF through 604-RTLR (see page 37), the output frequency will be reduced to the value of
parameter 309-FTL using the deceleration ramp configured by parameter 406-DECTL (see
page 32). If the load is sufficiently large enough to force the drive below the frequency set
with this parameter, an overcurrent fault (F65–F69) will occur and the drive will stop. See
page 51 for more information on overcurrent faults.
To disable Torque Limit mode, set this parameter to a value greater than or equal to parameter 302-FMAX.
NOTE:
If you want a resolution of 0.01 Hz for this parameter, then Parameter 801-PRGNO must
be set to 150; the maximum frequency, however, is limited to 100 Hz.
◊ Range: 0...1000 Hz
401-RSEL
Default: 10 Hz
Ramp Selector
Parameter 401-RSEL, the Ramp Selector parameter, selects the acceleration and deceleration ramps utilized by the drive, and also whether stops are accomplished by ramping to
zero speed or are by coasting. The following data values may be assigned to this parameter:
Data Value
Type of Stop
Ramp Configured by
0
Ramp-to-stop
Parameter 402-ACC1 and 403-DEC1.
1
Ramp-to-stop
Running Forward: 402-ACC1 and 403-DEC1.
Running Reverse: 404-ACC2 and 405-DEC2.
Ramp-to-stop
If the output frequency is less than preset frequency 307F6, the active ramp is set by 402-ACC1 and 403-DEC1. If
the output frequency is equal to or greater than 307-F6,
the active ramp is set by 404-ACC2 and 405-DEC2.
3
Ramp-to-stop
A digital input is defined as the Alternate Ramp Selector
(see page 44). The digital input is then used to select between the ramp configured by 402-ACC1 and 403-DEC1
(digital input false or open) and the ramp configured by
404-ACC2 and 405-DEC2 (digital input true or closed).
4
Coast-to-stop
Same as data value 0.
5
Coast-to-stop
Same as data value 1.
6
Coast-to-stop
Same as data value 2.
7
Coast-to-stop
Same as data value 3.
2
◊ Range: 0...7
10.06.03
02_GB
Default: 0
Operating Instructions
EF1 — 0.37–4.0
31
EF1 Parameters
402-ACC1
Acceleration Time 1
Parameter 402-ACC1, the Acceleration Time 1 parameter, configures the length of time to
accelerate from 0 Hz to the value of parameter 302-FMAX. This acceleration ramp is selected by parameter 401-RSEL.
Note that extremely short acceleration times may result in nuisance fault trips.
◊ Range: 0.1...600.0 s
403-DEC1
Default: 3.0 s
Deceleration Time 1
Parameter 403-DEC1, the Deceleration Time 1 parameter, configures the length of time to
decelerate from the value of parameter 302-FMAX to 0 Hz. This deceleration ramp is selected by parameter 401-RSEL.
Note that extremely short deceleration times may result in nuisance fault trips or may require an external dynamic brake.
◊ Range: 0.1...600.0 s
404-ACC2
Default: 3.0 s
Acceleration Time 2
Parameter 404-ACC2, the Acceleration Time 2 parameter, configures the length of time to
accelerate from 0 Hz to the value of parameter 302-FMAX. This acceleration ramp is selected by parameter 401-RSEL.
Note that extremely short acceleration times may result in nuisance fault trips.
◊ Range: 0.1...600.0 s
405-DEC2
Default: 1.0 s
Deceleration Time 2
Parameter 405-DEC2, the Deceleration Time 2 parameter, configures the length of time to
decelerate from the value of parameter 302-FMAX to 0 Hz. This deceleration ramp is selected by parameter 401-RSEL.
Note that extremely short deceleration times may result in nuisance fault trips or may require an external dynamic brake.
◊ Range: 0.1...600.0 s
406-DECTL
Default: 1.0 s
Deceleration Time When Torque Limit Active
Parameter 406-DECTL, the Deceleration Time in Torque Limit parameter, configures the
deceleration ramp when the drive is in Torque Limit mode (see parameter 309-FTL on page
31 for more information). It also serves as the acceleration ramp when Torque Limit mode
is active due to a regenerative condition.
◊ Range: 0.1...600.0 s
407-DCBRK
Default: 1.0 s
DC Brake Time
Once the means for enabling DC injection braking is activated as configured by parameter
411-DCACT (see page 33), parameter 407-DCBRK configures the length of time that DC
current will be applied to the motor windings to assist in stopping. The amount of current
that is applied is set with parameter 408-DCVLT.
The following table describes the type of DC braking that is configured by the setting of this
parameter:
32
Operating Instructions
EF1 — 0.37–4.0
10.06.03
02_GB
EF1 Parameters
Data Value
0
0.1...20.0
20.1
Type of DC Braking Configured
DC braking is disabled.
Timed DC injection braking is selected. DC current will be applied for the configured amount of time.
Permanent DC braking – the braking is permanent provided one of the requirements listed as described for parameter 411-DCACT applies.
◊ Range: 0.0...20.1 s
408-DCVLT
Default: 0.2 s
DC Brake Voltage
Parameter 408-DCVLT, the DC Brake Voltage parameter, configures the amount of DC
current to be injected into the motor windings during DC injection braking (see parameter
411-DCACT, page 33). The length of time that the current is applied is set with parameter
407-DCBRK.
MOTOR OVERHEATING. Do not use DC injection braking as a holding brake or excessive
motor heating may result. Failure to observe this instruction can result in equipment
damage.
◊ Range: 0...15%
411-DCACT
Default: 2/3 of 502-BOOST
DC Brake Activation
Parameter 411-DCACT, the DC Brake Activation parameter, is used to select the normal
means for enabling DC injection braking. Once enabled, parameter 407-DCBRK determines when DC injection braking will occur and for how long, while parameter 408-DCVLT
sets the amount of current injected.
The following data values may be assigned to this parameter:
Data Value
DC Injection Braking is Enabled when
0
DC injection braking is not used.
1
A digital input configured for this function becomes true.
2
The output frequency drops below preset frequency F7, which is set with parameter 308-F7.
3
The active stop ramp is finished.
The following requirements then lead to the triggering of the DC brake:
•
•
•
Terminal-oriented control and simultaneous setting of the FWD and REV inputs (for setting 0...3, but only for two wire control) or
Clockwise or anticlockwise rotation with a target value lower than 0.1 Hz (for setting
2...3) or
A Stop command set and a frequency lower than 0.1 Hz (for setting 2...3).
NOTE:
For 2 wire controls, the DC brake can also be triggered when the setting 0 (no activation)
is deactivated by setting the FWD and REV input.
◊ Range: 0...3
412-DBCFG
Default: 3
DB Configuration
Parameter 412-DBCFG, the DB Configuration parameter, determines whether an internal
or external dynamic brake (DB), or neither, is utilized. The following data values may be assigned to this parameter:
10.06.03
02_GB
Operating Instructions
EF1 — 0.37–4.0
33
EF1 Parameters
Data Value
DB Configuration
0
A dynamic brake is not utilized.
1
The internal dynamic brake is utilized.
2
An external dynamic brake is utilized. If this value is selected, parameter 413EDBDC becomes available so you may enter the maximum duty cycle of the
external dynamic brake.
◊ Range: 0...2
Default: 1
413-EDBDC
External DB Maximum Duty Cycle
If parameter 412-DBCFG is set to data value 2 to select an external dynamic brake, parameter 413-EDBDC, the External DB Maximum Duty Cycle parameter, becomes available so
you may enter the duty cycle of the application (see page 15 for information on calculating
the duty cycle).
◊ Range: 0.0...100.0%
501-VSEL
Default: varies
V/Hz Char. Selector
Parameter 501-VSEL, the V/Hz Characteristic Selection parameter, determines the characteristic of the V/Hz curve and whether any boost will be applied at starting. (The amount
of boost may be automatically determined or set with parameter 502-BOOST; see page
35.)
The following data values may be assigned to this parameter:
Data Value
V/Hz Curve Configured (see Figure 11 for sample curves)
0
Linear V/Hz curve with auto-boost. This is typically used for constant torque
applications; however, do not use it for multimotor applications. The amount
of boost applied varies from zero to the value of 502-BOOST and is calculated by the drive based on the load.
1
Linear V/Hz curve with the amount of boost fixed at the value set in parameter
502-BOOST.
2
Mixed (quadratic and linear) V/Hz curve with auto-boost. This is typically used
for pump applications.
3
Mixed (quadratic and linear) V/Hz curve with the amount of boost fixed at the
value set in parameter 502-BOOST.
4
Quadratic V/Hz curve with auto-boost. This is typically used for applications
involving fans.
5
Quadratic V/Hz curve with the amount of boost fixed at the value set in parameter 502-BOOST.
6 [1]
Activates parameters 510-VHZ1F, 511-VHZ1V, 512-VHZ2F, 513-VHZ2V,
514-VHZ3F, and 515-VHZ3V (which are described on page 37). These parameters are used to define three points through which the V/Hz curve passes so a custom curve may be created for special motor applications. Figure
12 on page 35 illustrates how these parameters define a custom V/Hz curve.
[1] This menu entry is only visible when parameter 801-PRGNO is set to 160.
◊ Range: 0...5...6
34
Default: 0
Operating Instructions
EF1 — 0.37–4.0
10.06.03
02_GB
EF1 Parameters
Figure 11
V/Hz Characteristics Configured by Parameter 501-VSEL
Figure 12
Custom V/Hz Characteristic Curve (501-VSEL = 6)
502-BOOST
Torque Boost
Parameter 502-BOOST, the Torque Boost parameter, increases the motor voltage at low
speed to increase the starting torque of the motor. The amount of boost decreases linearly
with increasing speed.
10.06.03
02_GB
Operating Instructions
EF1 — 0.37–4.0
35
EF1 Parameters
Parameter 501-VSEL determines whether the amount of boost configured in this parameter
is always applied or serves as the maximum value for the automatic determination of boost
by the drive.
MOTOR OVERHEATING. Too much boost may cause excessive motor currents and motor
overheating. Use only as much boost as is necessary to start the motor. Auto-boost may
be selected at parameter 501-VSEL to provide optimum value of boost to suit the load automatically. Failure to observe this instruction can result in equipment damage.
◊ Range: 0...25%
503-FKNEE
Default: Model dependent
V/Hz Knee Frequency
Knee frequency. This frequency defines the point on the frequency scale where the output
voltage reaches the value of the real input voltage – under consideration of the setting in
parameter 509-MVOLT.
This value should be equivalent to the nominal frequency of the motor when using AC motors. In the case of special motors, it may be higher in order to achieve constant torque over
a larger range. A higher value selected for 503-FKNEE can lead to minor motor losses at
low frequencies.
◊ Range: 30...1000 Hz
504-SKBND
Default: 50 Hz
Skip Frequency Band
To reduce mechanical resonances in a drive system, the drive may be configured to “skip”
certain frequencies. Once configured, the drive will accelerate or decelerate through the
prohibited frequency band without settling on any frequency in the band. The EF1 Microdrive provides the capability to configure three prohibited frequency bands.
Parameter 504-SKBND, the Skip Frequency Band parameter, sets the width of the band
above and below each of the prohibited frequencies set in parameters 505-SK1, 506-SK2,
and 507-SK3.
For example, if this parameter is set to its default value of 1 Hz and parameter 505-SK1 is
set to 20 Hz, a skip band from 19 to 21 Hz is established.
◊ Range: 0.2...20.0 Hz
Default: 1 Hz
505-SK1
Skip Frequency 1
506-SK2
Skip Frequency 2
507-SK3
Skip Frequency 3
As discussed in the description of parameter 504-SKBND above, the drive may be configured to skip certain frequencies. These three parameters set the center of the three skip
frequency bands (with the width of each band being twice the value of parameter 504-SKBND – an equal amount above and below the skip frequency).
For example, if parameter 504-SKBND is set to 2.5 Hz and parameter 507-SK3 is set to 55
Hz, a skip band from 52.5 to 57.5 Hz is established.
NOTE:
If you want a resolution of 0.01 Hz for this parameter, then you must set the parameter 801PRGNO to 150; the maximum frequency, however, is limited to 100 Hz.
◊ Range: 0.0...1000.0 Hz
36
Default: 0.0 Hz
Operating Instructions
EF1 — 0.37–4.0
10.06.03
02_GB
EF1 Parameters
508-MNLP
Motor Saturation
Determination of the starting point for the slip compensation. The slip compensation is only
used above the idle current defined here.
This adjustment must take place while the motor that is driven is idling. The value in this
parameter is to be reduced in small steps until the parameter 105-LOAD displays a value
near 0% during idling.
◊ Range: 15...85%
509-MVOLT
Default: Model dependent
Rated Motor Voltage
Setting the nominal motor voltage, i.e. the maximum output voltage for the converter which
is output to the motor when the knee frequency is reached (parameter 503-FKNEE).
◊ Range: Model dependent
Default: Model dependent
510-VHZ1F
V/Hz Frequency, Point 1
511-VHZ1V
V/Hz Voltage, Point 1
512-VHZ2F
V/Hz Frequency, Point 2
513-VHZ2V
V/Hz Voltage, Point 2
514-VHZ3F
V/Hz Frequency, Point 3
515-VHZ3V
V/Hz Voltage, Point 3
Note that by default these parameters are hidden, and the standard V/Hz curve is utilized
(see Figure 11 on page 35). To create a custom V/Hz curve and make these parameters
available, set parameter 501-VSEL to data value 6 and parameter 801-PRGNO to data value 160 (see page 41 for more information). (Also note that if parameter 801-PRGNO is set
to data value 160 a second time, the parameters will again become inaccessible.)
If desired, the V/Hz curve may be customized by setting three points through which the
curve will pass. Each point is a [frequency, voltage] coordinate. Parameters 510-VHZ1F
and 511-VHZ1V set the first coordinate; parameters 512-VHZ2F and 513-VHZ2V set the
second coordinate; and parameters 514-VHZ3F and 515-VHZ3V set the third and final coordinate. Figure 12 on page 35 illustrates how these parameters define a custom V/Hz
curve.
As soon as the frequency value in a parameter of a coordinate pair has been set to 0 (e.g.
parameter 512-VHZ2F), the characteristic curve moves through the range from point 1 directly to point 3.
◊ Parameter 510-VHZ1F
Parameter 511-VHZ1V
Parameter 512-VHZ2F
Parameter 513-VHZ2V
Parameter 514-VHZ3F
Parameter 515-VHZ3V
Range: 0...1000 Hz
Range: 0...100%
Range: 0...1000 Hz
Range: 0...100%
Range: 0...1000 Hz
Range: 0...100%
601-LTLF
Limit for Torque Load (Forward)
602-LTLR
Limit for Torque Load (Reverse)
Default: 0 Hz
Default: 0 Vac
Default: 0 Hz
Default: 0 Vac
Default: 0 Hz
Default: 0 Vac
When parameter 309-FTL is set to a value less than or equal to parameter 302-FMAX,
torque limiting is activated (see page 31).
10.06.03
02_GB
Operating Instructions
EF1 — 0.37–4.0
37
EF1 Parameters
Provided that parameter 210-TLSEL is set appropriately (see page 29), these two parameters configure the point at which torque limiting will occur when the drive is in motoring
mode (that is, driving a load), with individual settings for forward (601-LTLF) and reverse
(602-LTLR) operation. The value is a percentage of nominal motor torque.
◊ Range: 30...150%
Default: 150%
603-RTLF
Limit for Regen. Torque (Forward)
604-RTLR
Limit for Regen. Torque (Reverse)
When parameter 309-FTL is set to a value less than or equal to parameter 302-FMAX,
torque limiting is activated (see page 31).
Provided that parameter 210-TLSEL is set appropriately (see page 29), these two parameters configure the point at which torque limiting will occur when the drive is in regenerative
mode (that is, being driven by a load), with individual settings for forward (603-RTLF) and
reverse (604-RTLR) operation. The value is a percentage of nominal motor torque.
◊ Range: 30...110%
605-SLIP
Default: 80%
Slip Compensation
Parameter 605-SLIP, the Slip Compensation parameter, allows you to compensate for slip
in standard NEMA-rated induction motors. Do not set use slip compensation if the drive is
connected to a synchronous motor because gross instability may result. Slip compensation
is automatically turned off if the PI Regulator function is enabled.
The assigned value for this parameter may range from 0.0 to 12.0%, with a setting of 0.0%
causing slip compensation to be inactive. Use the following formula to calculate the value
for parameter 605-SLIP:
( Synch. Speed – Nameplate Speed )
Value of Par. 003-IRAT
Parameter 605-SLIP = ------------------------------------------------------------------------------------------------ × ------------------------------------------------------------------- × 100
Synch. Speed
Motor Nameplate Current
◊ Range: 0.0...12.0%
Default: 0.0%
607-TOL
Timed Overload Trip Point
610-TOLC
Timed Overload Characteristic
These parameters define the amount of load (parameter 607-TOL, expressed as a percentage of nominal motor current) and the length of time that the load is applied (parameter 610TOLC) for a timed electronic trip to occur. To derive a value for parameter 607-TOL, use
the following formula (see page 26 for the values of parameter 003-IRAT):
Motor Nameplate Current
Parameter 607-TOL = ------------------------------------------------------------------------------- × 100
Value of Parameter 003-IRAT
NOTE: set this parameter to zero to disable the timed electronic trip function.
For parameter 610-TOLC, set it to one of the following data values to configure the desired
overload characteristic:
Data Value Tripping Characteristic [1] Time Scale in Figure 13
0
Normal [2]
C
Standard induction
1
[2]
B
Standard induction
A
Standard induction
—
Standard induction
C
Inverter duty
2
3
4
38
Motor Type
Medium
Fast [2]
Shear pin
[3]
Normal [2]
Operating Instructions
EF1 — 0.37–4.0
10.06.03
02_GB
EF1 Parameters
Data Value Tripping Characteristic [1] Time Scale in Figure 13
Medium [2]
5
6
7
Fast
[2]
Shear pin [3]
Motor Type
B
Inverter duty
A
Inverter duty
—
Inverter duty
[1] Data values 0–3 have reduced thresholds below 40 Hz; values 4–7 follow the 40 Hz curve at any speed.
[2] Trip time at 150% of 607-TOL setting is 60 s for Normal, 30 s for Medium, and 6 s for Fast.
[3] Trip time at 110% of 607-TOL setting is instantaneous for shear pin effect.
Figure 13
Timed Overload Trip Point
◊ Parameter 607-TOL
Parameter 610-TOLC
Range: 0...100%
Range: 0...7
608-NRST
Trip Restart – Number of Attempts
609-DRST
Trip Restart – Time Delay
Default: 100%
Default: 0
You may configure the drive to attempt to re-start a specified number of times after certain
faults occur. Section 7, starting on page 50, lists all faults and notes which ones may be
reset automatically.
The number of attempts at re-starting is set with parameter 608-NRST (a value of 0 prevents the drive from attempting a re-start). The time duration that must elapse between restart attempts is set with parameter 609-DRST.
If the number of attempted re-starts is exceeded, the drive will trip with fault F90 and stop
operating. Resetting the fault can result in instant starting. (See page 51 for more information on fault F90).
Note that for 2-wire operation, the FWD or REV terminal must still be active for the drive to
attempt a re-start.
Also note that the counter for attempted re-starts will not reset to zero until ten minutes after
a successful re-start.
UNINTENDED EQUIPMENT ACTION! Ensure that automatic re-starting will not cause injury to personnel or damage to equipment. Failure to observe this instruction can result
in serious injury or equipment damage.
◊ Parameter 608-NRST
Parameter 609-DRST
10.06.03
02_GB
Range: 0...8
Range: 0.0...60.0 s
Operating Instructions
EF1 — 0.37–4.0
Default: 0 tries (disabled)
Default: 0.1 s
39
EF1 Parameters
614-RGNSTOP Permitted Time in Regenerative Current Limit
This parameter sets the limit to the amount of time that the drive may continue to run in regenerative current limit mode after a Stop command is issued. If the configured time duration expires and the drive is not at zero speed, fault F91 is generated and the drive coasts
to a stop. See page 51 for information about fault F91.
◊ Range: 0.0...5.0 s
Default: 1.0 s
620-PHLOSS Phase Loss Detection
Parameter 620-PHLOSS, the Phase Loss Detection parameter, may be configured to monitor line power for phase loss. When enabled (by default it is inactive), if the loss of a phase
is detected, fault F40 is generated and the drive coasts to a stop. See page 50 for further
information about fault F40.
◊ Range: 0...1
Default: 0 (inactive)
701-METER
Analog Meter Output AQ1 Selector
709-MET2
Analog Meter Output AQ2 Selector
These parameters select the analog output signal sent from terminal AQ1 and AQ2, respectively. The default full-scale setting is 0–10 Vdc on AQ1 or 0–20 mAdc on AQ2, but this may
be changed by using parameters 702-M1OFF and 703-M1SPN (for AQ1) or parameters
710-M2OFF and 711-M2SPN (for AQ2).
The following data values may be assigned to these parameters:
Data Value
Analog Output Signal Is Proportional to
0
AQ1/AQ2 is not utilized.
1
Output frequency (102-FOUT), with full scale at 302-FMAX.
2
Output current (104-IOUT), with full scale at 300% of rated current (value of
parameter 003-IRAT).
3
Load (105-LOAD), with full scale at 300% of rated load.
4
Output voltage (103-VOUT), with full scale at 150% of input voltage.
5
Calculated stator frequency.
6
Drive temperature (107-TEMP).
10...16
Same as 0 through 6, but with an offset. Use parameters 702-M1OFF (for
AQ1) and 710-M2OFF (for AQ2) to set the amount of offset.
◊ Parameter 701-METER
Parameter 709-MET2
Range: 0...16
Range: 0...16
702-M1OFF
AQ1 Offset
710-M2OFF
AQ2 Offset
Default: 1
Default: 3
If parameter 701-METER or 709-MET2 is set to a value between 10 and 16, these parameters become available and configure the amount of offset for AQ1 and AQ2, respectively,
expressed as a percentage of the maximum value of the output signal.
◊ Parameter 702-M1OFF
Parameter 710-M2OFF
40
Range: 0...100%
Range: 0...100%
Operating Instructions
EF1 — 0.37–4.0
Default: 20%
Default: 20%
10.06.03
02_GB
EF1 Parameters
703-M1SPN
AQ1 Span
711-M2SPN
AQ2 Span
If parameter 701-METER or 709-MET2 is set to a value between 10 and 16, these parameters become available and are used to configure the range (span) of AQ1 and AQ2, respectively. The values of the parameters are expressed as a percentage of the maximum
value of the output signal.
◊ Parameter 703-M1SPN
Parameter 711-M2SPN
Range: 0...200%
Range: 0...200%
704-R1
Relay R1 Selector
705-R2
Relay R2 Selector
Default: 100%
Default: 100%
These parameters configure what condition causes relay R1 and R2 to activate. The following data values may be assigned to these parameters:
Data Value
Relay Activates When
0
Relay is not used.
1
The drive is ready. (The relay will be open in Fault and Low Voltage conditions.)
2
As soon as an alarm occurs [1].
3
When the start command is set.
4
The motor is running in Reverse and the output frequency is above 0.5 Hz.
5
The motor is running Forward and the output frequency is above 0.5 Hz.
6
The output frequency is above 0.5 Hz.
7
The motor is running at the commanded speed.
8
The output frequency is greater than preset frequency F5 (which is set with
parameter 306-F5).
9
The drive is operating in torque limit.
10
The heatsink temperature is within 10 °C of the maximum temperature (overtemperature warning).
11
When a motor PTC connected to a digital input D6 reports an overheating
motor (see page 44, setting 19).
[1] When an alarm has occurred which can be reset by the auto-reset function (automatic restart try, see page
39) or while the automatic restart is occurring, the relay remains dropped out.
◊ Parameter 704-R1
Parameter 705-R2
801-PRGNO
Range: 0...11
Range: 0...11
Default: 2
Default: 6
Special Program
Setting and assigning special functions. After execution of a special function, this parameter
is automatically reset to 0.
The following data values may be assigned to this parameter:
10.06.03
02_GB
Operating Instructions
EF1 — 0.37–4.0
41
EF1 Parameters
Data Value
Special Function Configured
0
Standard program.
1
Reset all parameters to factory default values (display = SETP) [1].
2
Store custom parameter values (display = STOC) [1].
3
Recall custom parameter values (display = SETC) [1].
80
Enable PI control. When this value is entered and saved, and then Program
mode is exited and re-entered, the PI adjustment parameters (parameters
910-FSTAT, 911-FCORR and 912-ERROR2 through 918-PICFG) will become available.
150
Switching both the maximum value of the frequency parameter (0...1000 Hz
or 0...100 Hz) and the resolution of the display. At 0...1000 Hz the resolution
is 0.1 Hz, at 0...100 Hz it is increased to 0.01 Hz.
160
You can access the parameter to define an application-specific 3 point V/Hz
characteristic curve by setting this value (see page 37).
[1] This display only appears after exiting the program mode.
◊ Range: 0...255
802-START
Default: 0
Start Options
Parameter 802-START, the Start Options parameter, configures the type of start to be performed. It also determines whether the STOP key on the keypad functions as an emergency stop when the terminal strip is the active control source and whether the drive will trip if
Modbus serial communication is lost. See page 23 for special display indications used with
this parameter.
The following data values may be assigned to this parameter:
Data Value
Type of Start and Stop Configured
0
Line Start Lockout. If maintained contact run operators are used, they must
be opened and then re-closed for the drive to start after AC power is applied.
If parameter 201-MODE is set to a data value between 2 and 9 (see page 27),
the STOP key may be used as an emergency stop, with a coast-to-stop being
performed. (To recover from an emergency stop, press the STOP key again.)
The drive will not stop if the connection to J3 is lost.
1
Auto-Start. When AC power is applied, if a Run command is present through
the terminal strip, the drive will start. Otherwise, the same as data value 0.
2
Start into a rotating motor with Line Start Lockout. Otherwise, the same as data value 0.
3
Start into a rotating motor with Auto-Start. Otherwise, the same as data value
0.
4...7
Same as data values 0 through 3 except that the STOP key on the keypad is
disabled if the Start/Stop control source is defined as the terminal strip by parameter 201-MODE.
8...11
Same as data values 0 through 3 except that the drive will stop when the serial link watchdog timer (parameter 954-MBTO, see page 48) times out.
◊ Range: 0...11
42
Default: 0
Operating Instructions
EF1 — 0.37–4.0
10.06.03
02_GB
EF1 Parameters
803-PWM
PWM Carrier Frequency
Parameter 803-PWM, the PWM Carrier Frequency parameter, sets the carrier frequency of
the Pulse-Width Modulation (PWM) waveform supplied to the motor. Low carrier frequencies provide better low-end torque, but produce some audible noise from the motor. Higher
carrier frequencies produce less audible noise, but cause more heating in the drive and motor.
The EF1 Microdrive is rated to produce continuous full-load current at rated temperatures
when 803-PWM is set to the default value of 6 kHz. Data value 0 (Autoselect) automatically
selects the highest carrier frequency possible without overheating the drive.
The following data values may be assigned to this parameter:
Data Value
Carrier Frequency Configured
0
Autoselect
1
4 kHz.
2
6 kHz.
3
8 kHz.
4
12 kHz [2].
5
16 kHz [2].
[1]
.
[1] The carrier frequency is 16 KHz when you select “Auto-Select” and is automatically switched to 8 KHz when
either the nominal output of the converter or a converter temperature of more than 90° C is reached. The carrier frequency is reduced by one of the given carrier frequency steps (6 kHz, 4 kHz) for each further increase
of 2° C. When the temperature declines below this threshold, then the unit switches back to the previous frequency.
[2] The 12 and 16 kHz levels automatically shift to 6 and 8 kHz, respectively, and then to 4 kHz if derating is exceeded.
Consult factory for further information.
◊ Range: 0...5
Default: 2
804-DISP
Display Option Setting
Parameter 804-DISP, the Display Option Setting parameter, defines the information to be
displayed on the keypad during Run operation. The following data values may be assigned
to this parameter:
Data Value
In Run, Display Shows
0
Output frequency in Hz (102-FOUT).
1
Output current in A (104-IOUT).
2
Load as a percentage of nominal (105-LOAD).
3
Stator frequency; see parameter 701-METER on page 40.
4...3000
Revolutions per minute. To determine the data value, multiply the desired
rpm value to be displayed by (20 divided by the value of 102-FOUT).
For example, to display 1500 rpm at 50 Hz, the data value is equal to 1500 ×
(20/50) = 600.
◊ Range: 0...3000
10.06.03
02_GB
Default: 0
Operating Instructions
EF1 — 0.37–4.0
43
EF1 Parameters
807-ACODE
Security Access Code
An access right for all parameters is issued by entering a value from 1...999. After assigning
an access or security code, “000” appears in the display when the programming mode is
called up.
However, to continue, you must enter the value of parameter 807-ACODE. Once the correct security code is entered, the display will return to the normal Program mode display.
From the last keystroke, you now have ten minutes in which to perform programming tasks
unless power is lost or interrupted. After ten minutes expire, you must re-enter the security
code.
◊ Range: 0...999
901-PUPD
Default: 0
DI Logic
Parameter 901-PUPD, the Pull-up/Pull-down Logic for Digital Inputs parameter, configures
whether pull-up or pull-down control logic is utilized for the digital inputs. The following data
values may be assigned to this parameter:
Data Value
Type of Logic
0
Pull-down.
1
Pull-up.
◊ Range: 0...1
Default: 1
902-D2
D2 Selector
903-D3
D3 Selector
904-D4
D4 Selector
905-D5
D5 Selector
906-D6
D6 Selector
These parameters configure the functions performed by digital inputs D2 through D6. The
following data values may be assigned to this parameter:
Data Value
44
Function Performed by Digital Input (DI) [1]
0
Digital input Dx is not utilized.
1
Command Reverse.
2
Change direction of rotation. (For example, if the motor is running in Reverse,
momentarily activating the DI with this setting will cause the motor to decelerate to zero speed and then run Forward.)
3
Preset speed selection – bit 1.
4
Preset speed selection – bit 2.
5
Preset speed selection – bit 3.
6
Select alternate acceleration and deceleration ramp.
7
Activate DC injection braking.
8
When EMOP speed control is used, increase reference speed [2].
9
When EMOP speed control is used, decrease reference speed [2].
10
Stop using coast-to-stop deceleration if DI is true (closed).
11
Stop using coast-to-stop deceleration if DI is false (open).
Operating Instructions
EF1 — 0.37–4.0
10.06.03
02_GB
EF1 Parameters
Function Performed by Digital Input (DI) [1]
Data Value
12
Run/Jog (reference speed set by 303-F2).
13
Switching the analogue inputs A1 and A2 [3].
14
Toggle PI control on and off. See parameter 918-PICFG on page 46 for more
information.
15
Fault reset.
16
Normally-open external fault input. Generates fault F70; see page 51 for
more information on this fault.
17
Normally-closed external fault input. Generates fault F70; see page 51 for
more information on this fault.
18
Only for D6: PTC input (fault F71; see page 51 for more information on this
fault).
19
Only for D6: PTC input (warning).
[1] If a 2-wire control scheme is utilized, digital input D2 may be assigned any function. However, if 3-wire control
is utilized, D2 is automatically configured as the Stop input and cannot be set to another function.
[2] See data codes 6/7 or 8/9 of parameter 201-MODE on page 27 for further information.
[3] See data codes 12–15 of parameter 204-FSEL on page 28 for further information.
◊ Parameter 902-D2
Parameter 903-D3
Parameter 904-D4
Parameter 905-D5
Parameter 906-D6
909-RVLVL2
Range: 0...19
Range: 0...19
Range: 0...19
Range: 0...19
Range: 0...19
FL Revision
Default: 1
Default: 3
Default: 4
Default: 5
Default: 7
Read-Only
Parameter 909-RVLVL2, the FL Software Revision parameter, shows the fundamental layer software revision number.
◊ Range: –
910-FSTAT
Stator Frequency
Read-Only
Once parameter 801-PRGNO is set to 80 to activate the PI feedback set-up parameters,
parameter 910-FSTAT (the Stator Frequency parameter) becomes available and shows
the stator frequency.
◊ Range: 0...1000 Hz
911-FCORR
Frequency Correction
Parameter 911-FCORR, the Frequency Correction parameter, is only available when parameter 801-PRGNO is set to data value 80 (invokes PI feedback mode).
When available, it sets the limits of correction that may be imposed on the operating frequency of the drive. This is of benefit because it limits the response of the drive if feedback
is lost.
◊ Range: 0...1000 Hz
10.06.03
02_GB
Default: 0
912-ERROR2 Final Error
Read-Only
913-ERROR1 Initial Error
Read-Only
914-SIPART
Integral Sum
Read-Only
915-KP
Proportional Gain
Operating Instructions
EF1 — 0.37–4.0
45
EF1 Parameters
916-KI
Integral Gain
917-KIN
A2 Gain
918-PICFG
PI Configuration
When parameter 801-PRGNO is set to value 80, PI (proportional integral) control is enabled
and parameters 912-ERROR2 through 918-PICFG become available.
Parameter 918-PICFG configures the type of PI control: direct- or reverse-acting loop (in a
direct-acting loop, a positive error causes an increase in output frequency, while a reverseacting loop decreases the output frequency); slow or fast rate of integration; whether feedforward is active (it should be selected for speed loop applications since the reference value
has a direct relation to the feedback signal); and whether PI control may be enabled via a
digital input. The following data values may be assigned to this parameter:
Data Value
Loop Type
Rate
Feed-Forward
Enable by DI
0
Direct-acting
Slow
Yes
No
1
Direct-acting
Fast
Yes
No
2
Reverse-acting
Slow
Yes
No
3
Reverse-acting
Fast
Yes
No
4
Direct-acting
Slow
Yes
Yes
5
Direct-acting
Fast
Yes
Yes
6
Reverse-acting
Slow
Yes
Yes
7
Reverse-acting
Fast
Yes
Yes
8
Direct-acting
Slow
No
No
9
Direct-acting
Fast
No
No
10
Reverse-acting
Slow
No
No
11
Reverse-acting
Fast
No
No
12
Direct-acting
Slow
No
Yes
13
Direct-acting
Fast
No
Yes
14
Reverse-acting
Slow
No
Yes
15
Reverse-acting
Fast
No
Yes
The remaining configurable parameters are used to adjust proportional gain (915-KP), integral gain (916-KI), and scaling for the feedback terminal (917-KIN).
The Read-Only parameters provide information about the PI process: parameter 912ERROR2 is the final error, parameter 913-ERROR1 is the initial error, and parameter 914SIPART is the sum of the integral term of the PI regulator.
See chapter 9 on page 53 for further information on PI control.
◊ Parameter 912-ERROR2
Parameter 913-ERROR1
Parameter 914-SIPART
Parameter 915-KP
Parameter 916-KI
Parameter 917-KIN
Parameter 918-PICFG
46
Range: varies
Range: varies
Range: varies
Range: 0...255
Range: 0...255
Range: 0...255
Range: 0...15
Read-Only
Read-Only
Read-Only
Default: 0
Default: 0
Default: 0
Default: 0
Operating Instructions
10.06.03
EF1 — 0.37–4.0
02_GB
EF1 Parameters
950-MBPROT Modbus Protocol
Parameter 950-MBPROT, the Modbus Protocol parameter, configures the type of Modbus
protocol to be used, either RTU or ASCII. The following data values may be assigned to this
parameter:
Data Value
Type of Protocol
0
RTU (Parameter 952-MBPAR, setting 1...3).
1
ASCII (Parameter 952-MBPAR, setting 4...6).
◊ Range: 0...1
Default: 0
951-MBBAUD Baud Rate
Parameter 951-MBBAUD, the Modbus Baudrate parameter, configures the baud rate for
Modbus communication. The following data values may be assigned to this parameter:
Data Value
Baud Rate Configured (bps)
0
Serial communication is not utilized.
1
1200.
2
4800.
3
9600.
4
19200.
◊ Range: 0...4
Default: 3
952-MBPAR
Parity
Parameter 952-MBPAR, the Modbus Parity parameter, configures the parity for Modbus
communication. The following data values may be assigned to this parameter:
Data Value
Type of Parity
0
No parity, 8 data bits, 1 stop bit.
1
RTU mode: No parity, 8 data bits, 2 stop bits.
2
RTU mode: Even parity, 8 data bits, 1 stop bit.
3
RTU mode: Odd parity, 8 data bits, 1 stop bit.
4
ASCII mode: No parity, 7 data bits, 2 stop bits.
5
ASCII mode: Even parity, 7 data bits, 1 stop bit.
6
ASCII mode: Odd parity, 7 data bits, 1 stop bit.
◊ Range: 0...6
Default: 0
953-MBDROP Drop Number
Parameter 953-MBDROP, the Modbus Drop Number parameter, stores the address (drop
number) of the drive.
◊ Range: 1...247
10.06.03
02_GB
Default: 1
Operating Instructions
EF1 — 0.37–4.0
47
EF1 Parameters
954-MBTO
Watchdog Timer
Parameter 954-MBTO, the Watchdog Timer parameter, configures the length of time in
which the drive must receive a valid Modbus telegram. (Valid telegrams need not be addressed to a specific drive.) If a valid telegram is not received in the configured amount of
time, then fault F72 will occur and the drive will coast to a stop. See page 51 for more information on this fault.
◊ Range: 1.0...60.0 s
960-STAT1
Default: 1.0 s
Status Word 1
Read-Only
Serial communication may be used to read parameter 960-STAT1 (the Status Word 1 parameter) to gather status information about the drive. The bits of the word represented by
this parameter provide the following information:
+0
15
14
Bit
13
12
11
10
9
8
When Set to 1 Signifies
+1
7
Bit
6
5
4
3
2
1
0
When Set to 1 Signifies
8
Alternate ramp 2 is active
0
Serial link control active
9
not used
1
Frequency set via serial link
10 not used
2
Drive is running in Forward
11 Keypad is in control
3
Drive is running in Reverse
12 DC injection braking is active
4
FEXT2 is active serial link reference
13 not used
5
Drive is accelerating
14 Run commanded, but no reference
6
Drive is decelerating
15 Drive is faulted (locked-out)
7
Drive is at speed
◊ Range: 0...65535
961-STAT2
Status Word 2
Read-Only
Serial communication may be used to read parameter 961-STAT2 (the Status Word 2 parameter) to gather status information about the drive. The bits of the word represented by
this parameter provide the following information:
48
Operating Instructions
EF1 — 0.37–4.0
10.06.03
02_GB
EF1 Parameters
+0
15
14
Bit
13
12
11
10
9
8
When Set to 1 Signifies
+1
7
6
Bit
5
4
3
2
1
0
When Set to 1 Signifies
8
not used
0
Drive is ready to run
9
not used
1
Drive is in Program mode
10 not used
2
not used
11 not used
3
not used
12 not used
4
not used
13 Drive is in the undervoltage state
5
Drive is operating in Torque Limit
14 Overtemperature warning
6
not used
15 Drive is faulted (not locked-out)
7
not used
◊ Range: 0...65535
962-CNTL1
Control Word 1
Modbus Write commands may be used to control the drive via the serial link by setting the
bits of parameter 962-CNTL1 (the Control Word 1 parameter) appropriately. The bits of the
word represented by this parameter perform the following actions:
+0
15
14
Bit
13
12
11
10
9
8
When Set to 1 Signifies
+1
7
Bit
6
5
4
3
2
1
0
When Set to 1 Signifies
8
Command Alternate Ramp #2
0
Initiate serial link control
9
not used
1
Set ref. frequency by serial link
10 not used
2
Command Forward direction
11 not used
3
Command Reverse direction
12 Initiate DC injection braking
4
Use FEXT2 value as ref. frequency
13 Perform a coast-to-stop
5
Command Preset Speed (bit 1)
14 not used
6
Command Preset Speed (bit 2)
15 Alarm or serial connection reset
7
Command Preset Speed (bit 3)
◊ Range: 0...65535
Default: 0000
963-FEXT1
External Frequency Reference 1
964-FEXT2
External Frequency Reference 2
These parameters store two frequency values, each of which may be selected to be the active speed reference when the frequency is set via the serial link.
◊ Range: 0...1000 Hz
10.06.03
02_GB
Default: 0 Hz
Operating Instructions
EF1 — 0.37–4.0
49
Troubleshooting
7
Troubleshooting
The following table shows the fault codes that may be displayed, along with suggestions for
recovering from the fault condition.
Code
Description
Suggestions for Recovery
•
F1
Intra-processor communication fault.
F2
Internal data error.
•
•
•
•
F10
Internal watchdog timer fault.
F11
Internal clock error.
F12
Keypad error.
F13
Illegal internal operation.
F14
Internal module calibration fault.
F15
Programming error.
F16
Programming error.
F17
Programming error (custom set).
F18
Programming error.
F19
Module ID problem.
F25
[1]
Output ground fault at start-up.
F26
[1]
Output ground fault.
F27
[1]
Output ground fault.
F30
Bus overvoltage fault.
•
•
•
•
•
Reset the drive by pressing the STOP
key.
Cycle power.
Consult BERGES.
Reset the drive by pressing the STOP
key.
Consult BERGES.
Reset the drive by pressing the STOP
key.
Cycle power.
Consult BERGES.
Reset parameters to factory defaults
(set 801-PRGNO to data value 1), and
then re-initiate customization.
Consult BERGES.
•
Verify the insulation integrity of the connected motor and motor wiring.
•
•
Check the applied line voltage.
Verify that the load is not excessively
regenerative.
Increase the deceleration time.
Reduce the regenerative torque limits
(the value of parameters 603-RTLF
and 604-RTLR).
•
•
F35 [1] Bus overvoltage fault at start-up.
•
Check the applied line voltage.
F40 [1] Input phase loss.
•
•
Check the applied line voltage.
Set 620-PHLOSS to inactive.
•
Verify the size of the dynamic braking
circuitry/drive.
Increase the deceleration time.
Increase the process cycle time.
F45 [1] Dynamic braking overload fault.
•
•
•
F50
Drive overtemperature fault.
•
•
F51
Drive undertemperature fault.
Verify that the ambient temperature is
within the drive’s specifications.
Verify that the cooling fan, if present, is
functioning properly.
Verify that the ambient temperature is
within the drive’s specifications; increase the ambient temperature if necessary.
[1] May be automatically reset and a re-start attempted (Parameter 608-NRST or 609-DRST).
50
Operating Instructions
EF1 — 0.37–4.0
10.06.03
02_GB
Troubleshooting
Code
Description
F60
Phase T1 current fault.
F61
Phase T2 current fault.
F62
Phase T3 current fault.
F65 [1] Overcurrent fault at start-up.
F66 [1] Overcurrent fault.
F67 [1] Overcurrent fault at start-up.
F68
[1]
Overcurrent fault at start-up.
F69 [1] Overcurrent fault.
F70
External fault input active.
F71
Motor PTC (external) fault.
Suggestions for Recovery
•
•
Reset the drive by pressing the STOP
key.
Check motor and motor wiring.
•
•
Check motor and motor wiring.
Consult BERGES.
•
•
Check motor and motor wiring.
Verify that the value of 502-BOOST is
set properly.
Extend the acceleration ramp (increase
the value of 402-ACC1 and/or 404ACC2).
•
•
•
Check motor and motor wiring.
Consult BERGES.
•
•
Check motor and motor wiring.
Verify that the value of 502-BOOST is
set properly.
Extend the acceleration ramp (increase
the value of 402-ACC1 and/or 404ACC2).
•
•
Check the digital input device for the
external fault.
•
Verify the PTC with the temperature of
the motor and motor wiring.
Verify programming.
•
F72
Modbus communication watchdog
fault.
F80
Input signal at A1 is out of range.
F81
Calibration error for input signal A1.
F82
F90
Timed overload fault.
Number of auto-restart attempts exceeded.
•
•
Check the setting of parameters 802START (setting 8...11) and 954-MBTO.
Increase the value of 954-MBTO.
•
Verify/correct the problem at A1.
•
Verify the values of parameters 206A1OFF and 207-A1SPN with the signal
applied.
•
•
Check for an overload on the motor.
Verify the values of parameters 607TOL and 610-TOLC against the capabilities of the motor.
•
Verify the causes of the most recent
faults (read parameters 005-FLT5
through 009-FLT1), and take corrective
actions.
Review the values of parameters 608NRST and 609-DRST, and adjust if
necessary.
•
•
F91
Torque limit timeout fault.
•
•
•
Verify that the connected load is not excessively regenerative.
Verify the sizing of the dynamic braking
circuitry/drive.
Increase deceleration time.
Increase the process cycle time.
[1] May be automatically reset and a re-start attempted (Parameter 608-NRST or 609-DRST).
10.06.03
02_GB
Operating Instructions
EF1 — 0.37–4.0
51
Hexadecimal to Binary Conversion
8
Hexadecimal to Binary Conversion
The EF1 Microdrive utilizes hexadecimal numbers to display and store the binary values of
some parameters. These parameters are read and written as four-digit hexadecimal values.
The hexadecimal values are then translated to binary values, with the binary values being
compared to the “key” provided for each parameter to determine what status is shown or
what action is commanded.
The following table shows the sixteen hexadecimal values and the corresponding binary
values. The binary values are divided into four columns so you may more readily see which
bits of the status or control words are affected by the binary values.
Hexadecimal Value
Binary Value
0
0
0
0
0
1
0
0
0
1
2
0
0
1
0
3
0
0
1
1
4
0
1
0
0
5
0
1
0
1
6
0
1
1
0
7
0
1
1
1
8
1
0
0
0
9
1
0
0
1
A
1
0
1
0
B
1
0
1
1
C
1
1
0
0
D
1
1
0
1
E
1
1
1
0
F
1
1
1
1
15
11
7
3
14
10
6
2
13
9
5
1
12
8
4
0
Corresponding Bit Positions of Parameter Words
52
Operating Instructions
EF1 — 0.37–4.0
10.06.03
02_GB
Fundamentals of PI Control
9
Fundamentals of PI Control
9.1
Introduction
The EF1 Microdrive has a built-in PI (Proportional-Integral) Controller that makes it possible
to control a process by adjusting motor speed using a reference input and a feedback input.
When the drive is configured to operate with feedback from a transducer, the EF1 Microdrive essentially ceases to be a frequency controller and instead becomes a process controller.
Several EF1 parameters are specifically designed for PI control. These include:
•
•
•
•
•
•
801-PRGNO
911-FCORR
915-KP
916-KI
917-KIN
918-PICFG
The function performed by each of these parameters is described in the following section.
Figure 14 on page 54 provides a flowchart of PI control and shows the interaction of these
parameters.
9.2
Configuration of PI Control Parameters
This section discusses the parameters used for PI control and provides advice on how best
to configure these parameters for your particular application.
9.2.1
Parameter 801-PRGNO
Parameter 801-PRGNO, the parameter to set and assign special functions must be set to
80 in order to activate the PI controller. This results in a changed configuration of the control
terminals or the parameters 201-MODE (the analogue input A2 is used as the target value
input instead of A1) and 204-FSEL (only the data values 0 to 3 are permitted and A1 becomes the input for the return signal while A2 becomes the input for the frequency target
value).
9.2.2
Parameter 911-FCORR
Parameter 911-FCORR sets the frequency correction limit. The value stored in this parameter is used to limit the drive’s response to a change in, or loss of, the feedback signal.
10.06.03
02_GB
Operating Instructions
EF1 — 0.37–4.0
53
Fundamentals of PI Control
Figure 14
PI Controller Functional Diagram
54
Operating Instructions
EF1 — 0.37–4.0
10.06.03
02_GB
Fundamentals of PI Control
9.2.3
Parameter 915-KP
Parameter 915-KP is the proportional feedback gain for the process control loop. It determines the overall effect on the process for an incremental change in the feedback signal.
Generally, when configuring this parameter, you must observe the drive’s response to an
incremental change in the feedback input, and then decide if this response is sufficient.
For example, if the feedback input changes 1 V (or 1 mA), what is the drive’s response? Is
it enough or too much?
9.2.4
Parameter 916-KI
Parameter 916-KI is the integral feedback gain for the process control loop. This parameter
determines the short-term effects of a change in the feedback signal.
Generally, when configuring this parameter, you must observe the drive’s response to an
incremental change in the feedback input over a certain length of time, and then decide if
this response is acceptable.
For example, if the feedback input changed 1 V (or 1 mA) for 5 seconds, what is the drive’s
response? Is it acceptable? Would you prefer to have the drive ignore a change over such
a short time period, but still react to longer time durations (say, 8 to 10 seconds)? (If so,
decreasing the integral gain by reducing the value for parameter 916-KI would have that
effect.)
9.2.5
Parameter 917-KIN
Parameter 917-KIN is the feedback scaling factor. It is used to scale the signal supplied by
the transducer – thereby optimizing the effect of the signal on the drive.
9.2.6
Parameter 918-PICFG
Parameter 918-PICFG determines the characteristics of the process control loop. The following paragraphs discuss each of these characteristics in more detail:
1) Direct- or inverse-acting loop
In a direct-acting loop, as the process speed increases, the feedback signal will decrease and cause a corresponding decrease in the process speed as it approaches the
regulation point. This type is typically employed in pump applications where the level
control is the process variable.
Conversely, in an inverse-acting loop, as the process speed increases, the feedback
signal increases but causes a corresponding decrease in the process speed as it approaches the regulation point. This type is typically employed in supply pump applications where the pressure is the process variable.
2) Slow or fast rate of response
Whether the rate of response is fast or slow is relative; that is, one cannot assign a specific threshold and then say the response is fast or slow based on whether the threshold
is crossed. Instead, you must determine by observation whether a change in the process
speed causes a change in the feedback signal quickly enough for the requirements of
your application.
A slow rate of response (over 10 s, usually) is most often selected for processes with
long time constraints (for example, thermal and fluid level controls). On the other hand,
a fast response rate is utilized for processes with short time constraints (such as mechanical systems and pressure loops). Most industrial systems require a slow rate of response.
10.06.03
02_GB
Operating Instructions
EF1 — 0.37–4.0
55
Fundamentals of PI Control
3) Whether feed-forward is enabled
Feed-forward is usually enabled when there is very little difference between the process
speed and the feedback signal.
For example, feed-forward is useful in “speed regulation” situations, such as controlling
motor speed in a closed loop. Note that feed-forward should be enabled when attempting to close a speed loop.
Feed-forward is not suited to applications such as pressure regulation systems because
generally the process speed and the process variable are vastly different.
4) Whether PI control is enabled via a digital input
A digital input, when properly configured via the corresponding parameter, may be used
to toggle PI control.
Generally, a digital input is used when the process will be operated as both a closed and
an open loop and/or when circumstances may arise where you would want to override
the process speed as determined by the process variable and reference.
REMEMBER: to complete the implementation, you must configure a digital input separately
to invoke PI control.
9.3
Tuning the PI Control Loop
Once the parameters are initially configured (parameter 918-PICFG), you should tune them
so the process control loop operates as optimally as possible. To make tuning easier, the
following recommendations should be observed:
•
If your application does not require enabling by digital input, for the duration of tuning
you should select a value for parameter 918-PICFG which does allow a digital input to
enable PI control. Once tuning is finished, you can restore the parameter to its original
value.
•
Install a switch to select closed loop and open loop performance.
•
Connect a calibration signal to the drive to simulate the effects of the transducer’s signal.
While this is not absolutely required, it can be very helpful.
Once the preparations for tuning are complete, enable PI control via the digital input and
set the switch to open loop. Then operate the drive, utilizing any necessary instrumentation
(for example, pressure gauges, meters, etc.) to characterize the range of the signal supplied from the transducer (for example, at 3 PSI, the transducer provides 1 V). This will aid
in better understanding the operation of the system and make calibration easier.
Select a mid-range operating point for the system and inject a signal close to that which the
transducer would provide at that point. Vary the signal by the value determined by the setup technician and determine whether the proportional response of the system is appropriate. If the questions posed in the previous section are answered correctly and your initial
assumptions prove correct, a combination of input scaling and proportional gain should
make the performance match the system.
Next, examine the transient or short-term effects that are common on all real-world systems. Use the calibrator to change the feedback signal by some value for a measured interval, with the value and duration approximating the real system.
For example, say 1 V for 5 seconds was selected. By monitoring parameter 912-ERROR2,
the effect of the feedback signal may be observed. The value of this parameter should increase and then settle back to zero, or perhaps go below zero (negative). The value of the
parameter may go positive and negative a number of times as a response to repeated 5
second transients. Tune parameter 916-KI to optimize this effect to suit the circumstances.
56
Operating Instructions
EF1 — 0.37–4.0
10.06.03
02_GB
Fundamentals of PI Control
Finally, put the transducer into the circuit and review the results. The results will likely show
that the value of parameter 916-KI needs to be modified to complete the implementation.
Minor adjustment of the other PI control parameters may also be necessary.
Once the process control loop is optimally functioning, if you changed the value of parameter 918-PICFG for tuning, restore it to its original value.
If you need further assistance or advice, please contact BERGES.
10.06.03
02_GB
Operating Instructions
EF1 — 0.37–4.0
57
Summary of EF1 Parameters
10
Summary of EF1 Parameters
Parameter
Parameter Name
Level
Range
Default
Page
Read-Only
25
Read-Only
26
002-RVLVL
Software Revision
L2
003-IRAT
Drive Rated Current
L2
005-FLT5
Most-recent Fault
L1
Read-Only
26
006-FLT4
Second-oldest Fault
L2
Read-Only
26
007-FLT3
Third-oldest Fault
L2
Read-Only
26
008-FLT2
Fourth-oldest Fault
L2
Read-Only
26
009-FLT1
Oldest Fault
L2
Read-Only
26
102-FOUT
Motor Output Frequency
L1
0...1000 Hz
Read-Only
26
103-VOUT
Motor Output Voltage
L1
0...100%
Read-Only
26
104-IOUT
Motor Output Current
L1
0...60 A
Read-Only
26
105-LOAD
Drive Load
L1
0...200%
Read-Only
26
107-TEMP
Drive Temperature
L1
0...110 °C
Read-Only
27
110-WARN
Warning Code
L1
0...6
Read-Only
27
201-MODE
Input Mode
L1
0...11
0
27
204-FSEL
Speed Setpoint Selector
L2
0...15
0
28
205-A1TYP
A1 Input Type
L2
0...5
0
28
206-A1OFF
A1 Offset
L2
0...100%
20%
29
207-A1SPN
A1 Span
L2
0...200%
100%
29
208-A2OFF
A2 Offset
L2
0...100%
0%
29
209-A2SPN
A2 Span
L2
0...200%
100%
29
210-TLSEL
Torque Limit Source Selection
L2
0...3
0
29
301-FMIN
Minimum Frequency
L1
0...1000 Hz
0 Hz
30
302-FMAX
Maximum Frequency
L1
20...1000 Hz
50 Hz
30
303-F2
Preset Frequency 2/Jog Frequency
L1
0...1000 Hz
5 Hz
30
304-F3
Preset Frequency F3
L2
0...1000 Hz
20 Hz
30
305-F4
Preset Frequency F4
L2
0...1000 Hz
40 Hz
30
306-F5
Preset Frequency F5
L2
0...1000 Hz
50 Hz
30
307-F6
Preset Frequency F6
L2
0...1000 Hz
0 Hz
30
308-F7
Preset Frequency F7
L2
0...1000 Hz
0 Hz
30
309-FTL
Minimum Frequency When Torque Limit Active
L2
0...1000 Hz
10 Hz
31
401-RSEL
Ramp Selector
L2
0...7
0
31
402-ACC1
Acceleration Time 1
L1
0.1...600.0 s
3.0 s
32
403-DEC1
Deceleration Time 1
L1
0.1...600.0 s
3.0 s
32
404-ACC2
Acceleration Time 2
L2
0.1...600.0 s
1.0 s
32
405-DEC2
Deceleration Time 2
L2
0.1...600.0 s
1.0 s
32
406-DECTL
Deceleration Time When Torque Limit Active
L2
0.1...600.0 s
1.0 s
32
407-DCBRK
DC Brake Time
L2
0.0...20.1 s
0.2 s
32
408-DCVLT
DC Brake Voltage
L2
0...15%
58
Operating Instructions
EF1 — 0.37–4.0
varies
2/3 of 502-BOOST 33
10.06.03
02_GB
Summary of EF1 Parameters
Parameter
Parameter Name
Level
Range
Default
Page
411-DCACT
DC Brake Activation
L2
0...3
3
33
412-DBCFG
DB Configuration
L2
0...2
1
33
413-EDBDC
External DB Maximum Duty Cycle
L2
0.0...100.0%
varies
34
501-VSEL
V/Hz Char. Selector
L2
0...5...6
0
34
502-BOOST
Torque Boost
L1
0...25%
Model dependent
35
503-FKNEE
V/Hz Knee Frequency
L2
30...1000 Hz
50 Hz
36
504-SKBND
Skip Frequency Band
L2
0.2...20.0 Hz
1 Hz
36
505-SK1
Skip Frequency 1
L2
0.0...1000.0 Hz
0 Hz
36
506-SK2
Skip Frequency 2
L2
0.0...1000.0 Hz
0 Hz
36
507-SK3
Skip Frequency 3
L2
0.0...1000.0 Hz
0 Hz
36
508-MNLP
Motor Saturation
L2
15...85%
Model dependent
37
509-MVOLT
Rated Motor Voltage
L2
Model dependent Model dependent
37
510-VHZ1F
V/Hz Frequency, Point 1
L2
0...1000 Hz
0 Hz
37
511-VHZ1V
V/Hz Voltage, Point 1
L2
0...100%
0 Vac
37
512-VHZ2F
V/Hz Frequency, Point 2
L2
0...1000 Hz
0 Hz
37
513-VHZ2V
V/Hz Voltage, Point 2
L2
0...100%
0 Vac
37
514-VHZ3F
V/Hz Frequency, Point 3
L2
0...1000 Hz
0 Hz
37
515-VHZ3V
V/Hz Voltage, Point 3
L2
0...100%
0 Vac
37
601-LTLF
Limit for Torque Load (Forward)
L2
30...150%
150%
37
602-LTLR
Limit for Torque Load (Reverse)
L2
30...150%
150%
37
603-RTLF
Limit for Regen. Torque (Forward)
L2
30...110%
80%
38
604-RTLR
Limit for Regen. Torque (Reverse)
L2
30...110%
80%
38
605-SLIP
Slip Compensation
L1
0.0...12.0%
0.0%
38
607-TOL
Timed Overload Trip Point
L1
0...100%
100%
38
608-NRST
Trip Restart – Number of Attempts
L2
0...8
0 tries (disabled)
39
609-DRST
Trip Restart – Time Delay
L2
0.0...60.0 s
0.1 s
39
610-TOLC
Timed Overload Characteristic
L2
0...7
0
38
614-RGNSTOP Permitted Time in Regenerative Current Limit
L2
0.0...5.0 s
1.0 s
40
620-PHLOSS
Phase Loss Detection
L2
0...1
0 (inactive)
40
701-METER
Analog Meter Output AQ1 Selector
L1
0...16
1
40
702-M1OFF
AQ1 Offset
L2
0...100%
20%
40
703-M1SPN
AQ1 Span
L2
0...200%
100%
41
704-R1
Relay R1 Selector
L1
0...11
2
41
705-R2
Relay R2 Selector
L1
0...11
6
41
709-MET2
Analog Meter Output AQ2 Selector
L1
0...16
3
40
710-M2OFF
AQ2 Offset
L2
0...100%
20%
40
711-M2SPN
AQ2 Span
L2
0...200%
100%
41
801-PRGNO
Special Program
L2
0...255
0
41
802-START
Start Options
L2
0...11
0
42
803-PWM
PWM Carrier Frequency
L2
0...5
2
43
10.06.03
02_GB
Operating Instructions
EF1 — 0.37–4.0
59
Summary of EF1 Parameters
Parameter
Parameter Name
Level
Range
Default
Page
804-DISP
Display Option Setting
L2
0...3000
0
43
807-ACODE
Security Access Code
L2
0...999
0
44
901-PUPD
DI Logic
L2
0...1
1
44
902-D2
D2 Selector
L2
0...19
1
44
903-D3
D3 Selector
L2
0...19
3
44
904-D4
D4 Selector
L2
0...19
4
44
905-D5
D5 Selector
L2
0...19
5
44
906-D6
D6 Selector
L2
0...19
7
44
909-RVLVL2
FL Revision
L2
Read-Only
45
910-FSTAT
Stator Frequency
L2
0...1000 Hz
Read-Only
45
911-FCORR
Frequency Correction
L2
0...1000 Hz
0 Hz
45
912-ERROR2
Final Error
L2
varies
Read-Only
45
913-ERROR1
Initial Error
L2
varies
Read-Only
45
914-SIPART
Integral Sum
L2
varies
Read-Only
45
915-KP
Proportional Gain
L2
0...255
0
45
916-KI
Integral Gain
L2
0...255
0
46
917-KIN
A2 Gain
L2
0...255
0
46
918-PICFG
PI Configuration
L2
0...15
0
46
950-MBPROT
Modbus Protocol
L2
0...1
0
47
951-MBBAUD
Baud Rate
L2
0...4
3
47
952-MBPAR
Parity
L2
0...6
0
47
953-MBDROP Drop Number
L2
1...247
1
47
954-MBTO
Watchdog Timer
L2
1.0...60.0 s
1.0 s
48
960-STAT1
Status Word 1
L2
0...65535
Read-Only
48
961-STAT2
Status Word 2
L2
0...65535
Read-Only
48
962-CNTL1
Control Word 1
L2
0...65535
0000
49
963-FEXT1
External Frequency Reference 1
L2
0...1000 Hz
0 Hz
49
964-FEXT2
External Frequency Reference 2
L2
0...1000 Hz
0 Hz
49
60
Operating Instructions
EF1 — 0.37–4.0
10.06.03
02_GB
®
BERGES
Berges electronic GmbH
Industriestraße 13
D–51709 Marienheide-Rodt
Postfach 1140 • D–51703 Marienheide
Tel. +49 (0)2264 17-0
Fax +49 (0)2264 17126
http://www.berges.de
[email protected]
Berges electronic s.r.l.
Zona industriale, 11
I–39025 Naturno Italy
Tel. +39 (0)473 671911
Fax +39 (0)473 671909
http://www.berges.it
[email protected]
Uff. vendite Milano
Via Monteverdi, 16
I–20090 Trezzano sul Naviglio (MI)
Tel. +39 (0)2 48464206
Fax +39 (0)2 48499911
TB Wood’s Incorporated
440 North Fifth Avenue
Chambersburg, Pennsylvania 17201-1778
Telephone: 888-TBWOODS or 717-264-7161
Fax: 717-264-6420
http://www.tbwoods.com
[email protected]