1
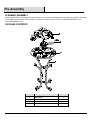
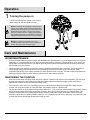
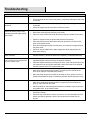
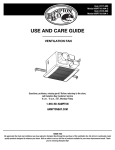
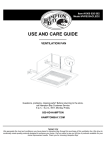
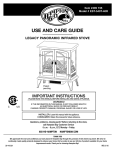
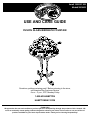
Item# 1000 527 822
Model# 2818422
USE AND CARE GUIDE
FUSION GLASS BIRDBATH FOUNTAIN
Questions, problems,missing parts? Before returning to the store,
call Hampton Bay Customer Service
8 a.m. - 6 p.m., EST, Monday-Friday
1-855-HD-HAMPTON
HAMPTONBAY.COM
THANK YOU
We appreciate the trust and confidence you have placed in Hampton Bay through the purchase of this fountain. We
strive to continually create quality products designed to enhance your home. Visit us online to see our full line of
products available for your home improvement needs. Thank you for choosing Hampton Bay!
Table of Contents
Table of Contents .......................................................... 2
Safety Information ......................................................... 2
Warranty ......................................................................... 3
Pre-Assembly ................................................................ 4
Planning Assembly ..................................................... 4
Package Contents ..................................................... 4
Assembly ....................................................................... 5
Operation ....................................................................... 6
Care and Maintenance .................................................. 6
Water Maintenance .................................................... 6
Maintaining the Fountain............................................ 6
Cleaning the Fountain ................................................ 7
Maintaining the Pump ................................................ 7
Cleaning the Pump .................................................... 7
Troubleshooting............................................................ 8
Safety Information
CAUTION: Do not use the pump for industrial
purposes.
WARNING:Risk of electric shock. This pump is
supplied with a grounding conductor and groundingtype attachment plug. To reduce the risk of electric
shock, be certain that it is connected only to a
properly grounded, grounding-type receptacle.
CAUTION: Do not use the pump in vehicles or on
board ships or aircraft or in swimming pools.
WARNING: To reduce the risk of electric shock,
use only on portable self-contained fountains no
larger than 5ft./1.52 m in any dimension.
CAUTION: Do not use the pump in locations where
special conditions prevail, such as the presence of a
corrosive or explosive atmosphere (dust, vapor, or
gas).
WARNING: If equipped with a 3-prong, grounded
type plug, do not remove the grounding pin from the
plug on the power cord.
CAUTION: Do not lift the pump by its power cord.
CAUTION: Risk of electric shock. Do not remove the
cord and strain relief. Do not connect the conduit to the
pump.
CAUTION: This pump has been evaluated for use
with water only.
CAUTION: Do not let the pump run dry. Pump must
be completely submerged for proper operation and
cooling.
CAUTION: Before connecting to the power source,
make sure that the pump is assembled and
completely submerged in water.
CAUTION: Keep the plug dry. Do not expose the
plug to water or steam.
CAUTION: Always disconnect the pump from the
power source before performing any maintenance
on the pump, lights (if equipped), or fountain.
CAUTION: Do not use the pump in water exceeding
86°F / 30°C.
CAUTION: Do not exceed the voltage shown on the
pump.
CAUTION: Do not use the pump with flammable
liquids.
CAUTION: Check the water level regularly to ensure
the pump is completely submerged during
operation. Do not add water while operating the
product. Always disconnect the pump from the
power source before adding water.
2
Warranty
LIMITED WARRANTY
This product is warranted to the user against missing parts, defective material and workmanship, under normal working
conditions, for a period not to exceed the term noted on the chart below. This warranty period begins on the date of
purchase by the original purchaser.
Cement Product
90 days on construction, materials, paint and finish
Pump
90 days
This warranty covers only properly installed and maintained units. Pump warranty is limited to applications pumping fresh
water at temperatures between 41°F - 95°F (5°C - 35°C), with a PH range of 5 – 9.
Upon receipt of a defective item, the manufacturer will, at its sole option, repair, replance or refund, as appropriate, any
defective parts free of charge and return it to you, postpaid. If it is appropriate to replace your product, the manufacturer
will replace the product with the same product or a comparable product at the manufacturer’s option.
GENERAL TERMS AND CONDITIONS
Proof of purchase is necessary to request a claim under this warranty.
This warranty does not apply to appearance or accessory items.
This warranty does not include damage due to improper packing, handling, or transportation. For products lost or
damaged in transit, a claim should be filed with the carrier.
This warranty does not cover any costs associated with the installation and removal of products or parts subject to this
warranty. This warranty shall not apply to acts of God, nor shall it apply to products which, have been subject to
negligence, abuse, accident, misapplication, tampering, alteration or modification; nor due to improper installation,
operation, maintenance, repair or storage; nor to other than normal application, use or service, including but not limited to,
operational failures caused by corrosion, rust or other foreign materials in the system, or operation at pressures in excess
of recommended maximums.
DISCLAIMER
Any oral statements made about the product by the seller, the manufacturer, the representatives, or any other parties do not
constitute warranties, should not be relied upon by the user, and are not part of the contract for sale. The sellers and
manufacturers only obligation, and buyers only remedy shall be for the manufacturer to either replace and /or repair at the
manufacturers sole discretion, the product as described above. Neither seller nor the manufacturer shall be liable for any
injury, loss or damages for lost profits, lost sales, injury to person or property, or any other incidental or consequential loss
arising from any cause whatsoever, no matter whether based upon warranty, contract, negligence or other misuse, and the
buyer and user agree that no other remedy shall be available to them. Before using, the buyer and user shall determine the
suitability of the product for intended use, and assume all risk and liability whatsoever in connection therewith. The warranty
and remedy described in this limited warranty is an exclusive warranty and remedy in lieu of any other warranty or remedy
expressed or implied. All other warranties and remdies ar hereby expressly excluded, including but not limited to any implied
warranty of merchantability of fitness for any particular purpose.
OTHER LEGAL RIGHTS
This warranty gives the buyer and user specific legal rights, and buyer and user may also have other rights which vary
from state to state. Some states do not allow exclusions or limitation of incidental or consequential damages, so the above
limitations or exclusions may not apply to you..
Contact the Customer Service Team at 855-HD-HAMPTON or visit www.Hamptonbay.com.
3
HAMPTONBAY.COM
Please Contact 1-855-HD-HAMPTON for further assistance.
Pre-Assembly
PLANNING ASSEMBLY
Unpack all parts from the packaging and ensure there are no missing or damaged parts. If any parts are missing or damaged,
do not attempt to assemble or use the product. Contact the Customer Service Team at 1-855-HD-HAMPTON or visit
www.HAMPTONBAY.com.
PACKAGE CONTENTS
Part
Description
Quantity
A
Metal Base
1
B
Glass Basin
1
C
Pump (Part No. PT-1020)
1
D
Metal Top
1
4
Assembly
1
□
□
□
Assembling the fountain body
Select a flat, level surface for the fountain location.
Unfold the metal base, and adjust the four legs to
90 degree angles. Then, turn the top screw (a)
counterclockwise and the bottom screw (1)
clockwise to lock the legs in place.
Position the glass basin (B) over the metal base (A).
Ensure the glass basin is level.
2
□
□
□
5
Attaching the pump and
metal top
Put the pump (C) into the glass basin (B)
horizontally, and draw out the pump power cord from
the edge of the glass basin and keep it opposite of
the operator.
Pull of the clips with suction cup (2) to a 45 degree
angle, then position the metal top (D) over the glass
basin (B) to clip the edge of the glass basin (B).
Insert the water supply tube (3) into the pump outlet
that is on the top of the pump. Slightly dampen the
surface of suction cups (2) and press them onto the
bottom of the glass to ensure that they stick on the
glass tightly.
Add clean water into the glass basin (B). The
required water volume is 4.5 liters (1.19 gallons)
or the water level should be approximately 0.8 in.
/20 mm lower than the edge of the glass basin.
HAMPTONBAY.COM
Please Contact 1-855-HD-HAMPTON for further assistance.
Operation
1 Turning the pump on
□
Connect the pump power cord to a GFCI outlet.
Water begins to flow through the fountain.
NOTE: To eliminate the possibility of water damage
around your fountain, check for leaks and excessive
splashing after the initial setup of your fountain. If the
water flow from the basins is uneven then check to
see if the fountain is level. It is highly recommended
this fountain be placed in an area where it cannot be
damaged should the area become wet and unstable.
NOTE: Do not leave your fountain running for
extended periods of time when no one is present to
observe the performance and water level.
Care and Maintenance
WATER MAINTENANCE
□
It is recommended that you fill your fountain with distilled water. Distilled water is pure and should have no minerals or
sediment in it. It will extend the life of the pump and the time between cleanings. If distilled water is not an option, use
filtered water, as water directly from your tap will generally have minerals and chemicals that can build up and leave
behind residue on your fountain.
□
Check the water level regularly to ensure the pump is completely submerged during operation. This is necessary to
ensure proper cooling of the pump and prevent overheating. In summmer months, or dry, hot climates, water
evaporates very quickly, so it may be necessary to check the water level every day. The rate of water evaporation will
also be greater with larger fountains, with more surface area, than smaller fountains.
MAINTAINING THE FOUNTAIN
□
Keep the fountain water and pump clean and clear of debris. If placed under a tree or near vegetation, you may need
to scoop out leaves and other debris every other day. Water treatments that prevent algae growth and mineral
deposits are available at your local home & garden stores.
□
If the fountain is not in use for an extended period of time, disconnect the power and empty all the water from the
fountain. Do not tip the fountain to empty the water. Use a siphon pump or a small bucket.
□
The fountain should not be operated in temperatures below 41°F (5°C) to prevent frost damage. During winter months,
before the temperature hits freezing, disconnect the power, drain your fountain and store it in a heated area. If the
fountain is stored outdoors in freezing temperatures, disconnect the power, empty all the water from the fountain,
remove the pump and any lights if possible, make sure it is completely dry and cover it with a tarp. Any water left in the
fountain may freeze and expand causing the fountain to crack.
6
Care and Maintenance (continued)
Preventing Mosquitos
□
If mosquitoes are a problem in your area, it is recommended to run the fountain as much as possible to prevent
standing water, where mosquitoes breed. You may also add a few drops of anti-mosquito water treatment, available at
your local home and garden store, to the fountain water.
Preventing Water Damage
□
To eliminate water damage to floors and/or surrounding fountain areas, check for leaks and excessive splashing after
initial installation and on a regular basis.
Repairing Leaks
□
If your fountain develops a leak and a visible crack is detected, seal the crack with plastic epoxy or Clear Silicone II
sealant. If the fountain leaks without a visible crack, turn the pump off, fill the fountain and let the fountain sit for one
week. If there is a crack, it will appear white. Remember to keep the water ¾ full as water evaporates over time.
CLEANING THE FOUNTAIN
□
Do not use bleach as it may be harmful to pets and wildlife and may also damage the finish of the fountain.
□
Clean the fountain monthly to prevent mineral deposits and contamination which may clog the pump.
□
Disconnect the pump from the power source and empty the water from the fountain. Use any gentle household
cleanser and a soft brush or cloth to clean the fountain. Avoid using any harsh chemicals, abrasives or rough
scrubbing, as this could damage the finish on your fountain. The frequency of cleaning may vary depending on the
location of your fountain.
MAINTAINING THE PUMP
□
□
□
Use a pre-filter on your pump, if available, to prevent it from clogging with leaves or other debris.
Regular cleaning of the pump is necessary depending upon the environment in which it is operated. Clean the pump
when it is visibly soiled or when a noticeable decrease in performance is detected. Failure to clean the pump will
result in overheating of the pump.
Although it is not required, pumps generally last longer if left running continuously as it reduces the wear from
starting and stopping.
CLEANING THE PUMP
WARNING: Before cleaning, always disconnect the
pump from the power source.
□
Disassemble the pump by removing the filter (1), flow regulator (2), and gland (3). Remove the impeller/rotor
assembly (4) by gently pulling on the impeller blades. Use a soft cloth or brush to clean the area inside of the pump
housing (5). Clean the flow regulator (2), filter (1), and impeller assembly (4) in warm soapy water. Reassemble the
pump and inspect for proper operation.
7
HAMPTONBAY.COM
Please Contact 1-855-HD-HAMPTON for further assistance.
Troubleshooting
Problem
Solution
□
Check to make sure the pump is connected to a power source.
□
Check the water level to ensure the pump is completely submerged. Add water
as needed.
□
Check the water level to ensure the pump is completely submerged. Add water
as needed.
□
Check the supply tube for any kinks or folds and correct.
□
Disconnect the pump from the power source.
□
Disconnect the supply tube from the pump outlet.
□
Check for clogs or holes and clean the tubing inside and outside if necessary.
□
Check for clogs and clean the pump inlets and outlet if necessary.
□
Place the pump back into the water outlet side up and then re-connect the
pump to the power source.
□
Once the water begins to flow from the pump, re-connect the supply tubing to
the pump outlet.
□
Check for any air trapped in the water supply tube which may prevent the
pump from working.
The pump runs with low or high
water circulation.
□
Check and adjust the regulator dial or slide on the front of the pump. Adjust the
dial/slide towards (+) to increase water flow or towards (-) to decrease water flow.
The pump operates, but the water
flow is uneven or non existent and
the pump makes noise.
□
Check the impeller assembly for wear. Remove the front cover and
regulator/impeller plate and remove the impeller assembly.
□
Clean the impeller assembly and inspect for wear. If the rotor spins freely from
the magnetic body, the impeller assembly is worn and needs to be replaced.
Contact customer service for replacement parts.
The pump starts to make noise.
□
Check the water level to ensure the pump is completely submerged. If the
water level drops below the pump intake, it may suck in air and cause the
noise or the pump to completely stop working.
□
Move the pump away from the sides of the basin or place a piece of foam or
sponge undermeath the pump to isolate any vibration which causes the noise.
□
Check the water level to ensure the pump is completely submerged. If the
water level drops below the pump intake, it may suck in air and cause the
pump to “spit” and foam the water.
□
Add a few drops of anti-foaming water treatment, available at your local home
and garden store, to the fountain water.
□
Gently sweep across the water surface to achieve even water flow across the
face of the fountain.
□
Check the top of the basin to ensure it is level. If not, shim the basin from the
bottom until the top spillway is level or has achieved even water flow all
around.
The pump does not operate.
The pump operates, but there is no
water flow.
The pump operates, but there is no
water flow and the pump is fully
submerged and the supply tubing
has no kinks.
The water starts to foam.
The water flow is uneven.
8
Questions, problems, missing parts? Before returning to the store,
call Hampton Bay Customer Service
8 a.m. - 6 p.m.,EST,Monday-Friday
1-855-HD-HAMPTON
HAMPTONBAY.COM
Retain this manual for future use.