1
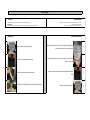
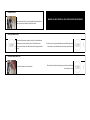
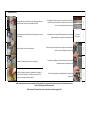
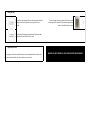
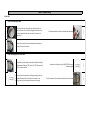
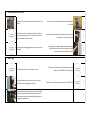
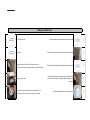
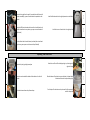
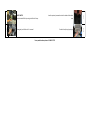
A6500
Aquverse Water Cooler Installation and Troubleshooting Instructions
WARNING: YOU MUST OBSERVE ALL LOCAL GOVERNING CODES AND ORDINANCES FOR INSTALLATION, OR THE
WARRANTY WILL BE VOIDED.
For any needed assistance please call 1-866-872-5722
If you do not own the property where the unit will be installed, you need to contact the owner and obtain
approval before you install your cooler. If you are not comfortable with the installation procedure it is
****Warning do not plug water cooler in until water line is in place and dispensing water
recommended to have a professional licensed plumber complete the install for you.
through the faucets****
WARNING: Do not use a saddle valve for installation or the warranty will be voided
WARNING: This product is intended for indoor use only. Outside temperatures can cause damage to all systems. Please use only inside your home or office.
Items You Need
Angle stop fitting (size depends on your water source, adaptable fitting
provided in water line kit)
Phillips head screw driver
Very sharp pair of scissors or a very sharp knife to cut tubing
Zip Ties (provided in water line kit)
Adjustable crescent wrench
Quick connect (2 sided coupler for poly line, provided in water line kit)
Poly Tubing (provided in water line kit)
Water filter
Drill with a 3/8 bit
Safety Glasses (Wear these at all times during installation)
To find the Aquverse warranty please go to www.aquverse.com
Cooler Set Up
First Steps
Filter Specifications
Determine where your cooler is going to be located and place it close to the determined area
DO NOT PLUG IN
A professional licensed plumber can perform the install or you can obtain the following items at your local hardware store:
STEP 1
STEP 2
Re-attach the drip tray by pushing in
STEP 4
Attach filter to filter head by pushing in, and turning to the right until it
stops
Insert the previously removed screw into the bottom of the cabinet
cover
STEP 3
Push the cabinet cover down and pull towards you
Push the top of the cabinet cover into place and let slide up naturally
and click into position
STEP 2
Remove the screw located behind the drip tray
Place the bottom of the cabinet cover over the plastic L-shaped clips at
the bottom of the cooler and press down gently
STEP 1
Remove the drip tray by pulling towards you
STEP 3
Re-attaching Front Cabinet
STEP 4
Attaching Filter
This drinking water system must be maintained in accordance with the manufacture's instructions
(see instructions that are provided with filter)
Maximum PSI = 10-125 psi/Capacity = 1500 gallons/Temperature = 35-100 F
STEP 1
Locate Water Source
A water source looks like this. It can be typically found underneath the
closest sink to were you would like to place your cooler
WARNING: YOU MUST OBSERVE ALL LOCAL GOVERNING CODES AND ORDINANCES
To confirm you are using the cold water please shut off the water source
valve and turn on your cold water faucet. No water should come out.
Drain the water from the faucet by turning on the hot and cold faucets
until no water is running
STEP 2
Make sure that the water source you will work with is connected to the
cold faucet on you sink by a water line hose. The cold faucet can be
determining which faucet is the cold faucet and connecting to that water
line hose
STEP 2
STEP 1
Locate the cold water source
STEP 1
Confirm Your Water Source Is Off
Turn the valve clockwise to shut of the water
STEP 1
STEP 2
STEP 3
STEP 4
Connect the tubing into the two sided quick connect provide in the
waterline kit.
STEP 10
Run tubing from water source to cooler. If water source is located in a
cabinet then you will need to drill a small 3/8 inch hole into the front
corner to run the tubing underneath the cabinet.
Connect the two sided quick connect to the water line running out of
the bottom back corner of you water cooler.
STEP 9
Insert water line kit tubing into quick connect on angle stop
Determine if you have excess waterline running from you water source ,
and if so cut the poly tubing to the correct length
STEP 8
Attach the cold water line hose to the angle stop
Use the Water Line Kit clips to affix the tubing underneath the cabinet
alongside kick plate, or along wall to help keep out of sight.
STEP 7
Attach the angle stop to the shut off valve, if the fittings connect correctly
skip the next step
Run tubing from water source to cooler. If water source is located in a
cabinet then you will need to drill a small 3/8 inch hole into the front
corner to run the tubing underneath the cabinet.
STEP 6
Unscrew the cold water line hose from the shut off valve (you will have a
few ounces of water remaining in the hose that will drip out)
STEP 5
Installing Water Line Kit
When finished with the above steps you should have tubing running from the angle stop that is attached to the water shut off valve(water source) to
the filter. Then tubing from the filter into the cooler.
Wait a minimum of 30 minutes after you turn on the water source before plugging in filter
STEP 1
To do this please flush two gallons (approximately 10 glasses of water)
through the cooler until the water is clear in color
There is no danger in drinking the water with the carbon residue
discoloring the liquid, however for the freshest tasting and looking
water it is beneficial to flush the system.
Begin Using Your Cooler
You may begin to use the cooler immediately however it can take approximately 1 hour for the cold
tank, and hot tank to take effect and chill or heat the water in your cooler
WARNING: YOU MUST OBSERVE ALL LOCAL GOVERNING CODES AND ORDINANCES
NOTE
You must flush water through the filter to wash excess carbon out before
drinking (this is commonly referred to as priming the filter, and is
required)
STEP 2
Flushing the Filter
Cooler Troubleshooting
What To Do If
Turn the thermostat a 1/3 turn clockwise to resemble the picture shown
STEP 4
STEP 1
If compressor is not functioning, call 1-866-872-5722 to receive
additional support
STEP 3
Only if your cooler has frozen turn the cold water thermostat down by
turning a 1/4 turn counter clockwise.
Check faucets to determine if water is blocked by any obstructions
STEP 3
Confirm that cooler is not frozen by checking inside water tank, and
determining if water is frozen. If frozen unplug the water cooler and let
thaw, then proceed to the next step. If your cooler is not frozen skip
ahead to step 3
STEP 2
Cooler Is Not Dispensing any Water
STEP 1
Check that cold water thermostat is not turned to the off position (picture
shows thermostat in factory set "ON" position. The "OFF" position would
be a 1/3 turn counter clockwise
STEP 2
Cooler is dispensing water but it is not chilled
Determine whether the compressor is working by putting your ear close
to the top of the cooler (if you hear silence, the compressor is not
working, if you hear a humming noise the compressor is working)
STEP 1
Check the back of the cooler, and make sure the hot tank switch is in the
on position
Turn the cooler around so you are facing the back (wire caged portion)
of the cooler
STEP 4
STEP 2
If hot tank switch is on then you will need to reset the hot tank (this can
be tripped to the off position much like a circuit breaker, if the cooler is
plugged in before water is filled into the tank)
Locate the hot tank through the back cage, and then locate the hot tank
reset button on the right side of the hot tank
STEP 5
STEP 3
Cooler is dispensing water but it is not Hot
Reset the hot tank by first unplugging the water cooler, then proceed to
the next steps
Using a chopstick or screwdriver, depress the hot tank reset button
(water should be hot in 30 minutes time, see figure below which
pictures hole used to access hot tank reset button)
STEP 6
If leaking is occurring from the nozzle of the faucets please contact
customer service at 1-866-872-5722 for replacement
STEP 3
If the leak is internal, please contact customer service at 1-866-872-5722
STEP 4
STEP 1
STEP 2
Top check if the faucets are the source of the leak, you will need to
remove the faucet cover by pulling down and the out
If the faucets are the source of the leak, check to make sure the faucets
have been screwed on completely. If still leaking, drain the cooler of
water and remove the faucets, and make sure the gaskets around the
water spigots are in good condition
STEP 4
Identify the source of the leak (i.e. internal, faucets, or top)
STEP 2
Water Is Leaking
STEP 1
STEP 2
STEP 3
STEP 4
Insert the cleaned baffle back into the cold water tank
STEP 13
Remove the float valve from the top of the cold water tank (not the
position as you will need to re-install when cleaning is completed)
Drain this water through the cooler by opening the hot water faucet
(this may take more time then through the cold water faucet as done
previously)
STEP 12
Remove top cover of cooler
Fill the cold water tank again with approximately four glasses of water
STEP 11
Drain water out of the hot faucet until the water reaches room
temperature (note that water is going to be hot when you begin draining)
Drain this water through the cooler by opening the cold water faucet
STEP 10
Unplug cooler
Fill the cold water tank with approximately four glasses of water
STEP 9
Turn the water source off
STEP 5
Cleaning Your Water Cooler
STEP 6
Remove the drain plug from the rear of the cooler (water will drain out of
the cooler immediately, so you will need a bucket or receptacle to catch
the water
Install the float valve back to its original placement as noted before
STEP 14
STEP 7
Remove the baffle from the cooler and clean with a clean dish towel, and
water (do not use bleach or any cleaners, you may use a small amount of
soap if desired)
Install the to cover of cooler back in its original position
STEP 15
STEP 8
Clean the cold tank with a clean dish towel, and water (do not use bleach
or any cleaners, you may use a small amount of soap if desired)
Attach the new filter to filter head by pushing in, and turning to the
right until it stops
STEP 6
Place the bottom of the cabinet cover over the plastic L-shaped clips at
the bottom of the cooler and press down gently
STEP 7
Push the top of the cabinet cover into place and let slide up naturally
and click into position
STEP 8
STEP 1
Remove the drip tray by pulling towards you
STEP 2
Remove the screw located at the bottom of the cabinet on the front of
the cooler
STEP 3
Replacing Your Water Filter
Push the cabinet cover down and pull towards you
STEP 4
STEP 5
Re-attach the drip tray by pushing in
STEP 10
Pull down gently on the filter until it is removed
Insert the previously removed screw into the bottom of the cabinet
cover
STEP 9
TURN OFF WATER!
Remove the attached filter by turning to the left until it stops
For any needed assistance please call 1-866-872-5722