1
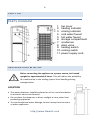
WCD-200W Water Dispenser OWNERS MANUAL Read and save these instructions. . 2 A Name You Can Trust Trust has to be earned and we will earn yours. Customer happiness is the focus of our business. From the factory to the warehouse, from the sales floor to your home, the whole NewAir family promises to provide you with innovative products, exceptional service, and support when you need it the most. Count on NewAir. As a proud NewAir owner, welcome to our family. There are no robots here, real people shipped your product and real people are here to help you. Thank you for your purchase and remember NewAir, A Name You Can Trust. Call us today at 855-963-9247 Or email [email protected] For future reference, we recommend you attach a copy of your sales receipt here and record the following information. You will need this information if it becomes necessary to contact the manufacturer for service inquiries. Date of Purchase: ___________________________________ Serial Number: ___________________________________ Model Number: ___________________________________ Connect with us online. http://www.NewAir.com 3 READ AND SAVE THESE INSTRUCTIONS. TABLE OF CONTENTS Specifications ............................................................................................... 3 Safety Information & Warnings ........................................................................... 4 Safe Operation Guidelines ........................................................................... 4 Disposal Guidelines ...................................................................................... 5 Parts List ............................................................................................................... 6 Parts Diagram............................................................................................... 6 Installation & Setup ............................................................................................. 6 Initial Setup .................................................................................................. 7 Cleaning & Maintenance ...................................................................................... 8 Troubleshooting ................................................................................................. 10 Limited Manufacturer’s Warranty ..................................................................... 11 SPECIFICATIONS MODEL NO. VOLTAGE: FREQUENCY: TOTAL POWER: HEATING POWER: TOTAL CURRENT: COOLING CURRENT: REFRIGERANT CODE NAME/QUANTITY: HOT WATER TEMPERATURE: COLD WATER TEMPERATURE: WCD-200W 115V 60 Hz 580W 500W 5.6A 1.3A R134a/31g 176°F - 203°F 43°F - 50°F All NewAir water dispensers are ETL listed, have been tested to meet CEC Energy Standards as well as compliance with AB1953 / Proposition #65 NO LEAD LAW. A Name You Can Trust 4 SAFETY INFORMATION & WARNINGS SAFE OPERATION GUIDELINES To reduce the risk of fire, electrical shock and/or injury to persons or property please follow basic safety precautions. Be sure to read all instructions before using this appliance and observe the following safety tips: ALWAYS DO THIS: Always transport your water dispenser in a vertical position and stand on a stable, level surface during use. Keep the water dispenser out of direct sunlight. Keep a distance of at least 6” (15 cm) from walls on all sides of the water dispenser. If the water dispenser is knocked over during use, turn off the unit and unplug it from the power supply immediately. Keep ventilation openings clear of obstruction. NEVER DO THIS: o Never use this appliance if it is not working properly, or if it has been dropped or damaged. o Do not use hazardous chemicals to clean or allow them to come into come into contact with the unit. Do not use the unit in the presence of flammable substances or vapor such as alcohol, insecticides, gasoline, etc. o Do not allow children to operate the unit unsupervised. o Do not use liquids other than water in this unit. o Do not plug in unit until water bottle is installed (see installation instructions below). o Do not turn on the hot water setting without a water supply or the inside may catch fire. Shock Hazard – Electrical Grounding Required This appliance is for indoor use only. Never attempt to repair or perform maintenance on the unit until the electricity has been disconnected. http://www.NewAir.com 5 Never remove the round grounding prong from the plug and never use a two-prong grounding adaptor. Use of an extension cord is not recommended. Do not pull or place strain on the power cord when moving the appliance. Altering or cutting of power cord, removal of power cord, removal of power plug, or direct wiring can cause serious injury, fire, or loss of property and/or life, and will void the warranty. If the power cord is damaged, it must be replaced by an electrician or specialized technician authorized by the manufacturer in order to prevent fire. Do not operate with an external switching device, such as a timer, or connect to a circuit that is regularly switched on and off by the utility. This appliance is not intended for use by persons (including children) with reduced physical, sensory or mental capabilities, or lack of experience and knowledge, unless they have been given supervision or instruction concerning use of the appliance by a person responsible for their safety. Children should be supervised to ensure that they do not play with the appliance. Household use only. Do not store explosive substances such as aerosol cans with flammable propellant in this appliance. WARNING---- Do not damage the refrigerant circuit. WARNING---Do not use electrical appliances inside the food storage compartments of appliance, unless they are of the type recommended by the manufacturer. DISPOSAL GUIDELINES It is prohibited to dispose of this appliance in domestic household waste. Disposing of waste in forests and landscapes endangers your health when hazardous substances leak into the ground-water and find their way into the food chain. For disposal, the following options may be available: The municipality may have established collection systems, where electronic waste can be disposed of free of charge to the user. When buying a new product the retailer may take back the old product free of charge. As old products contain valuable resources, they can be sold to scrap metal dealers. A Name You Can Trust 6 PARTS LIST PARTS DIAGRAM 1. top cover 2. heating indicator 3. cooling indicator 4. cold water faucet 5. hot water faucet 6. storage compartment 7. condenser 8. drain valve 9. heating switch 10. cooling switch 11. power supply cord INSTALLATION & SETUP Before connecting the appliance to a power source, let it stand upright for approximately 2 hours. This will reduce the possibility of a malfunction in the cooling system from handling during transportation. LOCATION The water dispenser should be placed on a firm, even foundation to minimize noise and vibration. Do not place the dispenser in direct sunlight or near other heat producing appliances. To avoid accidental water damage, locate it away from furniture or other appliances. http://www.NewAir.com 7 The unit must be placed within reach of a properly-rated grounded socket. Never place any obstacles around the air inlet or outlet of the unit. Allow a minimum 6-inch clearance on all sides for efficient operation. OPERATION To dispense hot water, pull the lever on the spigot upwards before pulling both the lever and the spigot downwards. IMPORTANT: Customers are not meant to adjust the temperature by themselves by removing the sticker or screw at the back of the appliance. Doing so will void the warranty if product issues are found to be caused by such adjustments. TEMPERATURE ADJUSTMENT To adjust the water temperature on the unit, locate the white plug on the left side of the unit. Remove the plug to expose an area where you can use a flat tip to adjust the water temperature for both hot and cold. Do not adjust the temperature by manipulating the screw at the back of the appliance because the unit may not cool or may not stop cooling. This can form ice and damage the unit. INITIAL SETUP IMPORTANT: Do not plug in the unit before installing a water bottle. Operating the unit with an empty hot water tank can cause physical damage to the water dispenser. WATER BOTTLE INSTALLATION This unit is designed to work with 2-gallon, 3-gallon or 5-gallon bottles of drinking water. To install the water bottle: 1. Remove the label from the cap of the bottle. 2. Use a clean cloth to wipe the cap and neck of the bottle. 3. Lift and invert the bottle, and insert the bottle neck into the water guard. 4. Allow bottle to fill the internal tank and wait for bubbles to stop rising from the bottom of the bottle. A Name You Can Trust 8 5. 6. 7. Turn on the Red (hot) tap until water flows from it. Plug the unit into an appropriate wall outlet. Turn on the switches on the rear of the unit one at a time (do not turn on the switches at the same time). The heating lamp and the cooling lamp will light up. INITIAL CLEANING This unit has been cleaned and sanitized prior to shipping. However, to remove dust accumulated during shipping, we recommend rinsing the water lines and tank upon initial operation: 1. Allow the unit to run with the water bottle in place for 30 minutes. 2. After 30 minutes, turn the unit off, unplug it, and remove the water bottle. 3. Run all taps until they are empty, then open the drain plug on the back of the unit and drain remaining water from the dispenser into a bucket or other container. 4. Once the unit has been completely flushed, you can replace the bottle and restart the unit according to the instructions above. CAUTION: To avoid burns, avoid direct contact with the hot water. Never allow children to dispense hot water without supervision. CLEANING & MAINTENANCE Unplug the unit from the electric outlet before performing any maintenance or servicing the product. CLEANING THE HOUSING Use a soft, damp cloth to wipe the body clean. Clean the drip tray and storage cabinet as needed. Remove dust from the condenser coils on the back of the unit to improve efficiency. Never use strong chemicals, gasoline, detergents, chemically-treated cloths, or any other cleaning solutions to clean the water dispenser, as these can all potentially damage the unit. Never use detergent or chemicals harmful to health when cleaning. http://www.NewAir.com 9 Do not directly spray water on the surface of the product. CLEANING THE WATER TANKS To periodically clean the water tanks, follow the procedure described for “Initial Cleaning” on page 6 of this manual. Hard water may cause mineral deposits to build up on the interior of the hot water tank, resulting in a decrease in heating capacity. To remove deposits, fill the hot water tank with an aqueous solution of 2% citric acid and leave for two hours. Flush system completely as described above. If the problem persists, contact your dealer or Customer Service for assistance. If power supply cord on this device is damaged, it must be replaced with a special power supply cord that is obtainable at the Service Center of our company. If the water dispenser will go unused for more than a few days, it is recommended that you unplug the unit, remove the water bottle, and drain the unit completely. A Name You Can Trust 10 TROUBLESHOOTING Problem No water from the faucets. Does not provide hot or cold water. Possible Causes Air entrance has been blocked Too much water has been used in a short time. Electric connection is loose. Electrical leakage. Loud noise. The connection is not good. Uneven footing. Water leakage. The bottle is broken. Solution Take down the bottle and reassemble it. Wait for a while and try again. Make sure the switch is ON and the plug is in the socket. Make sure the plug is properly grounded. Place the unit on a flat, even surface. Replace the bottle. NEVER TRY TO REPAIR OR DISMANTLE THE UNIT YOURSELF. UNAUTHORIZED REPAIRS CAN VOID THE WARRANTY AND ENDANGER THE UNIT. http://www.NewAir.com 11 LIMITED MANUFACTURER’S WARRANTY This appliance is covered by a limited manufacturer’s warranty. For one year from the original date of purchase, the manufacturer will repair or replace any parts of this appliance that prove to be defective in materials and workmanship, provided the appliance has been used under normal operating conditions as intended by the manufacturer. Warranty Terms: During the first year, any components of this appliance found to be defective due to materials or workmanship will be repaired or replaced, at the manufacturer’s discretion, at no charge to the original purchaser. The purchaser will be responsible for any removal or transportation costs. Warranty Exclusions: The warranty will not apply if damage is caused by any of the following: Power failure Damage in transit or when moving the appliance Improper power supply such as low voltage, defective household wiring or inadequate fuses Accident, alteration, misuse or abuse of the appliance such as using non-approved accessories, inadequate air circulation in the room or abnormal operating conditions (extreme temperatures) Use in commercial or industrial applications Fire, water damage, theft, war, riot, hostility or acts of God such as hurricanes, floods, etc. Use of force or damage caused by external influences Adjustments to temperature by removal of sticker and/or screw Partially or completely dismantled appliances Obtaining Service: When making a warranty claim, please have the original bill of purchase with purchase date available. Once confirmed that your appliance is eligible for warranty service, all repairs will be performed by a NewAir™ authorized repair facility. The purchaser will be responsible for any removal or transportation costs. Replacement parts and/or units will be new, re-manufactured or refurbished and is subject to the manufacturer’s discretion. For technical support and warranty service, please email [email protected] A Name You Can Trust