1
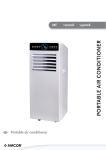
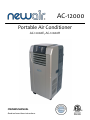
AC-12000 Portable Air Conditioner AC-12000E, AC-12000H OWNERS MANUAL Read and save these instructions. 2 AC-12000 Portable Air Conditioner AC-12000E, AC-12000H OWNERS MANUAL Read and save these instructions.http://www.NewAir.com . 3 A Name You Can Trust Trust has to be earned and we will earn yours. Customer happiness is the focus of our business. From the factory to the warehouse, from the sales floor to your home, the whole NewAir family promises to provide you with innovative products, exceptional service, and support when you need it the most. Count on NewAir. As a proud NewAir owner, welcome to our family. There are no robots here, real people shipped your product and real people are here to help you. Thank you for your purchase and remember NewAir, A Name You Can Trust. Call us today at 855-963-9247 Or email [email protected] For future reference, we recommend you attach a copy of your sales receipt here and record the following information. You will need this information if it becomes necessary to contact the manufacturer for service inquiries. Date of Purchase: ___________________________________ Serial Number: ___________________________________ Model Number: ___________________________________ Count On NewAir Connect with us online. 4 READ AND SAVE THESE INSTRUCTIONS. TABLE OF CONTENTS Safety Information & Warnings .............................................................................................................................. 5 Safe Operation Guidelines ............................................................................................................................... 5 Energy Saving Tips ............................................................................................................................................ 6 Disposal Guidelines .......................................................................................................................................... 6 Parts List .................................................................................................................................................................. 6 Parts Diagram ................................................................................................................................................... 7 Assembly & Installation .......................................................................................................................................... 7 Installation ........................................................................................................................................................ 7 Positioning the Exhaust Hose ........................................................................................................................... 8 Installing the Activated Carbon Filter............................................................................................................... 9 Operating Instructions .......................................................................................................................................... 10 Control Panel Diagram ................................................................................................................................... 10 Control Operation .......................................................................................................................................... 10 Draining the Unit ............................................................................................................................................ 12 Continuous Drainage ...................................................................................................................................... 13 Cleaning & Maintenance....................................................................................................................................... 13 Cleaning Your Portable Air Conditioner ......................................................................................................... 13 End of Season Storage.................................................................................................................................... 14 Troubleshooting .................................................................................................................................................... 15 Limited Manufacturer’s Warranty ........................................................................................................................ 16 SPECIFICATIONS MODEL NO. VOLTAGE: FREQUENCY: POWER CONSUMPTION, COOLING: POWER CONSUMPTION, HEATING: AIR VOLUME (MAX SPEED): DEHUMIDIFICATION CAPACITY: COMPRESSOR TYPE: REFRIGERANT TYPE: NUMBER OF FAN SPEEDS: TIMER: EXHAUST PIPE DIMENSIONS: COOLING CAPACITY: NOISE RATING: AC-12000E 115V 60Hz 1166W / 11A N/A 259 CFM 2.54 pints/hour Rotary R-410A 2 1 – 24hours 5” x 59.06” (120 x 1500 mm) 12,000 BTUs 57 dB http://www.NewAir.com AC-12000H 1054W / 10.1A 5 SAFETY INFORMATION & WARNINGS SAFE OPERATION GUIDELINES To reduce the risk of fire, electrical shock and/or injury to persons or property please follow basic safety precautions. Be sure to read all instructions before using this appliance and observe the following safety tips: ALWAYS DO THIS: NEVER DO THIS: Your air conditioner should be used in such a way that it is protected from moisture: e.g. condensations, splashed water, etc. Do not place or store your air conditioner where it can fall or be pulled into water or any other liquid. If your unit becomes wet, unplug immediately. Always transport your air conditioner in a vertical position and stand on a stable, level surface during use. Turn the product off when not in use. Contact a qualified person to carry out repairs. If the power cord is damaged it must be repaired by a qualified technician. Keep an air path of at least 14” (35 cm) all around the unit from walls, furniture and curtains. If the air conditioner is knocked over during use, turn off the unit and unplug it from the power supply immediately. o Do not operate your air conditioner in a wet room such as a bathroom or laundry room. o Do not touch the unit with wet or damp hands or when barefoot. o Do not press the buttons on the control panel with anything other than your fingers. o Do not remove any fixed covers. o Never use this appliance if it is not working properly, or if it has been dropped or damaged. o Never use the plug to start and stop the unit. Always use the switch on the control panel. o Do not place objects on the unit, and do not cover or obstruct the inlet or outlet grilles. o Do not use hazardous chemicals to clean or come into contact with the unit. Do not use the unit in the presence of flammable substances or vapor such as alcohol, insecticides, gasoline, etc. o Do not allow children to operate the unit unsupervised. o Do not use this product for functions other than those described in this instruction manual. Shock Hazard – Electrical Grounding Required This appliance is for indoor use only. Avoid operating this unit in excessively moist or humid environments. Always switch off the unit and unplug it when not in use. Never attempt to repair or perform maintenance on the unit until the electricity has been disconnected. Never remove the round grounding prong from the plug and never use a two-prong grounding adapter. Do not pull or place strain on the power cord when moving the appliance. Altering or cutting of power cord, removal of power cord, removal of power plug, or direct wiring can cause serious injury, fire, and loss of property and/or life, and will void the warranty. If the power cord is damaged, it must be replaced by an electrician or specialized technician authorized by the manufacturer in order to prevent fire. Never use an extension cord to connect power to the unit. Count On NewAir 6 ENERGY SAVING TIPS For maximum efficiency: Use the air conditioner in the recommended room size (up to 425 square feet). Keep doors and windows closed while the portable air conditioner is in use. Keep curtains and blinds closed during the sunniest part of the day while the air conditioner is in operation. Keep the filters clean. Once the room or area has reached your desired comfort level, be sure to reduce the unit’s temperature and ventilation settings. DISPOSAL GUIDELINES It is prohibited to dispose of this appliance in domestic household waste. Disposing of waste in forests and landscapes endangers your health when hazardous substances leak into the ground-water and find their way into the food chain. For disposal, the following options may be available: The municipality has established collection systems, where electronic waste can be disposed of free of charge to the user. When buying a new product the retailer will take back the old product free of charge. The manufacturer will take back the old appliance for disposal free of charge to the user. As old products contain valuable resources, they can be sold to scrap metal dealers. PARTS LIST When you receive your unit, carefully remove the exterior and interior packaging. It is recommended that you retain the packaging for future use. Check to make sure the following parts are included: Air conditioner Exhaust hose (A) Hose adapter (B) Activated carbon filter (C) Extendable window kit (2 pieces) (D) http://www.NewAir.com Drainage Hose (E) Remote control (F) 1 instruction manual 7 PARTS DIAGRAM 1. Control panel 2. Louvers 3. Carrying handles 4. Casters 5. Air filter 6. Air inlet 7. Cord storage 8. Exhaust air outlet 9. Water plug/drainage port ASSEMBLY & INSTALLATION INSTALLATION Before connecting the appliance to a power source, let it stand upright for approximately 2 hours. This will reduce the possibility of a malfunction in the cooling system from handling during transportation. LOCATION The air conditioner should be placed on a firm foundation to minimize noise and vibration. The unit has casters to aid placement, but it should only be rolled on smooth, flat surfaces. Use caution when rolling on carpet surfaces. Do not attempt to roll the unit over objects. The unit must be placed within reach of a properly rated grounded socket. Never place any obstacles around the air inlet or outlet of the unit. Allow 14 inches to 40 inches of space from the wall to the window for efficient air conditioning. Count On NewAir 8 WINDOW SLIDER KIT INSTALLATION Your window slider kit has been designed to fit most standard “vertical” and “horizontal” window applications. However, it may be necessary to improvise/modify some aspects of the installation procedures for certain types of windows. NOTE: If the window opening is less than the minimum length of the window slider kit, cut the piece with a hole in it, so that it is the correct size to fit the window opening. Leave the hole in the window slider kit intact. Never cut out the hole in the window slider kit. 1. Open the window and insert the window kit into the open gap. 2. Close the window until the window kit is held securely. You may need to adjust the size of the window kit and secure it with screws. This technique may also be used for sash windows. 3. Fit the exhaust hose into the exhaust air outlet located at the back of the air conditioner. 4. Attach the hose adapter onto the exhaust hose. 5. Attach the hose adapter to the window kit. POSITIONING THE EXHAUST HOSE Insert the exhaust hose into the back of the unit and tighten it into place. Avoid kinks and bends in the exhaust hose. These can cause moist air to accumulate, resulting in overheating and unexpected shut offs. The exhaust hose may be extended from 12 inches (300 mm) to 59 inches (1500mm), but for maximum cooling efficiency, use the shortest length possible. http://www.NewAir.com 9 WARNING: The included exhaust hose is specially designed to fit the specifications of this unit. Do not extend it with your own hose, as this can cause the air conditioner to malfunction. INSTALLING THE ACTIVATED CARBON FILTER 1. Remove the filter from the unit. 2. Separate the filter from the filter holder. 3. Remove the activated carbon filter from its plastic bag. 4. Insert the activated carbon filter into the filter and attach holder. 5. Reattach the filter holder onto the filter (make sure the active carbon filters will be held properly between the two pieces). 6. Insert the filter set into the unit. Count On NewAir 10 OPERATING INSTRUCTIONS CONTROL PANEL DIAGRAM 1. Fan speed (ventilation) button 2. Timer button 3. Display window 4. Remote control receiver 5. Heater indicator (AC12000H only) 6. Mode selection button 7. Automatic mode indicator 8. Cooling mode indicator 9. Fan mode indicator 10. Temperature increase button 11. Temperature decrease button 12. Power indicator 13. Full water tank indicator 14. ON/OFF (power) button 15. 16. 17. 18. 19. 20. 21. 22. Sleep mode button Ionizer button Compressor indicator Ionizer indicator Sleep mode indicator Timer indicator Low fan speed indicator High fan speed indicator CONTROL OPERATION TURNING THE UNIT ON AND OFF SETTING THE MODE/FUNCTION 1. Press the ON/OFF button. The unit will automatically begin operating in cooling mode on low fan speed. The default temperature is 75°. 2. The indicator lights will show any functions that are in progress. Please note that the display window will show ambient room temperatures ranging from 32°F to 122°F. 3. To turn the unit off, press the ON/OFF button again. 1. Press the MODE button to select the desired mode (cooling, heating, fan or automatic). Heating mode is only available on the AC-12000H. 2. The selected mode’s indicator light will turn on. In AUTO Mode, the air conditioner will automatically adjust the fan speed depending upon the ambient temperature. http://www.NewAir.com 11 SETTING THE TEMPERATURE SETTING THE FAN/VENTILATION SPEED 1. Press the UP or DOWN button to change the set temperature. 2. The display window will then indicate the set temperature. If no temperature is set, the display will show the room’s ambient temperature. 3. Please note that the default cooling temperature of this portable air conditioner is 75°F and 68°F for heating. 4. The cooling system will switch off if the ambient temperature is lower than the set temperature (the ventilation will keep working at the set level). If the ambient temperature rises above the selected level, cooling will resume. 1. Press the SPEED button to select the desired fan speed (high or low). The appropriate indicator light (high or low) will turn on accordingly. 2. If the unit is in AUTO mode, the fan speed will be automatically set according to the ambient temperature (the appropriate indicator light will turn on). Please note that when the unit is in AUTO mode, the speed setting cannot be changed. SETTING THE TIMER 1. Press the TIMER button to set the desired number of operating hours (from 1 to 24 hours). When the set time has been reached, the machine will automatically turn off. The display window will show the number of hours being set as you press the TIMER button. If the TIMER is not set, the unit will work continuously. 2. By pressing the TIMER button without selecting any other modes or setting’s, you can set the number of hours to be delayed before the unit turns on. For example, if you press the timer to “2”, the unit will automatically turn on after 2 hours. IONIZER SLEEP MODE 1. When in cooling mode, press the SLEEP button. The set temperature will increase 1°F on the first hour, another 1°F on the second hour, and then maintain that temperature. 2. When in heating mode, press the SLEEP button. The set temperature will decrease 1°F on the first hour, another 1°F on the second hour, and then maintain that temperature. 3. In sleep mode, the fan will automatically be set to low. By pressing the SLEEP button again, the set temperature and fan speed will revert back to previous settings. 4. The unit will shut down automatically after it has been in sleep mode for 12 hours. Sleep mode will not work when the unit is in the fan, dehumidification, or auto mode. It will only work in cooling or heating mode. HEATING MODE (AC-12000H model only) Press the IONIZER button to activate the ionizer function. ERROR MESSAGES If there is an error with the air conditioner, the LCD screen will display “E1” or “E2.” If either of these error messages appears, please contact the manufacturer or a service center. When the air conditioner is in heating mode, ambient warm air is recycled and used to heat your immediate area. The exhaust hose will still need to be fitted onto the unit in order for the cold air to be removed. When in heating mode, the machine can be set to HIGH or LOW speed. All of the above functions can be performed with the included remote control. The remote requires 2 AAA batteries to operate. Count On NewAir 12 CAUTION: After turning off the unit, please wait at least 3 minutes before turning it back on. This will prolong the life of the compressor. The cooling system will turn off if the ambient temperature is lower than the set temperature. However the fan will continue operating at the set level. Once the ambient temperature rises above the set temperature, cooling will resume. The heating system will turn off if the ambient temperature is higher than the set temperature. However the fan will continue operating at the set level. Once the ambient temperature drops below the set temperature, heating will resume. This machine is equipped with an ANTI-FROST function. When using the heating function in low temperature the heater will occasionally stop heating in order to melt any frost that has accumulated within the air conditioner. Normal operation will resume in a few moments. DRAINING THE UNIT During the cooling process, some water will be extracted from the air and stored within the unit’s water reservoir. If the water reservoir is full, both the compressor and motor will stop and the unit will beep (press any button to stop the beeping sound). The full water tank indictor light will also start flashing. To resume cooling, first empty the reservoir by following these steps: 1. Turn off the air conditioner and unplug it from the wall socket. To prevent water leakage, avoid moving the unit when full. 2. Place a container (such as a small pan) underneath the drainage port. 3. Remove the water plug from the drainage port and allow the water to drain out. 4. When the container is almost full, replace the water plug back into the drainage port and empty the water container. 5. Repeat until the water reservoir is completely empty. 6. Replace the water plug back into the drainage port and make sure it is firmly in place. 7. Turn the unit back on. The warning signal should be off. http://www.NewAir.com 13 CONTINUOUS DRAINAGE 1. Remove the water plug from the drainage port and retain it for future use. 2. Connect the drainage hose included with unit to the drainage port as shown. 3. Connect the other end of the hose into a drain. Please note: The drain must be at or below the level of the drainage port. The full water tank indicator will not work when the unit is being continuously drained. To extend the drainage hose, you can connect it with another hose with an overall diameter of 0.7” (18 mm). If room humidity levels are over 85%, it will be necessary to continuously drain the unit using the drainage hose. HEATING MODE These instructions apply only to model no. AC-12000H. While using the heating function, please note: In order to properly exhaust cool air, make sure the exhaust hose and window kit are properly installed. Set up the air conditioner for continuous drainage using the drain tube. The working range for the heating function is 32°F to 68°F. The unit may not provide optimal heating if used in temperatures outside this range. CLEANING & MAINTENANCE CLEANING YOUR PORTABLE AIR CONDITIONER Always unplug the unit from the power supply before cleaning. To maximize the efficiency of the air conditioner, regularly clean the unit. CLEANING THE HOUSING Use a soft, damp cloth to wipe the body clean. Never use strong chemicals, gasoline, detergents, chemically-treated cloths, or any other cleaning solutions to clean the air conditioner, as these can all potentially damage the unit’s housing. Count On NewAir 14 CLEANING THE FILTERS Clean the air filter at least once every two weeks to prevent interior fan malfunction due to dust. Use a vacuum cleaner or tap the filter lightly to remove loose dust and dirt from the filters and then rinse them thoroughly under running water (no warmer than 104°F). Thoroughly dry the filters before replacing them back into the unit. PLEASE NOTE: NEVER OPERATE THE UNIT WITHOUT FILTERS. END OF SEASON STORAGE 1. Completely drain any condensed water from the unit. 2. Set the air conditioner on fan mode (ventilation only) for a few hours to thoroughly dry the inside of the unit. 3. Clean or change the filter. 4. Unplug and wrap the power cord around the cord wrap as shown. Replace panel to keep cord in place. 5. Place the unit back in its original carton and store it in a clean, dry area. http://www.NewAir.com 15 TROUBLESHOOTING Problem The air conditioner does not function. The unit does not produce adequate cooling. Possible Causes The unit may be plugged in using a different voltage. The circuit breaker may be tripped or there is a blown fuse. The water tank is full. The ambient room temperature is lower than the set temperature. The unit is in direct sunlight. Too many windows or doors are open. There is an additional heat source in the room or there are too many people in the room. The filter is dusty or dirty. Air inlet or air outlet is blocked. The unit is noisy. The ambient room temperature is lower than the set temperature. The unit is not leveled. The compressor does not work. The compressor has overheated and shut off. Solution Check if using the wrong voltage. Reset the circuit breaker or check for a blown fuse. If the full water tank indicator light is flashing, empty the water reservoir. Lower the set temperature. Close any curtains or move the unit to a more shaded area. Close doors and windows. Lower the set temperature. Clean the filter per instructions above. Make sure there are no obstructions to proper air circulation through the unit. Lower the set temperature. Ensure the unit is positioned on a flat, level surface. Wait for temperature to drop and then turn the unit on again. NEVER TRY TO REPAIR OR DISMANTLE THE UNIT YOURSELF. UNAUTHORIZED REPAIRS CAN VOID THE WARRANTY AND ENDANGER THE UNIT. Count On NewAir 16 LIMITED MANUFACTURER’S WARRANTY This appliance is covered by a limited manufacturer’s warranty. For one year from the original date of purchase, the manufacturer will repair or replace any parts of this appliance that prove to be defective in materials and workmanship, provided the appliance has been used under normal operating conditions as intended by the manufacturer. Warranty Terms: During the first year, any components of this appliance found to be defective due to materials or workmanship will be repaired or replaced, at the manufacturer’s discretion, at no charge to the original purchaser. The purchaser will be responsible for any removal or transportation costs. Warranty Exclusions: The warranty will not apply if damage is caused by any of the following: Power failure Damage in transit or when moving the appliance Improper power supply such as low voltage, defective household wiring or inadequate fuses Accident, alteration, misuse or abuse of the appliance such as using non-approved accessories, inadequate air circulation in the room or abnormal operating conditions (extreme temperatures) Use in commercial or industrial applications Fire, water damage, theft, war, riot, hostility or acts of God such as hurricanes, floods, etc. Use of force or damage caused by external influences Partially or completely dismantled appliances Excess wear and tear by the user Obtaining Service: When making a warranty claim, please have the original bill of purchase with purchase date available. Once confirmed that your appliance is eligible for warranty service, all repairs will be performed by a NewAir™ authorized repair facility. The purchaser will be responsible for any removal or transportation costs. Replacement parts and/or units will be new, re-manufactured or refurbished and is subject to the manufacturer’s discretion. For technical support and warranty service, please email [email protected]. http://www.NewAir.com