Transcript
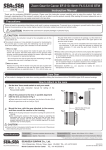
ASSEMBLY INSTRUCTIONS
“RECYCLE CADDY”
-----------------------------------------------Parts identification and quantities –
Frame – 1
Lower tray -1 (with temporary large bolt and
frame. (See photo #2). Tighten the bolt
gently as you spin the wheel. Wheel will
not spin on axle bolt if is too tight.
washers)
4. Attach the two of the 4 tray support
brackets to the frame with a 1 ½” bolt
and a ¼” lock-nut. The brackets attach to
the inside of the frame just above the
lower tray axle hole. Now hand-tighten
the nuts and bolts. Connect the two tray
support brackets to the outside of the
lower tray and hand-tighten. (See Photos
#2, #3 & #4)
Upper tray -1
Tension bars – 2 (1 is assembled)
Tray support brackets – 4
Wheels – 2
Casters with lock-nuts/washers – 2
-----------------------------------------------Hardware Package:
1 ½” bolts and lock nuts– 8
½” bolts and lock nuts – 4
3-inch axle bolts and lock nuts – 2
Axle bolt washers - 8
------------------------------------------------Assembly Instructions
1. Remove the tension bar from the
packaging and assemble to the frame
with two of the 1½ inch bolts and locknuts. One of the tension bars is preassembled. Do not over tighten locknuts.
2. After removing the 2 temporary large
nuts and bolts on lower tray during
shipping, attach the casters to the lower
tray using the caster lock-nuts to secure
casters to the tray. (See photo #1)
3. Attach wheels and lower tray to the
frame by sliding one axle bolt washer on
to one of the 3-inch axle bolts. Now
slide the axle bolt through the wheel and
slide on 2 axle bolt washers. Remove
washers and the 1/2” lock-nut from the 3inch axle bolt and now attach the wheel
to the frame by sliding the 3-inch axle
bolt through the hole at the bottom of the
frame. Now attach the lower tray to the
frame by sliding the 3 inch axle bolt
through the drilled hole in the end of the
lower tray. Put one washer on the axle
bolt and tighten the ¼” lock-nut to the
6302012
5. Attach the upper tray in the same
manner as the lower tray remembering to
hand-tighten the nuts and bolts.
Now tighten all nuts and bolts
remembering to tighten gently. Over
tightening may cause structural damage
to the frame and prevent the wheels from
spinning. (See Photo #6)
The cart is now fully assembled.
NOTE: The two tension bars can be
positioned to assure that the bars allow
for the recycle bins to sit evenly on the
trays. You can make adjustments to the
tension bars by removing the 1 ½” bolts
and repositioning the tension bar on the
frame for optimal tension bar position.
CAUTION: To avoid damaging the
frame and/or the powder coating,
gently tighten the bolts and lock nuts.
The lock nut will not loosen even when
tighten gently.