1
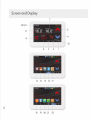
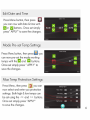
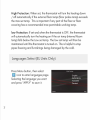
Roma Colour Touch Screen Thermostat
• This Thermostat is a digital touch screen thermostat, which is
designed for electric floor heating or water heating systems.
Using the 4 .3inch colour touch LCD display, the thermostat can be
easily operated and understood. The thermostat is fully programmable
to automate your heating or can be used in a simple manual mode.
• With five modes, these instruction will show you how to set your
system to work in accordance with your life style. This is done by
pre-setting your preferred temperatures into the 5+ l + l days easy
programmabl e function
• Simple regulation which sends commands to the heating
system according to a pre-selected temperature variation. The
thermostat control algorithm also includes an anticipation function
which reduces the discrepancy between the thermostat reading
and the temperature at the centre of the room.
• Choose from three (3) sensor setting: Air temperature, Floor
temperature and ambient (a combination of both air and floor sensors
working together). Air is controlled through the built in air temperature
sensor and floor is controlled via the included external floor probe.
Thermostat Features
• 4.3inch Colour Touch Screen Operation
• Adjustable Screen Brightness For On And Sleep Modes
• Electric Heating System ( Max. 16A) or Water Heating
System Max.3A)
• Adjustable Comfort Mode, Economy Mode, Party Mode, Holiday
Mode and Program Mode Control
• 5+1+1 Days Programmable settings
• External and Internal Sensors
• Clock and Day Display
·Temp .Calibration
• Temp . Protection
• 86'"86mm mounting
Technical Data
• Voltage: 230V, 50/60Hz
• Load: 16A Max)
·Temp .Setting Range: 5 - 35s
• Ambient :0 - 50°c
• Sensor: NTCIOK . 3950ohms at 25°c
• Accuracy: - 0.5 °c
• Protection Class : IP30
2
Screen and Display
7
10&11
I
-
6
5
4
9
12
8
13
3
I
I
14
15
2
I
16
17
•
I
3
18
19 20 21
22
l
ON/OFF Button
Use to turn on/ off Thermostat
2
Mode Button
Use to Choose Working Mode
3
Menu Button
Use to Select Menu Settings
4
Down Button
Decrease Temp. or Other Parameters
5
Up Button
Increase Temp. or Other Parameters
6
Floor Temp.
Show Floor (External Probe) Temp
7
Room Temp.
Show Room (Internal Air) Temp
8
Set Temp.
Set Temp (Range 5-35°C)
9
Mode Icon
Show Current Working Mode
10
Time
Current Time & (Parameter Settings See PB)
11
Day Of Week
Show Current Week Day
12
Heating Icon
Will Show When Heating Is On / Off
13
Date & Time Button
Set Weekday and Time
14
PRG. Program Schedule
Check 5+1+1 Days Heating Schedule
15
Pre-Set Mode Temps
Use to Pre-set Mode's Working Temps
16
Language Select Button
Select language (EL Units Only)
17
Hi/ Low Protection Temp
Set Max/ Min Temps
18
Comfort Mode Button
Pre-Set comfort Mode Setting
19
Economy Mode Button
Pre-Set Economy Mode Setting
20
Party Mode
Pre-Set Party Mode Setting
21
Holiday Mode Button
Pre-Set Holiday Mode Setting
22
PRG. Mode Button
Pre-Set Programme Mode 5+1+1
4
Schedule Setting
Press Menus Button, then press
you can then review the set
weekly schedule. Touch a column
to select and make any changes to
the 5+ l+l day schedules.
For example, if you want to edit
the Sat. schedule, touch the Sat.
column. You can then select each
of the 6 time zones separately. Use
buttons to set time and
temps for each zone .
..
07
I
•I
I
I
I
20
_a
l. In all columns there are six periods. Using the green
or
button to select the periods. You can then change the periods
selected, (the selected period is w ticked like this).
2. After the period is selected, you can set the time, H = hours, M =
minutes and temperature by pressing
buttons.
3. After new schedule is set, simply press "APPLY" to save the new
schedule.
5
Edit Date and Time
Press Menu button, then press
you can now edit date & time with
f'.1or
buttons. Once set simply
press" APPLY" to save the changes.
Mode Pre-set Temp Settings
Press Menu button, then press
you
can now pre-set the mode working
temps with the
and
buttons.
Once set simply press " APPLY" to
save the changes.
Max Temp Protection Settings
Press Menu, then press
j you can
now select and enter you protection
Settings Page l
<<
>>
settings. Both high & low temps can
<<
>>
be set using the << and >> buttons .
Once set simply, press "APPLY"
<<
>>
<<
>>
to save the changes.
Temp . Offset
,,.
6
High Protection: When set, the thermostat will turn the heating down
/ off automatically if the external floor temp (floor probe temp) exceeds
the max set temp . This is important if any part of the floor or floor
covering has a recommended max permitable working temp.
low Protection: If set and when the thermostat is OFF, the thermostat
will automatically turn the heating on if the air temp (internal Room
temp) falls below the Low set temp. The low set temp will then be
maintained until the thermostat is turned on. This is helpful to stop
pipes freezing and furnishings being damaged by the cold .
Languages Select (EL Units Only)
Press Menu button , then select
icon to enter languages page .
Selecting the language you want
and press "APPLY" to save it.
7
Parameter Settings
Depending upon how you want to use the thermostat, the parameter
settings may need to be chnaged to suit your requirements . To view
or change the ParameternSettings you must, Within 3seconds after turning
thermostat OFF(bottom right hand corner) , press and hold the time
(top left hand corner of screen), for 2 seconds . This will bring up the
parameter setting pages. You can set the desiredvalue by pressing
" « " or " » " ,and go to other pages by pressing "Pre" or "Next". Once
you have finished press the Home button to confirm settings and exit ..
Description
01
Temp. Offset
-8°C-8°C
Dead Zone
O'C-3°C
Set Point Max.
35°C
Set Point Min
5 'C- 35'C
02
NTC(I = Air Temp, E = Floor Temp, l+E = Ambient Temp)
I only. Eonly, I & E.
04
Backlight Off Time After Operation
3s 180s
05
06
07
Backlight Brightness When In Standby Status
1%- 100%
Relay Delay Time
Os-250s
Relay Output
Norma1(no); lnverted(nc)
Auto Lock
Disable I Enable
Delay Time
0-200s
Restore Factory Settings
8
Auto Lock Feature
In the parameter settings menu you can
either enable or disable the auto lock
feature. The auto lock will automatically lock
your screen after the set amount of time.
Unlocking the screen
To unlock your screen simply press and hold the top left corner of the screen where
the time is indicated for 10 seconds , or until the lock icon disappears.
9
Wiring Diagrams
Li
N
NL
3600W/16A
230V/AC
Electri c Heati ng System
SENSOR
NC
COM
NO
Water Heating System
10
Voltage-Free System
230V/ AC
Instal lotion
Using a flat screw driver carefully open the thermostat. (See fig 1),
connect the heating, power supply and floor probe cables to the
correct terminals tightly, (See Fig 2). Once wired fix the back plate
to the wall securely through firing locations (See fig 3)
Dimension (mm)
130
94
11