1
1-2-3MORTAR
Modified Portland cement based mortar, to be used to adhere any
prefabricated construction elements
Data Sheet
DESCRIPTION
TECHNICAL INFORMATION
1-2-3MORTAR is a ready to use commercial grade
mason mix used for bonding prefabricated
construction elements. Its unique delivery system
helps to obtain its outstanding workability,
convenience and simplicity of preparation and use.
These attributes make this product a preferred
solution for any masonry project. Its superior strength
allows for thinner joints. Just add water.
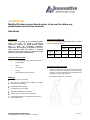
1-2-3MORTAR qualifies as Mortar Type M as it complies
with the standard ASTM test:
USES AND APPLICATIONS
Current specification ASTM C387-06a
Mortar
Mortar
Mortar
Type N
Type S
Type M
Compressive
strength, 28
days
Water
retention
3240 psi
95%
750 psi min 1800 psi min 2500 psi min
75% min
75% min
75% min
Test ran by NCMA (National Concrete Masonry Association)
1-2-3MORTAR characteristics make it ideal to be used on:
ü
Concrete block
ü
Bricks
ü
Clay pieces
ü
Pavers
ü
Other similar masonry elements
BENEFITS
PREPARATION INSTRUCTIONS
1.
Use clean, fresh water. Add 16.9 oz (500 mL) of water
to the 11.3 lb bag, or 8 oz (243 mL) to the 5.5 lb bag,
making a cut in the upper limit of the bag. Make sure
water flows freely through the neck.
Allow water to absorb for 3-5 minutes.
Ready-to-use, just add water
No need for additional tools, material is applied
directly from the package
Substantial waste reduction
No cleaning of tools or jobsite
Optimum workability and adherence
Quality control on all production processes
Concentrated strength in a smaller joint; much less
material is needed
Innovative Mortar Solutions Inc.
1646 Blaisdale, Suite 1400, Richmond, TX 77469
Pg. 1 of 4
2.
Start manual mixing that will take around 3 min. The
product must be mixed directly in its plastic bag,
making sure that all lumps are dissolved and you have
a ductile flowing mass, or smooth consistency. To
prevent material flowing out during the mixing
process, simply fold (or twist) the tip of bag between
your fingers.
Be sure to prepare just the amount of material (bags)
that you would be able to apply within a 90 to 120
minute time frame. Already-mixed material could
become dry and unmanageable beyond that time.
3.
Cut in the narrowest part of the neck to obtain 1/8”
joint. This cut will determine the desired diameter of
the cylindrical bed to be applied to the piece (or CMU).
After the material has been extruded out of the bag, it
should be confined between two masonry units in no
more than 10 minutes. Dry and hot weather could
accelerate material hardening.
Surfaces that will receive the material should be free
of excessive dust or other contaminant elements.
APPLICATION INSTRUCTIONS:
block single unit
standard
concrete
Before laying a block piece, apply two mortar beds on
the head of the block—the vertical surface that should
be joined laterally to the previous unit. The center of
the mortar cylinder should be around 0.5” (12mm)
from the edge.
Test the material consistency by extruding a few
inches on a flat surface. The mix should flow easily
and the cylindrical body surface laid should be
continuous and smooth. If material is difficult to
extrude or texture is not smooth, a small amount of
water can be added to adjust mix. Additional water
should not exceed 1 oz (or 29 mL).
Innovative Mortar Solutions Inc.
1646 Blaisdale, Suite 1400, Richmond, TX 77469
Pg. 2 of 6
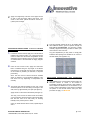
Apply one single body of mortar on the upper surface
of each of the two longer walls of the block. The
center of the mortar cylinder should be around 0.5”
(12mm) from the edge.
APPLICATION INSTRUCTIONS: a course of standard
concrete blocks
1.
2.
For the first course of block, apply two or more beds of
material over surface footing. You need just enough
mortar to make sure that surface irregularities can be
adjusted to level out the first course. The use of plastic
or metal levelers is recommended for highly irregular
surfaces.
Any joint adjustments you may need to comply with
standard wall openings are detailed as an annex to
this data sheet (see Appendix “A”).
Once the first course is laid, apply two continuous
beds of material along the top length of the blocks
(see figure 5). You should cover as much of the length
of the course as possible, per extrusion, to improve
productivity.
Note: The next course of blocks should be installed
within 10 minutes, to avoid material hardening. This
time frame can vary depending on temperature and
humidity.
3.
The joint between blocks will be to be smaller than
with traditional mortar, given its superior strength. A
1/8” joint is recommended. You will have a better
vertically aligned wall having avoided a thicker joint
that could be a source of error.
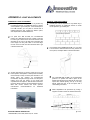
The blocks that will be installed for the next course
should be placed on the floor along the length of the
wall, head up, approximately 2 ft. apart (see figure 6).
APPLICATION INSTRUCTIONS: other prefabricated
elements
Units different than concrete block should receive an
adequate amount of mortar to be bonded to
surrounding surfaces. Since there is a vast number of
sizes, shapes and dimensions, we recommend to run
a test in order to determine: a) the amount of material
the pieces or units should receive and b) the best
procedure to apply 1-2-3MORTAR.
Apply the mix on the head of the blocks (see figure 4).
This way, once the first of these blocks is installed,
you may advance along the length of the wall to easily
find the next units to be laid, ready for bonding
laterally to the previous piece or CMU.
Once you finish with the above course, repeat steps 2
and 3.
Innovative Mortar Solutions Inc.
1646 Blaisdale, Suite 1400, Richmond, TX 77469
Pg. 3 of 6
YIELD one bag of 1-2-3MORTAR
Standard 8” block
5.5 lb bag
11.3 lb bag
15 blocks*
30 blocks*
* Could present variations depending on block dimensional uniformity and
installation practices.
PACKAGE
1-2-3MORTAR has two different presentations available:
5.5 lb and 11.3 lb plastic bags.
STORAGE
1-2-3MORTAR should be stored in its original plastic bag
package: hermetically closed, protected from any humidity
contact, over an adequate pallet.
The product has a storage life of approximately 5 months if
stored under proper conditions.
WARRANTY
The information and recommendations made are based on
our own research and the research of others, and are
believed to be accurate. However, no guarantee of their
accuracy is made given that we cannot cover every
possible application of our products, and anticipate every
variation encountered in masonry surfaces, job conditions
and method used. The purchasers shall make their own
tests to determine the suitability of such products for a
particular purpose.
Innovative Mortar Solutions, Inc. ("Company") warrants
this product to be free from defect in manufacture and of
merchantable quality and condition when used and applied
as indicated in instructions included herein. This product is
for construction use only and is not warranted for purposes
other than for what it is intended. In the event of failure due
to defect in material and manufacturing (proven), the
Company will, upon proof of purchase, refund purchase
price or replace at its own discretion. Warranty is not
applicable if product is subject to misuse, abuse or
alteration. Claims under this limited warranty must be sent
to Innovative Mortar Solutions, Inc. in writing. This limited
warranty is issued and accepted in lieu of all other express
warranties
and
expressly
excludes
liability
for
consequential damages.
(Next page: Appendix “A” for Specific Joint Adjustments)
Innovative Mortar Solutions Inc.
1646 Blaisdale, Suite 1400, Richmond, TX 77469
Pg. 4 of 6
APPENDIX A: JOINT ADJUSTMENTS
HORIZONTAL JOINT ADJUSTMENT
Horizontal joints can be adjusted in a very similar way
to traditional practice. An additional amount of mortar
can be placed to get a wider joint. If the needed joint is
from 1/8” to 1/4” you can place a second bed of
material above the first, position the CMU in place,
and adjust width to desired dimension.
For joints from 1/4" to 3/8”, the recommended
practice is to diminish the amount of water in the bag
in order to get a firmer texture for the mortar bed. This
will allow for the joint to set firm when supporting the
unit’s weight. You may also need to cut at the bag’s
neck an one inch lower from the narrowest area to get
a thicker mortar bed.
VERTICAL JOINT ADJUSTMENT
Vertical joints can be adjusted in a very similar way to
traditional practice. An additional amount of mortar
can be placed to get a wider joint.
If the needed joint is from 1/8” to 1/4” you can place
a second bed of material above the first, position the
unit in place, and adjust width to desired dimension.
Thicker bed
Another practical way to produce a 3/8” joint is to use
block spacers: these plastic or metal pieces are widely
used and help to keep a uniform joint dimension. You
simply place the spacers as manufacturers
recommend, and place enough mortar over the piece,
making sure that the height of the mortar bed
surpasses the block spacer. This will assure that when
the upper block is placed, all space between blocks is
filled with mortar. Please see block spacers’
manufacturer
recommendations
for
additional
information.
For joints from 1/4” to 3/8”, the recommended
practice is to position the CMU in place at the
desired joint dimension and then fill the open joint
space with material placing the tip of the bag
almost inside the joint to fill the space with a
vertical filling movement.
Wider adjustments are performed by cutting a
segment of CMU to reach the desired dimension.
Innovative Mortar Solutions Inc.
1646 Blaisdale, Suite 1400, Richmond, TX 77469
Pg. 5 of 6
WALL HEIGHT JOINT ADJUSTMENT
Wall heights can also be adjusted in a similar way to
the traditional practice. A piece of CMU is cut
horizontally at the desired height to reach the required
horizontal level.
First course leveling is performed through additional
mortar beds (or a thicker mortar bed through a wider
bag tip orifice)—if base irregularities are not too deep.
If base surface is deeply irregular, the commonly used
height adjusting plastic levelers can also be used.
Innovative Mortar Solutions Inc.
1646 Blaisdale, Suite 1400, Richmond, TX 77469
Pg. 6 of 6