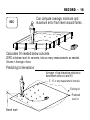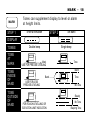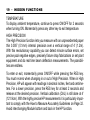
1
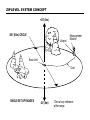
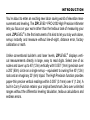
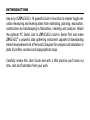
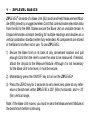
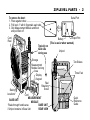
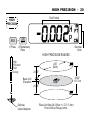
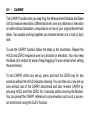
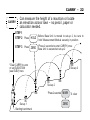
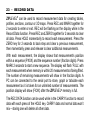
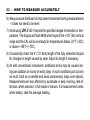
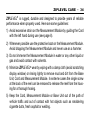
ZIPLEVEL SYSTEM CONCEPT
+20’ (6m)
200’ (60m) CIRCLE
Unipod
Measurement
Module*
Base Unit
Cord
SINGLE SET-UP RANGES
-20’ (6m)
*Zero at any reference
within range
INTRODUCTION
You’re about to enter an exciting new labor saving world of elevation measurement and leveling. The ZIPLEVEL® PRO-2000 High Precision Altimeter
lets you focus on your work rather than the tedious task of measuring your
work. ZIPLEVEL® is the first instrument of its kind to let you truly work alone,
set-up instantly and measure without line-of-sight, distance error, factory
calibration or math.
Unlike conventional builder’s and laser levels, ZIPLEVEL® displays vertical measurements directly in large, easy to read digits. Select one of six
scales and cover up to 40’ (12m) vertically with 0.050” (1mm) precision over
a 200’ (60m) circle on a single set-up – equivalent to owning five 40’ (12m)
rods and an imaginary 20’ (6m) tripod. The High Precision function provides
paper-thin precise vertical readings within 0.005” (0.1mm) over 4’ (1.2m). A
built-in Carry Function retains your original benchmark Zero over unlimited
ranges without the differential leveling tabulation, tedious calculations and
endless errors.
INTRODUCTION
Use any of ZIPLEVEL’s 16 powerful built-in functions to master tough elevation measuring and leveling tasks from estimating, planning, excavation,
construction and landscaping to fabrication, checking and analysis. Attach
the optional PC Serial Link to ZIPLEVEL’s built-in Serial Port and make
ZIPLEVEL® a powerful data gathering instrument capable of downloading
stored measurements to a Personal Computer for analysis and tabulation or
plots of profiles, sections and topographical maps.
Carefully review this User Guide and with a little practice you’ll soon cut
time, cost and frustration from your work.
TABLE OF CONTENTS
LABELED
FUNCTIONS
HIDDEN
FUNCTIONS
ZIPLEVEL® Basics.. .............................
Quick Start........................................
On/Off, Hold & Zero...........................
Scale & Resolution.. ...........................
Calibration.. .......................................
Record..............................................
Mark . ...............................................
Temperature & High Precision.. ...........
Carry.. ...............................................
Record Data......................................
Inspect/Dump & Initialize....................
Elevation...........................................
Monitor.. ............................................
Display Alarm Indicators.....................
Use Tips............................................
How to Measure Accurately.. ...............
ZIPLEVEL® Care.. ................................
Troubleshooting.................................
Maintenance/Product Assistance.. .......
ZIPLEVEL® Specifications....................
1-6
7
9
11
13
15
17
19
21
23
25
27
29
30
31
32
34
36
37
38
1 ▪ ZIPLEVEL BASICS
ZIPLEVEL® consists of a Base Unit (BU) and hand-held Measurement Module (MM) joined by a rugged wireless Cord that communicates elevation data
from the BU to the MM. Stakes secure the Base Unit on unstable terrain. A
Unipod eliminates constant bending for multiple readings and doubles as a
vertical calibration standard when fully extended. All components are stored
in the Base Unit when not in use. To use ZIPLEVEL:
1) Secure the Base Unit on its back at any convenient location and pull
enough Cord from the reel to cover the area to be measured. If desired,
attach the Unipod to the Measure Module. Although it is not necessary
for the Base Unit to be level, it must be secure.
2) Momentarily press the ON/OFF key to turn on the ZIPLEVEL®.
3) Press the ZERO key for 2 seconds to set a level zero plane at any reference or benchmark within ZIPLEVEL’s 200’ (60m) horizontal, and +/- 20’
(6m) vertical range.
Note: If the Base Unit moves, you must re-zero the Measurement Module at
the benchmark before continuing.
ZIPLEVEL PARTS ▪ 2
To remove the boot:
1. Place against chest
2. Pull back 1” with 4 fingernails each side.
3. Grip Measurement Module and Boot
and pull Boot off.
Cord
Reel
Typically on
back side
during use
Storage
Measurement
Module Docking
Area
Display
Keypad
Staking
Locations*
Serial Port
Boot
Unipod Port
Battery
(This is easier when warmed.)
Unipod
Two Stakes
Three Feet
Reel
Retaining
Screw
Cord
MEASUREMENT
BASE UNIT
MODULE
BASE UNIT
*Stake through handle area
REAR VIEW
if Unipod remains in Base Unit
Quick
Reference
Guide
3 ▪ MEASUREMENT MODULE
Use the Measurement Module to level and take readings. The bottom and
back of the Module are the only sides that may be used interchangeably for
measurements. You may use other sides only if you first zero on that side.
Hold the Module level and measure near the center of the side in use. Do not
zero the Module and then invert it without correcting the reading as shown in
the illustration on the next page.
Example: To measure the distance between the floor and ceiling: First, zero
the Measurement Module on its back or bottom on the floor. Then place its
top, bottom, or back against the ceiling to take a reading. Finally, add the
appropriate correction factor shown in the illustration.
MEASUREMENT MODULE ▪ 4
Display reading is equivalent for measurements
taken from back or bottom.
H = Display
Measurement
Module Rotated
H
To avoid adding values, use the same side for
start and finish, without rotating or inverting.
H = Display
OR
H
OR
WRONG
For Measurement Module Inverted
H = Display
+
2.0” or 2.25” with Boot
H = Display
+
3.5” or 3.75” with Boot
H
Typical Use
RIGHT
H
OR
Must add value to reading in these three examples.
OR
5 ▪ KEYPAD
Use the keypad on the Measurement Module to control the ZIPLEVEL® and
take readings. The most frequently used functions, called labeled functions,
are printed on the eight keys below the display.
ZIPLEVEL’s more advanced or less frequently used functions, called hidden
functions, may be accessed by logical combinations of two or more keys. All
keys except the HOLD and ON/OFF keys must be pressed and held for two
seconds to activate. This minimizes accidental operation of the functions.
Distinctive audible and display indicators ease use – you will soon learn to
recognize them. For example, when a measurement is nearly stable enough
to read, you will hear two short ‘read ready’ beeps. When storing a reading,
ZIPLEVEL® emits short, regular beeps while the display flashes. When the
reading is stable enough to store, the unit then emits a single long tone.
Note: All stored measurements and settings are retained indefinitely once
power is shut off and even without a battery installed.
KEYPAD & DISPLAY ▪ 6
Flashes when
battery is low.
Flashes when calibration is
required due to temperature.
Main Display Digits
Flashes when re-zero required
due to temperature.
Scale
indicators
Record indicators
REC flashes in RECORD DATA function.
On when display value is frozen.
Press 2 seconds
for these 6 keys
to enter function.
Fraction bar flashes
in MARK mode.
Every key clicks
and beeps when
pressed.
Hand grip area
7 ▪ QUICK START
Most ZIPLEVEL® users will use only those functions routinely necessary in
their work. We suggest that you try all ZIPLEVEL® functions at least once
to become familiar with its capabilities. This Quick Start will help you gain
confidence by using a few frequently used functions:
1. Raise the lower door of the Base Unit, remove the Measurement Module
and lay the Base Unit on its back on the floor or ground. The Base Unit
should be secure but need not be level.
2. Pull enough Cord from the reel to cover the area to be measured and
momentarily press the ON/OFF key to turn the unit on.
3. Place the Measurement Module on a nearby surface and press the ZERO
key for 2 seconds and hold steady until zeroed. You have now created an
imaginary infinite size level reference plane.
4. Move the Measurement Module to a different elevation. It will display the
difference in elevation with negative readings below and positive above the
reference plane.
5. Momentarily press ON/OFF key to shut off unit. Reel in the entire Cord
letting twists near MM spin out, put Module in its docking area and lock door.
WARNING: READ & UNDERSTAND ENTIRE USER’S GUIDE BEFORE USE.
MECHANICS OF USE ▪ 8
Suggested Reeling Technique
Typical Handling
Manage Cord with left hand, gently ‘whip’
over small objects.
Thumb can reach
the 3 most used
keys
For consistent readings,
balance with Unipod
between middle fingers like
a plumb-bob before
contacting surface.
Rest ‘round’
against thigh
Dock
Measurement
Module face-up
Cord Removal
Slowly move
from side to side
to make Cord
uniform on reel
Easiest Cord
removal
direction
Quick jerks may cause
reel over-spin and
Cord jams
Docking area
Avoid pulling or winding
Cord in docking area
9 ▪ LABELED FUNCTIONS
This section describes how to operate ZIPLEVEL’s labeled functions.
Glance through all the functions and illustrations then try each function on
the ZIPLEVEL®.
ON/OFF
Momentarily press to turn ZIPLEVEL® on or off. Without a key press or
movement within 3 minutes, two long warning beeps will sound followed by
automatic turn off at 4 minutes. All settings and data are retained.
HOLD
Momentarily press to freeze an elevation on the display. Press again to release. Use when the display is not visible, when measuring ceiling sag with
the Unipod, in dimly lit areas, etc.
ZERO
Press for 2 seconds to make the current elevation a reference or benchmark
plane. Re-zero at new elevations like large level steps, pool bottoms or block
courses to let ZIPLEVEL® do the high/low math.
HOLD & ZERO ▪ 10
HOLD
Press HOLD before the Module is in position - the reading
will lock on the display when movement stops.
Display not visible
ZERO
here first
Deep, dark trench
Framing
New reference plane
ZERO
When zeroed
above…
-10.00’
Will read
-10.00’ below
Original reference plane (set during calibration)
11 ▪ SCALE & RESOLUTION
SCALE
Press for 2 seconds and continue to press or press and release to select
fractional inches (”), decimal inches (IN), engineer’s feet (FT), builder’s
feet-inches (FT-IN), centimeters (CM) or meters (M). Fractional scales and
meters are not available in the High Precision function (Pages 19 & 20). If
you HOLD a reading on the display then SCALE can be used as a scale
converter.
RES
Press 2 seconds to enter and continue to press or press and release to select the desired measurement RESolution (measurement precision). Lower
resolution (larger values or increments) provides faster readings for rough
grade or estimates.
SCALE & RESOLUTION ▪ 12
SCALE
Fractional inches
Decimal inches
Feet
Feet - Inches
Centimetres
Meters
Right end of display
TYPICAL DISPLAY
Longer
Shorter
Time for reading to
stabilise
(Decimal Inches Scale )
Selection Sequence
RES
EQUIVALENT
DISPLAY READINGS
Use for highest precision
Use for intermediate precision
Use for rough measurements
13 ▪ CALIBRATION
Unlike rotary lasers and optical levels, the ZIPLEVEL® is not tilt sensitive,
its level plane does not develop tilt error and it does not amplify error with
distance or require factory calibration. The CAL function lets you calibrate
vertical measurement accuracy much like calibrating the vertical sight rod
of a rotary laser. Calibration may be needed for accurate vertical measurements but is not required for leveling operations.
Always check calibration before doing accurate vertical measurements,
particularly if the temperature has changed 36°F (20°C) or more since the
last calibration causing CAL to flash on the display or if you have never
calibrated a new or newly serviced ZIPLEVEL®. You can easily check calibration in two steps: 1) Zero the Measurement Module on bottom or back
on a flat surface beside the Base Unit. 2) Raise the Measurement Module
4’ (121.9 cm) above the zero point (still on bottom or back) to be sure the
display closely matches the height raised. The fully extended and calibrated
Unipod, a sheet of plywood or a tape rule can be used as a calibration
standard. If calibration is necessary then follow the easy 3 steps in the illustration. You can exit from calibration at any time by pressing the CAL key
for two seconds.
CALIBRATION ▪ 14
Step 1
Step 2
Step 3
To extend,
loosen/tighten CAL
bushings top
down (1, 2, 3)
Press CAL 2 seconds to start 3 beep tone.
Lay bottom or back down close to
Base Unit and press CAL again
[ ]
0 display*
Then [48] or [121.9] flashes and 2 beep tone
Raise to 48”(121.9cm), press CAL again and hold steady
[ ]
48” or 121.9cm display*
Then normal display resumes as 48” or 121.9cm
*a single beep sounds until value is locked in.
Adjustable and reversible foot
Unipod
Rubber
tip
Jam nut
To collapse,
loosen/tighten from
bottom up (3, 2, 1)
Occasionally check
Unipod for 4’ with a
tape rule.
To adjust length, loosen jam nut,
turn foot in or out and re-tighten nut.
To reverse foot for pointed end,
remove foot and rubber tip, place
jam nut in opposite end of foot,
reassemble foot, blunt end first,
back into Unipod, adjust and
tighten jam nut.
Step 2
Same spot
Step 3
48.00”
(121.9cm)
15 ▪ RECORD
The RECord function eliminates extensive tabulation and computation required to average large numbers of readings. Now you can easily estimate
the slurry necessary to level an uneven concrete surface, the fill needed
below concrete or predict the graded level of a hilly lot (see illustrations).
You can also estimate the volume of a pile of dirt or the volume to fill a hole
by first finding the difference between the average of readings every pace
around the edge of the pile or hole and the average of readings at every
pace criss-crossing the pile or hole. Volume = (difference of the two averages) X (estimated cross-sectional area of the pile or hole).
To enter the record function, press REC 2 seconds causing REC to appear
on the display. Momentarily press REC to display current reading, AVG (average), MIN (minimum) or MAX (maximum). Press HOLD momentarily to
include each of an unlimited number of readings in the computations.
Press REC 2 seconds to exit the Record function. Previously computed data
will be replaced with new data if you press the HOLD button after re-entry.
RECORD ▪ 16
REC
Can compute average, minimum and
maximum error from level around forms.
Calculates fill needed below concrete.
ZERO at bottom level for concrete, take as many measurements as needed.
Volume = Average x Area
Predicting lot elevations
Average = final elevation relative to
benchmark after cut and fill.
5’, 10’ or any measurement intervals
Existing lot
Predicted
level lot
Bench mark
17 ▪ MARK
The MARK function lets you create audible tones: 1) at a selected elevation,
2) for elevations within a selected band, or 3) elevations outside a selected
band. Tones may be set over ZIPLEVEL’s full vertical single setup range.
To set tones, place the Measurement Module at the desired elevation, press
MARK 2 seconds and hold steady until double band lines flash on the display then press MARK momentarily: 1) without moving the Module for a tone
at the elevation or 2) after moving the Module below for a tone within the
band or 3) after moving the Module above for a tone above the band, beeps
below and silence within. The fraction bar to the right flashes while in the
Mark function.
Press the MARK key 2 seconds to exit – settings will be lost. To exit and retain settings, momentary press ON/OFF while pressing MARK. Press MARK
2 seconds to re-enter.
MARK ▪ 18
MARK
STEP 1
Tones can supplement display to level or alarm
at height limits.
STEP 2
Enter at elevation
Set band
DISPLAY
TONES
TONE
AT
MARK
TONE
INSIDE
OF
BAND
TONE
OUTSIDE
OF
BAND
Double beep
Single beep
Mark
USE FOR PRECISE LEVELING
Band
USE FOR LESS
PRECISE LEVELING
Tone
Band
Tone
No Tone
Steady
FOR ROUGH LEVELLING OR
ELEVATION LIMIT INDICATION
No Tone
Beeping Tone
19 ▪ HIDDEN FUNCTIONS
TEMPERATURE
To display ambient temperature, continue to press ON/OFF for 2 seconds
when turning ON. Momentarily press any other key to exit temperature.
HIGH PRECISION
The High Precision function lets you measure with an unprecedented paper
thin 0.005” (0.1mm) internal precision over a vertical range of 4’ (1.2m).
With this revolutionary capability you can detect minute surface errors, set
precise pool negative edges, precisely fixture shop fabrications or set plant
equipment and do real time beam deflection measurements. The possibilities are endless.
To enter or exit, momentarily press ON/OFF while pressing the RES key.
You must re-zero when changing in or out of High Precision. When in High
Precision, HP will appear with readings in decimal inches, feet and centimeters. For a lower precision, press the RES key for at least 2 seconds and
release at the desired precision. Vertical calibration (CAL) is still done at 4’
(121.9cm). With the highly precise HP measurements it is particularly important to comply with the How to Measure Accurately Guidelines on Page 32.
Avoid interchanging Module bottom and back in the HP function.
HIGH PRECISION ▪ 20
Feet Format
HIGH
PRECISION
ON
OFF
RES
1) Press
2) Momentarily
Press
High
Precision
Floor
Survey
HIGH PRECISION RANGES
Decimal
Units
200’
(60m)
24.00”
Base Unit
Elevation
Optional
Unipod Adapter
*
24.00”
*Base Unit May Be Offset +/- 5.0” (13cm)
From Vertical Range Limits.
48.00”
121.7cm
21 ▪ CARRY
The CARRY function lets you leap-frog the Measurement Module and Base
Unit to measure elevations (differential level) over any distance or elevation
on earth without tabulation, computations or loss of your original benchmark
plane. Two people working together can traverse terrain at a 2 mph (3 kph)
rate.
To use the CARRY function follow the steps in the illustration. Repeat the
HOLD and ZERO sequence over any distance or elevation. You may keep
the Base Unit vertical for ease of leap-frogging if it was vertical when setting
the benchmark.
To exit CARRY within any set-up, press and hold the ZERO key for two
seconds without the HOLD indicator showing. You can then do a new set-up
zero without loss of the CARRY benchmark and later re-enter CARRY by
pressing HOLD and then ZERO for 2 seconds without moving the Module.
You can preset the CARRY reference to any elevation such as at a surveyors benchmark using the ELEV function.
CARRY ▪ 22
CARRY
Can measure the height of a mountain or locate
an elevation across town – no pencil, paper or
calculator needed.
STEP 1
Base Unit is moved to set-up 2, be sure to
STEP 2 Press HOLD Before
‘hold’ Measurement Module securely in position
2 seconds to enter CARRY) once
STEP 3 Press ZERO (Press
Base Unit is secured at set-up 2
*Clear CARRY to zero
or set ELEVATION
(see ELEV) here.
MM
Set-up 3
BU
MM
Set-up 2
MM
BU
Set-up 1
Starting benchmark
*Press 2 seconds MARK
ZERO
To clear
23 ▪ RECORD DATA
ZIPLEVEL® can be used to record measurement data for creating tables,
profiles, sections, contour or 3D maps. Press REC and MARK together for
2 seconds to enter or exit. REC will be flashing on the display while in the
Record Data function. Press REC and ZERO together for 2 seconds to clear
all data. Press HOLD momentarily to record each measurement. Press the
ZERO key for 2 seconds to back step and clear a previous measurement,
then momentarily press and release to clear additional measurements.
With each measurement, the display shows that measurement’s position
within a sequence (PXXX) and the sequence number (fraction digits). Press
MARK 2 seconds to start a new sequence. The display will flash ‘FULL’ with
each measurement when memory is within 20 measurements of being filled.
The number of remaining measurements will show in the fraction digits. A
PC can be connected to the serial port to store, graph or tabulate each
measurement as it is taken for an unlimited number of measurements. The
position display will show (FXXX) after the ZIPLEVEL® memory is full.
The REC DATA function can be used while in the CARRY function to record
data with each press of the HOLD key. CARRY data and normal data won’t
mix – storing one will delete all other data.
RECORD DATA ▪ 24
REC
DATA
Saves up to 137 measurements, or an unlimited number with a PC.
Take measurements over a grid of regular surface intervals for a contour or 3D map.
One sequence can define a profile or section.
Press HOLD momentarily to record
Press ZERO 2 seconds, back space (erase)
Sample position display
To
start
Press 2 seconds to enter
REC
Press 2 seconds
to clear all data
MARK
ZERO
POSI
Press MARK
TIO
NS
2 seconds to start
a new sequence
25 ▪ INSPECT/DUMP & INITIALIZE
INSPECT or DUMP
These functions allow inspection of Record Data registers and/or data
transfer to a PC. To use this function: Press and hold CAL and REC keys
together for two seconds to INSPECT data. Momentarily press the MARK
key to sequence up through positions. Momentarily press the REC key to sequence down through positions. To sequence up or down in multiples of ten
positions, momentarily press the HOLD key for up and CAL key for down.
Momentarily press the CAL and REC keys together to DUMP data to a PC.
INITIALIZE
This function resets all user settings to default values providing an easy way
to escape from an unwanted function. It will be necessary to re-calibrate
after you initialize. Place the Measurement Module back down on a flat surface and press the entire top row of keys for two seconds with two fingers
from each hand.
INSPECT/DUMP ▪ 26
INSPECT
/DUMP
Press CAL and REC two seconds to enter or exit INSPECT
Press CAL and REC momentarily and release to DUMP data to PC
CAL
TENS
REC
Sequence
down
ONES
MARK
ONES
HOLD
Sequence
up
INSPECT POSITION CONTROL KEYS
PC Serial Link
Compact PC mounted to Unipod in left hand
or in pocket with display visible to operator
RECORDING DATA ‘ON THE FLY’
When ZIPLEVEL registers fill, ‘FULL’ will display
but record data to PC can continue indefinitely.
TENS
27 ▪ ELEVATION
Elevation lets you preset the display and Carry reference plane to a benchmark elevation in engineers (FT) or metric scales for use in the CARRY
function. You may preset the ELEV function to zero by pressing MARK and
ZERO together for 2 seconds before entering the ELEV function. To enter or
exit the ELEV function, press and hold the SCALE and RES keys together
for 2 seconds.
It’s best to set digits starting with the least significant—momentarily press
the HOLD key to set the hundredths digit, press the MARK key to set tenths,
the REC key for ones, the CAL key for tens, the SCALE key for hundreds
and the RES key for thousands. Press the ZERO key to select up or down.
To use your preset elevation, exit ELEVATION and enter CARRY (see page
21).
ELEVATION ▪ 28
ELEV
Allows preset of elevation in CARRY function.
First place measurement module at benchmark.
Press two seconds
RES
SCALE to enter or exit
Display looks similar to CARRY function:
E for Elevation
Upper Display
Example reading: 17,469.80 (a very high elevation!)
Alternates
Lower Display
End Set Here
10′
1′
0.1′
0.01′
1000′
100′
UP
DOWN
ON
OFF
Start Set Here
29 ▪ MONITOR
The Monitor function can be used to keep the ZIPLEVEL® from shutting off
during periods of inactivity. It also can be used with the optional PC Serial
Link for remote monitoring or data logging. For example, place the Base Unit
on a Styrofoam® float to log water tank or river levels.
To enter the MONITOR function, press and hold the ON/OFF and CAL keys
together for two seconds when turning on ZIPLEVEL®. To exit, turn the unit
off. The MONITOR function disables the AUTO-OFF feature and enables
continuous data from the Serial Port.
CAUTION: MONITOR reduces battery life by at least 40%. Remember to
shut off when finished to avoid loss of battery.
DISPLAY ALARM INDICATORS ▪ 30
CAL
Flashes if unit needs to be re-calibrated due to a 36F (20C) temperature change since last calibration. CAL is on constantly when unit is
outside of the -22°F to +158°F (-30C to +70C) operating temperature
range. CAUTION: Vertical measurements may be in error.
--0--
Periodic flash on the display indicates re-zero may be necessary
due to a temperature change of 18F (10C) since the last zero.
8888 Alternates with displayed elevation when the Measurement Module
is more than 20’ (6m) above or below the Base Unit. CAUTION:
Overrange measurements may be in error. If 8888 flashes well
within range, check troubleshooting chart; check for Cord damage
or leakage and if necessary, return for service.
BAT
Flashes when only a few hours of battery life remain. A fresh 9V
alkaline battery can allow up to 60 hours of active use.
CORD Flashes to indicate need for routine factory Cord recharge required
about every 3 years or possible Cord damage. CAUTION: Measurements may be in error.
*See page 6 for illustration of alarm indicators.
31 ▪ USE TIPS
1)Secure the Base Unit after removing the Measurement Module.
2)Extend the Unipod from the top down and retract from the bottom up (see
page 14). Always gently tighten bushings (avoid over-tightening).
3)Hold the Measurement Module in the handgrip areas to the right and beneath the keypad. For single handed operation, use the thumb to press
the most frequently used buttons: ON/OFF, HOLD and ZERO. The left
hand can manipulate the Cord. Release or hold steady while reading (see
page 8).
4)In muddy conditions use a rag to wipe down the Cord before reeling in.
This can also remove Cord twists.
5)Place Module on ground beside Base Unit then pick up Base Unit and reel
Cord through Cord entry area by holding the Base Unit handle with Base
Unit tilted backward at about 45° (for example, resting against thigh). This
will ease reeling, reduce wear and keep docking area clean (see page 8).
6)Use a coin, screwdriver or thumbnail to loosen battery door screw to replace 9V alkaline battery. Lift the terminal end of battery with thumbnail
or simply thump Measurement Module against your hand and catch the
battery. Note: The protective Boot is more easily removed when warmed.
HOW TO MEASURE ACCURATELY ▪ 32
ZIPLEVEL® isothermal readings are typically precise to within 0.2% of measurements 10’ (6m) or less and 0.35% of measurements beyond 10’ (6m).
It can typically level to within 0.1” (2mm) or 0.01” (0.2mm) in High Precision
over a single set-up.
1)For critical levelling frequently re-check or re-zero at the benchmark (CAL
is not necessary for leveling). When possible minimize height differences
between Cord, Base Unit and Measurement Module.
2)For critical elevation measurements, frequently re-check calibration and
benchmark zero. Whenever possible avoid temperature differences between the Cord and Measurement Module (eg. sun vs. shade).
3)When moving the ZIPLEVEL® from one temperature to a much different
temperature, such as from indoors to outdoors on a cold day, pull out as
much Cord as needed and allow 10-15 minutes for ZIPLEVEL® to adapt
to the change.
4)Avoid violent tugging, whipping or stomping on the cord without re-check
or re-zero at the benchmark.
5)Promptly zero or calibrate ZIPLEVEL® when its display flashes –0– or CAL.
33 ▪ HOW TO MEASURE ACCURATELY
6)Always secure the Base Unit to prevent movement during measurements
– it does not need to be level.
7)Avoid using ZIPLEVEL® beyond the specified ranges of elevation or temperature. The display will flash 8888 when beyond the +/-20’ (6m) vertical
range and the CAL will be on steady for temperatures below -22°F (-30C)
or above +158°F (+70C).
8)Occasionally check the 4’ (121.9cm) length of the fully extended Unipod
for changes in length caused by wear. Adjust its length if necessary.
9)As with conventional instruments, additional errors may be caused during use outdoors on sunny or windy days. In such conditions pull out only
as much Cord as is needed and avoid unnecessary loops over objects.
Measurements are less affected by sun/shade in early morning, late afternoon, when overcast, in full shade or indoors. If a measurement varies
when breezy, take the average reading.
ZIPLEVEL CARE ▪ 34
ZIPLEVEL® is rugged, durable and designed to provide years of reliable
performance when properly used. Here are some guidelines:
1) Avoid excessive strain on the Measurement Module by guiding the Cord
with the left hand during use (see page 8).
2) Whenever possible use the protective boot on the Measurement Module.
Avoid dropping the Measurement Module and never use as a hammer.
3) Do not immerse the Measurement Module in water or any other liquid or
gas and avoid contact with solvents.
4) Minimize ZIPLEVEL® wear by wiping with a damp cloth (avoid scratching
display window) or rinsing lightly to remove mud and dirt from the Base
Unit, Cord and Measurement Module. In extreme cases the single screw
at the back of the reel can be removed to release the reel from the housing for a thorough hosing.
5) Keep the Cord, Measurement Module or Base Unit out of the path of
vehicle traffic and out of contact with hot objects such as smoldering
cigarette butts, fresh asphalt or welding.
35 ▪ ZIPLEVEL CARE
6) Pack up the ZIPLEVEL® when not in use for extended periods of time.
Never leave out in foul weather or overnight. Avoid storage inside a hot
closed vehicle or trunk.
7) ZIPLEVEL® contains a non-toxic biodegradable clear liquid. In the unlikely event that a damaged unit releases liquid or if the Cord is cut, bend
over Cord and wrap with tape or wire to stop liquid release. Wipe up liquid
with absorbent towels, remove residue with soap and water and return to
factory for service.
TROUBLE SHOOTING ▪ 36
Problem
Action
Unit won’t turn on or shuts off
soon after turn on
Replace battery
Display shows 8888 with steady
tone even though elevation is
small
Unit is stuck in an undesired function and you can’t remember how
to escape
Check for Cord kink or damage.
Initialize (see page 25)
Cord flashes on display and/or
readings are not repeatable
Check Cord and Base Unit and
return to factory for 3 year interval
recharge and/or repair if damaged
ErrX flashes on display when unit
is switch on
Return to factory – unit may need
service
See page 30 for alarm indicators
Initialize and don’t forget to recalibrate
37 ▪ MAINTENANCE/PRODUCT ASSISTANCE
Technidea Corporation warrants the ZIPLEVEL® PRO-2000 High Precision
Altimeter against deficiencies in materials and workmanship for one year
from the date of purchase. The ZIPLEVEL® hydro-pneumatics are covered
by a second year pro-rata warranty.
ZIPLEVEL® never requires factory calibration and normal use should allow
years of use without repair. Every 2 - 3 years ZIPLEVEL® will flash “CORD”
on the display indicating a need for a factory recharge of its hydro-pneumatics. For detailed warranty information, the location of your nearest service
center and shipping information, visit www.ziplevel.com/service.
PRODUCT ASSISTANCE
If you have difficulty using your new ZIPLEVEL® after reading this User
Guide then please email [email protected] or call 1.800.805.LEVEL(5383)
or 1.760.480.4740 outside the USA.
MADE IN THE USA
SPECIFICATIONS ▪ 38
Set-up vertical range:
Set-up horizontal range:
Carry function range:
Range of zero or mark:
Reading repeatability:
Leveling accuracy:
Elevation accuracy:
Record capacity:
Record data capacity:
Settings/data retention:
Operating temp. range:
Storage temp. range:
Shock resistance:
Water resistance:
9V alkaline battery life:
40’ (12m) (20’ (6m) above and below Base Unit)
48”(122cm) full range in High Precision (HP)
200’ (60m) dia. Circle, (150’ (46m) PRO-2000B)
No limit
Full vertical range
0.1” (2mm) or 0.01” (0.2mm) HP typical
0.1” (2mm) or 0.01” (0.2mm) HP typical
Greater of 0.1” (2mm)/0.01” (0.2mm) HP or 0.2%
reading <10’ (3m) & 0.35% reading >10’ typ.
16,384 with no practical limits
137 readings
Indefinitely, even without battery
-22°F to +158°F (-30C to +70C)
-40°F to +158°F (-40C to +70C)
Measurement Module – 5’ (2m) drop on concrete
Base Unit – 3’ (1m) drop on concrete
Rain tight; not immersible
60 hours active use (auto shut-off after
4 minutes inactive)
U.S. Patents: 4,878,297; 5,517,869; 5,726,365; 5,844,150