1
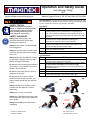
Operation and Safety Guide Jack Hammer Trolley JHT Vendor Website: www.makinexusa.com Makinex Support Phone #: US 407-446-1966, 407-826-0000 Tool Application: The Jack Hammer Trolley is used in conjunction with a 3035lb. Jack Hammer or Breaker for the removal of most types of flooring inclusive of; wood, ceramic and stone tile, vinyl, linoleum, and carpet. SAFETY TOPICS: Read and understand the operator’s Manual, or “Operations and Safety Guide” before using this machine. Failure to follow operating instructions could result in death or serious injury. Tool Setup: Step Action 1 Select appropriate Makinex scraper attachment for use. The wide chisel is primarily for use to remove tiles on a sanded cement bed. The Tile Smasher attachment is recommended for use on a concrete surface for the removal of wood, vinyl, carpet, ceramic & stone tiles. Carefully place the Jack Hammer Trolley onto its back (A) and mount the chosen scraper attachment by following the manufacturer’s instructions for the hammer/breaker. After returning the Jack Hammer Trolley to its upright position, lift handles to take weight off lock mechanism then pull the brake lever to disengage the lock mechanism. (B) Lift or lower the height of the handles to achieve the desired angle of the Jack Hammer Trolley (C). SAFETY CHECKLIST: Always wear safety goggles, ear protection and hard toe shoes when operating this equipment. Always ensure machine is switched OFF before plugging in. Always ensure the chisel or scraper shaft is correctly inserted and locked in position before use. Always inspect the Jack Hammer Trolley for any signs of damage before use. Do not use if it appears damaged. 2 3 4 5 Tool Operation: Step Action 1 Ensure hammer/breaker is properly secured in the clamping mechanism of the trolley and cannot rotate. Never allow hammer/breaker or chisel/scraper to overheat. (Refer to Jack Hammer manufacturer for continuous usage guidelines). Take regular breaks to avoid user fatigue and wear on hammer/breaker. Turn on the power switch of the hammer/breaker. Place both hands on handle and place a foot on the footrest. 2 Do not wear loose clothing while operating this machine. Loose material may become caught in the mechanism. Do not touch the Jack Hammer chisel or shaft while in operation. Release brake lever to re-engage the lock mechanism. 3 4 5 Maintain a straight back and proceed in a slow, steady linear motion while operating the Jack Hammer Trolley. (D) Do not operate if you have a known medical condition which may affect your ability to safety operate the Jack Hammer Trolley. (A) (B) (C) (D) Always maintain a correct stance while operating the Jack Hammer Trolley to avoid injury. Always use on a flat, level surface. Always use a dedicated power supply with an extension cord that does not exceed 30 feet in length. (C) Forward motion Always switch OFF the machine before unplugging. Created by: Michael Chen Company: Makinex Revision Level: 4 Revision Date: 08/19/14 JACK HAMMER TROLLEY MAINTENANCE GUIDE Supplier Support #: US Only: 407-446-1966, 407-826-0000 Supplier Website: www.makinexusa.com PURPOSE Follow the directions below to ensure that the Jack Hammer Trolley is in working order and properly maintained. SAFETY Always wear approved eye and ear protection when working with air tools. NEVER operate the machine if parts are faulty. Tool Inspection Process: Step Action 1 Visually check for dents as well as broken, missing or worn parts. 2 Check to ensure all bolts are secure and tighten or replace them if necessary. 3 Check the cart angle release cable, ensuring no kinks are present. Adjust or replace if needed. 4 Check electrical cables on hammer/breaker for damage. Carry out ‘Test and Tag’ procedure on electrical components as required. Tool Cleaning & Maintenance Process: Step Action 1 If needed, adjust cart angle release cable by tightening the retaining screw, then the adjustment screw with a Phillips head screw-driver. 2 Use compressed air to blow off excess dirt / dust. 3 Place a couple drops of light oil at the top of the release cable so that it runs through the cable housing. Do not use grease or heavy oil, as this will clog the housing. 4 Using a grease gun, apply grease via the grease nipple shown in (A) until excess starts to leak. (A) Wipe 5 off Wipe off tool with clean dry rag Revision 1 10/04/15