1
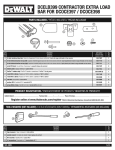
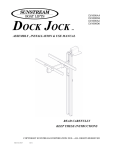
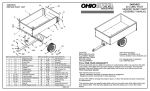
Repair Parts
5
3
9
10
4
1
11
2
ALUMINUM FOLDING
LOADING RAMP
12
10
17
Model 1084A
• 750lbs capacity - single.
• 1500lbs capacity - double.
• Compact storage.
• One person loading.
18
19
6
7
8
14
BB
•
•
•
•
•
•
•
•
LIMITED ONE-YEAR WARRANTY
REV-G
If this product fails due to a defect in material or workmanship within one year from the date
of purchase, Ohio Steel will at its option repair or replace it free of charge. Proof of purchase
required for all warranty claims.
This warranty does not cover:
•
Repairs necessary because of operator abuse or negligence.
•
Equipment used for commercial or rental purposes.
Contact your nearest Ohio Steel partner to arrange for product repair, or return this product
to place of purchase for replacement.
This warranty applies only while this product is in use in the U.S.A.
When ordering repair parts always give the following information,
PRODUCT NAME, MODEL NUMBER, PART NUMBER, and PART DESCRIPTION.
Manufactured under U.S. Patent No. 5,645,394
The loading ramp surfaces are sharp. Always wear proper clothing and use care when
handling the loading ramps. (Gloves are strongly recommended).
Read and understand all safety and operating instructions before using the loading ramp.
Never allow anyone unfamiliar with these instructions to use the loading ramps.
Read and understand all safety and operating instructions provided by the manufacturer
of the equipment the loading ramp will be used with.
Extreme caution should always be used while loading and unloading your equipment.
Do not exceed the rated capacity of the loading ramp.
Do not exceed the rated capacity of the loading surface (i.e. tailgate). If unknown, contact
the manufacturer to find the maximum load capacity.
Never stand in the path of equipment being loaded, and keep all bystanders and children
away from loading ramps.
This ramp must be only used for loading and unloading to and from a level and stable
surface.
Use caution when using ramp in icy or wet conditions. The ramp surface may become
slippery.
Do not use this loading ramp to load live animals.
Do not use loading ramps as a bridge, scaffolding, or any other use for which it is not
intended or designed.
If ramp is bowing while loading or unloading your equipment, which indicates an overload
condition, remove the equipment immediately.
Do not attempt to load or unload any power equipment with its motor running.
Failure to follow these warnings may result in property damage and/or serious bodily
injury.
WARNINGS
•
•
•
•
•
•
Ohio Steel Industries
2575 Ferris Road, Columbus, Ohio 43224
FOR MISSING PARTS, Call 1-800-652-2321,
Monday - Friday, 8 a.m. - 5 p.m. E.S.T.
SAFETY
Ramp Top Assembly
•
Step 4. Attach support bars (3) to ramp top (1) with bolts (9),
flat washers (10), lock washers (11), and
hex nuts (12). Tighten bolts at this time.
•
•
•
•
•
•
•
•
•
•
•
•
•
Be sure to read and follow all safety instructions and warnings. Failure to follow these
instructions may result in damage to the product and/or serious personal injury.
Danger of serious personal injury exists. Serious personal injury can occur when using a
loading ramp.
Never attempt to ride any vehicle up or down the loading ramp.
Look for a wall or a depression to reduce the loading angle, the lower the ramp angle the
easier the loading of the vehicle will be.
Park the vehicle on flat, firm, grassy terrain.
Set the emergency brake and chock the tires of the loading vehicle to prevent any
movement while loading and unloading the equipment.
Center loading ramp on the loading surface with support bars on top of the loading surface.
Make sure ramps are aligned at the proper distance apart so that the tires of the equipment
being loaded are centered on the ramp.
To prevent kick back, always attach cam buckle straps between the bumper of the truck
and the center of loading ramp. Pulling tight.
Roll or winch equipment up or down the ramp.
Before each use, always check for any worn, loose, or damaged parts on the loading ramp.
If any damage is present, DO NOT USE THE RAMP.
Periodically check the fasteners to make sure they are still tight and in place.
Keep ramp surface clean by occasionally cleaning with water and any mild detergent.
Do not add to or try to modify the loading ramp in any way. Any modifications will void any
warranties as well as affect the structural integrity of the ramp itself.
OPERATION
Assembly Instructions
Step 1. Stack one ramp top (1) on top of ramp bottom (2).
Lay other ramp top upside-down, as shown.
Note:
10
3
Apply a little soapy water
inside support bar
pad, this allows
the pad to
slide onto
the bar easier.
11
12
1
Connecting the Two Ramp Halves
Step 6. Invert ramp bottom (2) so that flanges face up. Place ramp top (1) inside the ramp
bottom so that the side holes of each are in line.
Step 7. Secure both side by inserting hex bolt (6) through flat washer (7), ramp bottom, ramp
top, another flat washer (7) and tighten with lock nut (8) as shown.
NOTE: DO NOT OVER TIGHTEN. Ramp must be able to swivel open and shut.
8
7
2
1
Step 2. Place foot in center of upside-down ramp
top and apply enough pressure to
create bow as shown.
Step 3. Add stiffener bar inside ramp top
flange as shown, with bolts (6), flat
washer (7) and lock nuts ( ). Align
hole in stiffener bar with hole in
7
12
Note: Stiffener bar is
ramp top. Do not tighten bolts until
not symmetrical
all bolts are in place. Add stiffener
bar to other side of ramp top. Repeat
HOLE TO SHOW PLACEMENT
steps 1 - 3 for other ramp top.
OF STIFFENER BAR ONLY.
9
Step 5. Slide support bar pads (5)
onto bars as shown.
TOOLS SUGGESTED FOR
ASSEMBLY
We suggest that you drill 7/16" diameter
holes through the support bars (3) into
7/16" wrench and/or socket
the tail gate or truck bed so that the pins
9/16" wrench and/or socket
can be inserted as a safety device in
Large blade screwdriver
holding ramps in place. To prevent kick
back of the loading ramp, always attach bungee strap to bumper of truck and center of ramp
stretching 5" to 6". Align individual ramps to correctly correspond to your ATV's track. Always
remove key, turn fuel off,and set parking brake after loading ATV.
19
5
1
7
6