1
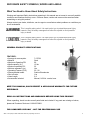
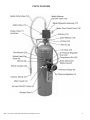
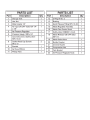
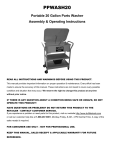
SB15
201301
15 lb. Portable Soda Blaster
Assembly & Operating Instructions
READ ALL INSTRUCTIONS AND WARNINGS BEFORE USING THIS PRODUCT.
This manual provides important information on proper operation and maintenance. Every effort has
been made to ensure the accuracy of this manual. We reserve the right to change this product at any
time without prior notice. Before use, read carefully and understand all warnings, cautions,
instructions and labels. Failure to do so could result in serious personal injury, property damage or
even death.
STOP!
CONTACT CUSTOMER SERVICE WITH QUESTIONS OR PROBLEMS.
DO NOT RETURN THIS PRODUCT TO THE RETAILER.
If you experience a problem or need parts for this product, call our customer help line at
1-888-287-6981, Monday-Friday, 8 AM - 4 PM Central Time or visit our website http://www.buffalotools.com.
A copy of the sales receipt is required.
IF THERE IS ANY QUESTION ABOUT A CONDITION BEING SAFE OR
UNSAFE, DO NOT OPERATE THIS PRODUCT!
FOR CONSUMER USE ONLY – NOT FOR PROFESSIONAL USE.
KEEP THIS MANUAL, SALES RECEIPT & APPLICABLE WARRANTY FOR FUTURE
REFERENCE.
RECOGNIZE SAFETY SYMBOLS, WORDS AND LABELS
What You Need to Know About Safety Instructions
Warning and Important Safety Instructions appearing in this manual are not meant to cover all possible
conditions and situations that may occur. Common sense, caution and care must be exercised when
assembling or using this product.
Always contact your dealer, distributor, service agent or manufacturer about problems or conditions you
do not understand.
This is a safety alert symbol. It is used to alert you to potential personal injury
hazards. Obey all safety messages that follow this symbol to avoid possible
injury or death.
This is a safety alert symbol. It is used to alert you to potential personal injury
hazards. Obey all safety messages that follow this symbol to avoid possible
injury or death.
GENERAL PRODUCT SPECIFICATIONS
FEATURES:
• Average air consumption
• Material
• Maximum Operating PSI
• Media capacity (lb.)
• Minimum operating PSI
• Moisture separator (y/n)
• Operating Pressure (PSI)
• Recommended media
• Shut off valve
• Hose Length
• Accessories Included
7.0 CFM
Steel
90
15 lbs.
35
Yes
35 - 90
Sodium Bicarbonate
Yes
5 ft.
Manual, 0.094 in. nozzle, hose
KEEP THIS MANUAL, SALES RECEIPT & APPLICABLE WARRANTY FOR FUTURE
REFERENCE.
READ ALL INSTRUCTIONS AND WARNINGS BEFORE USING THIS PRODUCT.
When unpacking, check to make sure all parts listed are included. If any parts are missing or broken,
please call Customer Service at 1-888-287-6981.
FOR CONSUMER USE ONLY – NOT FOR PROFESSIONAL USE
SB15 15 Lb Capacity Portable Soda Blaster Assembly & Operating Instructions
2
IMPORTANT SAFETY RULES
COMMON SENSE AND CAUTION ARE FACTORS WHICH CANNOT BE BUILT INTO ANY PRODUCT.
THESE FACTORS MUST BE SUPPLIED BY THE OPERATOR.
Keep your work area clean and well lit. Cluttered work benches and dark work areas may cause accidents
or injury.
Do not operate the soda blaster in explosive areas, such as in the presence of flammable liquids,
gases or dust. Tools create sparks which may ignite the dust or fumes.
Keep bystanders, children and visitors away while operating the soda blaster. Distractions can cause
you to lose control.
Do not force tool. Use the correct tool for your application. The correct tool will do the job better and
safer at the rate for which it is designed.
Store idle tools out of reach of children and other untrained persons. Tools are dangerous in the hands
of untrained users.
Always check to make sure that the trigger is not on before connecting blaster to air supply. Tool may
cause damage to property or person if plugged in while on.
Wash hands after handling the air hose. Touching the air hose could expose you to lead, which is known in
the State of California to cause cancer, birth defects and other reproductive harm.
All work areas should be clean and well lit. Accidents are more likely to occur in poorly lit and cluttered
areas.
Keep children, and other distractions at a distance while operating the Soda Blaster.
Keep the air hose in good condition, and replace damaged air hose immediately. Keep the air hose
away from materials and surfaces that could damage air hose.
Use common sense while operating this soda blaster.
Do not use this tool if you are:
•
Feeling tired or are under the influence of alcohol or drugs.
•
Wearing loose clothing or jewelry. Keep long hair pulled back and away from moving parts.
•
Overreaching or have improper footing. Handling the tool in this way could cause serious injury.
•
When using this Soda Blaster, always:
•
Wear the proper safety equipment, such as safety goggles, dust masks, non-skid shoes, etc.
•
Check to be sure all adjusting keys or wrenches have been removed before starting the power tool.
•
Check that the power switch is in the “OFF” position before plugging the unit into an electrical outlet.
SB15 15 Lb Capacity Portable Soda Blaster Assembly & Operating Instructions
3
Follow these steps to maintain safe working conditions and good working condition of air blaster.
Improper care can result in electric shock or serious injury.
Secure and support the work piece using clamps. Do not use your hands to hold the piece in place.
Use the correct tool for the job. Using the correct tool is safer and faster.
Keep out of reach of children, or any untrained person. Store tools in a safe and dry place.
Keep tools clean. Maintain tools with proper care to increase the life of the tool, and reduce risk of injury.
Check to be sure all moving parts are free from binding and are properly aligned.
Use only accessories that are recommended by the manufacturer for your tool model.
Safety glasses and ear protection must be worn during operation.
SERVICE
Tool service must be performed only by qualified repair personnel. Service or maintenance by unqualified
personnel could result in a risk of injury.
When servicing a tool, use only identical replacement parts and follow instructions in the manual. Use
of unauthorized parts or failure to follow Maintenance Instructions may create a risk of shock or injury.
SAVE THESE IMPORTANT SAFETY INSTRUCTIONS FOR FUTURE REFERENCE.
This manual contains important information regarding safety, operation, maintenance and storage of this product.
Before use, read carefully and understand all warnings, cautions, instructions and labels. Failure to do so could
result n serious personal injury, property damage or even death.
Before using this tool, you need to become familiar with its operation. If you are unsure about the
operation of the tool, or have any questions about its proper use, call the Customer Service Department at
1-888-287-6981. Follow these instructions for safe handling of the tool:
• Always secure and support the work piece using clamps. Do not use your hands to hold the piece.
• Be sure your work area is clean and secure. Be sure the area is free from all foreign material, nails,
staples, or any other material.
• Always use the appropriate safety gear when operating this Soda blaster. Including but not limited, to
goggles, dust mask or respirator. Always work in a well-ventilated area to reduce your exposure to harmful
chemicals and dust particles.
• Keep hands away from the cutting area. Do not reach under the work piece.
SPECIFIC SAFETY RULES AND/OR SYMBOLS
The following symbols may be used on your tool. Be familiar with and learn the symbols to operate the tool safely.
Symbol
V
A
Hz
W
Kg
min
s
…/min
1,2,3…
Name
Description
Volts
Amperes
Hertz
Watt
Kilograms
Alternating Current
Direct Current
Alternating or Direct Current
Earthing Terminal
Voltage (Potential)
Current
Frequency (Cycles per Second)
Power
Weight
Type of Current
Type of Current
Type of Current
Grounding Terminal
Class II Construction
Minutes
Seconds
Diameter
No Load Speed
Denotes Double Insulation
Time
Time
Size of Drill Bits, Grinding Wheels, etc.
No-load Rotational Speed
Revolutions per Minute
Ring Selector Settings
Revolutions, Surface Speed, Strokes, etc. per Minute
Speed, Torque or Position Settings
SB15 15 Lb Capacity Portable Soda Blaster Assembly & Operating Instructions
4
ATTACH AIR PRESSURE REGULATOR
1. Wrap the threads of the Pressure Gauge with thread sealer tape (not included). Screw the Pressure Gauge
into the opening in the face of the Air Pressure Regulator. Tighten snugly using a 9/16” wrench on the back of
the gauge block. Rotate till snug but do not overtighten.
2. Attach Bracket to the Tank using the two Socket Head Screws and wrench tighten. Observe the orientation,
remove the Compression Nut past the Air Pressure Regulator Knob and through the Bracket. Align the tab on the
Bracket with the recess at gauge side of the regulator, attach compression Nut, and finger tighten until snug.
LOADING MEDIA INTO TANK
WARNING! Never service or disassemble the Soda Blaster with the air hose attached. Always release any builtup air even after disconnecting the hose.
This portable Soda Blaster is designed to be used with Bicarbonate of Soda (Baking Soda) as the only media. Use
of other media may damage this tool.
Avoid clogging the Media Outlet Hose by making sure the media used is dry. Pull up on the Quick Release Fitting
blue ring and pull out Air Hose. Hold Bushing with a wrench and Hex Nut on the Bushing with another wrench.
Remove entire media discharge assembly slowly, being careful with the Pickup Tube as it may contain residual
media which can spill when removed. Allow time for the trapped aggregate to safely discharge back into the Storage
Tank.
Using a funnel, pour up to 15 pounds of media into the Storage Tank. Inspect condition of the O-ring at the bottom of
the Bushing, and replace if damaged. Insert the Pick up tube into the storage tank, attach the Hex Nut and finger
tighten. Tighten the nut (do not over tighten). Pull up on the blue pressure ring and insert the tube deep into the
fitting. Release the ring (if air leaks around the tube, remove it and cut approximately a quarter of an inch of its
length and reattach.
NOTE: If this is a large job, fill the Tank only 3/4 full and reload as needed to finish the job.
4. If the humidity is 90 to 100%, it is recommended to reduce the amount of media and refill more frequently. This
will reduce the possibility of clogging the bottom of the Storage Tank and the Media Outlet Hose or Ceramic
Discharge Nozzle. Insert the Pickup Tube into the Storage Tank. Place the O-Ring onto the top of the Pickup Tube
and position the Media Regulator on top of it.
ATTACH TO AIR COMPRESSOR
Be sure that the Media Release Valve on top of the Media Regulator is in the OFF (horizontal) position.
Air Hose should be attached to Air Pressure Regulator outlet and Media Regulator. Attach the pressure line from the
air compressor (not included) to the Regulator. Open the Air Input Valve (turn to horizontal position) at the air
pressure inlet. Adjust the air pressure to no more than 90 PSI. To do so, lift the Air Pressure Regulator Knob and
turn it clockwise to increase or counterclockwise to decrease the air pressure (Read the pressure on the Pressure
Gauge). When set, push the knob down to lock the Regulator Knob and save the setting.
Check to be sure all connections are tight with no leaks. Disconnect the air supply and discharge air from the tank
before making any needed repairs.
After putting on all required safety equipment, direct the Ceramic Discharge Nozzle on a piece of test material.
Open the Media Release Valve of the Media Regulator. Adjust the media flow as needed by turning the Media Flow
Control Knob. Turning this knob clockwise increases media flow, counterclockwise reduces flow.
You can also adjust the impact power of the media by adjusting the air pressure. Do this by adjusting the Air
Pressure Regulator Knob. Do not exceed 90 PSI.
After completing the test and insuring that the Soda Blaster works properly, turn off media flow. You are now ready
to set up the work piece.
SB15 15 Lb Capacity Portable Soda Blaster Assembly & Operating Instructions
5
Work Piece and Work Area Set Up
Designate a work area that is clean and well-lit. The work area must not allow access by children or pets to prevent
distraction and injury.
Route the air hose along a safe path to reach the work area without creating a tripping hazard or exposing the air
hose to possible damage. The air hose must be long enough to reach the work area with enough extra length to
allow free movement while working. Secure loose work pieces using a vise or clamps (not included) to prevent
movement while working.
There must not be hazardous objects (such as utility lines or foreign objects) nearby that will present a hazard
while working. There will be considerable excess blasting medium left in the work area. Contain it and clean it up.
General Operating Instructions
WARNING: Do not hold the work piece in hand while blasting it. You may seriously injure yourself.
If possible, place the work piece inside a sandblast cabinet. Otherwise, isolate the work piece to make
sure no damage can occur to nearby walls, tools, personal property, etc.
Make sure bystanders are completely clear of the work area before beginning work.
Turn the Air Input Valve at the Air Pressure Regulator to the ON position (aligned with the line).
Grip the Media Outlet Hose and Ceramic Nozzle firmly. Rotate the Media Release Valve of the Media Regulator
clockwise to release the media.
NOTE: The flow rate of the media may be irregular when first started. Provided the media is dry, the flow rate will
normalize in approximately one minute.
Spray the soda media onto the work material, moving the gun from side to side. Adjust Media Flow Control Knob to
increase or decrease the media flow rate.
Adjust the Air Pressure Regulator to trim the total air flow and pressure at the Ceramic Nozzle. Do not set the
pressure higher than 90 PSI.
If the Soda Blaster requires more force to accomplish the task, verify that the Soda Blaster receives sufficient,
unobstructed airflow (CFM) and increase the pressure (PSI) output of the regulator up to the maximum air pressure
rating of this Soda Blaster.
CAUTION! To prevent Soda Blaster and accessoryfailure, resulting in injury: Do not exceed the Soda Blaster’s
maximum air pressure rating.If the Soda Blaster still does not have sufficient force at maximum pressure and
sufficient airflow, then a larger Soda Blaster may be required.
If excessive air pressure is used, or Media Regulator becomes clogged, the Safety Valve may open, releasing air
pressure. Shut OFF Air Input Valve. Adjust Air Pressure Regulator to below 90 PSI. Turn the Air Input Valve back
on. If the problem happens again, detach the air supply and clean out the Media Regulator and Media Outlet Hose.
To prevent accidents, turn off the Soda Blaster, detach the air supply, safely discharge any residual air pressure in
the Soda Blaster, and turn the switch to its off position after use. Clean external surfaces of the Soda Blaster with
clean, dry cloth. Then store the Soda Blaster indoors out of children’s reach.
When work is completed, turn off the air pressure supply. Clean up all materials and store your Soda Blaster safely
and securely.
SB15 15 Lb Capacity Portable Soda Blaster Assembly & Operating Instructions
6
OPERATION
Always wear hood, dust mask and heavy duty canvas gloves when operating the blaster.
Before operating your soda blaster, inspect each connection, double checking to make
sure that all are tight and properly sealed.
Loading Soda Media
1. Check to make sure the soda media is dry and clean so that it does not clog the unit.
2. Close the brass Air Supply Valve by turning it to the vertical position.
3. To release the pressure from the Tank, press Safety Trigger until air stops.
4. Make sure the Pressure Gauge reads "0".
5. Remove the Filler Cap .
6. Using the Funnel, pour the selected soda media into the tank. Do not fill the tank more than 3/4 full. If humidity
in your region is 90% or more, only fill the tank half full and check the water trap more frequently.
7. Close the Filler Cap securely, assuring o-ring is in place.
Note: Place your air compressor in another room to prevent damage to it.
To Start Blasting
Note: Start with all valves in the closed position. Following the instructions below will help prevent the
formation of clogs in the abrasive hose, outlet manifold and the safety trigger.
1. Connect air compressor to the Inlet Connector.
2. Start compressor and open Air Supply Valve .
3. Open Throttling Valve.
4. Check for leaks at the Filler Cap and along all hoses and fittings as the system pressurizes. If leaks are
observed, release the pressure from the tank and repair immediately.
5. Point Safety Trigger in a safe direction away from people, pets or anything around you that may be
damaged by direct or indirect abrasive spray.
6. Press and hold Safety Trigger until air is flowing through the trigger.
7. With the Safety Trigger open, slowly open the Abrasive Control Valve until soda media
material begins to flow out of the Safety Trigger.
8. Adjust the Abrasive Control Valve until the desired amount of soda media material is flowing through the
Trigger.
9. Begin blasting.
To Stop Blasting
1. While continuing to press and hold the Safety Trigger, turn the Abrasive Control Valve to the
closed position (this is to prevent any clogging.)
2. When you notice only air (no abrasive) is coming out of the Safety Trigger, you can stop
the air flow by releasing the trigger. By doing this you are ensuring a clean and clog-free
manifold, hose, and safety trigger.
Releasing Pressure from the Tank
1. When finished blasting, point Safety Trigger in a safe direction away from people, pets or
anything around you that may be damaged by direct or indirect abrasive spray.
2. Press and hold the Safety Trigger to expel any remaining abrasive material from the Abrasive Hose.
3. Close the Abrasive Control Valve.
4. Release pressure on the Safety Trigger.
5. Close the Throttling Valve and the Air Supply Valve.
6. Disconnect air supply hose from abrasive blaster.
7. Press the Safety Trigger until air stops flowing and Pressure Gauge reads "0".
SB15 15 Lb Capacity Portable Soda Blaster Assembly & Operating Instructions
7
MAINTENANCE
Procedures not specifically explained in this manual must be performed only by a qualified
technician.
To prevent serious injury from accidental operation: Turn off the Soda Blaster, detach the air supply, safely
discharge any residual air pressure in the Blaster before performing any inspection, maintenance, or cleaning
procedures.
To prevent serious injury from Soda Blaster failure: Do not use damaged equipment. If abnormal noise, vibration, or
leaking air occurs, have the problem corrected before further use.
Separated moisture from supplied air will automatically drip from bottom of the filter. At the end of each project/daily,
pull down on the moisture trap release valve underneath the filter. This will allow discharge of possibility trapped
small particles.
1. When initially pressurizing, check for leaks at the tank top and at all hoses and fittings. Leaking joints
may be repaired by replacing worn or damaged parts and teflon tape at joints.
2. Check for worn abrasive hose and fittings. The Abrasive Control Valve, manifold, and all parts after the
soda media is ejected from the tank are subject to rapid wear due to the flow of abrasive. Watch especially
for leaks, blistering, bulging or thinness of the hose. Replace any parts which appear worn.
SB15 15 Lb Capacity Portable Soda Blaster Assembly & Operating Instructions
8
PARTS DIAGRAM
SB15 15 Lb Capacity Portable Soda Blaster Assembly & Operating Instructions
9