1
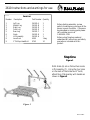
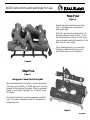
18" Convert to Gel Log Set # 2610
Instruction Manual
2610 Instructions and warnings for use
Parts List
Number
Description
Part Number Quantity
1
2
3
4
5
6
7
8
9
Left Log
Middle Log
Right Log
Front Log
Rear Log
Grate
Lift Assembly
Lava Rock
1" Phillips Head Bolt
2610-R A
2610-R B
2610-R D
2610-R E
2610-R F
2610-R G
2610-R H
4090
9742
1
1
1
1
1
1
1
1 bag
10
Before starting assembly, review
parts list making sure you have all the
pieces in good condition. If there are
any damaged or missing parts please
call customer service at
1-800-654-1704.
Before using fireplace read and
understand all instructions and safety
precautions included with this
product.
Step One
Figure 1
7
With Grate (6) set on flat surface locate
Lift Assembly (7). Using the four holes
on the back of the Grate and 1" bolts,
attach the Lift Assembly with handle as
shown in figure 1.
6
Figure 1
Rev 2/14/2007
2610 Instructions and warnings for use
Step Two
Figure 2
5
4
Raise handle on lift assembly to the
open position.
Place Front Log (4) and Rear Log (5)
as shown in figure 2
Figure 2
1
Step Three
Figure 3
Locate the Left Log (1) with the "V"
end of the log facing towards the front.
Attach log to metal brace with two 1"
bolts.
NOTE: Use caution not to over
tighten bolts.
Figure 3
Rev. 4/26/07
2610 Instructions and warnings for use
Step Four
Figure 4
1
5
2
3
4
Repeat step three with the remain two
logs. Use figure 4 as reference for
placing the logs.
After all logs have been fastened to Lift
Assembly slowly lower lift arm. If the
top three logs don't rest on Front Log (4)
you may need to adjust the position of the
Rear Log (5) left or right.
Place assembled unit in your existing
fireplace. Add decorative lava rock
around the base of your fireplace.
Figure 4
Step Five
Figure 5
Using your Convert to Gel Log Set
With assembled unit in fireplace, raise lift assembly.
Place two cans of REAL FLAME gel fuel in fuel tray
located in the middle of the grate. With an extended
lighter or long match light gel fuel. Carefully lower
lift handle.
During the initial burn you may experience a slight
odor. This odor is temporary and will be absent on
following burns.
Figure 5
Rev. 4/26/07