1
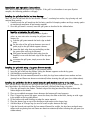
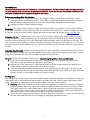
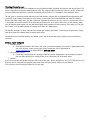
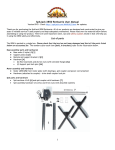
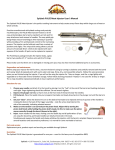
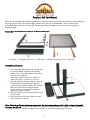
Fireplace Grill User Manual
Thank you for purchasing the SpitJack Fireplace Grill. Below you will find instructions for assembly, some suggestions
for setup and use of the grill in your fireplace, and a few tips on care and maintenance. Please read all of the
information below before you use your grill. Improper assembly or installation may result in personal injury or
property damage.
Please check that you have received all of the following parts:
1. Grill grate, 2. Grill grate handles (2), 3. Grill stand, 4. Thumb screw fasteners (2), 5. Drip tray
Assembly instructions:
1. Screw both grill grate handles into the grill grate.
Do not over-tighten by twisting the wooden
handles. Use a set of pliers over a soft cloth on
the steel rods to tighten.
Note: if the handle comes loose, simply use
some white glue (e.g. Elmer’s) to secure it.
2. Raise the grill grate support columns section of
the grill stand as illustrated at the right and
secure each side with the thumb screw fasteners.
Make sure the holes have aligned and the
fasteners have been inserted far enough to
engage the support columns.
3. Place the drip tray in the opening at the front of
the grill stand.
4. Check to make sure all connections are secure
and the structure is sturdy.
Note: Clean the grill grate with warm soapy water, dry thoroughly and wipe with a light coating of vegetable
oil before the first use. Your grill is make from cold-rolled steel for durability and is susceptible to rust and corrosion
if not properly cared for. Always coat lightly with vegetable oil after cleaning and drying for storage.
1
Installation and operation instructions:
Note: these instructions describe use in a fireplace. If the grill is used outdoors in an open firepit or
campfire, the following guidelines still apply.
Installing the grill after the fire has been burning:
Note: it is best to wait until the fire has become “mature”-- rendering hot embers, logs glowing red, and
minimal flame activity.
1. Carefully move the grill stand into the fire being careful of disrupting embers and logs causing sparks
or unexpected movement of hot burning material.
2. Once the grill stand is secured, insert the grill grate as described in the sidebar below.
Inserting or removing the grill grate:
Note: we recommend using heavy leather fireplace
gloves or oven mits when inserting the grill grate into a
mature fire.
1. Grab the grill grate towards the back edge on both
sides.
2. Set the edge of the grill grate between two sets of
guide pegs on the grill stand support columns.
3. Lower the back edge that you are holding so that
the grate slides easily up and forward.
4. Slide grate forward until the back edge (not the
handles) is even with the back edge of the drip pan
below.
5. to remove the grill grate, simply reverse the above
procedure.
Installing the grill while using a log grate (fire not started):
1. Load up your log grate with logs as you normally would.
2. Insert the grill stand into the firebox, sliding the bottom supports under the log grate.
3. Add kindling as needed and light the fire.
4. Wait until the fire has matured (burned for a while, the logs have rendered some embers and are
glowing hot and flames are absent or minimized) before inserting the grill grate (see sidebar above).
Installing the grill before the fire is started (using the grill stand as andirons or log rests):
Note: you will need 2 different size split logs for this setup; 19”(4-5) or longer and 16”(2) or shorter. We
have found that a fire built this way burns hotter and more efficiently than using a log grate.
1. Place the grill stand in the firebox. The back edge of the drip pan should be close to where the
firebox begins at the hearth.
2. Place two crumbled newspaper sheets between the bottom grill stand supports.
3. Place 2 longer logs across the paper, one at the front, the other at the back, leaving as wide a gap
in the middle as the log width allows.
4. Fill the hollow with small kindling or other fire starter material.
5. Place the shorter logs on top of the kindling at right angles to the longer logs.
6. Add third layer of 3 longer logs (no need to create a space between the logs).
7. Light the fire and wait until the fire has matured (burned for a while, the logs have rendered some
embers and are glowing hot and flames are absent or minimized) before inserting the grill grate (see
sidebar above).
2
Operating tips:
Warning: your fireplace was not designed as a cooking appliance. Fat that is burned while cooking can collect
on your chimney walls and become an unnatural fire hazard. If you use this grill heavily and cook fatty foods,
have your chimney checked regularly throughout the season.
Before you use the grill for the first time.
1. Check your fireplace, chimney and damper. We recommend having your fireplace and chimney system
examined yearly by a professional chimney sweep. Make sure that your firebricks and mortar are sound and
that your damper is working properly and you have sufficient draw and airflow to operate safely.
2. Follow the first-time cleaning instructions above.
Protection. We suggest using heavy gloves (either special fireplace gloves or oven gloves or mits) when cooking in
the fireplace. In addition, because of the high heat, we recommend using tools (forks, spatulas, cleaning brush, tongs,
etc. that are as long as possible both for comfort and to protect from injury (all available at http://spitjack.com).
Arranging the fire. It’s a good idea to create zones of heat for cooking. Ideally, there could be a hot zone where
searing and high-heat cooking would take place, a medium zone where food would cook less intensely and slower,
and a zone with no direct heat or live coals underneath (usually toward the back of the grill over the drip pan). This
area is used for resting, finishing or warming food and for relocating foods that are causing flare-ups.. It’s not as easy
to create these zones with a fireplace fire as it is with a typical outdoor gill and even more difficult if you are using a
log grate.
Adjusting the grill height. Another way to regulate heat is to move the grill grate up or down using the 3 levels set
on the grill stand. The setup of the fire (how high the logs are stacked, whether a log grate is used) and the intensity
of the fire will determine when and when to adjust the height of the grill grate.
General. We echo Steven Raichlen’s basic advice: “always keep the grill hot, clean and lubricated”.
1. Let the grill get hot before placing anything on it. Preheating the grill will cook the food faster, more
efficiently, and give the food a better appearance (grill marks).
2. When the grill is hot, make sure it is clean form any burnt or crusted residue from the last cooking. Use a
scraper and/or an abrasive scouring tool to clean the grill surface.
3. Just before cooking, pace some vegetable oil on a clean cloth and wipe the grill surface. You can use your
cleaning tool to do this. This last step help keeps certain foods (proteins) from sticking to the grill. Clean and
lubricate as often as needed while cooking to get the best results.
Cooking tips:
Once you have set up your system and become familiar with the operational techniques described above, cooking on
your fireplace grill is really no different than cooking on any other grill setup. There are many good sources of grill
cooking information in books, online, and from your neighbors. Here are a couple from us:
1. Smoking. Ironically it’s not that easy to get a good smoke flavor on your foods when cooking in a fireplace.
Cooking should be done over a mature fire in which the smoke has burned off and only the embers remain.
We suggest adding a few soaked wood chips or chunks directly under the food. You can even try placing a
deep lid (like a wok cover) over the food to capture the smoke for a more intense flavor. This technique also
works if you want to create a more oven-like effect or accelerate cooking time.
2. We use the grill in tandem with our fireplace rotisserie. While our finished roast is “resting” we insert the grill,
dip some garlic rubbed bread slices in the drippings and quickly grill them for service.
3
Cleaning & maintenance:
Your fireplace grill has two basic components; the grill stand assembly (including the drip pan) and the grill grate. The
stand is constructed of powder coated (painted) steel. This coating might burn off after some use and be restored by
using a hi-heat black paint that is specially created for grills and stoves. It is available in most hardware stores.
The grill grate is constructed from cold-rolled steel (which makes it better able to withstand high temperatures) and
given only a light coating of machine oil at the factory as protection. We recommend that you wash the cooking
surface with warm soapy water, dry and recoat with vegetable oil before the first use. Since it is unprotected steel, it
is susceptible to rust and corrosion if left untreated and exposed to air or water. After each use and cleaning, make
sure all exposed metal surfaces are dry and coated lightly with vegetable oil before storing. Over many uses, the grill
will “season” itself by baking on the oil coatings and require less maintenance.
The handles are made of cherry wood and are coated with a light polyurethane at the factory for protection. Simply
wipe them clean with a damp towel to remove light soiling.
Periodically unscrew both the handles and thumb screws and oil the threads before replacing to prevent binding
corrosion.
Service, repair and parts
1. Warranty service
a. Your SpitJack Fireplace Grill comes with a one year limited warranty (see below). If during that period
you need servicing, repair or new parts, please contact our service department at
[email protected] or calling (toll free) 800 755 5509.
2. Post warranty service
a. If servicing is needed after the warranty period has expired arrangements can be made for repair of
you unit either locally or by sending it back to us. Most parts can be ordered online.
3. Returns
If you need to return the SpitJack Fireplace Grill or any of the parts, please call (toll free) 800 755 5509 and you will
be given specific instructions for preparing the return items and give you the address to send them to.
Note: there are specific packing instructions for each part.
4
Limited Warranty
LIMITED WARRANTY. Rasa Incorporated, d/b/a/ SpitJack (the “Company”) warrants that (a) its SpitJack Fireplace
Grill (the “Product”) will perform substantially in accordance with the accompanying written materials for a period of
one year from the date of receipt and (b) that the components of the Product is contained will be free from defects in
materials and workmanship under normal use and service for a period of one (1) year. In the event applicable law
imposes any implied warranties, the implied warranty period is limited to one year (365 days) from the date of
receipt. Some jurisdictions do not allow such limitations on duration of an implied warranty, so the above limitation
may not apply to you. . This warranty is valid only for Product (s) purchased directly from SpitJack or from one of its
authorized dealers.
CUSTOMER REMEDIES. The Company’s and its suppliers’ entire liability and your exclusive remedy shall be, at the
Company’s option, either (a) return of the price paid for the Product, or (b) repair or replacement of the Product that
does not meet this Limited Warranty and which is returned to the Company with a copy of your receipt. This Limited
Warranty is void if failure of the Product has resulted from accident, abuse, or misapplication. Any replacement
Product will be warranted for the remainder of the original warranty period or thirty (30) days, whichever is longer.
NO OTHER WARRANTIES. TO THE MAXIMUM EXTENT PERMITTED BY APPLICABLE LAW, THE COMPANY AND
ITS SUPPLIERS DISCLAIM ALL OTHER WARRANTIES, EITHER EXPRESS OR IMPLIED, INCLUDING, BUT NOT
LIMITED TO IMPLIED WARRANTIES OF MERCHANTABILITY AND FITNESS FOR A PARTICULAR PURPOSE, WITH
REGARD TO THE PRODUCT AND ANY RELATED OR ACCOMPANYING WRITTEN MATERIALS. THIS LIMITED
WARRANTY GIVES YOU SPECIFIC LEGAL RIGHTS. YOU MAY HAVE OTHER RIGHTS WHICH VARY FROM
JURISDICTION TO JURISDICTION.
NO LIABILITY FOR DAMAGES. TO THE MAXIMUM EXTENT PERMITTED BY APPLICABLE LAW, IN NO EVENT
SHALL THE COMPANY OR ITS SUPPLIERS BE LIABLE FOR ANY DAMAGES WHATSOEVER (INCLUDING WITHOUT
LIMITATION, SPECIAL, INCIDENTAL, CONSEQUENTIAL, OR INDIRECT DAMAGES FOR PERSONAL INJURY, LOSS
OF BUSINESS PROFITS, BUSINESS INTERRUPTION, LOSS OF BUSINESS INFORMATION, OR ANY OTHER
PECUNIARY LOSS) ARISING OUT OF THE USE OF OR INABILITY TO USE THIS PRODUCT, EVEN IF THE COMPANY
HAS BEEN ADVISED OF THE POSSIBILITY OF SUCH DAMAGES. IN ANY CASE, THE COMPANY’S AND ITS
SUPPLIERS’ ENTIRE LIABILITY UNDER ANY PROVISION OF THIS AGREEMENT SHALL BE LIMITED TO THE
AMOUNT ACTUALLY PAID BY YOU FOR THE PRODUCT. BECAUSE SOME JURISDICTIONS DO NOT ALLOW THE
EXCLUSION OR LIMITATION OF LIABILITY FOR CONSEQUENTIAL OR INCIDENTAL DAMAGES, THE ABOVE
LIMITATION MAY NOT APPLY TO YOU.
© SpitJack 2005. All rights reserved
5