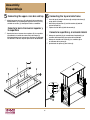
1
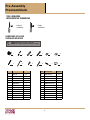
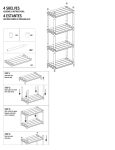
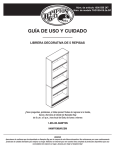
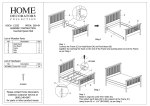
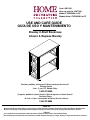
Item # 597 659
Núm. de artículo # 597 659
Model # THD90036.1a.OF
Modelo Núm # THD90036.1a.OF
USE AND CARE GUIDE
GUÍA DE USO Y MANTENIMIENTO
Brexley 2-Shelf Bookcase
Librero 2-Repisas Brexley
Questions, problems, missing parts? Before returning to the store call
Customer Service
9 a.m. - 5 p.m., CST, Monday-Friday
1-844-327-8600
¿Preguntas, problemas o piezas faltantes? Antes de regresar a la tienda, llama al
Servicio al Cliente,
de 9 a.m. a 5 p.m., hora estándar del Centro, de Lunes a Viernes
1-844-327-8600
THANK YOU
We appreciate the trust and confidence you have placed in Home Decorators Collection through the purchase of this Brexley Short Bookcase.
We strive to continually create quality products designed to enhance your home.Thank you for choosing Home Decorators Collection.
GRACIAS
por la confianza que has depositado en Home Decorators Collection al comprar este Librero Pequeño Brexley.
Nos esforzamos para continuamente crear productos de calidad diseñados para mejorar tu hogar. Gracias por elegir Home Decorators Collection.
Pre-Assembly
Preensamblado
TOOLS REQUIRED
HERRAMIENTAS REQUERIDAS
Flathead
screwdriver
Phillips
screwdriver
HARDWARE INCLUDED
HERRAJES INCLUIDOS
NOTE: Hardware not shown to actual size.
NOTA: No se muestra el tamaño real de los herrajes.
Part
1
2
3
4
5
6
7
8
9
10
11
12
Quantity
Pieza
Descripción
Cantidad
1
Description
Cam lock
10
1
Cierre de leva
10
2
Cam bolt
10
2
Perno de leva
10
3
Wooden dowel
22
3
Clavija de madera
22
4
Bolt
2
4
Perno
2
5
Spring washer
2
5
Arandela de res orte
2
6
Washer
2
6
Arandela
2
7
4x40 mm Screw
6
7
Tornillo 4x40 mm
6
8
Allen wrench
1
8
Llave Allen
1
9
1
9
Tornillo 4x16 mm
1
10
4x16 mm Screw
4x38 mm Screw
1
10
Wall anchor
1
11
Tornillo 4x38 mm
Ancla de pared
1
11
12
Strap
1
12
Correa
1
2
1
Pre-Assembly
Preensamblado
BOOKCASE PACKAGE CONTENTS
CONTENIDO DEL PAQUETE DEL LIBRERO
A
E
E
C
F
G
D
B
D
Part
Quantity
Pieza
A
Top
Description
1
A
Superficie
1
B
Left side frame
1
B
Armazón lateral izquierdo
1
Descripción
Cantidad
C
Right side frame
1
C
Armazón lateral derecho
1
D
Shelf
2
D
Estante
2
E
Upper cross bar
2
E
Barra transversal superior
2
F
Back cross bar
1
F
Barra transversal trasera
1
G
Cross bar
1
G
Barra transversal
1
3
Please contact 1-844-327-8600 for further assistance.
Para obtener asistencia, llama al 1-844-327-8600
Assembly
Ensamblaje
1
2
Preparing the shelf、back cross bar
and cross bar
Insert eight wooden dowels (3) into the two shelves (D).
Preparing the left side frame and
right side frame
Insert five cam bolts (2) and two wooden dowels (3)
into left side frame (B).
Insert five cam bolts (2) and two wooden dowels (3)
into right side frame (C).
Insert two wooden dowels (3) into the back cross bar (F).
Insert four wooden dowels (3) into the cross bar (G).
Prepare el armazón lateral izquierdo y
el armazón lateral derecho
Prepare el estante, la barra transversal
trasera y la barra transversal
Inserte cinco pernos de leva (2) y dos clavijas de madera (3)
en el armazón lateral izquierdo (B).
Inserte ocho clavijas de madera (3) en dos cinco estantes (D).
Inserte dos clavijas de madera (3) en las barras transversales
traseras (F).
Inserte cuatro clavijas de madera (3) en la barra transversal (G)
Inserte cinco pernos de leva (2) y dos clavijas de madera (3)
en el armazón lateral derecho (C).
2
3
D X2
3
B
F
3
2
G
3
C
4
Assembly
Ensamblaje
3
4
Connecting the cross bars and back
cross bars and shelf to left side frame
Connection left side frame (B) and two shelves (D) , back cross
bar (F) and cross bar (G) , Ensure that the wood dowels (3) and
cam bolts (2) are fully inserted into the appropriate holes.
Insert five cam locks (1) into the attached holes to the two
shelves (D) and back cross bar (F).
Insert the cross bar (G), two shelves (D) and back cross bar (F)
into the left side frame (B), then turn all of the cam lock (1)
clockwise until they lock into place over the cam bolts (2).
Connection right side frame (C) and two shelves (D) , back cross
bar (F) and cross bar (G) , Ensure that the wood dowels (3) and
cam bolts (2) are fully inserted into the appropriate holes.
Insert five cam locks (1) into the attached holes to the two
shelves (D) and back cross bar (F).
Insert the cross bar (G), two shelves (D) and back cross bar (F)
into the right side frame (C), then turn all of the cam lock (1)
clockwise until they lock into place over the cam bolts (2).
Conecte las barras transversales y las barras
transversales traseras y los estantes al
armazón lateral derecho
Conecte las barras transversales y las
barras transversales traseras y los
estantes al armazón lateral izquierdo
Conexión del armazón lateral derecho (C) y dos estantes (D), barra
transversale traseras (F) y la barra transversal (G), asegurando que
las clavijas de madera (3) y los pernos de leva (2) están
completamente insertados en los agujeros apropiados.
Inserte cinco cierres de leva (1) en los agujeros adjuntos a los dos
estantes (D) y barras transversales traseras (F).
Inserte la barra transversal (G), dos estantes (D) y barras transversales
traseras (F) en el armazón lateral derecho (C), luego gire todos los
cierres de leva (1) en sentido horario hasta que encajen en su lugar
sobre los pernos de leva (2).
Conexión del armazón lateral izquierdo (B) y dos estantes (D),
barra transversales traseras (F) y la barra transversal (G),
asegurando que las clavijas de madera (3) y los pernos de leva
(2) están completamente insertados en los agujeros apropiados.
Inserte cinco cierres de leva (1) en los agujeros adjuntos a los
dos estantes (D) y barras transversales traseras (F).
Inserte la barra transversal (G), dos estantes (D) y barras
transversales traseras (F) en el armazón lateral izquierdo (B),
luego gire todos los cierres
de leva (1) en sentido horario
hasta que encajen en su
lugar sobre
D
los pernos
de leva (2).
D
Connecting the cross bars and back
cross bars and shelf to right side frame
C
F
G
2
1
1
D
Spikes
Puntos
F
D
G
front
frente
B
B
5
Please contact 1-844-327-8600 for further assistance.
Para obtener asistencia, llama al 1-844-327-8600
Assembly
Ensamblaje
5 Connecting the upper cross bar and top 6 Connecting the top and side frame
□ Place the top (A) and left side frame (B) and right side frame (C)
on top of the assembly.
□ Attach the spring washers (5) and the washers (6) onto the
ends of the bolts (4).
□ Attach two upper cross bars (E) to the top (A) by inserting four
wooden dowers (3) Positioning two upper cross bars (E) using
six 4x40 mm screws (7), then tighten it with a screwdriver.
Conecte la barra transversal superior y
la superficie
□ Tighten all of the bolts (4) with the wrench (8).
Conecte la superficie y el armazón lateral
□ Conecte dos barras transversales superiores (E) a la superficie
(A) mediante la inserción de cuatro clavijas de madera (3)
posicionando dos barras transversales superiores (E) utilizando
seis tornillos 4 x 40 mm, luego lo apriete con un destornillador.
□ Coloque la superficie (A) y el armazón lateral izquierdo (B) y el
armazón lateral derecho (C) por encima del ensamblado.
□ Coloque las arandelas de resorte (5) y las arandelas (6) en
los extremos de los pernos (4).
□ Apriete todos los pernos (4) con la llave (8).
7
E
A
E
3
6
5
4
A
8
6
C
B
Assembly
Ensamblaje
7
8
Installing the strap
□ Insert the 4x16 mm screw (9) with the strap (12) into the top
panel (A), then tighten it with a screwdriver.
□
Instale la correa
□
□ Inserte el tornillo 4 x 16 mm (9) con la correa (12) en el panel
superior (A), luego lo apriete con un destornillador.
Securing the bookcase to the wall
Position the bookcase along the portion of wall where you wish the
bookcase to remain and mark the installation hole for the wall
anchor (11) using a pencil.
Drill a hole for the wall anchor (11) , insert the wall anchor (11) into
the wall , and secure the bookcase to the wall using the 4x38 mm
screw (10).
Asegure el librero en la pared
□
□
Posicione el librero a lo largo de la porción de pared donde desee
usted colocar el librero y marque con un lápiz el agujero de
instalación para la ancla de pared (11).
Perfore un agujero para la ancla de pared (11), inserte la ancla de
pared (11) en la pared, y asegure el librero en la pared utilizando
el tornillo 4 x 38mm (10).
12
11
9
WALL
PARED
10
A
7
Please contact 1-844-327-8600 for further assistance.
Para obtener asistencia, llama al 1-844-327-8600
Questions, problems, missing parts? Before returning to the store call
Customer Service
9 a.m. - 5 p.m., CST, Monday-Friday
1-844-327-8600
¿Preguntas, problemas o piezas faltantes? Antes de regresar a la tienda,
llama al Servicio al Cliente,
de 9 a.m. a 5 p.m., hora estándar del Centro, de Lunes a Viernes
1-844-327-8600
Retain this manual for future use.
Conserva este manual para referencias futuras.