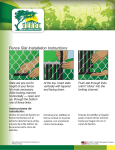
1
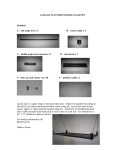
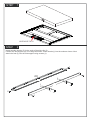
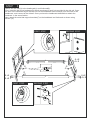
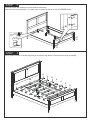
Hawthorne King Bed 48"H
SKU # 6086800120 - Dark Cherry
SKU # 6086800410 - White
SKU # 6086800550 - Oak
SKU # 6086800210 – Black
60 Min.
BEFORE BEGINNING ASSEMBLY, CHECK TO MAKE SURE ALL
PARTS AND HARDWARE ARE ACCOUNTED FOR.
IT IS SUGGESTED THAT YOU SAVE THE CARTON AND PACKING
MATERIAL UNTIL AFTER ASSEMBLY IS COMPLETED. SELECT A CLEAN,
SMOOTH SURFACE TO WORK (SUCH AS CARPET).
THEN, FOLLOW THE EASY STEPS BELOW.
IF PARTS ARE MISSING, PLEASE CALL 1-800-998-7021 FOR INFORMATION.
MADE IN BRAZIL
16 02 06 2
1
6
6
6
6
6
6
6
6
6
6
6
6
3
6
6
5
3
4
5
Part#
1
2
3
4
5
6
Qty
1
1
2
1
2
14
Description
HEADBOARD
FOOTBOARD
RAILS
SLATS SUPPORT
FEET
SLATS
2
Sizes(wxdxh)
83” X 48” X 2 5/8”
83” X 24” X 2 5/8”
80 4/8” X 5 4/8” X 1 7/8”
81 3/4” X 2 3/4” X 3/4”
7 3/4” X 2 3/4” X 3/4”
39 1/4” X 2 3/4” X 3/4”
HARDWARE
8
F
28
G
4
H
D
8
I
E
1
A
B
C
1/4”X3 1/4”
1/8”X1 1/4"
3/8”X1 1/4"
J
2
1/8”X3/4”
4
4
3/8”X 1 1/4”
1/8”X 1 5/8”
2
4
STEP
1
HARDWARE PACK
STEP
2
Insert wooden dowels (C) in the ends of the side rails (3).
Position the slat support (4) on its edge as shown. Insert dowels (I) into the ends as shown. Next
attach the feet (5) into the slat support using screws (J).
C
2X
I
J
J
3
4
J
J
5
C
I
5
STEP
3
Attach the side rails(3) to the headboard(1) and footboard(2):
First, insert the half moon hardware(D) exactly as shown to each hole provided in the side rail. Once
the hole of the hardware aligns with the hole on the headboard insert screw(A) from the back of the
headboard and connect to the siderail. Once you have the headboard attached then attach the
footboard in the same fashion.
Next attach the metal slat support brackets(F) to the headboard and footboard as shown using
screws (G).
FIRST STEP
SECOND STEP
E
A
1
D
D
A
F
E+A
E+A
3
G
G
D
D
GG
F
D
D
G
G
D
D
3
FIRST STEP
1º
A+E
A+E
SECOND STEP
A
E
A
E
2
F
A+E
A+E
STEP
4
Insert the wood slat support(4) to the brackets as shown.
Also insert the wood plugs(H). You may need to gently tap these in with a RUBBER mallet.
H
H
4
H
H
4
H
H
STEP
5
Evenly space out the cross slat supports(6) as shown and attach to the side rails using screws(B).
B
B
B
6
BB
BB
B
6
BB
B
BB
B
BB
B
6
B
6
6
6
B
B
B
6
B
6
6
6
B
6
BB
B
6
BB
6
06


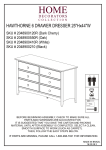
![HomeSullivan 40885B622W(3A)[BED] Instructions / Assembly](http://vs1.manualzilla.com/store/data/006934806_1-7eed6b9cc56669436b551357ae7c9d0a-150x150.png)