1
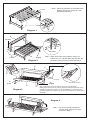
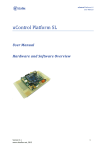
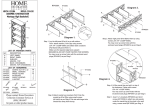
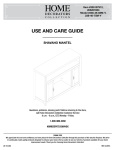
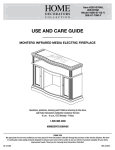
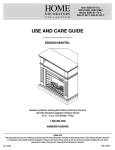
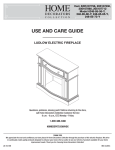
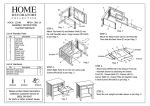
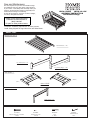
Care and Maintenance
The care required for your new Convertible Lounge
is no different from any other piece of fine furniture
in your home. A soft damp cloth will easily clean your
furniture. Avoid excessive moisture (especially from
condensation forming on cold drinks).
As with all fine furniture, exposure to direct sunlight,
over time, will lighten the finish.
HDC#: 02180
MFG#: 411-9X
ASSEMBLY INSTRUCTION
Convertible Lounge
Please contact Home Decorators
Collection Customer Service at
(800) 240-6047
for parts or other product issues.
CAUTION : Assembly required two or more persons.
Avoid sitting beyond the legs when arms are folded down.
PART LIST
Platform Frame (Part A)
Platform Frame 1 PC.
Leg Frame (Part B)
(LEFT)
Leg Frame (Left) 1 PC.
(RIGHT)
Leg Frame (Right) 1 PC.
Arm (Part C)
(RIGHT)
(LEFT)
Arms 2 PCS.
Back Frame (Part D )
Back Frame 1 PC.
HARDWARE LIST
SC10081
Screws JCA 1/4" x 38 mm
4 PCS.
SC10004
Screws F6 x 5/8"
8 PCS.
RF40216
Pin
4 PCS.
TL40015
Allen Wrench
1 PC.
SC10004
SC10004
Step 1 : Attach leg frames to the underside of the
platform using 8 pcs screws F6 x 5/8"
(SC10004).See Diag 1.
A
B
(Left)
Diagram 1.
D
SC10081
SC10081
B
(Left)
B
(Right)
A
Diagram 2.
Step 2 : Attach back frame to the platfrom using 4 pcs
screws JCA 1/4” x 38 (SC10081).Use the Allen key
provided to secure the connections.See Diag 2.
D
C
C
RF40216
RF40216
B
(Left)
B
(Right)
A
Diagram 3.
RF40216
Step 3 : Attach the arms to the platfrom with 4 pcs pins (RF40216).
Making sure that the arms are correctly positioned with the angled ends facing
upwards, as indicated by stickers on unit “THIS SIDE UP)”. Use the Alen key
provided to tighten pins. Tighten only until the pins sit flush with the wood surface.
See Diag 3.
Diagram 4.
Step 4 : Your unit is now fully assembled.
You may raise and lower the arms
as shown in Diag 4.