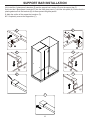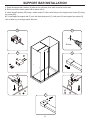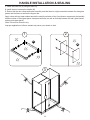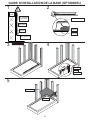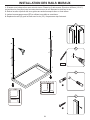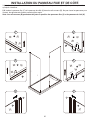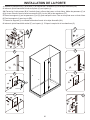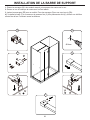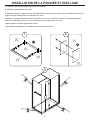
1
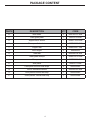
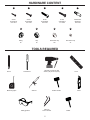
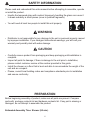
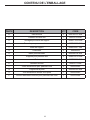
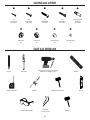
NEVIS
Purchase date: _________________________
OVE 2014-05-09
Product Tracking Reference: ________________________
Questions, problems, missing parts?
Before returning to your retailer, call our customer service department at
1-866-839-2888, 9 a.m. - 5 p.m., EST, Monday - Friday
2800 Etienne Lenoir, Laval
1
Québec H7R 0A3 Canada
TABLE OF CONTENT
PACKAGE CONTENT.......................................................................................................................................... 4
HARDWARE CONTENT...................................................................................................................................... 5
TOOLS REQUIRED............................................................................................................................................. 5
SAFETY INFORMATION..................................................................................................................................... 6
PREPARATION.................................................................................................................................................... 6
SHOWER REVERSIBILITY.................................................................................................................................. 7
BASE INSTALLATION GUIDELINES (OPTIONAL)............................................................................................ 8
WALL TRACKS INSTALLATION.........................................................................................................................9
FIXED PANEL AND SIDE PANEL INSTALLATION...........................................................................................10
DOOR PANEL INSTALLATION........................................................................................................................ 11
SUPPORT BAR INSTALLATION...................................................................................................................... 12
HANDLE INSTALLATION & SEALING.............................................................................................................. 14
CARE AND MAINTENANCE............................................................................................................................. 15
LIMITED 5 YEARS WARRANTY........................................................................................................................ 15
2
PACKAGE CONTENT
D
B
C
F
K
E
J
G
M
H
L
P
O
3
I
PACKAGE CONTENT
PART#
DESCRIPTION
QTY
CODE
B
Wall tracks
2
99STR3107-WM
C
Fixed glass panel
1
99SG3110-WM
D
Support bar’s anchor
1
99SGC1043-WM
E
Glass panel’s brackets
2
99SGC2030-WM
F
Support bar
1
99SGS0017-WM
G
Door hinges
2
99SHI0009
H
Towel bar
1
99SHA3104-WM
I
Glass panel clamps
2
99SGC0012-WM
J
Door panel
1
99SGD0023-WM
K
Side panel
1
99SG3111-WM
L
Fixed panel’s bottom seal strips
2
99SRU0082
M
Door’s decorative handle
1
99SHA1025-WM
O
Door panel’s bottom seal strip
1
99SRU0083
P
Glass panels’ vertical seal strip
1
99SRU0084
4
HARDWARE CONTENT
AA
BB
CC
DD
EE
Screw
ST4x12mm
6+2 extra
Screw
ST4x20mm
2+1 extra
Screw
ST5x30mm
6+2 extra
Screw
ST5x35mm
2+1 extra
Wall Anchor
ø8x30mm
8+2 extra
GG
FF
HH
II
Fitting
6x
Cap
6x
Decorative cap
12x
Decorative cap
4x
TOOLS REQUIRED
Pencil
Drill with ceramic tile bits
ø3mm (1/8”) & 8mm (5/16”)
Screwdriver
Measuring Tape
Silicone
Safety glasses
Level
Rubber mallet
Allen key
2.5mm & 4mm
5
Cutter
Mallet
SAFETY INFORMATION
Please read and understand this entire manual before attempting to assemble, operate
or install the product.
• Handle the tempered glass with caution! Improperly handling the glass can cause it
to break suddenly in small pieces (never in pointed fragments).
• You will need at least two people to install this unit properly.
WARNING
• Distributor is not responsible for any damage to the unit or personal property caused
by improper installation. If you disregard instructional warnings, you will void your
warranty and possibly deal with water damage.
CAUTION
• Carefully remove product from packaging and keep packaging until installation is
complete.
• Inspect all parts for damage; if there is damage to the unit prior to installation,
please contact customer service at the number provided in this guide.
• Install the shower on a floor that is level and able to accommodate the weight of the
unit and an occupant.
• Please, consult local building codes and compliance standards prior to installation
and ensure conformity.
PREPARATION
Before beginning assembly of product, make sure all parts are present. Compare
parts with package contents list and hardware contents list. If any part is missing or
damaged, do not attempt to assemble the product.
Estimated Assembly Time: Shower (60 min).
6
SHOWER REVERSIBILITY
•
This instruction is drawn up for an opening from left to right (see illustration B).
•
For an installation from right to left (see illustration A), use the same instructions, but switch around the
panels: mirror effect.
A
B
7
1
BASE INSTALLATION GUIDELINES (OPTIONAL)
2
Studs
Acrylic or
tile wall
Shower Base
Drywall
Cement
Flange
Silicone
Floor
Shower Base
3
4
Wood shim
Flange
Stud
5
Drywall
Silicone
8
WALL TRACKS INSTALLATION
1. Ensure the base and wall are leveled. Place the 2 metal tracks (B) approximately 29mm (1-3/16") from the
edge of the base to the center of the metal track. Ensure the 2 metal tracks (B) are leveled, then mark the
holes clearly on the wall.
2. Remove tracks and drill pilot holes in the marked locations with a Φ8mm drill bit.
3. Insert the wall anchors (EE) using a rubber mallet until the wall anchors are flush with the wall.
4. Replace and secure the two metal tracks (B) with screws (CC). Do not overtighten.
1
B
2
Φ 8mm
3
761mm
29mm
4
29mm
1472mm
EE
CC
9
FIXED PANEL AND SIDE PANEL INSTALLATION
1-4. Insert the fixed panel’s bottom seal strips (L) at the base of the fixed glass panel (C) and side panel (K). Cut the
surplus part for the clamp, about 13mm from each side.
5-6. Insert the fixed panel (C) and side panel (K) into the metal tracks (B). Do not fully tighten it as further adjustments
may be required.
Note: The wall metal tracks (B) allow you to adjust the position of the fixed glass panel (C) and side panel (K).
2
1
K
K
13
mm
L
L
13
mm
3
4
C
C
mm
13
L
L
mm
13
5
6
B
B
C
K
10
DOOR PANEL INSTALLATION
1. Install fixed glass panel (C) and door panel (J) with the 2 hinges (G). Use a ratchet to strongly tighten the bolts.
2. Insert the door panel’s bottom seal strip (O) into the door panel (J).
3-4. Drill the 2 wall metal tracks (B) on 3 positions (top, middle & bottom) with a ø3mm drill bit. Level the fixed glass
panel (C) and the side panel (K). Then fix it with the fitting (GG), screw (AA) and cap (FF).
5. Place the glass panel clamps (I) into the fixed glass panel (C) and side panel (K), mark the hole’s place and make a
pilot hole in the floor using ø3mm drill bit.
6. Secure the glass panel clamps (I) using screw (BB).
7. Completely install the glass panel clamps (I) using the provided bolts and decorative cap (HH).
8. Insert glass panels’ vertical seal strip (P) into the door panel (J). Cut the surplus part for the hinges (G).
2
1
C
J
G
O
J
4
3
Φ 3mm
GG
FF
AA
6
5
I
I
C
&K
BB
Φ 3mm
7
8
HH
I
J
11
P
G
SUPPORT BAR INSTALLATION
1-2. Install the 2 glass panel’s brackets (E) and the support bar’s anchor (D) onto the support bar (F).
3-4. Insert the 2 glass panel’s brackets (E) into the fixed glass panel (C) and the side panel (K). Ensure that the
plastic gaskets are in the brackets (E) as these protect the glass panels.
5. Mark the outline of the support bar’s anchor (D).
6-7. Completely remove the support bar (F).
1
2
D
F
F
E
E
3
4
5
6
7
12
SUPPORT BAR INSTALLATION
1. Place the support bar’s anchor (D) back on it’s wall mark, then mark its center on the wall.
2. Drill a hole on the center marks with a ø8mm drill bit.
3. Insert the wall anchors (EE) using a rubber mallet. Fix the center fitting on the support bar’s anchor (D) using
the screw (DD).
4-7. Install again the support bar (F) onto the fixed glass panel (C), side panel (K) and support bar anchor (D).
Use an Allen key to strongly tighten the bolts.
1
2
Φ 8mm
3
4
DD
D
EE
5
6
C
7
D
13
K
HANDLE INSTALLATION & SEALING
1. Install the towel bar (H) using an Allen key.
2. Install the door’s decorative handle (M).
3. Ensure that the door closes and opens smoothly, and that there is a tight connection between the side glass
panels and the frame as well as the support bar.
Apply a clear silicone water sealant around the outside perimeter of any fixed shower components (horizontally
between bottom of fixed glass panel, side panel and base, as well as vertically between the wall, glass frames,
and any side glass panel).
Allow 24 hours for silicone to dry.
Improper application of silicone sealant may cause your shower to leak.
2
1
H
M
3
14
CARE AND MAINTENANCE
For the daily maintenance, use a wet cloth and a soft liquid cleaner.
Never use abrasive cleaners containing some acetone, chlorine or strong bleach, scrapers, metallic brushes,
nor other objects or the products which can graze or tarnish surfaces.
Use a ratchet to strongly tighten any bolts used to support the fixed glass panels or doors panel (support bolts
can withstand up to 250 lbf*in of torque).
Check these bolts every 4 months and re-tighten them if necessary.
LIMITED 5 YEARS WARRANTY
This warranty extends only to the original owner lend-user for personal household use only. For commercial
uses, additional limitations may apply.
Distributor warrants your satisfaction with each shower. Should any shower not meet your satisfaction due to
a visual defect, simply return it to your retailer with the original packaging, PRIOR TO INSTALLATION, for a
replacement.
Distributor warrants shower doors to be free from defects in workmanship and materials under normal use and
service for a period of five (5) years.
Distributor warrants acrylic surface against blistering or cracking and chipping resulting from defect in the
acrylic surface material when used under normal conditions and service for a period of five (5) years from
purchase date.
Distributor further warrants the structure of the acrylic shell against loss of water through fiberglass laminate of
the acrylic body as a result of defect in materials and workmanship for a period of five (5) years from purchase
date.
Distributor warrants, shower hardware (handles, hinges, rubber support clips, metal support bars and wall
tracks) to be free from defects in workmanship and materials under normal use and service for a period of one
(1) year.
Distributor will, at its election, repair, replace, or make appropriate adjustment where distributor optional
inspection discloses any such defects occurring in normal usage within the warrantee periods.
Please note distributor is not responsible for installation or removal costs.
Modification of any shower enclosure components may void the warranty. This warranty does not cover any
claim arising from abuse, misuse, negligence, accident, improper installation or operations on the part of the
purchaser. This warranty is void if the distributor product is subject to alterations, or if repairs where done to the
shower unit.
This warranty does not extend to any plumbing or components installed by dealers, installers or by any party
other than distributor.
Implied warranties, including that of merchantability or fitness for a particular purpose, are expressly limited in
duration to the duration of this warranty.
Distributor disclaims any liability for special, incidental or consequential damages.
15
NEVIS
Date de l’achat : _______________________ Numéro de référence du produit : _______________________
Questions, problèmes ou pièces manquantes?
Avant de retourner le produit à votre détaillant, contactez notre service à la
clientèle au 1-866-839-2888, du lundi au vendredi de 9 h 00 à 17 h 00 HNE.
2800 Etienne Lenoir, Laval
OVE 2014-05-09
16
Québec H7R 0A3 Canada
TABLE DES MATIÈRES
CONTENU DE L’EMBALLAGE.........................................................................................................................19
QUINCAILLERIE FOURNIE...............................................................................................................................20
OUTILS REQUIS................................................................................................................................................20
INFORMATION SUR LA SÉCURITÉ.................................................................................................................21
PRÉPARATION....................................................................................................................................................21
CETTE DOUCHE EST RÉVERSIBLE...............................................................................................................22
GUIDE D’INSTALLATION DE LA BASE (OPTIONNEL)....................................................................................23
INSTALLATION DES RAILS MURAUX..............................................................................................................24
INSTALLATION DU PANNEAU FIXE ET DE CÔTÉ...........................................................................................25
INSTALLATION DE LA PORTE........................................................................................................................ 26
INSTALLATION DE LA BARRE DE SUPPORT............................................................................................... 27
INSTALLATION DE LA POIGNÉE ET SCELLAGE........................................................................................ 29
TRAITEMENT ET ENTRETIEN....................................................................................................................... 30
GARANTIE LIMITÉ DE 5 ANS........................................................................................................................ 30
17
CONTENU DE L’EMBALLAGE
D
B
C
F
K
E
J
G
M
H
L
P
O
18
I
CONTENU DE L’EMBALLAGE
PART#
DESCRIPTION
QTY
CODE
B
Rails muraux
2
99STR3107-WM
C
Panneau de verre fixe
1
99SG3110-WM
D
Ancrages pour barre de support
1
99SGC1043-WM
E
Racords pour panneaux de verre
2
99SGC2030-WM
F
Barre de support
1
99SGS0017-WM
G
Charnières
2
99SHI0009
H
Barre porte serviette
1
99SHA3104-WM
I
Supports pour panneau fixe
2
99SGC0012-WM
J
Porte
1
99SGD0023-WM
K
Panneau de côté
1
99SG3111-WM
L
Joints d’étanchéité pour panneaux fixe
2
99SRU0082
M
Poignée de la porte
1
99SHA1025-WM
O
Joint d’étanchéité du bas de la porte
1
99SRU0083
P
Joints d’étanchéité verticaux pour panneaux de verre
1
99SRU0084
19
QUINCAILLERIE
AA
BB
CC
DD
EE
Vis
ST4x12mm
6+2 extra
Vis
ST4x20mm
2+1 extra
Vis
ST5x30mm
6+2 extra
Vis
ST5x35mm
2+1 extra
Ancrage mural
ø8x30mm
8+2 extra
GG
FF
HH
II
Raccords
6x
Capuchon
6x
Clip décoratif
12x
Clip décoratif
4x
OUTILS REQUIS
Crayon
Ruban à mesurer
Perceuse avec forets à céramique
ø3mm (1/8”) & 8mm (5/16”)
Tournevis
Silicone
Lunettes de sécurité
Niveau
Maillet en caoutchouc
Clé Allen
2.5mm & 4mm
20
Exacto
Maillet
INFORMATION SUR LA SÉCURITÉ
S.v.p. lire et comprendre complètement le manuel avant de tenter d’assembler,
d’installer et d’utiliser le produit.
• Manipulez le verre trempé avec précaution sinon il pourrait se briser en petits
morceaux (jamais en fragments pointus).
• 2 personnes sont requises pour installer le produit correctement et sécuritairement.
AVERTISSEMENT
• Le distributeur n’est pas responsable pour les dommages sur le produit ou sur la
personne causés par une installation inadéquate. Si vous ne tenez pas compte
des indications du manuel d’instruction, vous annulerez votre garantie et vous vous
exposerez à des dommages causés par les fuites d’eau.
ATTENTION
• Sortir le produit de son emballage avec soin et le conserver jusqu’à ce que
l’installation soit complétée.
• Inspectez toutes les pièces. S’il y a des dommages sur le produit avant l’installation,
veuillez communiquer avec le service à la clientèle au numéro indiqué dans ce
guide.
• Installez la douche sur un plancher au niveau et capable de supporter le produit et
son utilisateur.
• Veuillez consulter le code du batiment et les normes de conformité avant
l’installation du produit.
PRÉPARATION
Avant de commencer l’installation du produit, soyez assuré d’avoir toutes les pièces.
Comparez les pièces avec les listes fournies. S’il y a des pièces manquantes ou
endommagées, ne tentez pas d’assembler le produit.
Temps de montage estimé: douche (60 min).
21
CETTE DOUCHE EST RÉVERSIBLE
•
Utilisez ces instructions pour une ouverture de la porte de gauche à droite (illustration B).
•
Pour une installation de droite à gauche (illustration A), suivez ces mêmes instructions mais permutez
l’emplacement des panneaux: effet miroir.
A
B
22
GUIDE D’INSTALLATION DE LA BASE (OPTIONNEL)
1
2
Montant
mural
Mur d’acrylique
ou de tuiles
Base de douche
Placoplâtre
Ciment
Bride
Silicone
Plancher
Base de douche
3
4
Cale en bois
Bride
Montant mural
5
Placoplâtre
Silicone
23
INSTALLATION DES RAILS MURAUX
1. S’assurer que la base et les murs soient à niveau. Placez les 2 rails muraux (B) environ à 29mm (1-3/16")
du bord du mur d’acrylique jusqu’au centre des trous sur le rail. Marquez les trous sur le mur.
2. Retirez les rails et percez des trous guides aux endroits marqués avec un foret Φ8mm.
3. Insérez les ancrages muraux (EE) en utilisant un maillet en caoutchouc.
4. Replacez les rails (B), puis les fixer avec les vis (CC). Ne pas serrer trop fortement.
1
B
2
Φ 8mm
3
761mm
29mm
4
29mm
1472mm
EE
CC
24
INSTALLATION DU PANNEAU FIXE ET DE CÔTÉ
1-4. Insérez les joints d’étanchéité des panneaux fixes (L) au bas des panneaux (C) et (K). Coupez le surplus tel
qu’iniqué ci-dessous.
5-6. Insérez le panneau fixe (C) et le panneau de côté (K) dans les rails muraux (B). Ne pas vissez les panneaux pour
l’instant, des ajustements futures pourraient être requis.
Note: Les rails muraux (B) permettent d’ajuster la position des panneaux fixe (C) et du panneau de côté (K).
2
1
K
K
13
mm
L
L
13
mm
3
4
C
C
mm
13
L
L
mm
13
5
6
B
B
C
K
25
INSTALLATION DE LA PORTE
1. Installez le panneau fixe (C) et la porte (J) en utilisant les 2 charnières (G) et les clips décoratifs (HH).
2. Insérez le joint d’étanchéité du bas de la porte (O) sur la porte (J)..
3-4. Percez les 2 rails muraux (B) à 3 endroits (haut, milieu et bas) avec un foret ø3mm. Mettre les panneaux (C) et
(K) à niveau. Ensuite, fixez-les avec les raccords (GG), les vis (AA) et les capuchons (FF).
5. Placez les supports (I) sur les panneaux (C) et (K), puis marquez le trou. Faire un trou pilote avec un foret ø3mm.
6. Fixez les supports (I) avec les vis (BB).
7. Fermez les supports (I) en utilisant les boulons fournis et les clips décoratifs (HH).
8. Insérez le joint d’étanchéité vertical (P) sur la porte (J). COupez le surplus là où les charnières (G).
2
1
C
J
G
O
J
4
3
Φ 3mm
GG
FF
AA
6
5
I
I
C
&K
BB
Φ 3mm
7
8
HH
I
J
26
P
G
INSTALLATION DE LA BARRE DE SUPPORT
1-2. Installez les 2 raccords pour panneaux de verre (E), ainsi que les ancrages pour la barre de support (D)
sur la barre (F).
3-4. Insérez les 2 raccords (E) dans le panneau fixe (C) et le panneau de côté (K). S’assurez que les joints en
plastique sont dans les raccords afin de protéger le verre.
5. Marquez le contour des ancrages de la barre (D).
6-7. Complètement retirez la barre (F).
1
2
D
F
F
E
E
3
4
5
6
7
27
INSTALLATION DE LA BARRE DE SUPPORT
1. Placez les ancrages (D) à leur endroit marqué, puis marquez leur centre sur le mur
2. Percez un trou à la marque du centre avec un foret ø8mm.
3. Insérez les ancrages (EE) avec un maillet. Fixez les ancrages (D) au mur avec les vis (DD)..
4-7. Installez la barre (F) à nouveau sur le panneau fixe (C) et le panneau de côté (K). Utilisez une clé Allen
afin de fixer la bar. Fortement serrez les boulons.
1
2
Φ 8mm
3
4
DD
D
EE
5
6
C
7
D
28
K
INSTALLATION DE LA POIGNÉE ET SCELLAGE
1. Installez la barre porte serviette (H) avec une clé Allen.
2. Installez la poidnée décorative (M).
3. Assurez-vous que la porte se ferme hermétiquement et s’ouvre doucement, et que le châssis et la barre de
support sont étroitement fixés aux panneaux de verre.
Appliquez un scellant étanche à base de silicone sur le contour extérieur de toutes les composantes de la
douche, et verticalement entre le mur, le châssis et tous les panneaux de verre).
Laissez sécher le scellant pendant 24 heures.
Une application inadéquate du scellant pourrait entraîner des fuites.
2
1
H
M
3
29
TRAITEMENT ET ENTRETIEN
Utilisez un chiffon mouillé et un nettoyant liquide doux pour l’entretien quotidien.
N’utilisez jamais de nettoyants abrasifs contenant de l’acétone, du chlore ou du javellisant puissant, et évitez
les grattoirs, les brosses métalliques et tout autre objet ou produit pouvant érafler ou ternir les surfaces.
Utilisez la clé à rochet pour serrer fortement tous boulons faisant partie d’une pièce supportant les panneaux
fixes de verre et les portes. Ces boulons peuvent soutenir jusqu’à 250 lbf*in de tension de serrage.
Vérifiez ces boulons tous les 4 mois et re-serrer les si nécessaire.
GARANTIE LIMITÉ DE 5 ANS
Cette garantie s’applique uniquement au propriétaire original et lorsque le produit est utilisé à des fins
domestiques.
Des restrictions supplémentaires peuvent s’appliquer dans le cas d’un usage commercial.
Le distributeur garantit que chaque douche vous procurera une entière satisfaction.
Si vous n’êtes pas satisfait de votre douche en raison d’un défaut d’ordre esthétique, retournez-la simplement
à votre détaillant dans son emballage original AVANT SON INSTALLATION pour son remplacement.
Le distributeur garantit que les panneaux de douche seront exempts de défauts de matériel et de fabrication,
dans des conditions d’utilisation et d’entretien normales, pour une période de 5 ans.
Le distributeur garantit la surface d’acrylique contre les fissures ou les cloques et contre l’écaillage causé par
un défaut de la surface d’acrylique dans des conditions d’utilisation et d’entretien normales, pour une période
de 5 ans à compter de la date d’achat.
Le distributeur garantit également la structure de la coquille d’acrylique contre les fuites à travers la pellicule
de fibre de verre de la coquille causées par des défauts de matériel et de fabrication, pour une période de 5
ans à compter de la date d’achat.
Le distributeur garantit la quincaillerie de la douche (poignée, charnières, fixations de support en caoutchouc,
barre de support en métal et rails muraux) contre les défauts de fabrication et de matériel dans des conditions
d’utilisation et d’entretien normales, pour une période d’un an.
Le distributeur pourra, à sa discrétion, réparer, remplacer ou ajuster adéquatement le produit, lorsque
l’inspection optionnelle du distributeur révélera la présence de défauts apparaissant dans des conditions
d’utilisation normales durant la période de validité de la garantie.
Notez que le distributeur n’est en aucun cas responsable des frais d’installation et de démontage.
La modification de toute pièce de la douche peut entrainer l’annulation de la garantie. Cette garantie ne couvre
aucune réclamation résultant d’un abus, d’un mauvais usage, d’une négligence, d’un accident, ou d’une
installation ou d’une utilisation inadéquate de la part de l’acheteur. Cette garantie est nulle si le produit fait
l’objet d’altérations, ou si des réparations ont été apportées à la douche.
Cette garantie ne s’applique pas à la plomberie et aux matériels installés par des vendeurs, des installateurs
ou toute autre partie autre que le distributeur.
Les garanties implicites, y compris celles de vente et d’adaptation à un usage particulier, sont expressément
limitées, en termes de durée, à la période de validité de cette garantie.
Le distributeur n’accepte aucune responsabilité quant à des dommages particuliers, accessoires ou indirects.
30