1
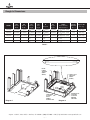
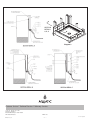
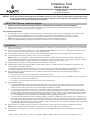
Installation Data
Shower Pans
3232CPAN, 3636CPAN, 4242CPAN, 4834CPAN, 6030CPAN, 6034CPAN
Patent Pending
Fax on Demand # 1166
NOTICE: Please inspect the unit thoroughly before installation to make sure it has not been damaged during transportation. Under
no circumstances should a damaged pan be installed. Neither Aquatic nor the distributor will be responsible for removal
or reinstallation costs should a replacement be necessary.
IMPORTANT! Before installation begins:
a.
READ ALL INSTALLATION INSTRUCTIONS COMPLETELY. IMPROPER INSTALLATION WILL VOID THE WARRANTY.
b. Make sure that walls and floors meet fire safety requirements of local building code and/or FHA/HUD Minimum Property Standards.
c. All dimensions are nominal. The stud opening is +1⁄8" (3mm) - 0.
Pre Installation Requirements:
a. In remodeling, if necessary, add studs at each end to provide a vertical nailing surface for the side nailing flanges of bath fixture product.
b. To avoid obstruction during installation make sure that supply lines, spout pipe and valve plumbing do not project into alcove.
c. Shower pans require a 6” (150mm) diameter floor opening for 2” (50mm) IPS drain fitting connection. [See Chart 1 for location]
NOTE: Be sure floor opening location matches left-hand, right-hand or center bath fixture drain location.
d. Locate rough plumbing/valving according to the manufacturer’s instructions. Do not install trim at this time.
Installation
n
n
Make sure framed-in alcove is of proper size per Aquatic dimensions, (See Chart 1. The stud opening is +1⁄8" (3mm) - 0), square, and plumb;
check floor for levelness.
Place pan in alcove with the front skirt firmly on the floor. The pan must be set level. To check, use a 3’ (915mm) long (minimum) level on
top of the ledge on both ends of pan and on top of dam. [See Diagram 2]
n
After leveling pan, mark each stud (or concrete or block wall) immediately above the back horizontal flange. Remove pan from alcove.
n
Pre-drill and fasten flange above scribe line shown on pan. [See Diagram 2].
NOTE: Fasteners to wood framing - 1” (25mm) galvanized roofing nails or 1” (25mm) pan head screws; to steel studs - drill flanges and
studs with +3⁄16" (5mm) carbide bit and fasten with #10 x 1” (25mm) sheet metal screws with washers; to concrete/block walls use 1” (25mm)
concrete nails with nailing tool or impacter. NOTE: Pre drilling flanges is required to prevent cracking of unit.
n
Apply sanitary drain assembly, per drain manufacturer’s recommendations to the pan.
n
Additional bottom support: Casting plaster/plaster of paris (herein referred as foundation materials), is mandatory for shower pans. The
following applies for foundation materials:
In a bucket, mix foundation material. Place three or four mounds of plaster on the subfloor around but away from drain hole. The mounds
should be placed high enough so that when the pan is set, it will cause the plaster to displace and spread. [See Diagram 2]
Place pan into alcove with front skirt firmly on floor and depress plaster mounds. Make certain that unit is level [See Diagram 2].
The pan must be set level.
n
a. Spot-fasten the four corners of the nailing flanges to studs above line on pan.
b. Nail fasten at each stud through the topside flanges; through back flange, at each stud (concrete; 16” (405mm) on center), working from
both ends toward back center. [See Diagram 2]
c.
As an option, a large head nail may be driven into place above the tiling flange.
Finished Wall Coverings:
n
a. For cultured marble walls - Bring water resistant wall board down to the top of the flange. Apply 100% silicone sealant with mildew
resistant properties between the gypsum board and nailing flange. Apply cultured marble over the gypsum board to the horizontal
surface of the unit, then seal the seams of the cultured marble. [See Diagram 3, Detail A]
b. For ceramic tile with cementitious backer board – Furring strips as thick as nailing flanges are recommended above the unit. Apply
concrete backer board to leave at least a gap of 1⁄4" between the backer board and the horizontal surface of the pan. Apply 100% silicone with mildew resistant properties between the backer board and the horizontal surface of the unit. Apply finished wall tiles, leaving
the valley detail on the pan clear of all materials to allow trapped water to escape. Finishing of other trades should be done in conformance with applicable codes and generally accepted building practices. [See Diagram 3, Detail B]
c.
Door Enclosures: Use Aquatic shower door model for an engineered fit, or refer to other door manufacturer’s installation instructions.
n
For ceramic tile with traditional mortar bed – Apply the waterproof membrane overlapping the flange of the unit 1” min. Apply wire over
the flange to leave a gap of 1⁄4" between the wire and the horizontal surface of the pan. Apply the mortar bed to the second step of the
pan, leaving the third step clear for tile. Apply 100% silicone with mildew resistant properties, leaving the valley detail on the pan clear
of all materials to allow trapped water to escape. Finishing of trades should be done in conformance with applicable codes and generally
accepted building practices. [See Diagram 3, Detail C]
NOTE: Where local codes specify minimum door openings, shower stalls may require swing (not sliding) doors.
n
3232CPAN does not carry the UPC seal and is not approved by some municipal plumbing codes due to inside dimensions. Check local
building codes.
Aquatic • 8101 E. Kaiser Blvd. • Anaheim, CA 92808 • (800) 877-2005 • FAX (714) 998-5340 • www.aquaticbath.com
—1—
Clean-up
CAUTION: DO NOT USE heat, or solvent based cleaning fluids.
NOTE: Do not remove adhered label. Warranty/User Maintenance Label must be left for occupant. (Required by ANSI Z124)
1. To prevent staining and/or blistering: Remove all construction debris before filling product for plumbing inspection. Drain and wipe clean
immediately after the inspection process. Use sponge with warm water and liquid detergent. Do not use abrasive cleaners, such as scouring powders or pads, steel wool, scrapers, sandpapers or anything else that may scratch, mar or dull the finish. Roofing tar or paints may be
removed with turpentine, rubbing alcohol or paint thinner (not lacquer thinner).
2. Plaster may be removed by scraping with the edge of a piece of wood or rigid plastic. Do not use a metal scraper or utensil to remove plaster
or paint from finish.
3. Dulled areas can be restored to a high gloss with white or cream-colored automotive rubbing compound, followed by application of a coat of
good quality white automotive polish (or similar) and buff with a soft cloth. Do not polish or buff on the standing or floor areas of the pan.
4. Remove minor scratches with 600 grit wet/dry sandpaper, followed by Step #3 (above).
5. Major gouges require professional repair.
User Maintenance Instructions
IMPORTANT! Use only recommended cleaners and procedures described herein. Use of other materials and methods may damage
your bath fixture and void the warranty.
n
For normal cleaning: Never use abrasive cleaners such as scouring powders or pads, steel wool, scrapers, sandpaper or anything else that
could scratch or dull the surface of your Aquatic unit. Instead, use warm water and liquid detergents or non-abrasive cleansers, especially
those bathroom cleaners recommended for cleaning fiberglass.
n
n
To restore a scratched or dull unit: Use an automotive polishing compound applied with a clean cotton rag. Rub scratches and dull areas
vigorously. Wipe off residues. Follow with automotive wax treatment described above.
n
To remove adhesive: Try 3-M Natural Cleaner, De-Solv-It® or similar materials. If residues remain, saturate a small, white, cotton rag with nail
polish remover (naphtha or acetone) and rub vigorously until the adhesive dissolves and disappears. These solvents are highly flammable
and must be used sparingly and with caution. Do not smoke or permit others to do so. Make sure all nearby heating devices (including pilot
lights) are extinguished. Do not allow solvent to go down the drain. Make sure not to contact plastic drain grates or other synthetic materials.
n
Rubber Mats: If you use a rubber “anti-skid” mat, make sure to remove it from the unit after each use to avoid harm to the surface finish.
n
Hard Water: Water in certain regions, if not wiped up after bathing/showering, may cause fading of some bath fixture colors. This is a natural
occurrence beyond Aquatic’s control. (See Warranty)
To keep your Aquatic bath fixture sparkling clean: Apply a coat of good quality automotive paste wax or polish and buff to a high shine with a
soft cloth or towel. Repeat every six months for easier cleaning and long lasting protection.
NOTE: DO NOT WAX floor/bottom of unit, which could result in greater risk of slipping and personal injury.
CAUTION: When using any cleaning or polishing materials, make sure to read and follow all package instructions carefully. Wear
rubber gloves at all times and avoid contact with eyes, skin, clothing, rugs and furnishings. Make sure all residues are rinsed
off thoroughly.
Aquatic • 8101 E. Kaiser Blvd. • Anaheim, CA 92808 • (800) 877-2005 • FAX (714) 998-5340 • www.aquaticbath.com
—2—
Rough-In Dimensions
MODEL
OW
Overall
Width
OD
Overall
Depth
OH
Overall
Height
DH
Dam
Height
RI
Rough-In
RC
RoughCenter
DR/DC
Drain Diamerter
Drian Clearance
Fax-OnDemand
Doc. #
Approx. Wt.
lbs. (kg)
3232-CPAN
32" (810mm)
32" (810mm)
7 1⁄16" (180mm)
6" (150mm)
151⁄2" (395mm)
16" (405mm)
31⁄4" / 3⁄8" (80mm) / (10mm)
2101
21lbs. (8kg.)
3636-CPAN
36" (915mm)
36" (915mm)
71⁄16" (180mm)
6" (150mm)
171⁄2" (445mm)
18" (455mm)
31⁄4" / 3⁄8" (80mm) / (10mm)
2102
25lbs. (9kg.)
4242-CPAN
42" (1065mm)
42" (1065mm)
7 ⁄16" (180mm)
6" (150mm)
20 ⁄2" (520mm)
21" (535mm)
3 ⁄4" / ⁄8" (80mm) / (10mm)
2103
33lbs. (13kg.)
4834-CPAN
48" (1220mm)
34" (865mm)
71⁄16" (180mm)
6" (150mm)
161⁄2" (420mm)
24" (610mm)
31⁄4" / 3⁄8" (80mm) / (10mm)
2104
33lbs. (13kg.)
6034-CPAN
60" (1525mm)
34" (865mm)
7 ⁄16" (180mm)
6" (150mm)
16 ⁄2" (420mm)
30" (760mm)
3 ⁄4" / ⁄8" (80mm) / (10mm)
2105
38lbs. (15kg.)
1
1
1
1
1
1
3
3
Chart 1
I M P O RT A NT !
F A ST E N A B OV E L I N E
LEVEL
FRONT
TO BACK
(BOTH
SIDES)
LEVEL LEFT
TO RIGHT
(BOTH
SIDES)
DR
OD
OW
Diagram 1
RI
RC
NAIL
FASTENED
AT EACH
STUD
ABOVE
SCRIBE LINE
EXAMPLE OF
CASTING
PLASTER
MOUND
PATTERN
Diagram 2
Aquatic • 8101 E. Kaiser Blvd. • Anaheim, CA 92808 • (800) 877-2005 • FAX (714) 998-5340 • www.aquaticbath.com
—3—
SECTION
DETAILS
A, B, C
Diagram 3
Customer Service | Technical Services | Warranty Services
1521 No. Cooper, Ste. 500
Arlington, TX 76011
PH: 800-945-2726, 817-801-8300
FAX: 866-544-5353
Printed in U.S.A.
LITID1166
—4—
© 2011 Aquatic