1
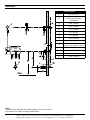
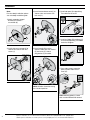
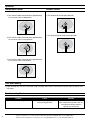
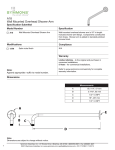
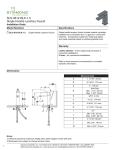
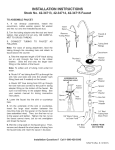
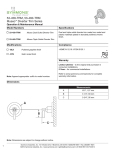
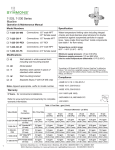
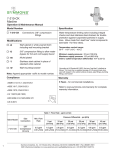
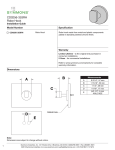
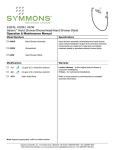
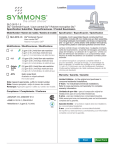
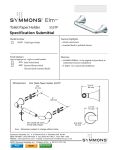
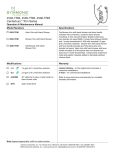
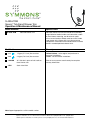
S-4304-TRM
Sereno™ Tub/Hand Shower Trim
Operation & Maintenance Manual
Model Numbers
S-4304-TRM
Specifications
Tub/Hand Shower Trim
Modifications
Warranty
-1.5 1.5 gpm (5.7 L/min) flow restrictor
-2.0 2.0 gpm (7.6 L/min) flow restrictor
-432HSB 30" slide bar in place of wall cradle on
hand shower units
-STN
Tub/hand shower trim with lever handle and secondary
integral diverter handle includes wall connection, cradle
for hand shower mounting, non-diverter tub spout,
in-line vacuum breaker, flexible metal hose and 1 mode
hand shower with 2.5 gpm (9.5 L/min) flow restrictor.
Components made from metal and nonmetallic materials
plated in standard polished chrome finish.
Limited Lifetime - to the original end purchaser in
consumer installations.
5 Years - for commercial installations.
Refer to www.symmons.com/warranty for complete
warranty information.
Satin nickel finish
Note: Append appropriate -suffix to model number.
Symmons Industries, Inc. ■ 31 Brooks Drive ■ Braintree, MA 02184 ■ (800)796-6667 ■ Fax: (800)961-9621
©2014 Symmons Industries, Inc.■ www.symmons.com ■ [email protected] ■ ZV-3072 REV A 09/25/14
Dimensions
Measurements
B
A
E
D
C
H
I
G
K
Floor
F
A
Ø 2 1/4", 57 mm
B
Female 1/2" IPS thread must
be recessed 7/8" from
finished wall
C
5 3/4", 146 mm
D
9 1/4", 235 mm
E
3 1/2", 89 mm
F
32", 813 mm
G
12", 305 mm
H
4 1/2", 114 mm
I
3 1/4", 83 mm
J
(Rough in)
2 3/8" ± 1/2", 60 mm ± 13 mm
K
Ø 2 3/8", 60 mm
L
1/2" NPT
M
1/2", 13 mm
N
8 1/2", 216 mm
J
L
M
N
Notes:
1) All dimensions measured from nominal rough-in (see J as reference).
2) Dimensions are subject to change without notice.
2
Symmons Industries, Inc. ■ 31 Brooks Drive ■ Braintree, MA 02184 ■ (800)796-6667 ■ Fax: (800)961-9621
©2014 Symmons Industries, Inc.■ www.symmons.com ■ [email protected] ■ ZV-3072 REV A 09/25/14
Parts Breakdown
Replacement Parts
C
M
L
B
A
N
P
O
Q
I
G
D
K
J
E
H
F
Item
Description
Part Number
A
T
Vacuum Breaker
60" Hose
EF-104
B
C
Wall Elbow
Flange
T-444-KIT
D
E
F
G
Plug Button
O-ring
Set Screw
Handle
T-251
H
I
Locknut
Dome Cover
T-19/20-PL
J
K
Mounting Screws
Shower Escutcheon
T-249A
L
M
N
O
P
Cradle Mount
Cradle Mounting Screws
Washer
Cradle Arm
Set Screw
T-545
Q
Hand Shower
432W
R
Diverter Handle
T-30M
S
Tub Spout
432TS
Notes:
1) Append -STN to part number for satin nickel finish.
S
2) Append -1.5 or -2.0 to hand shower for low flow.
R
T
Required for Installation
Adjustable wrench
Phillips head screwdriver
Plumber tape
3
Symmons Industries, Inc. ■ 31 Brooks Drive ■ Braintree, MA 02184 ■ (800)796-6667 ■ Fax: (800)961-9621
©2014 Symmons Industries, Inc.■ www.symmons.com ■ [email protected] ■ ZV-3072 REV A 09/25/14
Installation
Note:
For valve body installation, please
see valve body installation guide.
3) Install shower dome cover (I) to
shower valve and secure with
lock nut (H).
5) Install tub spout (S) to pipe fitting.
Turn clockwise to secure.
1
1) Attach secondary integral
diverter (R) to shower
escutcheon (K).
I
1
S
K
H
2
R
6) Install wall elbow (B) and flange (C)
to recessed pipe fitting. Turn elbow
clockwise to tighten.
4) Install handle (G) to valve.
Secure handle with star washer
(E) and screw (F). Attach
plug button (D) to handle.
1
2) Install shower escutcheon (K) to
shower valve. Secure with two
screws (J).
2
2
C
K
B
1
J
G
1
7) Press tab to remove mounting
plate (L2) from cradle mount
cover (L1).
F
E
2
1
D
3
2
L2
L1
2
Notes: Handles should be facing
the 6 o'clock position.
Note: Mounting plate (L2) center
tabs must be horizontal for removal.
4
Symmons Industries, Inc. ■ 31 Brooks Drive ■ Braintree, MA 02184 ■ (800)796-6667 ■ Fax: (800)961-9621
©2014 Symmons Industries, Inc.■ www.symmons.com ■ [email protected] ■ ZV-3072 REV A 09/25/14
Installation
8) Place mounting plate (L2) in
position, mark and drill 1/8" pilot
holes into stud.
9) Install mounting plate (L2).
Secure with two screws (M).
Replace cradle mount cover (L1).
L2
1
1
L2
M
2
2
11) Attach large end of
hand shower hose (T) to
hand shower (Q). Attach small
end of hand shower hose (T)
and gasket to in-line vacuum
breaker (A). Connect
in-line vacuum breaker to
wall elbow (B). Turn clockwise
to tighten.
L2
1
L2
L1
3
Option: Place mounting plate (L2) in
position, mark and drill 3/16" holes
into wall. Install anchors.
Q
2
Note: Mounting plate (L2) center tabs
must be horizontal for
installation.
10) Attach cradle arm (O) and
washer (N) to cradle mount (L).
Secure with screw (P).
3
2
L
1
T
B
3
A
T
1
2
N
O
5
P
Symmons Industries, Inc. ■ 31 Brooks Drive ■ Braintree, MA 02184 ■ (800)796-6667 ■ Fax: (800)961-9621
©2014 Symmons Industries, Inc.■ www.symmons.com ■ [email protected] ■ ZV-3072 REV A 09/25/14
4
Operation
Diverter Control
Temperature Control
1) Turn shower handle counterclockwise approximately
1/4 turn to put valve in cold position.
1) T
urn diverter left for tub spout operation.
2) Turn diverter right for hand shower operation.
2) T
urn shower handle counterclockwise approximately
1/2 turn to put valve in warm position.
3) T
urn shower handle counterclockwise approximately
3/4 turn to put valve in hot position.
Care and Cleaning
1) Clean finished trim area with a soft cloth using mild soap and water or a non-abrasive cleaner and then quickly rinse
with water.
Troubleshooting Chart
6
Problem
Cause
Solution
Finish is spotting.
Elements in water supply may cause
water staining on finish.
Clean finished trim area with a soft
cloth using mild soap and water or a
non-abrasive cleaner and then
quickly rinse with water.
Symmons Industries, Inc. ■ 31 Brooks Drive ■ Braintree, MA 02184 ■ (800)796-6667 ■ Fax: (800)961-9621
©2014 Symmons Industries, Inc.■ www.symmons.com ■ [email protected] ■ ZV-3072 REV A 09/25/14