1
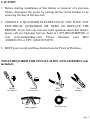
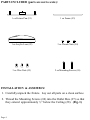
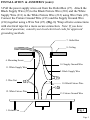
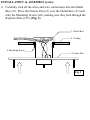
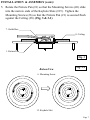
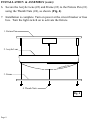
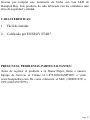
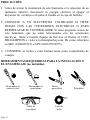
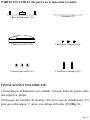
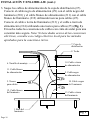
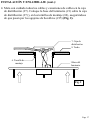
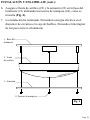
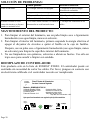
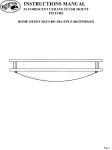
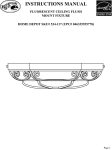
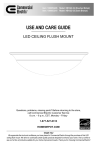
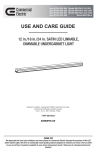
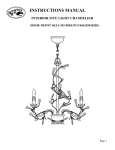
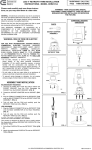
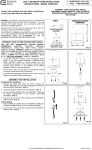
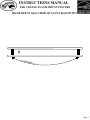
INSTRUCTIONS MANUAL
LED CEILING FLUSH MOUNT FIXTURE
HOME DEPOT SKU# 1000021219 (UPC# 046335974975)
Page 1
Thank you for purchasing this Hampton Bay LED Ceiling Flush Mount
Fixture. This product has been manufactured with the highest standards
of safety and quality.
FEATURES:
1. Easy to install.
2. ENERGY STAR® qualified
QUESTIONS, PROBLEMS, MISSING PARTS:
Before returning to your local Home Depot, please call our Customer
Service Team at 1-855-HD-HAMPTON or visit www.hamptonbay.com.
Please reference your SKU (1000021219) or UPC (046335974975).
Page 2
CAUTION:
1. Before starting installation of this fixture or removal of a previous
fixture, disconnect the power by turning off the circuit breaker or by
removing the fuse at the fuse box.
2. CONSULT A QUALIFIED ELECTRICIAN IF YOU HAVE ANY
ELECTRICAL QUESTIONS OR NEED TO REPLACE THE
DRIVER. If you have any non-electrical questions about this fixture,
please call our Customer Service Team at 1-855-HD-HAMPTON or
visit www.hamptonbay.com. Please reference your SKU
(1000021219) or UPC (046335974975).
3. KEEP your receipt and these Instructions for Proof of Purchase.
TOOLS REQUIRED FOR INSTALLATION AND ASSEMBLY (not
included):
Phillips
screwdriver
Flathead
screwdriver
Safety goggles
Wire
cutters
Wire
strippers
Electrical tape
Page 3
PARTS INCLUDED (parts are not to scale):
1 ea Fixture Pan (#1)
1 ea Frame (#3)
1 ea Acrylic Lens (#2)
3 ea Thumb Nuts (#4)
3 ea Wire Nuts (#5)
2 ea Mounting Screws (#6)
INSTALLATION & ASSEMBLY:
1. Carefully unpack the fixture. Lay out all parts on a clean surface.
2. Thread the Mounting Screws (#6) into the Outlet Box (#7) so that
they extend approximately ½” below the Ceiling (#8). (Fig. 1)
Page 4
INSTALLATION & ASSEMBLY (cont.):
3.Pull the power supply wires out from the Outlet Box (#7). Attach the
Black Supply Wire (#9) to the Black Fixture Wire (#10) and the White
Supply Wire (#11) to the White Fixture Wire (#12) using Wire Nuts (#5).
Connect the Fixture Ground Wire (#13) and the Supply Ground Wire
(#14) together using a Wire Nut (#5). (Fig. 1) Wrap all wire connections
with electrical tape for a more secure connection. Note: If you have
electrical questions, consult your local electrical code for approved
grounding methods.
7. Outlet Box
8. Ceiling
6. Mounting Screw
14. Supply Ground Wire
11. White Supply Wire
9. Black Supply Wire
5. Wire Nut
10. Black Fixture Wire
12. White Fixture Wire
13. Fixture Ground Wire
1. Fixture Pan
Fig. 1
Page 5
INSTALLATION & ASSEMBLY (cont.):
4. Carefully, tuck all the wires and wire connections into the Outlet
Box (#7). Place the Fixture Pan (#1) over the Outlet Box (#7) and
onto the Mounting Screws (#6), making sure they feed through the
Keyhole Slots (#15). (Fig. 2)
7. Outlet Box
8. Ceiling
6. Mounting Screw
1. Fixture Pan
Fig. 2
INSTALLATION & ASSEMBLY (cont.):
5. Rotate the Fixture Pan (#1) so that the Mounting Screws (#6) slide
into the narrow ends of the Keyhole Slots (#15). Tighten the
Mounting Screws (#6) so that the Fixture Pan (#1) is secured flush
against the Ceiling (#8). (Fig. 3 & 3-1)
7. Outlet Box
8. Ceiling
1. Fixture Pan
Fig. 3
Bottom View
Fig. 3-1
6. Mounting Screw
15. Keyhole Slot
Page 7
INSTALLATION & ASSEMBLY (cont.):
6. Secure the Acrylic Lens (#2) and Frame (#3) to the Fixture Pan (#1)
using the Thumb Nuts (#4), as shown. (Fig. 4)
7. Installation is complete. Turn on power at the circuit breaker or fuse
box. Turn the light switch on to activate the fixture.
1. Fixture Pan
2. Acrylic Lens
3. Frame
4. Thumb Nuts
Fig. 4
Page 8
TROUBLESHOOTING:
Light will not turn on.
Fuse blows or circuit breaker
trips when light is turned on.
Possible Cause
Corrective Action
1. Power is off.
1. Make sure power supply is on.
2. Faulty switch.
2. Test or replace switch.
3. Faulty wire connection.
3. Check wiring.
4. Damaged or defective driver.
4. Replace the driver.
1. Crossed wires or power wire is 1. Check wire connections.
grounding out.
PRODUCT MAINTENANCE:
1. To clean the outside of the fixture, use a dry or slightly dampened clean cloth
(use clean water, never a solvent) to wipe the surface of the fixture.
2. To clean the inside of the fixture, first disconnect power to the fixture by
turning off the circuit breaker or by removing the fuse at the fuse box. Next,
use a dry or slightly dampened clean cloth (use clean water, never a solvent) to
wipe the interior surface of the fixture.
3. Do not use any cleaners with chemicals, solvents or harsh abrasives. Use only
a dry soft cloth to dust or wipe carefully.
DRIVER REPLACEMENT:
This product is ENERGY STAR® listed. The driver can be replaced without
having to cut wires. Please contact a qualified electrician if driver replacement is
needed.
CDL
tc
•
Class 2 Power Supply
Dimmable Constant Current
Model: JWM024W-0700-36
Output Current: 700mA
Input Voltage: 120Vac
Max. Output Power: 24W
Input Current: 0.22A
Max. Output Voltage: 36Vdc
Frequency: 60Hz
Max. Case Temp tc=70°C
PF: >0.9
Max. Operating Temp=40°C
Suitable for operation with main supply dimmer
Red: +
Black: -
E362575
RoHS
SELV
Equiv.
L: Black
N: White
Page 9
DIMMING:
Although this product is compatible with most common residential type dimmers,
dimming performance depends on dimmer, dimmer setting (for dimmers with
brightness range adjustments), wiring method, and the number of LED modules.
For best results, set dimmer position at maximum before adjusting to a lower
light level.
Recommended Dimmers (minimum load of four LED modules for optimal
dimming performance):
Leviton Decora – 6631, IPI06
Lutron Skylark – S-603PGH, CTCL-153PDH
Lutron Diva – DVWCL-153PDH,
Lutron Maestro – MACL-153M
Lutron TGCL-153PH
FCC:
This device has been tested and found to comply with the limits for a Class B
digital device, pursuant to part 15 of the FCC Rules. These limits are designed to
provide reasonable protection against harmful interference in a residential
installation. This equipment generates, uses and can radiate radio frequency
energy and, if not installed and used in accordance with the instruction manual,
may cause harmful interference to radio communications. However, there is no
guarantee that interference can be determined by turning the equipment off and
on, the user is encouraged to try to correct the interface by one or more of the
following measures:
• Reorient or relocate the receiving antenna
• Increase the separation between the device and receiver
• Connect the equipment into an outlet on a circuit different from that to which
the receiver is connected
• Consult the dealer or an experienced radio/TV technician for help.
Page10
LIMITED WARRANTY
The manufacturer warrants this lighting fixture to be free from defects in materials and
workmanship for a period of three (3) years from date of purchase. This warranty applies
only to the original consumer purchaser and only to products used in normal use and service.
If this product is found to be defective, the manufacturer’s only obligation, and your
exclusive remedy, is the repair or replacement of the product at the manufacturer’s discretion,
provided that the product has not been damaged through misuse, abuse, accident,
modifications, alterations, neglect or mishandling. This warranty shall not apply to any
product that is found to have been improperly installed, set-up, or used in any way not in
accordance with the instructions supplied with the product. This warranty shall not apply to a
failure of the product as a result of an accident, misuse, abuse, negligence, alteration, or
faulty installation, or any other failure not relating to faulty material or workmanship. This
warranty shall not apply to the finish on any portion of the product, such as surface and/or
weathering, as this is considered normal wear and tear. The manufacturer does not
warrant and specially disclaims any warranty, whether expressed or implied, of fitness
for a particular purpose, other than the warranty contained herein. The manufacturer
specifically disclaims any liability and shall not be liable for any consequential or
incidental loss or damage, including but not limited to any labor/expense costs involved
in the replacement or repair of said product.
Page 11
MANUAL DE INSTRUCCIONES
LUMINARIO DE TECHO CON LUZ LED
HOME DEPOT SKU# 1000021219 (UPC# 046335974975)
Page 12
Gracias por comprar este Luminario de Techo con Luz LED de
Hampton Bay. Este producto ha sido fabricado con los estándares más
altos de seguridad y calidad.
CARACTERÍSTICAS:
1.
Fácil de instalar.
2.
Calificado por ENERGY STAR®.
PREGUNTAS, PROBLEMAS, PARTES FALTANTES:
Antes de regresar el producto a su Home Depot, llame a nuestro
Equipo de Servicio al Cliente al 1-855-HD-HAMPTON o visite
www.hamptonbay.com Dé como referencia el SKU (1000021219) o
UPC (046335974975).
Page 13
PRECAUCIÓN:
1. Antes de iniciar la instalación de este luminario o la remoción de un
luminario anterior, desconecte la energía eléctrica al apagar el
disyuntor de circuitos o al quitar el fusible en la caja de fusibles.
2. CONSULTE A UN ELECTRICISA CALIFICADO SI TIENE
DUDAS CON LAS CONEXIONES ELÉCTRICAS O PARA
REEMPLAZAR EL CONTROLADOR. Si tiene preguntas acerca de
este luminario, que no estén relacionadas con las conexiones
eléctricas, llame a nuestro Equipo de Servicio al Cliente al 1-855HD-HAMPTON o visite www.hamptonbay.com. Dé como referencia
su SKU (1000021219) o UPC (046335974975).
3. CONSERVE su recibo y estas Instrucciones como comprobante de
compra.
HERRAMIENTAS REQUERIDAS PARA LA INSTALACIÓN Y
EL ENSAMBLAJE (no incluidas):
Desarmador de
punta de cruz
Desarmador de
punta plana
Gafas de
seguridad
Page 14
Pinzas
para cables
Cinta de
aislar
Pelacables
PARTES INCLUIDAS (las partes no se muestran a escala):
1 Base del luminario (#1)
1 Armazón (#3)
1 Lente de acrílico (#2)
3 Tuercas de mariposa (#4)
3 Tuercas para cables (#5)
2 Tornillos de montaje (#6)
INSTALACIÓN Y ENSAMBLAJE:
1.Desempaque el luminario con cuidado. Coloque todas las partes sobre
una superficie limpia.
2.Enrosque los tornillos de montaje (#6) en la caja de distribución (#7)
para que sobresalgan ½” aprox. por debajo del techo (#8) (Fig. 1).
Page 15
INSTALACIÓN Y ENSAMBLAJE (cont.):
3. Saque los cables de alimentación de la caja de distribución (#7).
Conecte el cable negro de alimentación (#9) con el cable negro del
luminario (#10) y el cable blanco de alimentación (#11) con el cable
blanco del luminario (#12) utilizando tuercas para cables (#5).
Conecte el cable a tierra del luminario (#13) y el cable a tierra de
alimentación (#14) utilizando una tuerca para cables (#5) (Fig. 1).
Envuelva todas las conexiones de cables con cinta de aislar para una
conexión más segura. Nota: Si tiene dudas acerca de las conexiones
eléctricas, consulte a su código eléctrico local para los métodos
aprobados para la conexión a tierra.
7. Caja de
distribución
8. Techo
6. Tornillo de montaje
11. Cable blanco
de alimentación
5. Tuerca
para cables
12. Cable blanco
del luminario
1. Base del
luminario
Page 16
14. Cable a tierra
de alimentación
9. Cable negro
de alimentación
10. Cable negro
del luminario
13. Cable a tierra
del luminario
Fig. 1
INSTALACIÓN Y ENSAMBLAJE (cont.):
4. Meta con cuidado todos los cables y conexiones de cables en la caja
de distribución (#7). Coloque la base del luminario (#1) sobre la caja
de distribución (#7) y en los tornillos de montaje (#6), asegurándose
de que pasen por los agujeros de bocallave (#15) (Fig. 2).
7. Caja de
distribución
8. Techo
6. Tornillo de
montaje
1.Base del
luminario
Fig. 2
Page 17
INSTALACIÓN Y ENSAMBLAJE (cont.):
5. Gira la base del luminario (#1) en una dirección, de tal manera que los
tornillos de montaje (#6) se deslicen por los extremos estrechos de los
agujeros de bocallave (#15). Apriete los tornillos de montaje (#6) para
que la base del luminario (#1) quede asegurada al ras del techo (#8)
(Fig. 3 y 3-1).
7. Caja de
distribución
8. Techo
1. Base del
luminario
Fig. 3
Vista Desde Abajo
6. Tornillo de montaje
15. Agujeros de bocallave
Fig. 3-1
Page 18
INSTALACIÓN Y ENSAMBLAJE (cont.):
6. Asegure el lente de acrílico (#2) y la armazón (#3) en la base del
luminario (#1) utilizando las tuercas de mariposa (#4), como se
muestra (Fig. 4).
7. La instalación ha terminado. Encienda la energía eléctrica en el
disyuntor de circuitos o la caja de fusibles. Encienda el interruptor
de luz para activar el luminario.
1. Base del
luminario
2. Lente
de acrílico
3. Armazón
4. Tuercas de mariposa
Fig. 4
Page 19
SOLUCIÓN DE PROBLEMAS:
La luz no enciende.
El fusible se funde o el disyuntor de circuitos se dispara
cuando se enciende la luz.
Causa posible
Acción correctiva
1. La energía eléctrica está apagada.
2. Hay una falla en el interruptor.
1. Asegúrese de que la energía
eléctrica esté encendida.
2. Pruebe o cambie el interruptor.
3. Hay una falla en la conexión de los
cables.
4.
Controlador dañado o defectuoso
1. Los cables están cruzados o el cable de
alimentación no está haciendo tierra.
3. Verifique los cables.
4. Reemplazar el controlador
1. Verifique las conexiones de los
cables.
MANTENIMIENTO DEL PRODUCTO:
1. Para limpiar el exterior del luminairo, use un paño limpio seco o ligeramente
humedecido (use agua limpia, nunca un solvente.
2. Para limpiar el interior del luminario, primero suspenda la energía eléctrica al
apagar el disyuntor de circuitos o quitar el fusible en la caja de fusibles.
Después, use un paño seco o ligeramente humedecido (use agua limpia, nunca
un solvente) para limpiar la superficie interior del luminario.
3. No use limpiadores con químicos, solventes o abrasivos fuertes. Use sólo un
trapo seco para sacudir o limpiar con cuidado.
REEMPLAZO DE CONTROLADOR:
Este producto está en la lista de ENERGY STAR®. El controlador puede ser
sustituido sin necesidad de cortar los cables. Por favor, póngase en contacto con
un electricista calificado si el controlador necesita ser reemplazado.
CDL
t
c
Clase 2 Fuente de Alimentacion
Corriente Constante Regulable
•
Modelo: JWM024W-0700-36
Voltaje de Entrada: 120Vac
Corriente de Salida : 700mA
Corriente de Entrada: 0.22A
Salida Máx. de Potencia: 24W
Frecuencia: 60Hz
Salida Máx.de Voltaje: 36Vdc
Factor de Potencia: >0.9
Temp. Máx. del Caso tc=70°C
Temp. Máx. de Funcionamiento =40°C
Apta para funcionamiento con regulador principal de suministro
Rojo: +
Negro: -
E362575
Page 20
RoHS
SELV
Equiv.
L: Negro
N: Blanco
ATENUADORES:
Aunque este producto es compatible con la mayoría de los atenuadores
(“dimmers”) residenciales más comunes, su rendimiento depende del atenuador,
ajuste del ador (en modelos con ajustes para escala de luminosidad), método de
cableado y número de módulos LED. Para mejores resultados, coloque el
regulador en la posición máxima antes de ajustarlo a un nivel de luz más bajo.
Atenuadores recomendados (carga mínima de cuatro módulos LED para un
rendimiento óptimo de regulación):
Leviton Decora – 6631, IPI06
Lutron Skylark – S-603PGH, CTCL-153PDH
Lutron Diva – DVWCL-153PDH
Lutron Maestro – MACL-153M
Lutron TGCL-153PH
FCC:
Este aparato ha sido probado y cumple con los límites para un aparato digital de
Clase B, según la Parte 15 de la normativa FCC. Estos límites están diseñados
para proporcionar una protección razonable contra las interferencias perjudiciales
en una instalación residencial. Este aparato genera, utiliza y puede irradiar
energía de radiofrecuencia y, si no se instala y utiliza de acuerdo con las
instrucciones, puede causar interferencias perjudiciales en las comunicaciones de
radio. Sin embargo, no hay garantía de que la interferencia puede determinarse
encendiéndolo y apagándolo, se recomienda al usuario que intente corregir la
interfaz en una o más de las siguientes medidas:
• Reorientar o reubicar la antena de recepción
• Aumentar la distancia entre el aparato y el receptor
• Conectar el equipo a un enchufe de un circuito diferente de aquel al que está
conectado el receptor
• Consulte al distribuidor o un técnico de radio/televisión para obtener ayuda.
Page 21
GARANTÍA LIMITADA
El fabricante garantiza que este luminario estará libre de defectos en sus materiales y mano
de obra por un periodo de tres (3) años a partir de la fecha de compra. Esta garantía aplica
únicamente al comprador original y a productos bajo uso y servicio normal. Si se encuentra
que este producto está defectuoso, la única obligación del fabricante, y el único recurso que
usted tiene, es la reparación o cambio del producto, a la sola discreción del fabricante,
provisto que el producto no haya sido dañado de alguna manera por medio de mal uso, abuso,
accidente, modificaciones, alteraciones, negligencia o mal manejo. Esta garantía no aplicará a
un producto que se encuentre que haya sido instalado, configurado o usado incorrectamente,
en desacuerdo con las instrucciones provistas con el producto. Esta garantía no aplicará a una
falla del producto como resultado de un accidente, mal uso, abuso, negligencia, alteración,
mala instalación u otra falla que no esté relacionada con material o mano de obra
defectuosos. Esta garantía no aplicará al acabado de alguna parte del producto, como la
superficie y/o desgaste, ya que se consideran uso y desgaste normales. El fabricante no
garantiza y especialmente renuncia a cualquier garantía, ya sea expresa o implícita, de
adaptación para un fin en particular, que no sea la garantía contenida aquí. El
fabricante renuncia específicamente a cualquier responsabilidad y no será responsable
de pérdidas o daños consecuenciales o incidentales, incluyendo de manera enunciativa,
pero no limitativa, costos de mano de obra/gastos relacionados en el cambio o
reparación de dicho producto.
Page 22