1
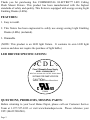
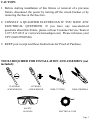
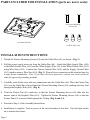
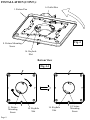
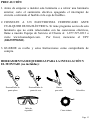
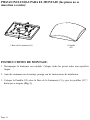
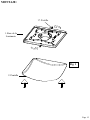
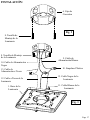
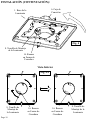
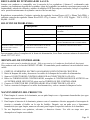
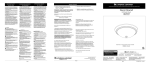
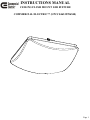
INSTRUCTIONS MANUAL
CEILING FLUSH MOUNT LED FIXTURE
COMMERCIAL ELECTRIC™ (UPC# 046335996540)
Page 1
Thank you for purchasing this COMMERCIAL ELECTRIC™ LED Ceiling
Flush Mount Fixture. This product has been manufactured with the highest
standards of safety and quality. This fixture is equipped with energy-saving Light
Emitting Diodes (LEDs).
FEATURES:
1. Easy to install.
2. This fixture has been engineered to safely use energy-saving Light Emitting
Diodes (LEDs) (included).
3. Dimmable
(NOTE: This product is an LED light fixture. It contains its own LED light
sources and does not require the purchase of light bulbs.)
LED DRIVER SPECIFICATIONS:
CDL
Class 2 Dimmable Power Supply
MODEL: XPSDKS340FM11Y
INPUT: AC 120V 60Hz 15W OUTPUT: DC 38V 340mA
SUITABLE FOR DAMP LOCATION
CAUTION: Risk of Electric Shock
E358430
QUESTIONS, PROBLEMS, MISSING PARTS:
Before returning to your local Home Depot, please call our Customer Service
Team at 1-877-527-0313 or visit www.homedepot.com. Please reference your
UPC (046335996540).
Page 2
CAUTION:
1. Before starting installation of this fixture or removal of a previous
fixture, disconnect the power by turning off the circuit breaker or by
removing the fuse at the fuse box.
2. CONSULT A QUALIFIED ELECTRICIAN IF YOU HAVE ANY
ELECTRICAL QUESTIONS. If you have any non-electrical
questions about this fixture, please call our Customer Service Team at
1-877-527-0313 or visit www.homedepot.com. Please reference your
UPC (046335996540).
3. KEEP your receipt and these Instructions for Proof of Purchase.
TOOLS REQUIRED FOR INSTALLATION AND ASSEMBLY (not
included):
FLATHEAD
SCREWDRIVER
#2 PHILIPS
SCREWDRIVER
SAFETY
GOOGLES
WIRE CUTTERS
WIRE STRIPPERS
ELECTRICAL TAPE
Page 3
PARTS INCLUDED FOR ASSEMBLY (parts are not to scale):
1 ea Fixture Pan (#1)
1 ea Shade (#2)
ASSEMBLY INSTRUCTIONS:
1. Carefully unpack the fixture. Lay out all parts on a clean surface.
2. Before continuing Assembly, please proceed to the Installation Instructions.
3. Place the Shade (#2) on the Fixture Pan (#1) and turn the Latches(#17) until secure.
(Fig. 1)
Page 4
ASSEMBLY:
17. Latch
1. Fixture
Pan
Fig. 1
2. Shade
Page 5
PARTS INCLUDED FOR INSTALLATION (parts are not to scale):
2 ea Fixture Mounting
Screws (#8)
1 ea Fixture Pan (#1)
3 ea Wire Nuts (#10)
INSTALLATION INSTRUCTIONS:
1. Thread the Fixture Mounting Screws (#8) onto the Outlet Box (#6), as shown. (Fig. 2)
2. Pull the power supply wires out from the Outlet Box (#6). Attach the Black Supply Wire (#14)
to the Black Fixture Wire (#15) and the White Supply Wire (#9) to the White Fixture Wire (#11)
using Wire Nuts (#10). Connect the Fixture Ground Wire (#12) and the Supply Ground Wire
(#13) together using a Wire Nut (#10). (Fig. 3) Wrap all wire connections with electrical tape for
a more secure connection. Note: If you have electrical questions, consult your local electrical
code for approved grounding methods.
3. Carefully, tuck all the wires and wire connections into the Outlet Box (#6). Place the Fixture Pan
(#1) over the Outlet Box (#6) and onto the Fixture Mounting Screws (#8), making sure they feed
through the Keyhole Slots (#16). (Fig. 4)
4. Twist the Fixture Pan (#1) clockwise, so that the Fixture Mounting Screws (#8) slide into the
narrow ends of the Keyhole Slots (#16). Tighten the Fixture Mounting Screws (#8) so that the
Fixture Pan (#1) is secured flush against the Ceiling. (Fig. 4 and 4-1)
5. Proceed to Step 3 of the Assembly Instructions.
6. Installation is complete. Turn on power at the circuit breaker or fuse box. Turn the light switch
on to activate the fixture.
Page 6
INSTALLATION:
6. Outlet Box
Fig. 2
8. Fixture Mounting
Screw
8. Fixture Mounting
Screw
9. White Supply Wire
14. Black Supply Wire
13. Supply Ground Wire
12. Fixture Ground Wire
10. Wire Nut
11. White Fixture Wire
15. Black Fixture Wire
1. Fixture Pan
Fig. 3
Page 7
INSTALLATION (CONT.):
6. Outlet Box
1. Fixture Pan
Fig. 4
8. Fixture Mounting
Screw
16. Keyhole
Slot
Bottom View
Fig. 4-1
8. Fixture
Mounting
Screw
Page 8
16. Keyhole
Slot
16. Keyhole
Slot
8. Fixture
Mounting
Screw
DIMMING:
Although this product is compatible with most common residential type dimmers, dimming performance
varies from dimmer to dimmer. In addition, dimmer settings (for dimmers with brightness range
adjustments) and the number of LED modules installed on the circuit can affect dimming performance.
Recommended Dimmers: Any variation of Leviton Decora – 6631, and Illuma Tech IPI06; and any variation
of the Lutron Dimmers Diva DVCL-153P, Contour CTCL-153P, and Toggler -TGCL-153P and Skylark –
S-603P.
TROUBLESHOOTING:
Light will not turn on.
Fuse blows or circuit breaker
trips when light is turned on.
Possible Cause
Corrective Action
1. Power is off.
1. M ake sure power supply is on.
2. Faulty switch.
2. Test or replace switch.
3. Faulty wire connection.
3. Check wiring.
4. Driver malfunction.
4. Replace driver. See "DRIVER
REPLACEM ENT" section.
1. Crossed wires or power wire is grounding 1. Check wire connections.
out.
For driver replacement questions please call our Customer Service Team at 1-877-527-0313.
DRIVER REPLACEMENT:
(Not necessary for initial installation – only required if the driver has malfunctioned.)
This product is ENERGY STAR® listed. The driver can be replaced without having to cut wires.
1.
2.
3.
4.
DISCONNECT POWER AT THE CIRCUIT BREAKER.
Remove the fixture from the ceiling and disconnect its wires from the power supply wires.
Separate the LED DRIVER CONNECTOR from the LED BOARD CONNECTOR.
Remove the DRIVER SCREWS and replace the OLD LED DRIVER with the NEW LED DRIVER,
securing it in place using DRIVER SCREWS.
5. Connect the LED DRIVER CONNECTOR to LED BOARD CONNECTOR.
6. Reconnect the fixture to the power supply wires and mount the fixture back onto the ceiling.
PRODUCT MAINTENANCE:
1. To clean the outside of the fixture, use a dry or slightly dampened clean cloth (use clean water, never a
solvent) to wipe the surface of the fixture.
2. To clean the inside of the fixture, first disconnect power to the fixture by turning off the circuit breaker
or by removing the fuse at the fuse box. Next, use a dry or slightly dampened clean cloth (use clean
water, never a solvent) to wipe the interior surface of the fixture.
3. Do not use any cleaners with chemicals, solvents or harsh abrasives. Use only a dry soft cloth to dust or
wipe carefully.
Page 9
FCC COMPLIANCE:
This device complies with part 15 of the FCC Rules. Operation is subject to the following two conditions:
1. This device may not cause harmful interference, and
2. This device must accept any interference received, including interference that may cause undesired
operation.
NOTE: This equipment has been tested and found to comply with the limits for a Class B digital device,
pursuant to Part 15 of the FCC Rules. These limits are designed to provide reasonable protection against
harmful interference in a residential installation. This equipment generates, uses and can radiate radio
frequency energy and, if not installed and used in accordance with the instructions, may cause harmful
interference to radio communications. However, there is no guarantee that interference will not occur in a
particular installation. If this equipment does cause harmful interference to radio or television reception,
which can be determined by turning the equipment off and on, the user is encouraged to try to correct the
interference by one or more of the following measures:
•
•
•
•
•
Reorient or relocate the receiver antenna.
Increase the separation between the equipment and receiver.
Install the product onto on a circuit different from that to which the receiver is connected.
Consult with the dealer or an experienced radio/TV technician for help.
CAUTION: Any changes made to the electronics circuit will void this equipment’s compliance with Part
15 of the FCC Rules and should not be operated.
LIMITED WARRANTY
The manufacturer warrants this lighting fixture to be free from defects in materials and workmanship for a
period of five (5) years from date of purchase. This warranty applies only to the original consumer
purchaser and only to products used in normal use and service. If this product is found to be defective, the
manufacturer’s only obligation, and your exclusive remedy, is the repair or replacement of the product at the
manufacturer’s discretion, provided that the product has not been damaged through misuse, abuse, accident,
modifications, alterations, neglect or mishandling. This warranty shall not apply to any product that is found
to have been improperly installed, set-up, or used in any way not in accordance with the instructions
supplied with the product. This warranty shall not apply to a failure of the product as a result of an accident,
misuse, abuse, negligence, alteration, or faulty installation, or any other failure not relating to faulty material
or workmanship. This warranty shall not apply to the finish on any portion of the product, such as surface
and/or weathering, as this is considered normal wear and tear. The manufacturer does not warrant and
specially disclaims any warranty, whether expressed or implied, of fitness for a particular purpose,
other than the warranty contained herein. The manufacturer specifically disclaims any liability and
shall not be liable for any consequential or incidental loss or damage, including but not limited to any
labor/expense costs involved in the replacement or repair of said product.
Page 10
MANUAL DE INSTRUCCIONES
LUMINARIA DE MONTAJE A RAS DEL TECHO CON LED
COMMERCIAL ELECTRIC™ (UPC# 046335996540)
Page 11
Gracias por comprar esta luminaria de montaje a ras del techo con LED
de COMMERCIAL ELECTRIC™. Este producto ha sido fabricado
siguiendo las normas más estrictas en materia de seguridad y calidad.
Este luminario está equipado con Diodos Emisores de Luz (LEDs) que
ahorran energía.
CARACTERÍSTICAS:
1. Fácil de instalar.
2. Este luminario ha sido diseñado para usar de manera segura Diodos
Emisores de Luz (LEDs) que ahorran energía (incluidos).
3. Luz regulable.
NOTA: Este producto es un accesorio de iluminación con LED.
Contiene sus propias luz de LED y no requiere la compra de bombillas.
ESPECIFICACIONES DE FUENTE DE ALIMENTACIÓN:
CDL
Clase 2 Fuente de Alimentación
Regulable
MODELO: XPSDKS340FM11Y
ENTRADA: AC 120V 60Hz 15W POTENCIA: DC 38V 340mA
APTO PARA LUGARES HÚMEDOS
PRECAUCIÓN: Riesgo de descarga eléctrica
E358430
PREGUNTAS, PROBLEMAS, PIEZAS FALTANTES:
Antes de devolver el producto a su Home Depot, llame a nuestro Equipo
de Servicio al Cliente al 1-877-527-0313 o visite www.homedepot.com.
Por favor, mencione el UPC (046335996540).
Page 12
PRECAUCIÓN:
1. Antes de empezar a instalar esta luminaria o a retirar una luminaria
anterior, corte el suministro eléctrico apagando el interruptor de
circuito o retirando el fusible en la caja de fusibles.
2. CONSULTE A UN ELECTRICISTA CERTIFICADO ANTE
CUALQUIER DUDA ELÉCTRICA. Si tiene preguntas acerca de esta
luminaria que no estén relacionadas con las conexiones eléctricas,
llame a nuestro Equipo de Servicio al Cliente al 1-877-527-0313 o
visite www.homedepot.com.
Por favor, mencione el UPC
(046335996540).
3. GUARDE su recibo y estas Instrucciones como comprobante de
compra.
HERRAMIENTAS REQUERIDAS PARA LA INSTALACIÓN Y
EL MONTAJE (no incluidas):
Destornillador de
punta plana
Destornillador de
punta de cruz
Gafas de
seguridad
Pinzas
para cable
Pelacables
Cinta aislante
Page 13
PIEZAS INCLUIDAS PARA EL MONTAJE (las piezas no se
muestran a escala):
1 Base de la Luminaria (#1)
1 Pantalla
(#2)
INSTRUCCIONES DE MONTAJE:
1. Desempaque la luminaria con cuidado. Coloque todas las piezas sobre una superficie
limpia.
2. Antes de continuar con el montaje, prosiga con las Instrucciones de instalación.
3. Coloque la Pantalla (#2) sobre la Base de la Luminaria (#1) y gire los pestillos (#17)
hasta que se asegure. (Fig. 1)
Page 14
MONTAJE:
17. Pestillo
1. Base de la
Luminaria
Fig. 1
2. Pantalla
Page 15
PIEZAS INCLUIDAS PARA LA INSTALACIÓN (las piezas no se
muestran a escala):
2 Tornillos de Montaje de
la Luminaria (#8)
1 Base de la Luminaria (#1)
3 Empalmes Plásticos (#10)
INSTRUCCIONES DE INSTALACIÓN:
1. Inserte los Tornillos de Montaje de la Luminaria (#8) en la Caja de Conexión (#6) como se
muestra. (Fig. 2)
2. Saque los cables de alimentación eléctrica de la Caja de Conexión (#6). Conecte el Cable de
Alimentación Negro (#14) al Cable Negro de la Luminaria (#15) y el Cable de Alimentación
Blanco (#9) al Cable Blanco de la Luminaria (#11) usando los Empalmes Plásticos (#10).
Conecte el Cable a Tierra de la Luminaria (#12) con el Cable de Alimentación a Tierra (#13)
usando un Empalme Plástico (#10). (Fig. 3) Cubra todas las conexiones de cables con cinta
aislante para una conexión más segura. Nota: Si tiene dudas eléctricas, consulte su código
eléctrico local para los métodos aprobados de conexión a tierra.
3. Coloque con cuidado todos los cables y las conexiones de cables en la Caja de Conexión (#6).
Coloque la Base de la Luminaria (#1) sobre la Caja de Conexión (#6) e insértela en los Tornillos
de Montaje de la Luminaria (#8), asegurándose de que pasen por las Ranuras en Forma de
Cerradura (#16). (Fig. 4)
4. Gire la Base de la Luminaria (#1) en el sentido de las agujas del reloj de modo que los Tornillos
de Montaje de la Luminaria (#8) se deslicen por los extremos estrechos de las Ranuras en Forma
de Cerradura (#16). Apriete los Tornillos de Montaje de la Luminaria (#8) a fin de que la Base de
la Luminaria (#1) quede asegurada a ras del Techo. (Fig. 4 y 4-1)
5. Continúe con el Paso 3 de las Instrucciones de Montaje.
6. La instalación ha terminado. Restablezca el suministro eléctrico en el interruptor de circuito o la
caja de fusibles. Encienda el interruptor de luz para prender la luminaria..
Page 16
INSTALACIÓN:
6. Caja de
Conexión
Fig. 2
8. Tornillo de
Montaje de la
Luminaria
8. Tornillo de Montaje
de la Luminaria
14. Cable de Alimentación
Negro
13. Cable de
Alimentación a Tierra
12. Cable a Tierra de la
Luminaria
1. Base de la
Luminaria
9. Cable de
Alimentación Blanco
10. Empalme Plástico
15. Cable Negro de la
Luminaria
11. Cable Blanco de la
Luminaria
Fig. 3
Page 17
INSTALACIÓN (CONTINUACIÓN):
6. Caja de
Conexión
1. Base de la
Luminaria
Fig. 4
8. Tornillo de Montaje
de la Luminaria
16. Ranura
en Forma de
Cerradura
Vista Inferior
Fig. 4-1
8. Tornillo de
Montaje de
la Luminaria
Page 18
16. Ranura
en Forma de
Cerradura
16. Ranura
en Forma de
Cerradura
8. Tornillo de
Montaje de la
Luminaria
REGULADOR DE INTENSIDAD DE LA LUZ:
Aunque este producto es compatible con la mayoría de los reguladores (“dimmers”) residenciales más
comunes, su rendimiento depende del regulador, ajuste del regulador (en modelos con ajustes para escala de
luminosidad), método de cableado y número de módulos LED. Para mejores resultados, coloque el regulador
en la posición máxima antes de ajustarlo a un nivel de luz más bajo.
Reguladores recomendados: Cualquier variación de regulador Leviton Decora -6631 y Illuma Tech IPI06; y
cualquier variación de regulador Lutron Diva-DVCL-153p, Contour – CTCL-153P, Toggler – TGCL-153P, y
Skylark –S-603P.
SOLUCIÓN DE PROBLEMAS:
La luz no se prende.
El fusible se funde o el interruptor
de circuito salta cuando se
enciende la luz.
Causa posible
Medida correctiva
1. El suministro eléctrico está apagado.
1. Asegúrese de que el suministro eléctrico esté
encendido.
2. Hay una falla en el interruptor.
2. Controle o cambie el interruptor.
3. Hay una falla en la conexión de los cables.
3. Controle el cable.
4. La fuente de alimentación falló.
4. Reemplacé la fuente de alimentación. Vea la
sección “REEMPLAZO DE CONTROLADOR”
1. Los cables están cruzados o el cable de
alimentación no está haciendo tierra.
1. Controle las conexiones de los cables.
Para preguntas sobre el reemplazo de la fuente de alimentación, favor llame a nuestro número de atención al
cliente 1-877-527-0313.
REEMPLAZO DE CONTROLADOR:
(No es necesario para la instalación inicial - Sólo es necesario si el conductor ha dejado de funcionar)
Este producto esta en la lista de ENERGY STAR®. El controlador puede cambiarse sin necesidad de cortar
cables.
1.
2.
3.
4.
CORTE EL SUMINISTRO ELCTRICO APAGANDO EL DISYUNTOR DE CIRCUITOS.
Retire la lámpara del techo y desconecte los cables de la lámpara de los cables de alimentación.
Separe el CONECTOR DEL CONTROLADOR LED del CONECTOR DE LA PLACA.
Retire los TORNILLOS DEL CONTROLADOR, reemplace el CONTROLADOR LED ANTIGUO con
el CONTROLADOR LED NUEVO sujete con los TORNILLOS DEL CONTROLADOR.
5. Conecte el CONECTOR DEL CONTROLADOR LED al CONECTOR DE LA PLACA.
6. Vuelva a conectar la lámpara a los cables de alimentación y vuelva a montar la lámpara al techo.
MANTENIMIENTO DEL PRODUCTO:
1. Para limpiar el exterior de la luminaria, use un paño limpio seco o ligeramente humedecido (use agua
limpia, nunca un solvente).
2. Para limpiar el interior de la luminaria, primero corte el suministro eléctrico apagando el interruptor de
circuito o retirando el fusible en la caja de fusibles. Después, use un paño seco o ligeramente
humedecido (use agua limpia, nunca un solvente) para limpiar la superficie interior de la luminaria.
3. No use limpiadores con químicos, solventes o abrasivos fuertes. Use sólo un trapo seco para
desempolvar o limpiar con cuidado.
Page 19
CONFORMIDAD CON LA FCC:
Este aparato cumple con la parte 15 de las normas FCC. La operación está sujeta a las siguientes dos
condiciones:
1. Este dispositivo no puede causar interferencia dañina, y
2. Este dispositivo debe aceptar cualquier interferencia recibida, incluidas las interferencias que puedan
provocar un funcionamiento no deseado.
NOTA: Este equipo ha sido probado y se ha encontrado que cumple con los límites para un dispositivo
digital de la Clase B de conformidad con la Parte 15 de las Reglas de la FCC. Estos límites están diseñados
para proveer protección razonable contra interferencia dañina en una instalación residencial. Este equipo
genera, usa y puede emitir energía de frecuencia de radio y, si no es instalado y usado de acuerdo con las
instrucciones, puede causar interferencia dañina a las comunicaciones de radio. Sin embargo, no existe
garantía de que no ocurrirá interferencia en una instalación en particular. Si este equipo causa interferencia
dañina a la recepción de radio o televisión, la cual se puede determinar al apagar y encender el equipo,
pedimos al usuario que intente corregir la interferencia por medio de una o más de las siguientes medidas:
• Reorientar o reubicar la antena receptora.
• Incrementar la separación entre el equipo y el receptor.
• Conectar el equipo a un enchufe que se encuentre dentro de un circuito diferente a donde está
conectado el receptor.
• Consultar a su distribuidor o un técnico de radio/TV especializado para obtener ayuda.
• PRECAUCIÓN: Cualquier cambio hecho al circuito electrónico anulará el cumplimiento de este
equipo con la Parte 15 de las Reglas de la FCC y no debe ser operado.
GARANTÍA LIMITADA
El fabricante garantiza esta luminaria contra defectos en sus materiales y mano de obra por un plazo de
cinco (5) años a partir de la fecha de compra. Esta garantía aplica únicamente al comprador original y a
productos bajo uso y servicio normal. Si encuentra una falla en este producto, la única obligación del
fabricante, y el único recurso que usted tiene como comprador, es la reparación o el cambio del producto, a
exclusiva discreción del fabricante, siempre y cuando el producto no haya sido dañado como resultado de su
mal uso, accidente, modificaciones, alteraciones, negligencia o mal cuidado. Esta garantía no aplicará al
producto que haya sido instalado, configurado o usado incorrectamente, en desacuerdo con las instrucciones
provistas con el producto. Esta garantía no aplicará a ninguna falla del producto ocasionada por un accidente,
mal uso, negligencia, alteración, mala instalación u otra falla que no esté relacionada con material o mano de
obra defectuosos. Esta garantía no aplicará al acabado de ninguna parte del producto, como la superficie y/o
desgaste, ya que se consideran uso y desgaste normales. El fabricante no garantiza y niega
específicamente cualquier garantía, ya sea expresa o implícita, de la capacidad para un fin en
particular que no sea la garantía incluida aquí. El fabricante renuncia específicamente a cualquier
responsabilidad y no se responsabiliza por ningún tipo de pérdida o daño incidental o indirecto,
incluyendo sin carácter limitativo, costos de mano de obra/gastos relacionados en el cambio o
reparación de dicho producto.
Page 20