1
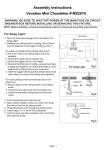
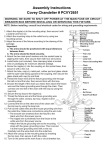
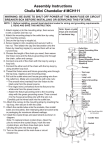
Assembly Instructions
Mallow Pierced Pendant # PXS211
WARNING: BE SURE TO SHUT OFF POWER AT THE MAIN FUSE OR CIRCUIT
BREAKER BOX BEFORE INSTALLING OR SERVICING THIS FIXTURE.
NOTE: 1. Before installing, consult local electrical codes for wiring and grounding requirements.
2. READ AND SAVE THIS INSTRUCTION.
For Swag Light:
Ceiling Hook
1. Open the hardware package which is marked "For
Swag Light".
2. Installing two ceiling hooks on ceiling. (One of them
must be fastened on the edge of ceiling as Fig.1)
For plaster or plaster board ceilings (See Fig.2)
a. Drill a 5/8" hole in the ceiling where it is to be
installed.
b. Insert the nipple into the ceiling hook.
c. Secure the toggle bolt onto the nipple.
d. Measure the thickness of ceiling, squeeze two flaps
of toggle bolt together, and adjust the length (L) from
toggle bolt to ceiling hook as you measured.
e. Insert the toggle bolt through the drilled hole until the
ceiling hook touches ceiling, then secure the ceiling
hook tightenly.
For wood ceilings (minimum thickness size is 3/4")
(See Fig.3)
a. Select a place on the ceiling where a wood beam
exists.
b. Insert the dry wall screw into the ceiling hook.
c. Screw the assembled ceiling hook into the wood
beam.
3. Thread the cord and fixture grounding wire through
the "C" spider of the shade, attach the nipple of the
socket to the "C " spider and secure it with the loop.
(See the illustration as shown in "For Pendant" page.)
4. Cut the fixture grounding wire near the loop.
5. Take a certain length of chain you need, then hang
the links of chain to the ceiling hooks.
6. Thread the cord through the ceiling hooks.
7. Insert the plug into wall receptacle, then control the
lamp with the switch.
Page 1
Switch
Plug
For Swag Light
Ceiling
L
Fig.1
Toggle Bolt
Nipple
Ceiling Hook
Fig.2
Dry Wall Screw
Ceiling Hook
Fig.3
For Pendant:
1. Open the hardware package which marked "For Pendant".
2. Thread two screws through the mounting strap, then secure
them with two lock nuts. Adjust the length of the screws if
necessary.
3. Attach the mounting strap to the outlet box by using two
mounting screws.
4. Thread the cord and fixture grounding wire through the
"C" spider of the shade, attach the nipple of the socket to
the "C" spider and secure it with the loop.
5. Take one loop lock, twist the locking tube open, then hook
onto the loop and onto one end of the chain. Close back
the locking tube of the loop lock.
6. Choose the length of the chain you need, then take another
loop lock, twist the locking tube open, hook onto top end of
the chain and the top loop. Close back the locking tube of
the loop lock.
7. Weave the cord and the fixture grounding wire through the
chain and the canopy.
8. Measure about 8" of the cord (A) from the top of the
canopy, then cut off the unnecessary cord.
9. Slit the cord apart into two wires (C), about 4" from the
top of the cord. Then use a knife to peel off the insulation
of the two wires at about 5/8" length(B) from the top of
the wires to expose the copper for wiring. (See Fig.4)
10. Pull out the outlet wires and house grounding wire from
the outlet box. Make wire connections with wire nuts:
---The smooth wire (marked) from the fixture to the
black wire from the power source.
---The ridged wire (unmarked) from the fixture to the
white wire from the power source.
---Attach the fixture grounding wire to the mounting
strap with the green grounding screw. Then connect
it to the house grounding wire with the wire nut.
Carefully put the wires back into the outlet box.
11. Attach the canopy to the mounting strap by inserting the
screws, then secure it with two bolt nuts.
12. Carefully pull the inner shade downward in place from
the outer shade.
13. Install a bulb (not included). Note relamping label at socket
or packaging area for maximum allowed wattage.
14. Turn on the power at the main fuse or circuit breaker box.
Outlet Box
House Grounding
Wire
Wire Nut
Screw
Mounting Strap
Green Grounding
Screw
Lock Nut
Mounting Screw
Fixture Grounding
Wire
Canopy
Bolt Nut
Top Loop
Locking Tube
Chain
Cord
Loop Lock
Loop
"C" Spider
Outer Shade
Inner Shade
Nipple
Socket
B (5/8")
C (4")
A (8")
Smooth Wire
Ridged Wire
Cord
Canopy
Fig.4
Page 2