Transcript
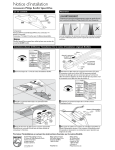
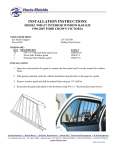
Eco Lighting LED Door Bracket Retrofit Kit Installation Instructions
Installation instructions for converting a 2’ x 4’ recessed troffer lensed fluorescent luminaire to LED
WARNING! - Risk of fire or electric shock. Luminaire wiring and electrical parts may be damaged when
drilling for installation of LED retrofit kit. Check for enclosed wiring and components.
WARNING! - Risk of fire or electric shock. LED Retrofit Kit installation requires knowledge of luminaires
electrical systems. If not qualified, do not attempt installation. Contact a qualified electrician.
WARNING! - Risk of fire or electric shock. Install this kit only in the luminaires that have the construction
features and dimensions shown in the photographs and/or drawings.
WARNING! - To prevent wiring damage or abrasion, do not expose wiring to edges of sheet metal or other
sharp objects.
WARNING! - Do not make or alter any open holes in an enclosure of wiring or electrical components during
kit installation.
“THIS PRODUCT MUST BE INSTALLED IN ACCORDANCE WITH THE APPLICABLE INSTALLATION CODE BY A PERSON FAMILIAR WITH THE CONSTRUCTION AND OPERATION OF THE
PRODUCT AND THE HAZARDS INVOLVED.”
"THE RETROFIT ASSEMBLY IS ACCEPTED AS A COMPONENT OF A LUMINAIRE WHERE THE
SUITABILITY OF THE COMBINATION SHALL BE DETERMINED BY UL OR AUTHORITIES HAVING JURISDICTION"
Contents
Retrofit Kit LED Door
Frame (See ILL #1)
2 – Side Mounting Brackets
1 – LED Door Retrofit
ILL #1 LDR
Instructions
Ballast
1. Disconnect power to fixtures.
Lamp Holder Leads
Lamp Holders
Door Frame
Lens / Louver
ILL #2
Existing
Fixture
2. Remove existing door frame and lamps. If
clearance permits, abandon ballast and socket
bars inside the existing fixture. Otherwise remove these as needed. Please dispose of lamps
and ballast properly. (See ILL #2)
Ballast Cover
Fluorescent Lamps
3. Lift luminaire housing and slide in both
Hinge and Latch Side Mounting Brackets between luminaire and “T” grid. (See Ill 3) Lower
luminaire onto mounting brackets
THE RETROFIT ASSEMBLY IS ACCEPTED AS A COMPONENT OF A
LUMINAIRE WHERE THE SUITABILITY OF THE COMBINATION
SHALL BE DETERMINED BY UL OR AUTHORITIES HAVING HAVING JURISDICTION.
4. Slide the adjustable hinges and latches on the
LDR kit to match the existing door frame. (See
ILL #4 & 5) Please dispose of existing doorframe afterwards properly.
5. Hang the LDR by its hinges on the existing
fixture. (See Ill #6)
6. Install power disconnect (pre-attached to
supplied cord) to main power cord coming into
the fixture. (See ILL #7)
7. Wire the existing fixture’s ground along with
the main power ground to the supplied three
wire lever nut attached to the supplied cord.
ILL #4
ILL #5
8. OPTIONAL: If required, attach the safety
chains via supplied S-Hooks.
9. Close the LDR and secure the latches.
10. Reconnect main power.
Wires from LED
Driver
For Customer Service :
Call 1-800-388-6141 ext. 216
M-F, 9:30– 3 p.m. EST
ILL #6
ILL #7
Wires from
Supply