1
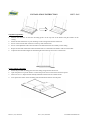
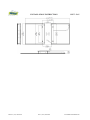
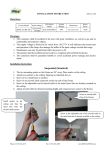
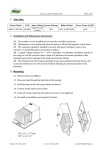
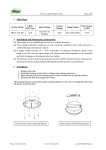
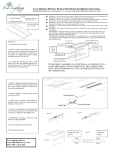
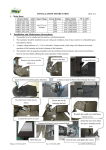
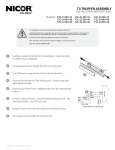
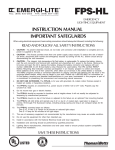
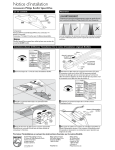
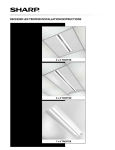
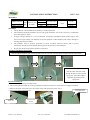
INSTALLATION INSTRUCTION
MHTL-PAN
Main Data:
Fixture Model
LED Input Voltage Input Wattage
Dimensions
36W
MHTL-PAN-2x2
23.5”x23.5”x3”
48W
5630 120-277V AC
50-60Hz
MHTL-PAN-1x4 HE
36W
47.2”x11.7”x3”
MHTL-PAN-2x4
72W
47.2”x23.5”x3”
Power Factor
Net Weight
17 lbs
>0.98
16 lbs
26 lbs
Warnings:
1.
This product is to be installed and serviced by a certified electrician.
2.
The Luminaire should be installed in an area with good ventilation, clear of any corrosive or combustible
gases and explosive objects.
3.
A supply voltage tolerance of +/- 10% is allowable. An improper installation outside of this range or with
the incorrect input voltage will influence the normal operation of this luminaire and result in damage to
the lamp and electronic ballast.
4.
The luminaire must be properly grounded to prevent accidental electrical shocks, and to prevent
interference from the electrical ballast affecting the normal operation of the luminaire.
5.
Do not open the housing with the luminaire powered on.
Steel Wires Installation Instruction:
Pull the cable through the hole in each cap and secure the caps onto the metal bases along the channel of the fixture.
Install metal bases to ceiling.
Push the other end of the cable
through the hole in each cap with
spring lock. The cable length is
adjustable by pushing in the
spring lock.
Recessed (Standard):
1. Remove the traditional lay-in troffer fixture.
2. Choose the replacement that fits in the grid (Install provided steel cable as a second means of support if needed).
3. Remove the panel on the back box to access the wiring and connect the power source.
4. Replace the panel on the back box.
Close Back Panel
Connect Power
Knock out
Phone # (718) 524-4370
Source
Fax # (718) 524-4390
www.MHTLIGHTING.com
INSTALLATION INSTRUCTION
MHTL-PAN
Suspended (Optional):
1.
Measure the distances for the four mounting points on the top side of the fixture and place marks on the
ceiling.
2.
Install the four metal bases to your markings on the ceiling with anchors and screws.
3.
Screw in one aircraft cable connector on the top side of the fixture.
4.
Screw in the adjustable end of aircraft cable to the metal bases that are already on the ceiling.
5.
Repeat for the other metal bases until all metal bases are connected to the fixture with an aircraft cable.
6.
Adjust the aircraft cable length for desired height and connect power source to the fixture.
Surface Mount (Optional):
1.
Install the provided mounting plate onto the ceiling using anchors and screws.
2.
Open the panel on top of the fixture. Connect the power source to the fixture and close panel.
3.
There are two “L” shape brackets already attached on the fixture for surface mount.
4.
Line up the four hooks on the mounting plate and mount the fixture onto the plate.
Phone # (718) 524-4370
Fax # (718) 524-4390
www.MHTLIGHTING.com
INSTALLATION INSTRUCTION
Phone # (718) 524-4370
Fax # (718) 524-4390
MHTL-PAN
www.MHTLIGHTING.com