1
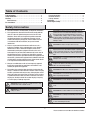
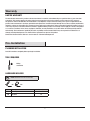
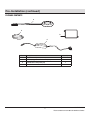
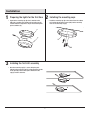
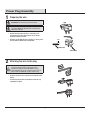
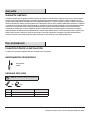
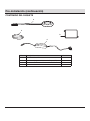
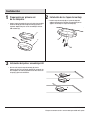
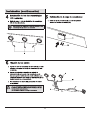
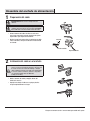
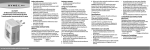
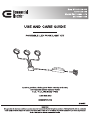
Table of Contents
Table of Contents. . . . . . . . . . . . . . . . . . . . . . . . . . . . . . . . . . . . 3
Safety Information. . . . . . . . . . . . . . . . . . . . . . . . . . . . . . . . . . . 3
Warranty. . . . . . . . . . . . . . . . . . . . . . . . . . . . . . . . . . . . . . . . . . . 4
Limited Warranty. . . . . . . . . . . . . . . . . . . . . . . . . . . . . . . . . . . 4
Pre-Installation. . . . . . . . . . . . . . . . . . . . . . . . . . . . . . . . . . . . . . 4
Planning Installation . . . . . . . . . . . . . . . . . . . . . . . . . . . . . . . . 4
Hardware Included. . . . . . . . . . . . . . . . . . . . . . . . . . . . . . . . . . 4
Package Contents . . . . . . . . . . . . . . . . . . . . . . . . . . . . . . . . . . 5
Installation . . . . . . . . . . . . . . . . . . . . . . . . . . . . . . . . . . . . . . . . . 6
Power Plug Assembly. . . . . . . . . . . . . . . . . . . . . . . . . . . . . . . . . 8
Safety Information
1. Read all instructions carefully before you begin this installation.
2. This equipment has been tested and found to comply with the
limits for a Class B digital device pursuant to Part 15 of the
FCC Rules. These limits are designed to provide reasonable
installation protection. This equipment generates and can
radiate radio frequency energy and, if not installed and used
in accordance with the instructions, may cause harmful
interference.
3. There is no guarantee that interference will not occur in a
particular installation. If this equipment does cause harmful
interference to radio or television reception, which can be
determined by turning the equipment off and on, the user is
encouraged to try to correct the interference by one or more of
the following measures: a) Reorient or relocate the receiving
antenna, b) Increase the separation between the equipment and
the receiver, c) Connect the equipment into a different outlet and
circuit from the receiver outlet and circuit, d) Consult the dealer
or an experienced radio/TV technician for help.
4. Changes or modifications to this unit not expressly approved
by the party responsible for compliance could void the user’s
authority to operate the equipment.
5. This product has a polarized plug (one blade is wider than the
other) as a feature to reduce the risk of electric shock. This plug
will fit in a polarized outlet only one way. If the plug does not fit
fully in the outlet, reverse the plug. If it still does not fit, contact
a qualified electrician. Never use with an extension cord unless
the plug can be fully inserted. Do not alter the plug in any way
as serious injury or damage may result.
WARNING: Deviation from the assembly instructions may
result in a risk of fire or electric shock.
WARNING: Not intended for recessed installation in
ceilings or soffits.
CAUTION: The National Electrical Code (NEC) does not
permit cords to be concealed where damage to insulation
may go unnoticed. To prevent fire danger, do not run the
cord behind walls, ceilings, soffits, or cabinets where it may
be inaccessible for examination. Cords should be visually
examined periodically and immediately replaced when any
damage is noted.
CAUTION: For indoor and dry location use only.
CAUTION: To reduce the risk of fire, electric shock, or
injury to persons use only insulated staples or plastic ties to
secure cords. Route and secure cords so that they will not
be pinched or damaged when the cabinet is pushed to the
wall.
CAUTION: Do not operate this fixture with a missing or
damaged cover or housing.
CAUTION: Position the portable cabinet light with
respect to the cabinet so the lamp replacement marking is
able to be read during re-lamping.
CAUTION: The LED source cannot be replaced.
CAUTION: Do not mount this fixture near heat sources
which may damage this fixture.
CAUTION: Do not stare directly into the LED source.
CAUTION: The power plug can be disassembled without
a tool.
CAUTION: Do not allow children to touch the power plug.
CAUTION: Do not attempt to install this product while
plugged in.
CAUTION: Do not dismantle or alter this fixture. There are
no user serviceable parts inside.
3HOMEDEPOT.COM
2
Please contact 1-877-527-0313 for further assistance.
Warranty
LIMITED WARRANTY
The manufacturer warrants this product to be free from defects in materials and workmanship for a period of three (3) years from date
of purchase. This warranty applies only to the original consumer purchaser and only to products used in normal use and service. If
this product is found to be defective, the manufacturer’s only obligation, and your exclusive remedy, is the repair or replacement of the
product at the manufacturer’s discretion, provided that the product has not been damaged through misuse, abuse, accident, modifications,
alterations, neglect, or mishandling. This warranty shall not apply to any product that is found to have been improperly installed, set-up, or
used in any way not in accordance with the instructions supplied with the product. This warranty shall not apply to a failure of the product
as a result of an accident, misuse, abuse, negligence, alteration, or faulty installation, or any other failure not relating to faulty material
workmanship. The manufacturer specifically disclaims any liability and shall not be liable for any consequential or incidental loss or
damage, including labor/expense costs involved in the replacement or repair of said product.
Contact the Customer Service Team at 1-877-527-0313 or visit www.homedepot.com.
Pre-Installation
PLANNING INSTALLATION
Read all instructions completely before you begin installation.
TOOLS REQUIRED
Phillips
screwdriver
HARDWARE INCLUDED
NOTE: Hardware not shown to actual size.
AA
BB
Part
Description
Quantity
AA
Mounting screw
14
BB
Fastener
16
4
3
Pre-Installation (continued)
PACKAGE CONTENTS
A
B
D
C
Part
Description
Quantity
A
LED puck assembly
3
B
Mounting cap (preassembled to LED lights)
3
C
Dimmable driver with power plug
1
D
Connection box
1
5HOMEDEPOT.COM
4
Please contact 1-877-527-0313 for further assistance.
Installation
1 Preparing the lights for the first time 2 Installing the mounting caps
□□ Separate the mounting cap (B) that is attached to the
LED puck assembly (A) by rotating the mounting cap (B)
counterclockwise. Repeat this step for the remaining LED
puck assemblies (A).
□□ Install the mounting cap (B) to the underside of the cabinet
by inserting two mounting screws (AA) into the mounting
holes on the mounting cap (B).
B
A
B
AA
3 Installing the first LED assembly
□□ Once the mounting cap (B) is secure, bring the puck
light (A) to the mounting cap (B), engage the three catches
on the puck (A) into the three groves molded into the
cap (B) and turn clockwise.
B
A
A
6
5
6
Power Plug Assembly
1
Preparing the wire
WARNING: Disconnect the power before wiring.
WARNING: This is a polarized plug. One blade is wider
and marked WHITE. This blade must be connected to the
ribbed side of the wire.
□ Cut the end of the wire. One line is shorter by 0.2 in.
(5.0 mm) than the other. Ensure there are no strands
sticking out of the insulation.
□ Slide the cap off. With the plug in position as shown, place
the wire with the ribbed side at the bottom.
.2 in.
Ribbed Side
Wider Blade
2
Attaching the wire to the plug
CAUTION: Do not use type TPT extra flexible cords
(as used on electric shavers) or type XT (as used on
Christmas tree lights), or any small diameter cords. To
avoid overheating, do not use on broilers, toasters, irons or
devices rated over 1000 watts (8 amps and 125 volts).
□ Bend the end of the wire and push into the bottom of the
groove.
□ Push the wire down with your thumb and slide the cap
completely into place.
8
7
Questions, problems, missing parts? Before returning to the store,
call Commercial Electric Customer Service
8 a.m.-6 p.m., EST, Monday-Friday
1-877-527-0313
HOMEDEPOT.COM
Retain this manual for future use.
8
1000 028 892
1000 028 890
847658001078
847658001085
Tabla de contenido
Tabla de contenido . . . . . . . . . . . . . . . . . . . . . . . . . . . 3
Información de seguridad. . . . . . . . . . . . . . . . . . . . . 3
Garantía. . . . . . . . . . . . . . . . . . . . . . . . . . . . . . . . . . . . 4
Garantía limitada. . . . . . . . . . . . . . . . . . . . . . . . . . . . . . . . . . . 4
Pre-instalación. . . . . . . . . . . . . . . . . . . . . . . . . . . . . . . 4
Planificación de la instalación. . . . . . . . . . . . . . . . . . . . . . . . . 4
Herraje incluido. . . . . . . . . . . . . . . . . . . . . . . . . . . . . . . . . . . . 4
Contenido del paquete. . . . . . . . . . . . . . . . . . . . . . . . . . . . . . . 5
Instalación. . . . . . . . . . . . . . . . . . . . . . . . . . . . . . . . . . 6
Ensamble del enchufe de alimentación . . . . . . . . . . 8
Información de seguridad
1. Lea todas las instrucciones cuidadosamente antes de empezar
con esta instalación.
2. Este equipo ha sido probado y se ha encontrado en cumplimiento
con los límites correspondientes para un dispositivo digital de la
Clase B, conforme a la Parte 15 de las Reglas de la FCC. Estos
límites están diseñados para ofrecer una protección razonable
en la instalación. Este equipo genera y puede irradiar energía
de radiofrecuencia, si no se instala y se usa conforme a las
instrucciones puede causar interferencia perjudicial.
3. No hay garantía de que no ocurrirá una interferencia en una
instalación en particular. Si este equipo no causa interferencia
perjudicial a la recepción de radio o televisión, la cual se puede
determinar al apagar y encender el equipo, se recomienda al
usuario que intente corregir la interferencia mediante una o más de
las siguientes medidas: a) reoriente o reubique la antena receptora;
b) aumente la distancia de separación entre el equipo y el receptor;
c) conecte el equipo a un tomacorriente y circuito distinto a los que
está conectado el receptor; d) consulte con su distribuidor o con un
técnico de radio y TV profesional para obtener ayuda.
4. Los cambios o las modificaciones a esta unidad que no sean
aprobados en forma expresa por la parte responsable del
cumplimiento, pueden invalidar el permiso del usuario para
operar el equipo.
5. Este producto tiene un enchufe polarizado (una cuchilla es
más ancha que la otra) como función para reducir el riesgo de
choque eléctrico. Este enchufe se conecta en un tomacorriente
polarizado únicamente de una manera. Si el enchufe no se conecta
totalmente en el tomacorriente, voltee el enchufe. Si sigue sin poder
conectarse, póngase en contacto con un electricista calificado.
Nunca use un cable de extensión, salvo cuando el enchufe se pueda
insertar totalmente. No altere el enchufe de ninguna manera, ya que
puede resultar en lesiones graves o daños.
ADVERTENCIA: Si no sigue las instrucciones de
ensamblaje puede resultar en riesgo de choque eléctrico.
ADVERTENCIA: No prevista para instalación ahuecada
en techos o sofitos.
PRECAUCIÓN: El Código Eléctrico Nacional (NEC) no
permite que se oculten cables donde no se adviertan
daños al aislamiento. Para evitar peligro de incendio, no
tienda el cable detrás de la pared, cielos rasos o gabinetes
donde pueda estar inaccesible para ser examinado. Los
cables deben examinarse visualmente de forma periódica y
reemplazarse de inmediato cuando se advierta algún daño.
PRECAUCIÓN: Use únicamente en interiores y
lugares secos.
PRECAUCIÓN: Para evitar el riesgo de incendio, choque
eléctrico o lesiones a las personas, use solamente grapas
aisladas o amarres plásticos para asegurar los cables.
Oriente y asegure los cables para que no sean comprimidos
o dañados cuando se empuje el gabinete a la pared.
PRECAUCIÓN: No debe usar este dispositivo con una
tapa o carcasa dañada.
PRECAUCIÓN: Coloque la luz portátil del gabinete con
respecto al gabinete de modo que la marca de reemplazo
de la lámpara se pueda leer durante el reemplazo.
PRECAUCIÓN: La fuente del LED no puede
reemplazarse.
PRECAUCIÓN: No monte este dispositivo cerca de
fuentes de calor que puedan dañarlo.
PRECAUCIÓN: No mire directamente a la fuente LED.
PRECAUCIÓN: El enchufe de alimentación se puede
desarmar sin herramientas.
PRECAUCIÓN: No permita que los niños toquen el
enchufe de alimentación.
PRECAUCIÓN: No intente instalar este producto
mientras está enchufado.
PRECAUCIÓN: No desarme ni altere este dispositivo. No
hay piezas interiores reparables.
2
Garantía
GARANTÍA LIMITADA
El fabricante garantiza que este producto está libre de defectos en materiales y mano de obra por un periodo de tres (3) años a partir de la fecha
de compra. Esta garantía aplica únicamente al comprador consumidor final y únicamente para los productos usados en condiciones de uso y
servicio normal. Si este producto está defectuoso, la única obligación del fabricante y su exclusiva solución, es reparar o reemplazar el producto a
discreción del fabricante, siempre y cuando el producto no ha sido dañado por mal uso, abuso, accidente, modificaciones, alteraciones, negligencia
o mal manejo. Esta garantía no aplicará a ningún producto que se detecte que se haya instalado, configurado o usado incorrectamente de alguna
manera que no sea de acuerdo con las instrucciones proporcionadas con el producto. Esta garantía no aplicará a fallas del producto como
resultado de un accidente, mal uso, abuso, negligencia, alteración o instalación incorrecta o cualquier otra falla no relacionada a una falla por
fabricación material. El fabricante renuncia específicamente a cualquier responsabilidad civil y no se hará responsable por daños y perjuicios, por
pérdida o daños accesorios, incluidos los gastos de mano de obra u otros gastos relacionados al reemplazo o reparación de dicho producto.
Póngase en contacto con el Equipo de Servicio al Cliente llamando al 1-877-527-0313 o visite www.homedepot.com.
Pre-instalación
PLANIFICACIÓN DE LA INSTALACIÓN
Lea todas las instrucciones completamente antes de empezar con la instalación.
HERRAMIENTAS REQUERIDAS
Destornillador
Phillips
HERRAJE INCLUIDO
NOTA: No se muestra el herraje en el tamaño real.
AA
Pieza
BB
Descripción
Cantidad
AA
Tornillo de montaje
14
BB
Sujetador
16
3HOMEDEPOT.COM
Póngase en contacto con el 1-877-527-0313 para recibir más ayuda.
Pre-instalación (continuación)
CONTENIDO DEL PAQUETE
A
B
D
C
Pieza
Descripción
A
Ensamble del disco LED
3
B
Tapa de montaje (preensamblada en las lámparas LED)
3
C
Controlador atenuable con enchufe de alimentación
1
D
Caja de conexiones
1
4
Cantidad
Instalación
por primera vez
1 Preparación
de las lámparas
2 Instalación de las tapas de montaje
□□ Separe la tapa de montaje (B) que está unida al ensamblaje
del disco LED (A) girando la tapa de montaje (B) hacia la
izquierda. Repita este paso con los ensamblajes de disco
LED restantes (A).
□□ Instale la tapa de montaje (B) en la parte de abajo del
gabinete insertando dos tornillos de montaje (AA) en los
agujeros de montaje en la tapa de montaje (B).
B
A
B
AA
3 Instalación del primer ensamblaje LED
□□ Una vez esté segura la tapa de montaje (B), lleve la
lámpara de disco (A) a la tapa de montaje (B), enganche los
tres receptores en el disco (A) dentro de las tres ranuras en
la tapa (B) y gire hacia la derecha.
B
A
A
5HOMEDEPOT.COM
Póngase en contacto con el 1-877-527-0313 para recibir más ayuda.
Ensamble del enchufe de alimentación
1 Preparación del cable
ADVERTENCIA: Desconecte la energía antes del
cableado.
ADVERTENCIA: Este es un dispositivo polarizado. Una
cuchilla es más ancha que la otra y está marcada BLANCO.
Esta cuchilla debe conectarse al lado estriado del cable.
□□ Corte el extremo del cable. Una línea es más corta
que la otra en 0.2 pulg. (5.0 mm. Asegúrese de que no
hayan hebras que salgan del aislamiento.
□□ Deslice la tapa hacia afuera. Con el enchufe en posición
como se muestra, coloque el cable con el lado estriado
en el fondo.
0.2 pulg.
Lado estriado
Aspa más ancha
2 Instalación del cable en el enchufe
PRECAUCIÓN: No use cables flexibles extra tipo TPT
(como los usados en rasuradoras eléctricas) o tipo XT (como
los usados en las luces de árbol de navidad), o cualquier
cable de diámetro pequeño. Para evitar sobrecalentamiento,
no lo use en asadores, tostadoras, planchas o dispositivos
con capacidad nominal arriba de 1000 vatios
(8 amps y 125 voltios).
□□ Doble el extremo del cable y empújelo dentro del
fondo de la muesca.
□□ Empuje hacia abajo el cable con su pulgar y deslice
la tapa completamente en su lugar.
7HOMEDEPOT.COM
Póngase en contacto con el 1-877-527-0313 para recibir más ayuda.
¿Tiene preguntas, problemas, o faltan piezas? Antes de regresar a la tienda,
llame a Servicio al Cliente de Commercial Electric
de 8 a.m. a 6 p.m., hora local del Estede lunes a viernes
1-877-527-0313
HOMEDEPOT.COM
Conserve este manual para uso futuro.