1
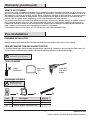
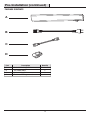
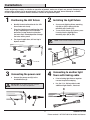
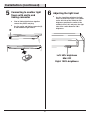
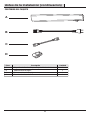
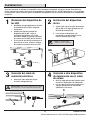
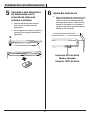
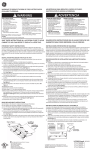
Item
#1000-235-424
#1000-235-522
#1000-235-640
#54074143
Model
#54195111
#54194111
#54197111
#54196111
USE AND CARE GUIDE
LED UNDER CABINET LIGHTING KIT
9 IN., 12 IN., 18 IN., AND 24 IN.
Questions, problems, missing parts? Before returning to the store,
call Commercial Electric Customer Service
8 a.m. – 6 p.m., EST, Monday - Friday
1-877-527-0313
HOMEDEPOT.COM
THANK YOU
We appreciate the trust and confidence you have placed in Commercial Electric through the purchase of this
LED Under Cabinet Light. We strive to continually create quality products designed to enhance your home. Visit
us online to see our full line of products available for your home improvement needs. Thank you for choosing
Commercial Electric!
Table of Contents
Table of Content ......................................... 2
Safety Information...................................... 2
Warranty ..................................................... 2
Pre-Installation........................................... 3
Planning Installation............................. 3
Tools Required ..................................... 3
Hardware Included............................... 3
Package Contents ................................ 4
Installation .................................................. 5
Care and Cleaning ...................................... 7
Troubleshooting.......................................... 7
Safety Information
WARNING: Carefully read and understand the information given in
this manual before beginning the assembly and installation. Failure to
do so could lead to electric shock, fire, or other injuries which could
be hazardous or even fatal.
WARNING: Ensure the electricity to the wires you are working on is
shut off. Either remove the fuse or turn off the circuit breaker.
WARNING: Changes or modifications not expressly approved by the
party responsible for compliance could void the user’s authority to
operate the equipment.
NOTICE: Added weight of the device may cause instability of a
free-standing portable luminaire. This device is not intended for use
with emergency exits.
WARNING: This equipment has been tested and found to
comply with the limits for a Class B digital device, pursuant to Part 15
of the FCC Rules. These limits are designed to provide reasonable
protection against harmful interference in a residential installation.
This equipment generates, uses and can radiate radio frequency
energy and, if not installed and used in accordance with the
instructions, may cause harmful interference to radio
communications.
However, there is no guarantee that interference will not occur in a
particular installation. If this equipment does cause harmful
interference to radio or television reception, which can be determined
by turning the equipment off and on, the user is encouraged to try to
correct the interference by one or more of the following measures:
■ Reorient or relocate the receiving antenna
■ Increase the separation between the equipment and the receiver.
■ Connect the equipment into an outlet on a circuit different from
that to which the receiver is connected.
■ Consult the dealer or an experienced radio/TV technician for help.
CAUTION: To reduce the risk of fire, electric shock,
or injury to persons:
a) Use only insulated staples or plastic ties to secure cords;
b) Route and secure cords so that they will not be pinched or
damaged when the cabinet is pushed to the wall;
c) Not intended for recessed installation in ceilings, or soffits;
d) The National Electrical Code (NEC) does not permit cords to be
concealed where damage to insulation may go unnoticed. To
prevent fire danger, do not run cord behind walls, ceilings,
soffits, or cabinets where it may be inaccessible for
examination. Cords should be visually examined periodically
and immediately replaced when any damage is noted.
e) Maximum units to be interconnected as below:
1) 541941XX(24” undercabinet): maximum 20 units to be
interconnected
2) 541951XX(18” undercabinet): maximum 25 units to be
interconnected
3) 541961XX(12” undercabinet):maximum 30 units to be
interconnected
4) 541971XX(9” undercabinet): maximum 40 units to be
interconnected
f) Maximum distance between units to be interconnected is 12”.
g) "IMPORTANT SAFETY INSTRUCTIONS: This portable luminaire
has a polarized plug (one blade is wider than the other) as a
feature to reduce the risk of electric shock. This plug will fit in
a polarized outlet only one way. If the plug does not fit fully in
the outlet, reverse the plug. If it still does not fit, contact a
qualified electrician. Never use with an extension cord unless
plug can be fully inserted. Do not alter the plug."
h) “TO PREVENT ELECTRIC SHOCK, MATCH WIDE BLADE OF PLUG
TO WIDE SLOT, FULLY INSERT”
Warranty
WHAT IS COVERED
The manufacturer warrants this lighting fixture to be free from defects in materials and workmanship for a period
of five (5) years from date of purchase. This warranty applies only to the original consumer purchaser and only to
products used in normal use and service. If this product is found to be defective, the manufacturer’s only
obligation, and your exclusive remedy, is the repair or replacement of the product at the manufacturer’s discretion,
provided that the product has not been damaged through misuse, abuse, accident, modifications, alterations,
neglect, or mishandling.
2
Warranty (continued)
WHAT IS NOT COVERED
This warranty shall not apply to any product that is found to have been improperly installed, set-up, or used in any
way not in accordance with the instructions supplied with the product. This warranty shall not apply to a failure of
the product as a result of an accident, misuse, abuse, negligence, alteration, faulty installation, or any other failure
not relating to faulty material or workmanship. This warranty shall not apply to the finish on any portion of the
product, such as surface and/or weathering, as this is considered normal wear and tear.
The manufacturer does not warrant and specifically disclaims any warranty, whether express or implied, of fitness
for a particular purpose, other than the warranty contained herein. The manufacturer specifically disclaims any
liability and shall not be liable for any consequential or incidental loss or damage, including but not limited to any
labor / expense costs involved in the replacement or repair of said product.
Contact the Customer Service Team at 1-877-527-0313 or visit www.HomeDepot.com.
Pre-Installation
PLANNING INSTALLATION
Identify the desired location for the LED fixture to make sure the length of the fixture fits the cabinet.
PRODUCT DESCRIPTION AND CHARACTERISTICS
LED under cabinet light can be directly mounted to the underside of a cabinet or wall and requires little space. It is
energy-saving, environmentally friendly, and used for emitting soft and even distribution of light.
NOTE: Keep your receipt and these
instructions for proof of purchase.
TOOLS REQUIRED
Phillips
Screwdriver
Measuring
Tape
Power Drill
with 1/8 in.
drill bit
HARDWARE INCLUDED
NOTE: Hardware not
shown to actual size.
AA
Part
AA
BB
CC
BB
Description
“U” Clips
“L” Clips
Drywall Anchors and Screw Pack
CC
Quantity
2
2
1
3
HOMEDEPOT.COM
Please contact 1-877-527-0313 for further assistance.
Pre-Installation (continued)
PACKAGE CONTENTS
A
B
C
D
Part
A
B
C
D
Description
Under Cabinet Light Fixture
5 ft. Power Cord
12 in. Linking Cable
End to end linking connector
Quantity
1
1
1
1
4
Installation
Before beginning assembly, installation or operation of product, make sure all parts are present. Compare parts
with package contents list on previous page. If any part is missing or damaged, do not attempt to assemble,
install or operate the product. Contact customer service for replacement parts.
1
2
Positioning the LED fixture
■
■
■
Identify the desired location for the LED
fixure and mark clearly.
Installing the light fixture
■
Place the light fixture mounting clips (AA)
or (BB), depending on the installation
preference, along the desired location
and mark their intended position through
the holes with a pencil.
■
For drywall application, drill and tap in
drywall anchors.
Secure each lighting fixture mounting
clip (AA) or (BB) in place with the
mounting clip screws (CC).
To secure the fixture (A) in place, press
it evenly into the lighting fixure
mounting clips (AA) or (BB).
NOTE: Screws must be installed flush with surface.
AA
AA
or
BB
BB
3
4
Connecting the power cord
■
Connect the power cord (B) to the
installed fixture (A).
Connecting to another light
fixure with linking cable
■
■
IMPORTANT: Do not plug in the power cord to the
wall until after connecting to the light fixure.
Prior to linking light fixtures together
remove the plastic end plug.
Use the 12 in. linking cable to add
additional light fixtures, if desired.
C
A
B
5
HOMEDEPOT.COM
Please contact 1-877-527-0313 for further assistance.
Installation (continued)
5
6
Connecting to another light
fixure with end to end
linking connector
■
■
D
Prior to linking light fixtures together
remove the plastic end plug.
Use the end to end linking connector (D)
to add additional light fixtures.
Adjusting the light level
■
Use the 3-position switch on the light
fixture to control the lights. Press down
on the left side of the switch for 50%
brightness, position the switch in the
middle to turn it off, and press the right
side of the switch down for 100%
brightness.
Left: 50% brightness
Mid: OFF
Right: 100% brightness
6
Troubleshooting
Minor problems often can be fixed without the help of an electrician.
WARNING: Before doing any work on the fixture,
shut off power supply at the circuit panel to avoid
electrical shock.
Problem
The fixture does not light.
Possible Cause
The power is off.
The cables are not properly
connected.
The power plug may not be
properly connected.
Corrective Action
Check if power supply is on.
Ensure all cables are properly
connected.
Ensure the power plug is in
the wall outlet.
Care & Cleaning
CAUTION: Before attempting to clean the fixture,
disconnect the power to the fixture by turning the breaker
off or removing the fuse from the fuse box.
Your fixture is made from quality materials that will last many years with minimum care. You may want to
periodically clean the diffuser, or interior of fixture using a mild, non-abrasive glass cleaner and a soft cloth.
DO NOT use solvents, or cleaners containing abrasive agents. When cleaning the inside of the fixture, make sure
you have the power turned off, and do not spray liquid cleaner directly onto the LEDs, LED driver or wiring.
7
HOMEDEPOT.COM
Please contact 1-877-527-0313 for further assistance.
Questions, problems, missing parts? Before returning to the store,
call Commercial Electric Customer Service
8 a.m. – 6 p.m., EST, Monday - Friday
1-877-527-0313
HOMEDEPOT.COM
Retain this manual for future use.
Artículo #1000-235-424
#1000-235-522
#1000-235-640
#54074143
Modelo
#54195111
#54194111
#54197111
#54196111
GUÍA DE USO Y CUIDADO
JUEGO DE ILUMINACIÓN LED PARA
LA PARTE INFERIOR DE ALACENAS
9 PULG., 12 PULG., 18 PULG., Y 24 PULG.
Preguntas, problemas, piezas faltantes? Antes de devolver el producto a la tienda,
llame al Centro de Atención al Cliente de Commercial Electric en el horario de
8 a.m. – 6 p.m., Hora del Este de EE.UU., de lunes a viernes.
1-877-527-0313
HOMEDEPOT.COM
GRACIAS
Apreciamos la confianza que ha puesto en Commercial Electric a través de la compra de esta juego de iluminación
LED para la parte inferior de alacenas.. Nos esforzamos por crear constantemente productos diseñados para dar
realce a su hogar. Visítenos en línea para ver nuestra gama completa de productos disponibles para sus
necesidades al momento de hacer mejoras en su hogar. ¡Muchas gracias por elegir a Commercial Electric!
Contenido
Contenido.................................................. 10
Informacíon sobre seguridad................... 10
Garantía .................................................... 10
Antes de la instalacíon............................. 11
Planificacíon de la instalacíon ........... 11
Herramientas necesarias ................... 11
Materiales incluidos........................... 11
Contenido del paquete ....................... 12
Instalacíon ................................................ 13
Cuidado y limpieza ................................... 15
Solucíon de problemas............................. 15
Informacíon sobre seguridad
ADVERTENCIA: Lea cuidadosamente y comprenda la
información incluida en este manual antes de comenzar el armado e
instalación. No hacerlo, puede provocar descarga eléctrica, incendio,
u otras lesiones que pueden ser peligrosas o incluso fatales.
ADVERTENCIA: Asegúrese de cortar el suministro eléctrico en
los cables con los que trabajará. Extraiga los fusibles o apague el
cortacircuitos.
ADVERTENCIA: Los cambios o modi caciones que no estén
expresamente aprobados por la parte responsable del cumplimiento
anulan la autoridad del usuario de operar el equipo.
AVISO: El mayor peso de este dispositivo puede provocar
la inestabilidad de un aparato de iluminación portátil de pie.
Este dispositivo no debe utilizarse en salidas de emergencia.
ADVERTENCIA: Este equipo ha sido sometido a prueba y se
halló que cumple con los límites establecidos para la clase B de
dispositivos digitales, conforme a la Parte 15 de las Normas de FCC.
Estos límites se establecen para brindar protección razonable
contra interferencia dañina en una instalación residencial.Este
equipo genera, utiliza y puede irradiar energía de frecuencias de
radio y, si no se instala conforme a las instrucciones, puede
provocar interferencia dañina a las comunicaciones de radio. A
pesar de esto, no existe garantía de que la interferencia no se
produzca en una instalación en particular. Si este equipo produce
interferencia dañina a la recepción de radio o televisión, lo que
puede determinarse encendiendo y apagando el equipo, se insta al
usuario a intentar corregir la interferencia mediante uno de los
siguientes métodos:
■ Cambie la orientación o ubicación de la antena receptora.
■ Aumente la separación entre el equipo y el receptor.
■ Conecte el equipo en un enchufe que esté en un circuito
diferente al cual está conectado el receptor.
■ Consulte con el representante o con un técnico experimentado en
radio y televisión para solicitar asistencia.
PRECAUCIÓN: Para reducir el riesgo de incendio,
descarga eléctrica o lesiones a las personas:
a) Use solo grapas revestidas o ataduras plásticas para sujetar
cables.
b) Dirija y sujete los cables de forma tal que no queden apretados
ni se dañen cuando coloque el armario contra la pared.
c) No es apto para instalaciones empotradas en cielorrasos ni
sofitos.
d) El Código Nacional de Electricidad (NEC, por sus siglas en
inglés) no permite ocultar cables donde no puedan observarse
los daños en el aislamiento. Para evitar el peligro de incendio,
no instale cables detrás de muros, cielorrasos, sofitos, o
armarios donde no puedan examinarse. Periódicamente debe
realizarse una evaluación visual de los cables y deben
reemplazarse inmediatamente cuando se observe algún daño.
e) Cantidad máxima de unidades que pueden interconectarse:
1) 541941XX (parte inferior de alacenas de 24”): puede
interconectarse una cantidad máxima de 20 unidades
2) 541951XX (parte inferior de alacenas de 18”): puede
interconectarse una cantidad máxima de 25 unidades
3) 541961XX (parte inferior de alacenas de 12”): puede
interconectarse una cantidad máxima de 30 unidades
4) 541971XX (parte inferior de alacenas de 9”): puede
interconectarse una cantidad máxima de 40 unidades
f) La distancia máxima entre unidades que desean
interconectarse es 12”
g) Las instrucciones indicarán: "IMPORTANTES INSTRUCCIONES
DE SEGURIDAD: Este aparato de iluminación portátil tiene un
enchufe polarizado (una pata es más ancha que la otra) con el
fin de reducir el riesgo de descarga eléctrica. Este enchufe se
conectará a un tomacorrientes polarizado de una sola forma. Si
el enchufe no entra correctamente en el tomacorrientes
invierta el enchufe. Si aun así no lo puede enchufar,
comuníquese con un electricista calificado. Nunca utilice una
prolongación a menos que el enchufe entre totalmente. No
haga modificaciones al enchufe".
h) “PARA EVITAR DESCARGAS ELÉCTRICAS, HAGA COINCIDIR LA
PATA ANCHA DEL ENCHUFE CON LA RANURA ANCHA E
INSÉRTELO TOTALMENTE”
Garantía
CUBRE
El fabricante garantiza que este aparato de iluminación no tendrá defectos en los materiales o en la mano de obra
por un periodo de cinco (5) años desde la fecha de compra. Esta garantía se aplica sólo al comprador consumidor
original y sólo a los productos que se utilizan y reciben servicio en forma normal. Si se encuentra que este
producto tiene defectos, la única obligación del fabricante, y su exclusiva solución, es reparar o reemplazar el
producto a su entera discreción, siempre y cuando el producto no se haya dañado debido al mal uso, abuso,
accidente, modificaciones, alteraciones, negligencias o mal manejo del mismo.
10
Garantía (continuacíon)
NO CUBRE
Esta garantía no se aplica a ningún producto que se ha instalado incorrectamente, ajustado o utilizado en una
forma que no concuerde con las instrucciones suministradas junto con el producto. Esta garantía no se aplicará a
fallas del producto como resultado de un accidente, uso incorrecto, abuso, negligencia, alteración, instalación
defectuosa, o ninguna otra falla no relacionada con el material o mano de obra defectuosa. Esta garantía no se
aplica a la terminación en una parte del producto, tales como la superficie o la acción de los elementos, ya que
esto se considera desgaste normal.
El fabricante no garantiza y no acepta responsabilidad, ya sea, expresa o implícita de la idoneidad para un fin
particular, a excepción de la garantía contenida en el presente. El fabricante niega específicamente
responsabilidad y no será responsable por daños o pérdidas indirectas o consecuenciales, e incluye pero no se
limita a los costos de mano de obra, gastos relacionados en el reemplazo o reparación de dicho producto.
Comuníquese con el equipo de Servicio al Cliente al 1-877-523-0313 o visite www.HomeDepot.com.
Antes de la instalacíon
PLANIFICACÍON DE LA INSTALACÍON
Identifique el sitio en el que desea instalar el dispositivo LED para asegurarse de que tiene suficiente espacio en la
alacena.
DESCRIPCIÓN DEL PRODUCTO Y CARACTERÍSTICAS
El dispositivo de luz LED puede instalarse directamente en la parte inferior de una alacena o muro y no ocupa
mucho lugar. Ahorra energía, es ecológico y se utiliza para emitir una luz de distribución uniforme y suave.
NOTA: Guardar el recibo de compra y estas
instrucciones como prueba de compra.
HERRAMIENTAS NECESARIAS
Destornillador
Phillips
Cinta
métrica
Taladro eléctrico
con broca de 1/8
pulg.
MATERIALES INCLUIDOS
NOTA: Los materiales no se
ilustran en tamaño real.
Pieza
AA
BB
CC
Descripción
“U” Clips
“L” Clips
Anclajes para panel mural en seco
y paquete de tornillos
AA
BB
CC
Cantidad
2
2
1
11
HOMEDEPOT.COM
Sírvase comunicarse al 1-877-527-0313 para recibir asistencia.
Antes de la instalacíon (continuacíon)
CONTENIDO DEL PAQUETE
A
B
C
D
Pieza
A
B
C
D
Descripción
Dispositivo de iluminación para la parte inferior de alacenas
Cable eléctrico de 5 pies
Cable de enlace de 12 pulg.
Conector de enlace de extremo a extremo
12
Cantidad
1
1
1
1
Instalacíon
Antes de comenzar el armado, la instalación o antes de operar el producto, asegúrese de que tiene todas las
piezas. Compare las piezas con la lista del contenido en la página anterior. Si falta alguna pieza o si está dañada,
no comience a armar, instalar ni operar el producto. Comuníquese con el servicio al cliente para el reemplazo de
las piezas.
1
2
Ubicación del dispositivo de
luz LED
■
■
■
Identifique el lugar donde desea instalar
el dispositivo de luz LED y márquelo
claramente.
Coloque los clips de sujeción del
dispositivo (AA) o (BB), según la
instalación que prefiere, en el sitio
deseado e indique la posición haciendo
una marca con un lápiz por los orificios.
En el caso de que desee instalarlo en un
panel mural en seco, taladre e coloque
los anclajes para panel mural en seco.
Instalación del dispositivo
de luz
■
■
Sujete cada uno de los clips de montaje
(AA) o (BB) en el lugar deseado con los
tornillos de montaje (CC).
Para instalar el dispositivo (A),
presiónelo en forma uniforme en los
clips de montaje (AA) o (BB).
NOTA: Los tornillos deben
instalarse a ras de la superficie.
AA
AA
o
BB
BB
3
4
Conexión del cable de
suministro eléctrico
■
Conecte el cable eléctrico (B) que
instalará al dispositivo (A).
Conexión a otro dispositivo
de iluminación con el cable
de enlace
■
■
IMPORTANTE: No enchufe el cable eléctrico a la pared
hasta después de conectar el dispositivo de iluminación.
Quite el tapón plástico del extremo antes
de unir los dispositivos de iluminación.
Use el cable de enlace de 12 pulg. para
agregar dispositivos de iluminación
adicionales si lo desea.
C
A
B
13
HOMEDEPOT.COM
Sírvase comunicarse al 1-877-527-0313 para recibir asistencia.
Instalacíon (continuacíon)
5
6
Conexión a otro dispositivo
de iluminación con el
conector de enlace de
extremo a extremo
■
■
Quite el tapón plástico del extremo
antes de unir los dispositivos de
iluminación.
Ajuste del nivel de luz
■
Utilice el interruptor de 3 posiciones en el
dispositivo de iluminación para controlar
el brillo. Presione el lado izquierdo del
interruptor para obtener el 50% de brillo,
coloque el interruptor en el medio para
apagarlo y presione el lado derecho para
obtener el 100% de brillo.
Use el conector de enlace de extremo a
extremo (D) para agregar dispositivos
adicionales.
D
Izquierda: 50% de brillo
Medio: Apagado
Derecha: 100% de brillo
14
Guía de solución de problemas
Los problemas menores pueden arreglarse sin ayuda de un electricista.
ADVERTENCIA: Antes de realizar algún trabajo en
el aparato, desconecte el suministro eléctrico en el
panel de circuitos para evitar descargas eléctricas.
Problema
Causa posible
El suministro eléctrico está cortado.
El aparato no enciende.
Los cables no están correctamente
conectados.
El enchufe puede no estar
correctamente conectado.
Acción correctiva
Verifique si el suministro eléctrico
está encendido.
Asegúrese de que todos los cables
estén correctamente conectados.
Asegúrese de que el enchufe esté
enchufado al tomacorrientes en la pared.
Cuidado y limpieza
PRECAUCIÓN: Antes de limpiar la lámpara, desconecte
el suministro eléctrico hacia ésta apagando el cortacircuitos
o extrayendo el fusible de la caja de fusibles.
Su luminaria está hecha con materiales de calidad y que durarán por muchos años con un cuidado mínimo.
Limpie el difusor periódicamente o el interior del aparato con un paño suave utilizando un limpiador de
vidrios no abrasivo.
NO use solventes ni limpiadores que contengan agentes abrasivos. Cuando limpie el interior del aparato,
asegúrese de que el suministro eléctrico esté desconectado, y no pulverice limpiadores líquidos
directamente en las luces LED o en los cables LED.
15
HOMEDEPOT.COM
Sírvase comunicarse al 1-877-527-0313 para recibir asistencia.
Preguntas, problemas, piezas faltantes? Antes de devolver el producto a la tienda,
llame al Centro de Atención al Cliente de Commercial Electric en el horario de
8 a.m. – 6 p.m., Hora del Este de EE.UU., de lunes a viernes.
1-877-527-0313
HOMEDEPOT.COM
Conserve este manual para uso futuro.