1
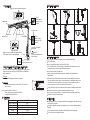
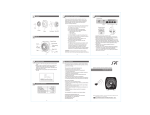
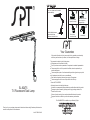
LAMP INSTALLATION When table or surface thickness is less than 2 cm, please use the insole to increase stability. Add the Height-Increase Insole when surface thickness is less than 2cm. Do not install lamp: Limited surface space for clamp Surface that is too thin or fragile to support lamp On a pole or uneven surface Horizontally Your Guarantee If this product is found to be faulty as a result of faulty materials or workmanship within one year from date of purchase, it will be repaired free of charge. This guarantee is subject to the following terms: Sunpentown must be notified of the fault. Proof of purchase must be presented to Sunpentown’s nominated representative. The warranty will be void if the product if modified, misused or repaired by an unauthorized person. The warranty after repair will not be extended beyond the original one-year period. All replacement parts will be new or reconditioned. Parts, which are replaced, become the property of Sunpentown. The warranty applies for the use of the product in the USA only. SL-824T5 T-5 Fluorescent Task Lamp What is NOT COVERED: Warranty does not include freight charges. Incidental or consequential damage caused by possible defects with this product. Damage to product caused by improper power supply voltage, accident, fire, floods or acts of nature. Failure of product resulting from unauthorized modifications to the product. Improper installation or failure to perform the necessary maintenance. This GUARANTEE is in addition to your Statutory Rights Thank you for your purchase, please read all instructions before using.Please keep this instruction manual in a safe place for future reference. Ver.01 DRH-R-84-12 SUNPENTOWN INTERNATIONAL INC. 14625 Clark Ave. City of Industry, CA 91745 Tel: 800-330-0388 [email protected] www.sunpentown.com IMPORTANT SAFEGUARDS PARTS IDENTIFICATION If loose, use a screwdriver to tighten. Fixture When installing make sure “click” is heard. Lamp Shade Aluminum arm Light bulb Bottom cover Lid Dimmer control Power switch Fixture When installing make sure “click” is heard. Use a coin or flathead screwdriver Adjustment screw If loose, use a screwdriver to tighten screws (use of other tools may cause damage) Attention Clamp Do not use excessive force when securing height increased insole BULB INSTALLATION / REPLACEMENT INSTRUCTIONS Make sure lamp is powered off and unplugged from power source. Wait until bulb is cool enough to handle. Bulb is hot immediately after powering off. Do not cut or shorten the power cord. Always unplug lamp before performing bulb installation, bulb replacement or maintenance. Removal 1. Turn bulb 90 degrees and remove from socket . Installation 1. Align base of bulb to notch on the socket. Turn bulb until a “click” is heard. Note: Handle with care, do not drop. Do not replace anything other than the bulb. Only replace with HO-24W bulb SPECIFICATIONS Model Power Consumption Power Supply Dimension Weight Replacement Bulb SL-824 T5 24W 120V / 60Hz Approx. 22.4x27.56x19.67 (in) 3.17 lbs HO-27W IMPORTANT SAFEGUARDS Do not operate this lamp near a water source to avoid electric shock. Do not dismantle. Do not use with power supply other than 120V~60Hz. Do not operate lamp in close proximity to flammable or combustible vapors, such as aerosol spray, or where oxygen is being administered. Socket Bulb Notch Teminal This product may cause interference with radios, cordless telephones or devices that use a wireless remote control, such as televisions. If interference occurs, move the product away from the device, plug the device or lamp in a different outlet or move the lamp out of the line of the remote control receiver. Unplug the lamp during lightning storms or when unused for extended period of time. All moisture should be properly wiped away and dried prior to use. Do not touch bulb when lamp is on or shortly after powering off. May cause burns. Dispose of bulbs per local regulations. MAINTENANCE Before cleaning, make sure lamp is powered off and unplugged. Allow sufficient time for the bulb to cool down. Periodically wipe the lamp with a soft damp cloth. Use a mild non-abrasive cleaner if needed. All liquid should be properly wiped away and dried prior to restoring power. Do not use solvents or abrasive cleaners.