1
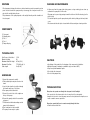
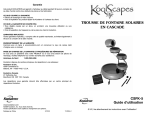
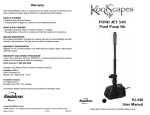
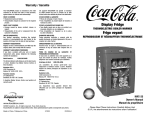
Warranty
This KOOLATRON product is warranted to the retail customer for 90 days from date of
retail purchase, against defects in material and workmanship.
WHAT IS COVERED
• Replacement parts and labour.
• Transportation charges to customer for the repaired product.
SOLAR CASCADING FOUNTAIN KIT
WHAT IS NOT COVERED
• Damage caused by abuse, accident, misuse, or neglect.
• Transportation of the unit or component from the customer to Koolatron.
IMPLIED WARRANTIES
Any implied warranties, including the implied warranty of merchantability are also limited to
the duration of 90 days from the date of retail purchase.
WARRANTY REGISTRATION
Register on-line at www.koolatron.com AND keep the original, dated, sales receipt with
this manual.
WARRANTY AND SERVICE PROCEDURE
If you have a problem with your PRODUCT, or require replacement parts, please telephone
the following number for assistance:
North America
1-800-265-8456
Koolatron has Master Service Centres at these locations:
Koolatron U.S.A.
4330 Commerce Dr.
Batavia, NY 14020-4102 U.S.A.
Koolatron Canada
27 Catharine Ave.
Brantford, ON N3T 1X5 Canada
A Koolatron Master Service Centre must perform all warranty work.
CSFK-5
User Manual
www.koolatron.com
©2009 Koolatron, Inc. All rights reserved. All specification are subject to change without notice.
Made in China
H1S108
11/2009-v1
Please Read These Instructions Carefully Before Use!
OVERVIEW
CLEANING AND MAINTENANCE
• The solar pump is designed for indoor or outdoor fountain use, and is powered by a solar
panel. In order to make the pump work by solar energy, the solar panel needs to be
placed in the sunlight facing the sun.
• The performance of the pump depends on the sunlight intensity and the orientation of
the solar panel.
• If after some time the pump starts losing power or stops working, please clean up
sediment in the pump shell or filter cribs.
• The pump can be opened by pressing down at the bottom of the filter housing. (see the
photo below)
• To clear the impeller, open the pump housing at the front by sliding up the front plastic
cover.
• The solar module should only be cleaned with soft tissue and glass cleaning solution.
COMPONENTS
1)
2)
3)
4)
5)
Solar panel
Adjusting knob
Pole 1
Pole 2
Pump with plug
TECHNICAL DATA
Peak Power of Solar Panel
Operation Voltage
Maximum Water Lift Height
Maximum Flow Rate
Cable Length
1.5W
6V
0.75m (2.5 ft)
175L (46.2 gal) / h
5m (16.4 ft)
ASSEMBLING
1. Unpack all components carefully.
2. Find a suitable spot and place bowls on the
stand.
3. Loop the tube from the top pitcher through
the stand’s small loops. See picture.
4. Place pump in the bottom bowl.
5. Connect the end of tube to the adapter on
the top of the pump.
6. Connect the pump’s cable to the assembled
solar panel.
7. Fill bottom bowl with water, making sure the
pump is fully submersed.
8. Place solar panel in direct sunlight.
8. The pump is now ready to operate.
CAUTIONS
•
•
•
•
•
Any altering of the product itself or changing of the components is forbidden.
Operate the pump in freshwater or saltwater only (never above 30°C).
Keep it away from flammable liquids.
Do not strike the solar panel.
Do not let the pump run dry.
TROUBLESHOOTING
Pump does not operate even though the solar panel is in full sunlight.
• No connection to the solar module—check connection to the solar module.
• Impeller is blocked—to clean the pump, remove the front plate and the impeller, use a
brush or water to remove any debris.
Pump does operate but there is no water running through the tubes.
• Clear the tube and the filter.