1
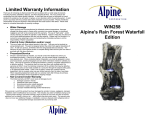
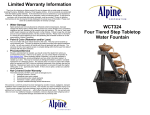
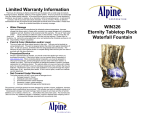
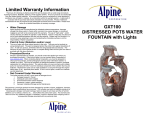
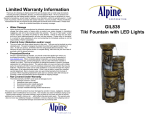
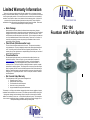
Limited Warranty Information
Thank you for choosing an Alpine product! We aim to please with our wide range of products
including Fountains, Birdbaths, Statuary, Pond Supplies & More. All of our products are constructed
from the highest quality materials. In the event that we have not achieved our usual standard of
excellence, we will repair or replace, at our discretion within the warranty period. A valid proof of
purchase with the purchase date clearly indicated must be provided. Photos of defective
merchandise will also be required to help distinguish the actual cause of the defect. Please read
below for a detailed description of warranty coverage.
•
Water Damage
Alpine products are not manufactured to withstand extreme temperatures. Improper
storage that allows water to freeze within a product may cause damage. This is considered
negligence and will not be covered under this warranty. The use of “hard water” and/or
caustic cleaners can affect the painted or other finishes. Failure to keep the unit clean and
use of such additives/cleaners will also void the warranty. Please note: for fountains, it is
normal for some splashing to occur and protecting the immediate surfaces is not the
responsibility of Alpine Corporation
•
Paint & Color (Retention and/or Loss)
The use of water will cause natural erosion to the color. This area can be touched up
using standard paint. The paint is designed protect the entire finish against breakdown of
color. As with any product, all finishes with time will gradually fade and discolor. The
warranty will only cover against severe or complete fading within the first year from date of
purchase with the above exclusion.
•
Procedure/Service
Should a warranty/claim be needed, you should contact the retailer from whom you
purchased the product. If that not an option, you can contact Alpine Corporation at
www.alpine4u.com. When contacting Alpine Corporation, you must be prepared to
show proof of purchase, provide photographs and any other information needed to
validate your claim. This may be necessary to distinguish between a partial or complete
replacement of a defective product. The warranty does not cover any items with multiple
parts; the warranty will ONLY cover the individual component of the unit/item that may be
defective. Replacement parts can be made available to a consumer through the original
selling party, or an approved parts retailer. If this is not an option, contact our customer
service department.
•
Not Covered Under Warranty
The limited warranty will NOT cover cases of damages due to
1. Damages caused in Transit
2. Inadequate care and/or neglect
3. Environmental and/or natural elements
4. Immersion in water, unless specified
5. Improper Installation/Storage and/or Maintenance
This warranty is void if the product has been damaged by accident, misuse, negligence, improper
installation and/or modifications have occurred. This includes any and/or all defects arising out of
freezing water damage, hard water damage, failure to keep the unit clean and free of harmful
additives such as bleach, chlorine, etc…. which affects the paint and/or parts. This warranty also
does not cover any additional charges or installation, removal, disposal and/or shipping costs or
consequential damage associated with any warranty claim
TEC 104
Fountain with Fish Spitter
Assembling & Using Your Product
•
Gently pour water into the fountain, being careful not to
overflow and cause splashing. Make sure the water
completely submerges the pump and the water runs clear
during operation. Plug pump cord into your local power
supply & make sure that there is no water around the plug.
Always keep the power source in a dry place.
•
NOTE: We recommend that you use distilled water to prevent
any build-up. The first time you operate the pump it can take
up to 5 minutes for the air to be completely expelled and
water to flow properly.
Unpack all components carefully. Please check to ensure all parts have been
removed from the packaging. Decide on a suitable location to begin assembling.
Parts:
1.
2.
3.
4.
5.
6.
Fish Figurine (1)
Small Tier (1)
Dish Cover (1)
Big Tier (1)
Pump Cover (1)
Pump/Pump Housing/Metal
Connector
7.
8.
9.
10.
11.
Fountain Basin (1)
Fountain Leg (1)
Bottom Leg Connector (1)
Fountain Base (1)
Screws/Washers (3)
Assembling:
Please refer to diagrams during assembly.
•
•
Diagram 1-1
Insert the Pump cable through the Fountain
Leg (Part 8), the Bottom Leg Connector (Part
9), and the Fountain Base (Part 10).
Screw together the Fountain Leg (Part 8) into
the Bottom Leg Connector (Part 9), followed
by screwing together the Bottom Leg
Connector (Part 9) to the Fountain Base
(Part 10).
•
Screw the Fountain Basin (Part 7) into the
top of the Fountain Leg (Part 8).
•
Align the Pump (Part 7) that is connected to
the housing unit and metal screw connector
with the screw holes on the Fountain Basin
(Part 7). Use the three Screws and Washers
(Part 11) to tighten them in place.
•
Pump Cover (Part 5) over the Metal
Connector to cover the Pump.
•
Place the Big Tier (Part 4) on top of the
Pump Cover (Part 5), followed by placing the
Dish Cover (Part 3) onto the Big Tier (Part 4).
•
Then place the Small Tier (Part 2) onto the
Dish Cover (Part 3) and lock in place by
screwing in the Fish Figurine (Part 1).
Please continue on other page.
Diagram 1-2
Trouble Shooting & Caution
If you have any questions and/or problems, please contact the retail store where
you purchased this fountain.
•
If your pump fails to run
•
•
•
•
•
•
If your pump “spews”
•
Check the water level to make sure the pump is completely submerged and
there if enough water in the basin to operate your fountain. Not having enough
water will cause your pump to spew
If your pump is making abnormal loud noises
• Disconnect the pump from the electrical power supply and remove the front
•
•
•
Check the circuit breaker or try a different outlet to make sure the pump is
receiving electrical power.
Check the pump discharge and tubing for any kinks and/or obstructions
Any buildup obstructing the water flow can be flushed with a garden hose
Check the rotor by removing the front cover & plate to access the impellor area.
Turn the rotor and make sure that the rotor is not jammed or broken
cover & plate
Carefully grip the impellor and gently pull the impellor/rotor assembly out of the
pump housing
Rinse the impellor/rotor assembly and clean the cavity with clean water. If
breakage or damage is found, contact your local retailer for parts
Caution
o
o
o
o
o
o
o
o
Always unplug the pump from the electrical outlet before cleaning & handling
Uses with clean water only, do not place the fountain and/or parts in any other
liquid.
Periodically change water & clean the pump to keep free from micro-organisms
Disconnect and store the unit in a dry place if not in use for an extended period
of time
Do not operate with water above 90°F or 30°C
Do not lift, carry or pull the pump by the power cord
Do not exceed the maximum voltage & wattage on transformer or pump
NEVER LET THE PUMP RUN DRY