1
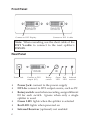
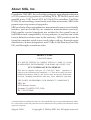
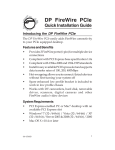
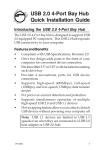
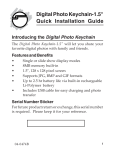
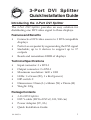
3-Port DVI Splitter
Quick Installation Guide
Introducing the 3-Port DVI Splitter
The 3-Port DVI Splitter provides an easy solution for
distributing one DVI video signal to three displays.
Features and Benefits
•
•
•
•
Connects a DVI video source to 3 DVI compatible
displays
Perfect as a repeater by regenerating the DVI signal
Stackable; up to 8 devices to support up to 17
outputs
Reads and remembers EDID of displays
Technical Specifications
•
•
•
•
•
•
•
Input connector: 1 x DVI-I
Output connector: 2 x DVI-I
Maximum resolution: 1600 x 1200
LEDs: 1 x Green (ID), 1 x Red (power)
DIP switch: 2
Dimensions: 12mm (L) x 88mm (W) x 25mm (H)
Weight: 300g
Package Contents
•
•
•
•
3-Port DVI Splitter
DVI Y-cable (DVI to DVI x2, 100/180 cm)
Power Adapter (5V, 2A)
Quick Installation Guide
04-0493A
1
Front Panel
Connect to DVI Display
Connect to DVI Y-cable
Note: When cascading, use the short cable of the
DVI Y-cable to connect to the next splitter's
DVI-IN.
Rear Panel
Power Jack
•
•
•
•
•
•
2
Connect to DVI
output (PC)
Rotary
switch
Green
LED
Red
LED
Infrared
receiver
Power Jack: connect to the power supply
DVI-In: connect to DVI output source, such as PC
Rotary switch: used when cascading, assign different
ID for each switch. Ignore when only a single
splitter is used.
Green LED: lights when the splitter is selected
Red LED: lights when powered on
Infrared Receiver (optional): not enabled
DIP Switch
•
•
•
•
1 ON: open EQ. Less noise but more power
consumption
1 OFF: Close EQ
2 ON: Writing Default EDID. Set switch to ON,
plug in the power adapter. The green light will turn
on after the writing process in completed.
2 OFF: Recording EDID of the Connected Display
via DVI-Out 1 connector. Plug in the DVI cable first
from the display and then plug in the power adapter.
The recording process will be initated and the green
LED lights up. The green LED will turn off after the
reading process is completed.
Important: Do not plug in your DVI source when the
3-Port DVI Splitter is writing default EDID or recording
EDID from displays. This will cause damage to the EDID
in the flash memory.
Note: If you cannot boot your computer from the
connected 3-Port DVI Spitter due to damaged EDID
in the splitter, proceed with Writing Default EDID
and Recording EDID of the Connected Display as
outlined above. This will force the 3-Port DVI
Splitter to write the EDID from the display.
3
Hardware Installation
We suggest to connect the monitor with the lowest
resolution to DVI-OUT 1. Unless you would like to use
the default universal EDID, please set DIP switch 2 at
OFF position, which allows the 3-Port DVI Splitter to read
the first connected monitor's EDID.
Single Splitter
1.
2.
3.
4.
5.
Connect a monitor, projector or other displays with
DVI inputs to DVI-Out 1 of the 3-Port DVI Splitter.
Plug the DVI Y-cable into the DVI-Out 2 of the 3-Port
DVI Splitter.
Connect the second and third displays to the DVI
female connectors of the DVI Y-cable.
Plug the power adapter into the Power Jack, then
plug the adapter into a reliable power outlet.
Connect a PC or other device with DVI output to the
DVI-In of the 3-Port DVI Splitter.
Multiple Splitters (Cascading)
1.
2.
3.
4.
5.
4
Connect a monitor, projector or other displays with
DVI inputs to DVI-Out 1 of the 3-Port DVI Splitter.
Plug the DVI Y-cable into the DVI-Out 2 of the 3Port DVI Splitter.
Connect the second display to the long cable of the
DVI Y-cable female connector and plug the short
cable to the DVI-In of the second 3-Port DVI Splitter.
Connect the third display to the DVI-Out 1 of the
second 3-Port DVI Splitter
Repeat steps 2-4 for the remaining cascaded splitters.
6.
7.
For each splitter, plug the power adapter into the
Power Jack, then plug the power adapter into a
reliable power outlet.
Connect a PC or other device with DVI output to the
DVI-In of the first 3-Port DVI Splitter.
Safety Precautions
Like all electronic equipment the 3-Port DVI Splitter
should be used with care. Please read and follow the
safety precautions to protect yourself from possible
injury and minimize the risk of damage to the unit.
•
•
•
•
•
•
Follow all instructions and warnings marked on
the unit
Provide proper ventilation and air circulation, do
not use near water
Do not attempt to service the unit yourself, except
where explained in the manual
Keep objects that might damage the device at a safe
distance and assure that the placement of this unit
is on a stable surface
Do not use liquid or aerosol cleaners to clean this
unit and always unplug the power to the device
before cleaning
Use only the power adapter and accessories that
came with the unit
5
Blank Page
6
Technical Support and Warranty
QUESTIONS? SIIG’s Online Support has answers! Simply visit our
web site at www.siig.com and click Support. Our online support
database is updated daily with new drivers and solutions. Answers
to your questions could be just a few clicks away. You can also submit
questions online and a technical support analysts will promptly
respond.
SIIG offers a 2-year manufacturer warranty with this product. Please
see our web site for more warranty details. If you encounter any
problems with this product, please follow the procedures below.
A) If it is within the store's return policy period, please return the
product to the store where you purchased from.
B) If your purchase has passed the store's return policy period, please
follow these steps to have the product repaired or replaced.
Step 1: Submit your RMA request.
Go to www.siig.com, click Support, then RMA to submit a
request to SIIG RMA. If the product is determined to be
defective, an RMA number will be issued.
Step 2: After obtaining an RMA number, ship the product.
• Properly pack the product for shipping. All software, cable(s)
and any other accessories that came with the original package
must be included.
• Clearly write your RMA number on the top of the returned
package. SIIG will refuse to accept any shipping package, and
will not be responsible for a product returned without an
RMA number posted on the outside of the shipping carton.
• You are responsible for the cost of shipping. Ship the product
to the following address:
SIIG, Inc.
6078 Stewart Avenue
Fremont, CA 94538-3152, USA
RMA #:
• SIIG will ship the repaired or replaced product via Ground
in the U.S. and International Economy outside of the U.S. at
no cost to the customer.
7
About SIIG, Inc.
Founded in 1985, SIIG, Inc. is a leading computer upgrade manufacturer
of I/O connectivity products, including PCIe, PCI & ISA serial and
parallel ports, USB, Serial ATA & UltraATA controllers, FireWire
(1394a/b), networking, sound cards, and other accessories. SIIG is the
premier one-stop source of upgrades.
SIIG products offer comprehensive user manuals, many user-friendly
features, and are backed by an extensive manufacturer warranty.
High-quality control standards are evident by the overall ease of
installation and compatibility of our products, as well as one of the
lowest defective return rates in the industry. SIIG products can be
found in computer retail stores, mail order catalogs, through major
distributors, system integrators, and VARs in the Americas and the
UK, and through e-commerce sites.
PRODUCT NAME
3-Port DVI Splitter
FCC RULES: TESTED TO COMPLY WITH FCC PART 15, CLASS
B OPERATING ENVIRONMENT: FOR HOME OR OFFICE USE
FCC COMPLIANCE STATEMENT:
This device complies with part 15 of the FCC Rules. Operation is
subject to the following two conditions: (1) This device may not cause
harmful interference, and (2) this device must accept any interference
received, including interference that may cause undesired operation.
THE PARTY RESPONSIBLE FOR PRODUCT COMPLIANCE
SIIG, Inc.
6078 Stewart Avenue
Fremont, CA 94538-3152, USA
Ph: 510-657-8688
3-Port DVI Splitter is a trademark of SIIG, Inc. SIIG and the SIIG logo are registered trademarks of SIIG,
Inc. Other names used in this publication are for identification only and may be trademarks of their
respective companies.
August, 2008
Copyright © 2008 by SIIG, Inc. All rights reserved.