Transcript
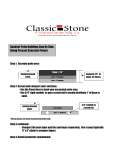
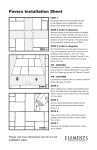
Heritage Stone Patio Installation Instructions
Step 1 Excavation
Mark the area to be paved with stakes and string lines. Set the string lines at the desired finished
elevation. Excavate a minimum of 7” below the final desired finished elevation. Allow 1/8” to ¼”
slope per foot for correct water runoff.
Step 2 Base Preparation
Compact the entire subgrade with a vibratory plate compactor after excavation. After compacting the
subgrade, add 2” of road base material, rake smooth and compact. The road/paver base should extend
4” beyond the desired perimeter of the finished project. Repeat this step until the desired base depth (46” in most pedestrian applications) is achieved. For a standard 1 1/2” thick Stonebilt Heritage Stone
paving slab the final base elevation should be 2 1/2” below the desired finished grade. Soil conditions
containing a high percentage of clay may require a deeper base course.
Step 3 Bedding Sand
Bedding sand should be screeded to a depth of 1”. Place the EMT conduit pipe (approx. 1” outside
diameter) parallel to each other and almost as wide as the 8’ long 2x4 (screed board). Place sand
between the pipes and pull the screed board across both pipes. This will allow an approximately 1”
deep, level bed of sand to be screeded between the pipes. Repeat this process as necessary to cover the
entire area of the project. Remove the screed rails and fill the voids with sand and trowel smooth.
Step 4 Install Stonebilt Paving Slabs
Depending on the size of pavers and pattern, starting points and direction of installation will vary. More
often than not, opt for the easiest access where the longest run will be made with no cutting. From the
starting point install paving slabs out toward the border in a triangular direction. Do not install a border
and try to fill it in with paving slabs, they will not fit properly. Paving slabs should be placed gently into
the sand and not pushed. Use a rubber mallet to tap pavers into the sand and assist in leveling when
necessary.
Step 5 Cutting Paving Slabs
Although Heritage stone patio packs can be laid in patterns that no not require cuts, some project
parameters may require cutting pavers. Use a masonry saw with a diamond blade to complete any cuts
that may be necessary for a curved edge or to fit within a fixed area. Be sure to wear eye, ear and dust
protection when cutting.
Step 6 Edge Restraint
Any edge already not restrained by a solid rigid structure (ie. concrete walkway, foundation, etc…)
should be contained by a plastic or aluminum edge restraint. These are easier to install after the paving
slabs are laid. Carefully moisten the sand bed around the perimeter of the paved area. This will allow a
trowel to remove sand from the paving slab edge without sand migrating or sloughing away. Place the
edge restraint system against the bottom of the paving slab, making sure to hold in the base sand as well
as the paving slab. Install 10” spikes every 8-10 inches along the paving slab’s edge.
Step 7 Sand the Gaps
Sweep sand across the top of the project to fill gaps between paving slabs. Sweep the excess sand off
the finished project. Polymeric sand can be used to complete this step. Be sure to read and follow the
instructions for proper polymeric sand installation if this option is chosen.