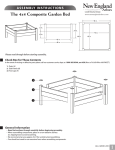
1
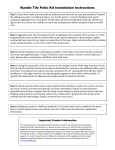
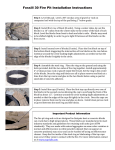
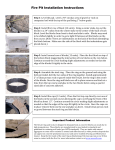
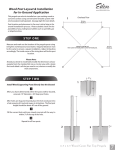
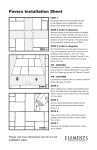
Sandset Patio Building Step By Step
Using Precast Concrete Pavers
Step 1: Excavate patio area:
Existing Ground
Level.
Paver = 1.5"
Sand = 1" Maximum
Excavate 3.5" to
allow for layers.
Base = 1" Maximum
Step 2: Screed and compact sand and base:
- Use the Paver Base to level your excavated patio area.
- Use 3/4" rigid conduit as your screed rail to evenly distribute 1" of Base or
sand.
Existing Ground
Level.
Screed Board
3/4" conduit as
screed rail.
Base = 1" Maximum
*All instructions are based on pedestrian traffic only.
Step 3 continued:
- Compact the base layer and the sand layer separately. Use a tamp (typically
8" x 8" plate) to compact layers.
Step 4: Install perimeter containment:
- Some form of perimeter containment is recommended.
-Perimeter containment must stop any unwanted migration of bedding
sand from below pavers. There are plastic, wood and concrete options
available at your local Home Depot store.
Step 5: Install weed barrier (Optional):
- Placing the weed barrier on top of the sand layer prevents root growth in the
sand.
Step 6: Place pavers:
- When placing pavers avoid disturbing the sand layer.
- For Square pavers---Butt paver bottoms together. Our square pavers have
slightly sloped sides. When the bottoms touch it will reveal
approximately 3/16" open joint at the top.
- For irregularly shaped pavers lay the pavers in the desired pattern with
appropriate joint spacing.
Step 6: Sweep Sand Into Joints:
- Break a bag or pour sand on top of patio and use a stiff push broom to move
the sand into the joints.
Frequently Asked Questions:
1] Can I cut these pavers?
-If you are going to cut, you can use a diamond tipped saw blade and make
1/4" deep passes through the paver. Therefore, a 1-1/2" paver will take six (6)
passes to complete the cut.
2] Can I seal these pavers?
-Yes, but there are considerations!
Any glossy topical sealers are not recommended.
Water repellant penetrating sealants can be appropriate to stop/reduce the
absorption of water by the paver. The pavers will absorb water through the
top, the sides and the bottom. Therefore, it is advisable to seal all six sides
before installing. Please note that any sealant should be applied to a single
paver as a test to see if it affects color and/or texture. Sealing can have an
impact on the next item – efflorescence,
3] What is the white powdery stuff?
All porous material placed in contact with the ground will absorb water and
go through a process of evaporating the moisture and transporting the
solids contained in that moisture. As the moisture evaporates it leaves
behind a layer of white solids on top of our pavers. This process, called
efflorescence, occurs naturally and it will continue to occur as long as there
is moisture to evaporate. A water repellant sealer applied to all six sides can
reduce the occurrence of efflorescence. There are no guarantees that it
won't occur. However, once it appears you can remove the powder with a stiff
push broom and literally some shoe leather! Pedestrian traffic will wear it
off. Do not spray water on the powder trying to wash it off! Adding water will
add to the whole evaporation cycle. Our pavers are going to age and weather
naturally, you should expect some variation in color as a part of this natural
process.