1
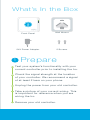
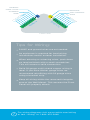
Intelligent Sprinkler Controller
Easy Install Guide
What’s In the Box
1
Front Panel
Wall Mount
24V Power Adapter
2 Screws
Prepare
Test your system’s functionality with your
current controller prior to installing the Iro.
Check the signal strength at the location
of your controller. We recommend a signal
of at least 2 bars on your phone.
Unplug the power from your old controller.
Take a picture of your current wiring. This
is important for reference when you are
wiring the Iro.
Remove your old controller.
2
Install
Install the Iro Wall Mount to the wall using
the two screws included.
Reconnect the wires to the Wall Mount
terminals.
Required Wiring
Common Wires
Install into either white terminal slot. If you
have more than one common wire we
suggest entering one in each common slot
(left and right).
Zone Wires
Install in the green terminal slots.
Master/Pump Valve Wire (if present)
Install in the blue terminal slot, and enable in
Advanced Settings within the app.
Optional Hardware
Rain/Moisture Sensors (optional)
Install in the yellow terminal slots, and enable
in Advanced Settings within the app.
Hydraulic Indexing Valves
Indexing Valves are uncommon and typically
found in the state of Florida. Install following
the Master/Pump valve wiring instructions.
(above)
For details on Indexing Valves, reference
www.rachio.com/indexing
?
For install video visit www.rachio.com/install
or text “install” to 1-844-472-2446
MASTER/
PUMP VALVE
SENSORS
COMMON
WIRE
2
4
5
7
9
ZO
2ND COMMON
10 WIRE
11
12
13
14
15
16
N
16
9-
ZO
N
ES
ES
18
1
3
6
8
16 ZONE SHOWN
Tips for Wiring:
24VAC and ground wires are not needed.
An enclosure is required for hard wiring
installations and/or outdoor installation.
When entering or releasing wires, push down
on terminal block with a small screwdriver.
This will ensure a solid connection.
Solid 18 gauge multi-strand copper wiring is
ideal. If you have thicker gauge wires we
recommend retrofitting with 18 gauge wires
using a terminal strip.
Keep all wiring within the recessed triangular
area of the Wall Mount. This ensures the Front
Panel will properly attach.
?
For wiring diagrams visit www.rachio.com/wiring
or text “wiring” to 1-844-472-2446
3
Connect
WiFi credentials are needed for this process.
Download the Rachio app.
www.rachio.com/appstore
Create a Rachio account.
Proceed through the blink up tutorial.
Steps for Blinkup:
Make sure the Iro is powered on.
The WiFi light should be blinking amber or red. If your
WiFi light is not blinking, please power cycle your Iro.
Ensure your smart phone/tablet is connected to a
2.4GHz network. Iro cannot connect to a 5GHz
network.
Once the countdown begins, position screen face down
and flush against the photo sensor. Leave your phone
there while the screen is blinking. This should take
approximately 10-15 seconds.
Once connected, the WiFi light will blink green for one
hour. After one hour, the WiFi light will go gray (turn off).
Tips for Connecting
Turn auto brightness all the way up on your
smart phone/tablet.
Hold your smart phone/tablet as still as
possible during BlinkUp
If you are in a brightly lit area, ambient light
may impede the Blinkup process. We suggest
a dark room.
?
For Blinkup video visit www.rachio.com/connect
or text “connect” to 1-844-472-2446
4
Configure
Your Iro will need to know a little about your
landscape in order to water effectively.
Set up your zones.
You can configure each zone’s vegetation,
soil, shade, nozzle, and slope types.
Set up your watering times.
The Iro will recommend an optimal
watering schedule based upon the the
zone attributes selected.
Flex Schedules TM
Dynamically selects watering days based on
soil moisture needs. Promotes root growth,
reduces watering frequency and results in a
healthier, more drought tolerant landscape.
Fixed Schedules
Waters based on a static schedule, adjusting
duration for changes in weather and
seasonality.
Additional Smart Features:
Smart Cycle
Eliminates runoff and promotes deeper roots by
breaking watering times into shorter durations
dependent on your soil, nozzle and slope settings.
Weather Intelligence
Operates like a virtual rain sensor, watering like it knows
the future. Watering times are skipped when it has
rained or will rain.
?
For config video visit www.rachio.com/config
or text “config” to 1-844-472-2446
Troubleshooting
Blinkup
There will be a short green flash at the end of the
blinkup, this indicates that your Iro is responding to the
signal codes that are being sent. No short green flash?
Please reattempt blinkup.
If blinkup fails more than twice, power cycle your Iro
and your smart phone/tablet.
WiFi light not blinking green flash after blinkup? Take
note of the wifi light light code and cross reference the
error at www.rachio.com/blinkup
Valves
Master Valve
Not every system has a master valve. If there’s no wire
on your old controller, there’s no need to worry about
this terminal.
Pump Valve
The Iro is designed to operate a pump start relay.
Please reference the pump start relay user manual for
wiring instructions.
Not Running
When the Iro is watering, the status light should be lit
blue. If the status light is blue, double check that the
valve in question in wired to the wall mount correctly.
Assuming wiring is correct, double check to make sure
that your sprinkler valves have 24V AC solenoids.
Not Turning Off
When the Iro is watering, the status light should be lit
blue. If the status light is off, the valve in question is
likely stuck open and needs to be cleaned.
?
For more help visit www.rachio.com/support
or text “support” to 1-844-472-2446
Additional Help
H E LPDE S K
www.rachio.com/support
S U PPORT PHON E
844-4-RACHIO (844-472-2446)
S U PPORT E M A I L
[email protected]
COM M U N IT Y
www.rachio.com/community
WA R R A NT Y
www.rachio.com/warranty
R E BATE S
www.rachio.com/rebates
Returns
If for any reason you are not completely satisfied with
your Rachio product, you can return it within 30 days of
purchase for a full product refund.
www.rachio.com/returns
Do not return to retailer. Contact us first.
w w w.rachio.com